Quick Start with MHO-140 - Single Site with Two Orchestrators
Part 1 - Installing the Hardware and Connecting Cables
-
Mount the two Quantum Maestro Orchestrators
 A scalable Network Security System that connects multiple Check Point Security Appliances into a unified system. Synonyms: Orchestrator, Quantum Maestro Orchestrator, Maestro Hyperscale Orchestrator. Acronym: MHO. MHO-140 in the racks on the site.
See Mounting the Quantum Maestro Orchestrator MHO-140 and MHO-170 in a Rack.
-
 Procedure
-
Install the applicable Expansion Line Cards (if required) in the appliances.
See Installing and Removing Line Cards.

Notes:
-
Maestro configuration supports only ports 10 Gbps or faster.
-
Maestro does not support Downlink connections from a 10 Gbps Expansion Line Card and a 25 / 40 / 100 Gbps Expansion Line Card at the same time on the same Security Appliance.

Warning - You must remove all unused Expansion Line Cards (not including 1Gbps) from Security Appliances.
-
-
Mount appliances in their racks.
See the Getting Started Guide for your appliances in sk96246.
-
Power on the Security Appliances.
-
-
Connect a DAC cable
 Direct Attach Copper cable. A form of the high-speed shielded twinax copper cable with pluggable transceivers on both ends. Used to connect to network devices (switches, routers, or servers). between the dedicated Synchronization ports 48 on the two Orchestrators
 See "Maestro Orchestrator"..
For more information, see Port Mapping for the Quantum Maestro Orchestrator MHO-140.
-
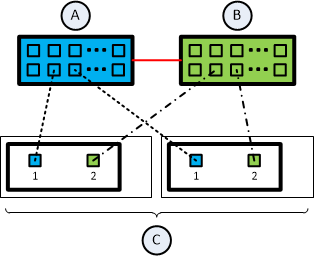
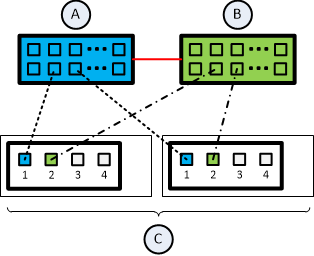
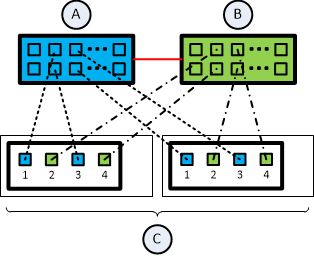
Connect the required cables between the Security Appliances and the applicable 10 Gbps Downlink ports
 Interfaces on the Quantum Maestro Orchestrator used to connect to Check Point Security Appliances. You use DAC cables, Fiber cables (with transceivers), or Breakout cables to connect between the Downlink ports and Security Appliances. The Check Point Management traffic (policy, logs, synchronization, and so on) co-exists with the data (user) traffic on the Downlink ports. Bandwidth is guaranteed for the Check Point Management traffic (portion of the downlink bandwidth). These ports form the system backplane (management, data plane, synchronization). 27 - 47 on each Orchestrator.
 More information

Important:
-
Maestro configuration supports only ports 10 Gbps or faster on Security Appliances.
-
To connect Security Appliances to these 10 Gbps Downlink ports, use a Fiber cable or a DAC cable.
You can connect Fiber cables and DAC cables to the same Security Appliance.
-
To connect Fiber cables, you must use only the supported transceivers.
See sk92755 - Compatibility of transceivers for Check Point appliances.
See:
 Legend
Item
Description
A
First Orchestrator.
B
Second Orchestrator.
C
Security Appliances in Security Groups.

A DAC cable connected to the dedicated Synchronization ports on the Orchestrators.

Cables that connect odd ports on the Quad Port Card to the first Orchestrator.

Cables that connect even ports on the Quad Port Card to the second Orchestrator.
-
-
Connect the required cables between the applicable Uplink ports
 Interfaces on the Quantum Maestro Orchestrator used to connect to external and internal networks. Gaia operating system shows these interfaces in Gaia Portal and in Gaia Clish. SmartConsole shows these interfaces in the corresponding SMO Security Gateway object. 5 - 26, 49 - 55 on each Orchestrator and your switches.
 More information

Important - To connect Fiber cables, you must use only the supported transceivers.
See sk92755 - Compatibility of transceivers for Check Point appliances.

Best Practice - In a Dual Site environment, configure the Uplink ports in the same way on each Orchestrator.
See:
Port Speed
on a Switch
Port Type on the
Orchestrator
Cable to Use
10 Gbps
SFP+ / SFP28
Ports 5 - 26
Fiber or DAC
25 Gbps
QSFP / QSFP28
Ports 49 - 55
Fiber, DAC, or Breakout
40 Gbps
QSFP / QSFP28
Ports 49 - 55
Fiber, DAC, or Breakout
100 Gbps
QSFP / QSFP28
Ports 49 - 55
Fiber, DAC, or Breakout

Note - The 25 Gbps speed is available in:
-
Check Point R81.20 and higher
-
R81.10 Jumbo Hotfix Accumulator Take 110 and higher (MBS-14158)
-
-
Power on each Orchestrator.
Part 2 - Initial Configuration on each Orchestrator
|
|
Notes:
|
-
Connect with a web browser to Gaia Portal on the "first" Orchestrator.
https://<IPv4 Address you configured on the Orchestrator MGMT port>Example:
https://192.168.10.22 -
Log in with these default credentials:
-
Username -
admin -
Password -
admin
The Gaia First Time Configuration Wizard opens.
-
-
In the Deployment Options window:
-
In the section Setup, select Continue with <Version> configuration.
Click Next.
-
In the section Environment, select the applicable option:
-
Create a new Maestro environment
Select this option if this is a new Maestro environment without Security Groups.
-
Join an existing Maestro environment
Select this option if you need to add this Maestro Orchestrator to an existing Maestro environment with configured Security Groups.
Click Next.
-
-
-
In the Authentication Details window:
-
Enter the desired administrator password for the Expert mode.
-
Enter the desired administrator password for the Maintenance mode.
Click Next.
-
-
In the Management Connection window:
If needed, configure the IP settings for the Orchestrator Management Port.
Click Next.
-
In the Device Information window:
Configure the required settings:
-
Hostname
-
Domain Name
-
DNS Servers
-
Proxy Server
Click Next.
-
-
In the Date and Time Settings window:
Configure the required settings.
Click Next.
-
In the Orchestrator Configuration window:
-
In the Number of Sites field, select the applicable value.
-
In the Number of Orchestrators on each Site field, select the applicable value.
-
In the Site ID field, select the applicable value.
-
In the Orchestrator ID on Site field, select the applicable value.
-
Click Next.
-
Optional: In the Internal Sync field, select the applicable interface other than the default.
-
Optional: In the External Sync field, select the applicable interface other than the default.
-
Optional: Select Change VLAN configuration, if it is necessary to change the default VLAN IDs used for Orchestrator synchronization. Configure the required VLAN IDs. See sk168092.
-
Click Next.
-
-
In the First Time Configuration Wizard Summary window:
-
Read the information on this page.
-
Click Finish.
-
-
Connect the MGMT port of the Orchestrator #1 to your network.
-
Make sure the connection from a computer on your network to Orchestrator #1 works.
-
Repeat Steps 1 - 11 for the Orchestrator #2.
You must configure a different IPv4 address than that of the Orchestrator #1.
|
|
Notes:
|
-
Connect the included Ethernet cable from your computer to the MGMT port labeled 0 on the rear panel of the Orchestrator #1.
See MHO-140 Rear Panel.
You use this MGMT port only to manage the Orchestrator.
-
On your computer, configure a static IP address (see the documentation for your operating system):
-
IP address - between 192.168.1.2 and 192.168.1.254
-
Subnet mask - 255.255.255.0
-
Default Gateway - empty
-
DNS Servers - empty
-
-
Open an SSH client and connect to this IP address - 192.168.1.1
-
Log in to Gaia Clish on the Orchestrator #1 with these default credentials:
-
Username -
admin -
Password -
admin

Best Practice - Change the default password.
If the SSH connection is interrupted after the password change, log in again with the new password.
 More information
See the Gaia Administration Guide for your Orchestrator version:
-
-
Activate the Orchestrator #1 - enter "
y" when it asks you. More information
This Orchestrator activation enables the Downlink ports and the Uplink ports.
For more information, see sk171784 - Activation of a Quantum Maestro Orchestrator.
-
Configure the IPv4 settings on the MGMT port on the Orchestrator #1 as required in your network.
 Procedure
-
Configure the required IPv4 address and Mask Length:
set interface Mgmt1 ipv4-address <IPv4 Address> mask-length <Length>Example:
set interface Mgmt1 ipv4-address 192.168.10.22 mask-length 24 -
Change the state of the MGMT port to "on":
set interface Mgmt1 state on -
Configure the required Default Gateway:
set static-route default nexthop gateway address <IPv4 Address> onExample:
set static-route default nexthop gateway address 192.168.10.1 on -
Save the configuration:
save config
-
-
Connect the MGMT port of the Orchestrator #1 to your network.
-
Make sure the connection from a computer on your network to Orchestrator #1 works.
-
Repeat Steps 1 - 8 for the Orchestrator #2.
You must configure a different IPv4 address than that of the Orchestrator #1.
Part 3 - Creating a New Security Group
-
Connect with a web browser to Gaia Portal on the "first" Orchestrator.
https://<IPv4 Address you configured on the Orchestrator MGMT port>Example:
https://192.168.10.22 -
Log in.
-
From the left navigation panel:
-
In the Orchestrator versions R82 and higher:
In the Orchestrator Management section, click the Security Groups page.
-
In the Orchestrator versions R80.20SP - R81.20:
Click the Orchestrator page.
 More information
The Topology section contains the table that shows these sections (from left to right):
Pane
Description
Unassigned Gateways
All detected Security Appliances that are not part of configured Security Groups.
Topology
Configured Security Groups with their assigned Security Appliances and ports.
Unassigned Interfaces
All interfaces on Orchestrators that are not part of configured Security Groups.
-
-
In the middle pane Topology, at the top, right-click Security Groups and click New Security Group.
-
In the Security Group <X> configuration window, enter the required information, including the First Time Wizard, and click OK.
-
From the left pane Unassigned Gateways, drag and drop at least one Security Appliance to the Security Group’s Gateways section.
-
From the right pane Unassigned Interfaces, drag and drop at least one Management port (
eth<X>-Mgmt<Y>) to the Security Group’s Interfaces section. -
From the right pane Unassigned Interfaces, drag and drop the required Uplink ports to the Security Group’s Interfaces section.
-
At the bottom of this page, click Apply.
-
Wait for the Orchestrator to create the new Security Group.

Important - This takes approximately 10 minutes, and it automatically reboots the assigned Security Appliances.
-
Connect a cable between the assigned Management port (
eth<X>-Mgmt<Y>) on the Orchestrator front panel and your switch.
For more information, see the Maestro Administration Guide for your version:
Part 4 - Configuring Gaia Settings on the New Security Group
-
Connect with a web browser to Gaia Portal on the Security Group (through the assigned Management port
eth<X>-Mgmt<Y>).https://<IPv4 Address of Security Group>Example:
https://192.168.10.66 -
Log in.
-
Configure the applicable interfaces and other settings.
Part 5 - Configuring a Security Gateway Object in SmartConsole
-
Connect with SmartConsole to the applicable Security Management Server / Domain Management Server that must manage this Security Group.
See the Quantum Security Management Administration Guide for your version.
-
Create a new Security Gateway and configure the required settings.
-
Configure the applicable rules in the Access Control Policy.
-
Configure the applicable rules in the Threat Prevention Policy.
See the Threat Prevention Administration Guide for your version.
-
Install the Access Control Policy on this Security Gateway object.
-
Install the Threat Prevention Policy on this Security Gateway object.
Part 6 - Monitoring the Security Group Members
-
Connect to the command line on the Security Group with an SSH client to:
<IPv4 Address of Security Group> -
Run this command:
-
In the Orchestrator versions R82 and higher:
insights -
In the Orchestrator versions R80.20SP - R81.20:
asg monitor
-
-
Wait for each Security Group Members to show its state as "
ACTIVE".
Important - This can take 6-7 minutes.


