Incidents - Affected Assets
The Affected Assets page displays the assets involved in the incident, with a separate tab for each of the asset types. The label on the tab indicates the number of assets in that type.
The asset types include:
|
|
Note - The tab for mobile assets is displayed only if there are mobile assets present in the incident. |
To view the Affected Assets page:
-
Access XDR
 Extended Detection & Response and click Incidents > Incidents.
 -
Click the incident title or hover over the incident and click >.
-
Click Affected assets.

Devices
The Devices tab displays information about the device assets involved in the incident.
|
Item |
Description |
||
|---|---|---|---|
|
Device name |
Name of the device.
|
||
|
Priority |
Priority level of the associated incident. For more actions, hover over the priority and click the You can filter the table by including or excluding the specific priority level. |
||
|
Isolation status |
Isolation status of the device. Applies only to devices with Endpoint Security Security Client installed. |
||
|
Data source |
Security product that detected the device. |
||
|
OS |
Operating System on the device. |
||
|
OS version |
Operating System version. |
||
|
Related usernames |
Users who have used the device. |
||
|
Domain |
Domains accessed on the device. |
||
|
Last activity |
Time stamp of last activity on the device. |
||
|
Associated IPs |
IP addresses associated with the device. |
||
|
Insights |
Number of insights related to the incident in which the device is involved. Hover over the count to view the insights by severity. To view the insight details, click the count. The Incidents - Insights & Forensics page appears. |
||
|
Indicators |
Number of indicators related to the incident in which the device is involved. |
||
|
Related incidents |
Number of incidents in which the device is involved. Hover over the count to view the number of the filtered incidents (if applicable) and the total number of incidents.
To view the incidents details, click the count. The Incidents page appears. |
||
|
Security agent |
Security agent running on the device. |
 icon. You can:
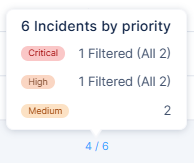
Managing Affected Devices
-
Click Incidents:
-
Click the incident title.
-
Hover over the incident and click >.
-
-
Click Affected assets.
-
Click the Devices tab.
-
To copy the device name, hover over at the end of the row, click
 and then click Copy asset name.
XDR copies the name of the device to the clipboard.
-
To view Threat Hunting for a device, hover over at the end of the row, click
and then click Open in Threat Hunting.XDR opens the Threat Hunting page searching for the chosen device in the logs from the past seven days.
-
To create an exclusion for the device, hover over at the end of the row, click
and then click Create Exclusion. For more information, see Creating an Exclusion for Devices from an Incident. -
To search, in the Search field, enter the string. The table automatically filters and shows the content that matches with the string.
-
To isolate a device from the network, select the device and at the top of the page, click Isolate and then click Isolate on Endpoint. In the confirmation message appears, click Yes.
XDR enforces isolation through Endpoint Security's Isolate Computer push operation.
-
To isolate a device of the type IP address on the Quantum Security Gateway
Dedicated Check Point server that runs Check Point software to inspect traffic and enforce Security Policies for connected network resources., at the top of the page, click Isolate and then click Isolate on Gateway. In the confirmation message that appears, click Yes. -
To de-isolate an isolated device from the network, select the device and at the top of the page, click De-Isolate and then click De-Isolate on Endpoint. In the confirmation message appears, click Yes.
XDR enforces isolation through Endpoint Security's Isolate Computer push operation.
-
To view intelligence for an IP address, hover over at the end of the row, click
and then click Open in Intelligence.XDR opens the Intelligence page and shows the available intelligence for the IP address.

Note - This applies only to devices of type IP address.
-
To isolate an IP address on the Quantum Security Gateway, hover over at the end of the row, click
and then click Isolate on GW.A confirmation message appears. Click Yes.
Notes:
-
This applies only to assets of type IP address.
-
This is implemented using Check Point Playblocks. For more information, see Infinity Playblocks Administration Guide.
-
Creating an Exclusion for Devices from an Incident
You can create exclusions for devices so that they do not create new incidents. For example, an asset that represents an approved network scanner.
|
|
Note - You can also create exclusions from the Policy menu. See Exclusions. |
To create an exclusion for devices from an incident:
-
Click Incidents:
-
Click the incident title.
-
Hover over the incident and click >.
-
-
Click Affected assets and select the Devices tab.
-
In the table, at the end of the row, hover over
for the device, and click Create Exclusion.The New Exclusion window appears.
The Field and Value are pre-filled.
-
(Optional) In the Expiration date (UTC) field, set an expiration date for the exclusion. After the expiration date, the asset can create incidents.
-
(Optional) In the Exclusion comment field, enter a comment about the exclusion.
-
Click Create.
Users
The Users tab displays information about the user assets involved in the incident.
|
Item |
Description |
||
|---|---|---|---|
|
User name |
Name of the user in the events and alerts processed by XDR.
|
||
|
Full name |
Full name of the user. |
||
|
Priority |
Priority level of the associated incident. For more actions, hover over the priority and click the |
||
|
Email addresses |
Email address(es) of the user. |
||
|
Related devices |
Devices used by the user. |
||
|
Domain |
Domain(s) accessed by the user. |
||
|
Last activity |
Time stamp of last activity by the user. |
||
|
Insights |
Number of insights related to the incident in which the user is involved. Hover over the count to view the insights by severity. To view the insight details, click the count. The Incidents - Insights & Forensics page appears. |
||
|
Indicators |
Number of indicators related to the incident in which the user is involved. |
||
|
Related incidents |
Number of incidents in which the user is involved. Hover over the count to view the number of the filtered incidents (if applicable) and the total number of incidents.
To view the incidents details, click the count. The Incidents page appears. |
Managing Affected Users
-
Click Incidents:
-
Click the incident title.
-
Hover over the incident and click >.
-
-
Click Affected assets.
-
Click the Users tab.
-
To copy the username, hover over at the end of the row, click
and then click Copy asset name.XDR copies the username to the clipboard.
-
To view Threat Hunting for a user, hover over at the end of the row, click
and then click Open in Threat Hunting.XDR opens the Threat Hunting page searching for the chosen user in the logs from the past seven days.
-
To search, in the Search field, enter the string. The table automatically filters and shows the content that matches with the string.
Mobile
The Mobile tab displays information about the mobile device assets involved in the incident.
|
Item |
Description |
|---|---|
| Status | Status of the mobile device. |
| Device model | Mobile device model. |
| Phone number | Phone number of the mobile device. |
| Email address of the mobile device user. | |
| Device type |
Mobile device OS type:
|
| OS version | Operating system version on the device. |
| Name | Name of the mobile device. |
Adding Filters
To add a new filter:
-
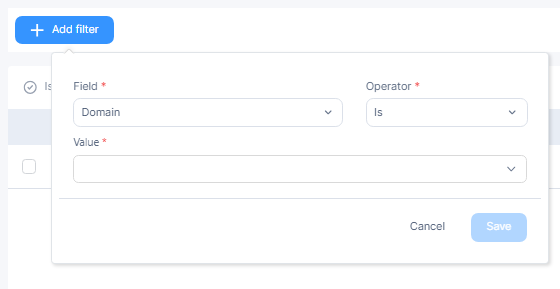
Click + Add Filter.
-
Enter these details:
-
Field - Select the device/user field.
-
Operator - Select the operator to be applied.
-
Value - Select the value of the device/user field.
-
-
Click Save.
Note - You can add multiple filters.
The system updates the table based on all the active filters.