Incidents - Indicators & Artifacts
The Indicators & Artifacts page shows the indicators and artifacts in the incident.
An artifact of an incident is a domain, URL, IP address or a file affected in the incident. An indicator is a malicious artifact. For example, an artifact is a legitimate file involved in an incident and an indicator is a malicious domain.
You can use the Indicators & Artifacts page to perform these actions:
-
Managing Indicators and Artifacts
-
Copying an Indicator
 A malicious artifact, such as domain, URL, IP address, and files. or an Artifact A domin, URL, IP address or file impacted by the security attack. For example, an encrypted file. Value to Clipboard
 -
Copying HASH of an Indicator to Clipboard
-
Viewing Intelligence for an Indicator or Artifact
-
Viewing Threat Hunting for an Indicator or Artifact
-
-
Creating an Exclusion for Artifacts and Indicators from an Incident
-
Adding or Editing an Indicator or Artifact in IoC Management
To view the Indicators & Artifacts page:
-
Access XDR
Extended Detection & Response and click Incidents > Incidents. -
Click the incident title or hover over the incident and click >.
-
Click Indicators & Artifacts.
To edit the columns in the table, click Edit columns and select the columns.
To export the data to an excel in CSV format, click Export All (CSV).
To search, in the Search field, enter the string. The table automatically filters and shows the content that matches with the string.
The Indicators & Artifacts tab shows a list of all indicators and artifacts involved in the incident. The Domains, URL, IP Address and Files tabs offer a drill-down view into their respective type and their related information:
|
Column |
Description |
Indicators & Artifacts |
Domains |
URL |
IP Address |
Files |
|---|---|---|---|---|---|---|
|
Type |
Indicator or an artifact. |
|
|
|
|
|
|
Value |
Value of the indicator or artifact. |
|
|
|
|
|
|
Status IOC Mgmt |
Indicates whether the indicator was enabled or disabled in the IoC management. |
|
|
|
|
|
|
XDR Confidence |
Confidence level of the indicator, calculated by XDR. |
|
|
|
|
|
|
XDR Severity |
Severity level of the indicator, calculated by XDR. |
|
|
|
|
|
|
Classification |
Threat classification of the indicator. For example, Malware or Benign. |
|
|
|
|
|
|
Malware Family |
The malware family associated with the indicator. For example, Invader. |
|
|
|
|
|
|
VT |
VirusTotal score reported by virustotal.com. |
|
|
|
|
|
|
Related Assets |
Assets related to the indicator or artifact. |
|
|
|
|
|
|
Related Incidents |
Incidents related to the indicator or artifact. |
|
|
|
|
|
|
Global Top country |
Top country where the indicator was seen in the Check Point telemetry. |
|
|
|
|
|
|
Global Top industry |
Top industry where the indicator was seen in the Check Point telemetry. |
|
|
|
|
|
|
Registrar name |
Name of the registrar. |
|
|
|
|
|
|
Country |
Country where the IP address is registered. |
|
|
|
|
|
|
Owner |
Organization to which the IP address is registered. |
|
|
|
|
|
|
IP abuse |
Confidence of abuse reported by abuseipdb.com. |
|
|
|
|
|
|
File type |
Type of file. |
|
|
|
|
|
|
File size |
Size of the file. |
|
|
|
|
|
|
Signer |
Authority that signed the certificate of the file. |
|
|
|
|
|
|
Additional file names |
Other known names seen for the file's hash in the on-boarded product logs. |
|
|
|
|
|
|
File path |
Path of the file. |
|
|
|
|
|
|
File origin |
Source application of the file. |
|
|
|
|
|
|
Download the Threat Emulation report for the file. |
|
|
|
|
|

Managing Indicators and Artifacts
Copying an Indicator or an Artifact Value to the clipboard:
-
Click Incidents:
-
Click the incident title.
-
Hover over the incident and click >.
-
-
Click Indicators & Artifacts.
-
At the end of the row, hover over
 .
. -
To copy the indicator or artifact (of the type file) file name, click Copy file name.
XDR copies the file name to the clipboard.
-
To copy the indicator or artifact value, click Copy value.
XDR copies the value to the clipboard.
-
To copy the indicator or artifact (of the type file) file name, click Copy HASH.
XDR copies the HASH of the file to the clipboard.
-
To view the intelligence for indicators or artifacts, and click Open in Intelligence at the top of the table. You can select up to 20 indicators or artifacts.
XDR opens the Intelligence page and shows the available intelligence for the indicator or artifact.
-
To view Threat Hunting for an indicator or artifact, click Open in Threat Hunting
XDR opens the Threat Hunting page and shows the data for the indicator or artifact.
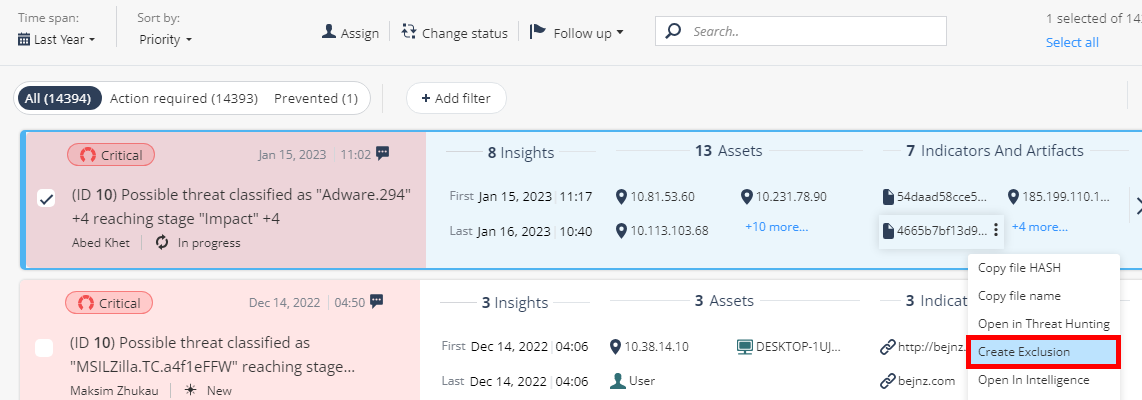
Creating an Exclusion for Artifacts and Indicators from an Incident
You can create exclusions for artifacts and indicators so that they are not added to the existing incidents and do not create new incidents.
|
|
Note - You can also create exclusions from the Policy menu. See Exclusions. |
To create an exclusion for an indicator or artifact from an incident:
-
Go the Incidents page.
-
To create an exclusion:
-
From the Incidents main page:
-
In the Indicators and Artifacts section, hover over the indicator or artifact and click
. -
Click Create Exclusion.
-
-
From the incident Overview page:
-
In the Incidents page, click the incident or hover over the incident and click >.
The incident Overview page appears.
-
Go to Assets and Indicators > Indicators and Artifacts section.
-
Hover over the indicator or artifact and click
. -
Click Create Exclusion.

-
-
From the incident Indicators & Artifacts page:
-
In the Incidents page, click the incident or hover over the incident and click >.
-
Go to Indicators & Artifacts tab.
-
In the table, at the end of the row, hover over
, and click Create Exclusion.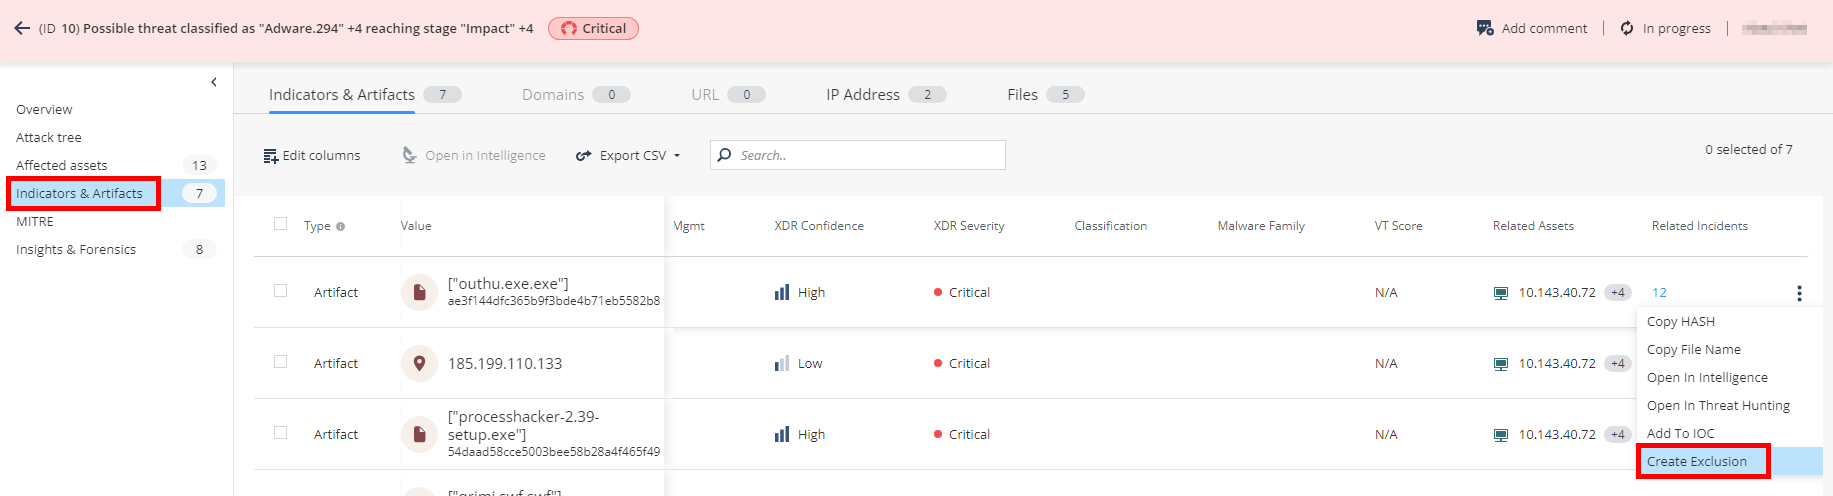
-
The New Exclusion window appears. The following fields are pre-filled:
-
Exclusion type - Asset / Artifact
-
Type - Type of the selected artifact.
For example, IPV4, URL
-
Exclusion value - Value of the selected artifact.
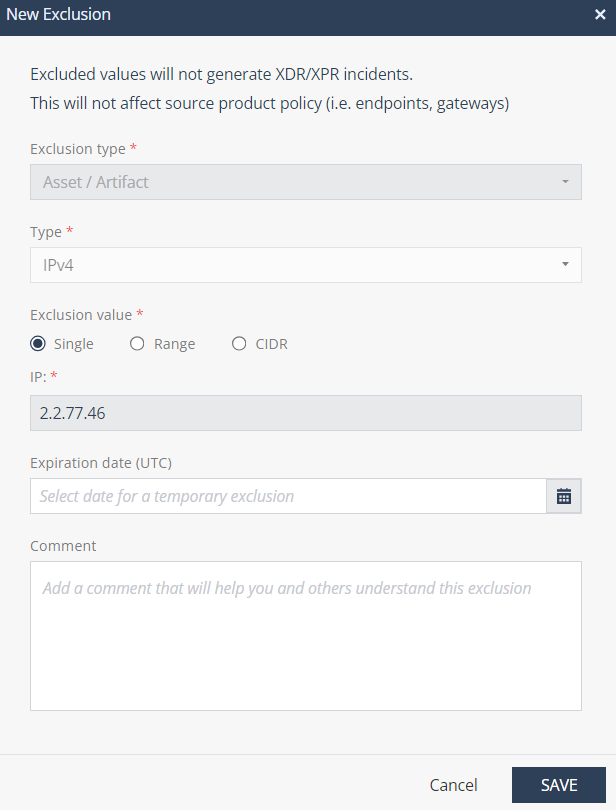
-
-
(Optional) Select an Expiration date (UTC) for the exclusion. After the expiration date, the artifact or indicator can create incidents.
-
(Optional) Enter Comments.
-
Click Save.
Adding or Editing an Indicator or Artifact in IoC Management
-
Click Incidents:
-
Click the incident title.
-
Hover over the incident and click >.
-
-
Click Indicators & Artifacts.
-
To add an artifact to IoC Management, in the table, at the end of the row, hover over
, and click Add to IoC Management.
Note - Adding an artifact to IoC Management changes its type from artifact to indicator.
-
To edit an indicator's setting in IoC Management, in the table, at the end of the row, hover over
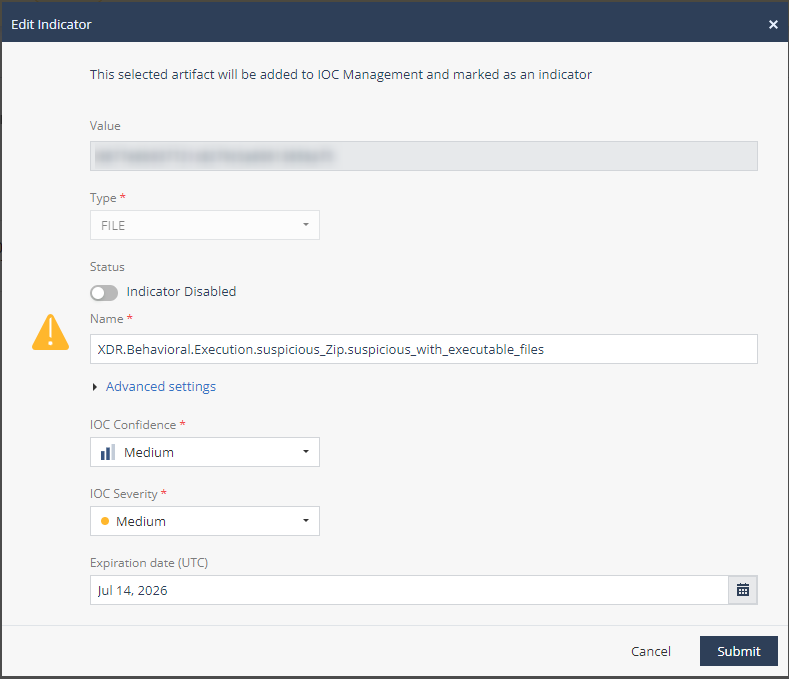
, and click Edit in IoC Management.The Edit Indicator pop-up appears.
If you are using the legacy IoC Management
If you are using the New IoC Management
-
XDR automatically populates Status, Action and Name fields.
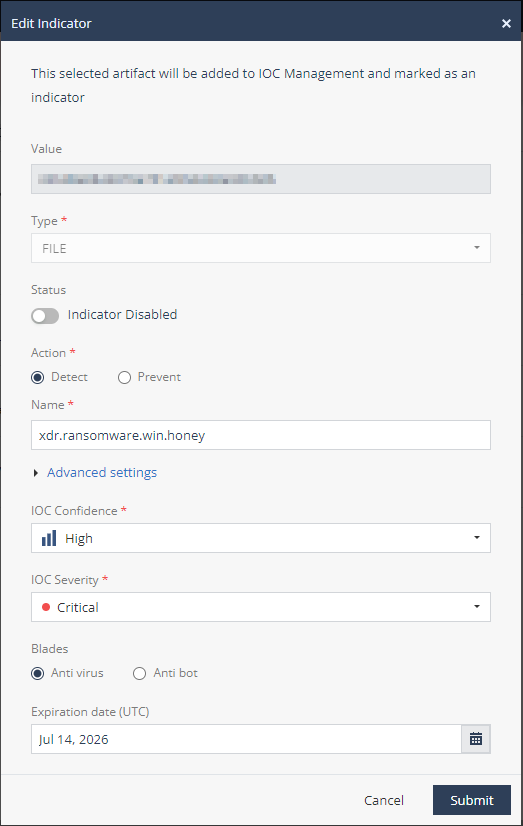
-
Expand Advanced settings, and enter:
-
Confidence
-
Severity
-
Blade
-
Expiration date - After the expiration date, the IoC is disabled automatically.
-
-
XDR automatically populates Value, Type and Feed fields.
-
Enter Confidence, Severity, and Expiration date.
Note - To migrate to the New IoC Management, see Migrating to the New IoC Management.
-
-
Click Save.
Removing an Indicator from IoC Management
-
Click Incidents:
-
Click the incident title.
-
Hover over the incident and click >.
-
-
Click Indicators & Artifacts.
-
To remove an indicator from IoC Management, in the table, at the end of the row, hover over
, and click Remove from IoC Management.
Note - If you remove an indicator from IoC Management, it changes its type from an indicator to an artifact.
-
A confirmation message appears. click Yes.