
Appendix
Disabling the Anti-Malware Periodic Scan
Anti-Malware Scan Storms can occur when anti-virus scans run at the same time on multiple virtual machines on the same physical server.
A degradation of system performance is possible that can affect disk I/O and CPU usage.
We recommend that you disable the Anti-Malware periodic scan in one of these ways:
In Endpoint Web Management
-
Go to the Policy Page.
-
In the right pane, click Web & Files Protection.
-
In the Perform periodic scan every field, select Never.
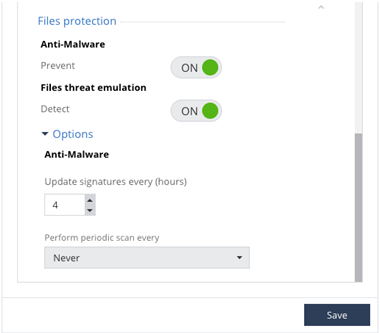
-
Click Save.
-
Install policy.
Configure the Windows Registry settings on the client machine
-
In Windows Registry, configure the value
0x0bfor theAVSchedOfkey:-
On 64-bit operating system:
HKEY_LOCAL_MACHINE\SOFTWARE\Wow6432Node\CheckPoint\EndPoint Security\Anti-Malware\AVSchedOf=(DWORD)0x0b -
On 32-bit operating system:
HKEY_LOCAL_MACHINE\SOFTWARE\CheckPoint\EndPoint Security\Anti-Malware\AVSchedOf=(DWORD)0x0b
-
-
Restart the machine to restore Self-Protection.
Use the Compliance Software Bladeto change the registry. See sk132932.
Use this approach if the "Policy Approach" is not available.
Configuring the Client Machine
You can configure the Client Machine (the Golden Image) manually or with a script.
Manual Configuration
-
Disable the Anti-Malware Periodic Scan. See the instructions above.
-
In Windows Registry, configure the value
0x01for the keyAVBasesScheme(to enable the "Shared Signatures" scheme):-
On 64-bit operating system:
HKEY_LOCAL_MACHINE\SOFTWARE\WOW6432Node\CheckPoint\Endpoint Security\Anti-Malware\AVBasesScheme=(DWORD)0x01 -
On 32-bit operating system:
HKEY_LOCAL_MACHINE\SOFTWARE\CheckPoint\Endpoint Security\Anti-Malware\AVBasesScheme=(DWORD)0x01
-
-
In Windows Registry, configure the path to the shared signatures folder in the key
AVSharedBases:-
On 64-bit operating system:
HKEY_LOCAL_MACHINE\SOFTWARE\WOW6432Node\CheckPoint\Endpoint Security\Anti-Malware\AVSharedBases=(SZ)"\\Server\FolderWithSharedSignatures" -
On 32-bit operating system:
HKEY_LOCAL_MACHINE\SOFTWARE\CheckPoint\Endpoint Security\Anti-Malware\AVSharedBases=(SZ)"\\Server\FolderWithSharedSignatures"
Note:Notes:
-
If you do not configure the path, then the default shared folder is:
C:\ProgramData\CheckPoint\EndpointSecurity\Anti-Malware\bases\shared -
The default shared folder exists after the first successful update.
-
-
Reboot the machine or restart the Anti-Malware process.
Configuration with the Script
-
Download the Golden Image Configuration script file.
-
Execute the script on the Golden Image and follow the instructions.
-
Make sure the machine is rebooted.