
Virtual Groups
Virtual Groups in Policy Rules
You can use these types of groups in SmartEndpoint:
-
Active Directory group - These are synchronized automatically from Active Directory using the Directory Scanner. You cannot modify an Active Directory group.
-
Virtual group - Create these in SmartEndpoint or use one of the predefined virtual groups. There are two types of virtual group:
-
Virtual Group
 - Can contain users and computers.
 -
Computer Group
 - Can contain only computers.
-
Virtual Groups work like Active Directory groups. You can:
-
Create groups and then add users and computers to the groups automatically or manually.
-
Assign policies to virtual groups or users.
-
Put users and computers into more than one group.
-
Select which policies have priority for endpoints that belong to more than one virtual group.
You can use Virtual Groups with Active Directory for added flexibility or as an alternative to Active Directory.
Members of Active Directory OUs or groups can also be members of Virtual Groups.
You can use virtual groups to manage computers and servers in all environments. To manage users with a virtual group, you must do one of these steps:
-
Use Full Disk Encryption and enable User Acquisition.
-
Import objects into Endpoint Security with the Active Directory Scanner. Then, you can move them between virtual groups manually.
For each Endpoint Security component, only one rule can be assigned to a user or computer. Therefore, if a user belongs to more than one group, with different rules assigned to each group, the Endpoint Security Management Server applies the first rule that matches the user or computer.
Why Use Virtual Groups
You may want to use Virtual Groups if you are:
-
Using Active Directory but do not want to use it for Endpoint Security. For example:
-
Different administrators manage the Active Directory and Endpoint Security.
-
Your Endpoint Security requirements are more complex than the Active Directory groups. For example, you want different groups for laptop and desktop computers.
-
-
Using a non-Active Directory LDAP tool.
-
Working without LDAP.
-
Creating computer-based policies for Endpoint Security components that normally support only user-based policies.
Prerequisites for Using virtual groups
To manage users with a virtual group, you must do one of these steps:
-
Use Full Disk Encryption and enable User Authorization before Encryption.
-
Import objects into Endpoint Security with the Active Directory Scanner. Then, you can move them between virtual groups manually.
Types of Virtual Groups
There are two types of virtual groups:
-
Virtual Group - Can contain users and computers.
-
Computer Group - Only contains computers. Computers in this group have computer-based policies if there is a policy assigned to the group. The priority of the policies is based on the sequence of rules in the Policy Rule Base.
For example, Media Encryption & Port Protection policy rules normally apply to users, regardless of which endpoint computer they use. However, if a Media Encryption & Port Protection rule is applied to a Computer Group, that rule can be effective before a rule that applies to a user. This is true if the Computer Group rule is above the user's rule in the Policy Rule Base.
If you add objects to a virtual group with an installation package, the objects are not automatically put into these virtual groups. You must do so manually.
Predefined Virtual Groups
Users and computers with Endpoint Agent installed are automatically assigned to the following predefined virtual groups:
- All Laptops
- All Desktops
- All Servers
- All Mac OS X Desktops
- All Mac OS X Laptops
- All Windows Desktops
- All Windows Laptops
Users and computers can be added to another virtual group, or removed from one virtual group and added to another.
If you add objects to a virtual group with an installation package, the objects are not automatically added to these predefined virtual groups. Add them manually as required.
By design, Predefined Virtual Groups cannot be deleted.
Managing Virtual Groups
Virtual Groups manage groups of users and devices.
You can use Virtual Groups with Active Directory for added flexibility or as an alternative to Active Directory.
Objects can be members of more than one virtual group.
The benefits of using Virtual Groups include:
-
Using the Active Directory without using it for Endpoint Security.
For example: Different administrators manage the Active Directory and Endpoint Security.
-
Your Endpoint Security requirements are more complex than the Active Directory groups. For example, you want different groups for laptop and desktop computers.
-
Using a non-Active Directory LDAP tool.
-
Working without LDAP.
Some virtual groups are pre-defined with users and devices assigned to them automatically.
Creating a Virtual Group
-
Access Endpoint Security and click Asset Management.
-
Go to Organization > Organizational Tree and select Virtual Groups.
-
To create a virtual group for a group, right-click a group.
-
To create a virtual group for a specific device or a user, click the group and right-click the device or user.
-
Select Create Virtual Group.
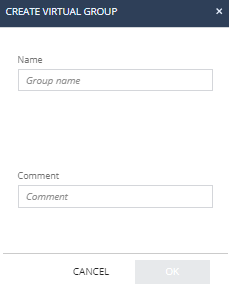
The Create Virtual Group window appears.
-
In the Name field, enter a group name.
-
(Optional) In the Comment field, enter a comment.
Note:-
A user or a device can belong to multiple virtual groups.
-
Selecting a certain user or device shows the Active Directory information collected about them.
-
You cannot edit Active Directory groups but you can view their content.
-
You can create a group and then assign the users or devices to the group, or select users or devices first and then create a group from them.
-
-
Click OK.
Note:You can also perform this procedure from Asset Management > Organization > Computers. See Managing Computers.
Adding a group, device or a user to a Virtual Group
-
Access Endpoint Security and click Asset Management.
-
Go to Organization > Organizational Tree and select Virtual Groups.
-
To add a group to a virtual group, right-click a group.
-
To add a specific device or a user to a virtual group, click the group and right-click the device or user.
-
Select Add to Virtual Group.
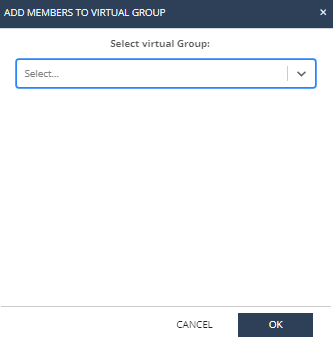
The Add Members to Virtual Group window appears.
-
Select the applicable virtual group.
-
Click OK.
Note:You can also perform this procedure from Asset Management > Organization > Computers.
Creating and Adding Members to Virtual Group
-
Access Endpoint Security and click Asset Management.
-
Go to Organization > Organizational Tree and select Virtual Groups.
-
To create and add a group to a virtual group, right-click a group.
-
To create and add a specific device or a user to a virtual group, click the group and right-click the device or user.
-
Select Create and Add to Virtual Group.
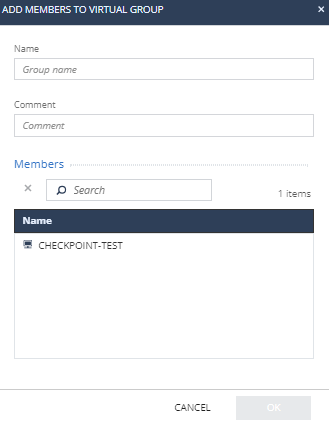
The Add Members to Virtual Group window appears.
-
In the Name field, enter a group name.
-
(Optional) In the Comment field, enter a comment.
-
In the Members section search box, search and select the member.
-
Click OK.
Note:You can also perform this procedure from Asset Management > Organization > Computers.
Moving Devices between Virtual Groups
-
In the left navigation panel, click Asset Management.
-
In the left pane, click Organization > Organizational Tree.
-
Click Virtual Groups.
-
Move the devices:
-
To move all the devices from a virtual group, select the virtual group.
-
To move specific devices from a virtual group, click the virtual group, and select the devices.
-
-
Right-click the virtual group or devices and select Move to Virtual Group.
The Move Members to Virtual Group window appears.
-
Select the virtual group where you want to move the devices.
-
Click OK.
To export the list of devices in a virtual group to an excel file
-
From the left navigation panel, click Asset Management > Organization > Organization Tree.
-
From the list, click Virtual Group.
-
Right-click the virtual group and select Export Virtual Group Report.
The system exports the list of devices to an excel file. If the virtual group contains child virtual groups, then the devices in those virtual groups are also included in the exported file.
Using a Computer Group in a User-Based Policy
You can assign a rule to a Virtual Group, as you can for any other entity.
This example shows how to use a Computer Group in the Media Encryption & Port Protection Policy, which is user-based.
Best Practice - In a component policy that is user-based, put computer group rules above user rules in the "more rule(s)" section.
Read the comments in the rules.
|
No |
Name |
Applies to |
Comment |
|---|---|---|---|
|
- |
|
||
|
Default Media Encryption & Port Protection settings for the entire organization |
|
This rule applies to all users that are not logged in to computers in "Media Encryption computer Group". |
|
|
- |
1 more rule |
||
|
1 |
Media Encryption & Port Protection Rule for "Media Encryption computer Group" |
|
Media Encryption & Port Protection policy rules normally apply to users, regardless of which endpoint computer they use. However, this rule applies to computers in "Media Encryption Computer Group" regardless of which users are logged in to the computer. |

 Entire Organization
Example Deployment Rules for Virtual Groups
You can deploy Endpoint Security components to Endpoint Security clients according to Virtual Groups.
This example shows Software Deployment Rules that specify the components to be deployed to the All Laptops and All Desktops Virtual Groups.
Read the comments in the rules.
|
No |
Name |
Applies to |
Actions |
Comment |
|---|---|---|---|---|
|
- |
|
|||
|
Default Deployment |
|
|
Default Software Deployment settings for the entire organization |
|
|
- |
2 more rules |
|||
|
1 |
Deployment to Desktops |
|
|
|
|
2 |
Deployment to Laptops |
|
|
Same as desktop plus Full Disk Encryption and Endpoint Security VPN |

 Do Not install
 Selected blades

Adding Objects with an Installation Package
When you distribute a new Endpoint Security client installation package, you can assign users and computers to a destination group. Computers and users that use this package are automatically assigned to the group when they connect to the server for the first time.
For example, an MSP that services 5 organizations can export 5 installation packages to divide endpoints into 5 different groups. Users who install the package designated for Group A are automatically put in Group A. Users who install the package designated for Group B are automatically put in Group B.
To configure a virtual group destination for an installation package:
-
In the Users and Computers tab, create a virtual group.
-
In the Deployment tab, click Packages for Export.
-
Select a package and change the rule settings to Export to the new virtual group.
Change other rule settings as necessary. If you are upgrading from version R73 or earlier, make sure that you configure the legacy version passwords.
-
Right-click the package and select Export Package from the option menu.
-
In the Export Package window, select the platform type and 32-bit or 64-bit.
-
Define the path to the directory that the package is saved to.
-
Click OK.
The package downloads to the specified location.
Monitoring Virtual Groups
Virtual Groups show in Reporting reports like other objects. You can create them for monitoring and other purposes. Endpoints can be members of more than one group.
For example, if you want to do a test of a new Endpoint Security upgrade, you can create a Virtual Group that contains only those endpoints included in the test. Then you can create a report for the deployment and activity of these endpoints.
To see activity for virtual group objects:
-
Go to the Reporting tab and select Software Deployment from the tree.
-
Click the ... button in the Endpoint List section of the Software Deployment Status pane.
-
Select Virtual Groups and then select the virtual group that you want to see.