
Creating a Push Operation
Create a push operation to run a predefined task remotely on the managed endpoint devices.
To create a new push operation:
-
Click Create operation.
The Create operation page appears. You need to select the required operation and the required actions.

-
In the Devices tab, configure the required devices.

- To perform a push operation for all organizational assets, select Entire organization.
- To perform a push operation for specific affected assets, select Custom and choose the affected devices.
-
Configure the operation settings.
-
Anti-Malware
Push Operations Description 2FA Required Scan for Malware Runs an Anti-Malware scan on the computer or computers, based on the configured settings. No Update Malware Signature Database Updates malware signatures on the computer or computers, based on the configured settings. No Restore Files from Quarantine Restores files from quarantine on the computer or computers, based on the configured settings.
To restore files from quarantine:
In the Full Path field, enter the path to file before it was quarantined including the file name. For example, c:\temp\eicar.txt
Click OK.
No -
Forensics and Remediation
Push Operations Description 2FA Required Analyze by Indicator Manually triggers collection of forensics data for an endpoint device that accesses or executes the indicator. The indicator can be a URL, an IP, a path, a file name or an MD5. No File Remediation Quarantines malicious files and remediates them as necessary.
To move or restore files from quarantine:
Click
 and select the organization.
Click Update Selection.
Select the device and click Next.
Add Comment, optional comment about the action.
To move the files to quarantine, select Move the following files to quarantine.
To restore the files from quarantine, select Restore the following files from quarantine.
Click
.From the drop-down:
Select Full file path or Incident ID:
In the Element field, enter the incident ID from the Endpoint Security client or enter the incident UID for the corresponding incident from the Logs menu in the Endpoint Security portal. To obtain the incident UID, open the log entry and expand the More section to view the incident UID.
Click OK
Select MD5 Hash:
Enter or upload the Element.
Click OK.
Click Finish.
No Isolate Computer Makes it possible to isolate a specific device that is under malware attack and poses a risk of propagation. This action can be applied on one or more devices. The Firewall component must be installed on the client in order to perform isolation. Only DHCP, DNS and traffic to the management server are allowed. No Release Computer Removes device from isolation. This action can be applied on one or more devices. No -
Agent Settings
-
Deploy New Endpoints
Installs the Initial Client on the target devices remotely using any device as the medium to run the push operation. This is suitable if do not have third party tools such as Microsoft System Center Configuration Manager (SCCM) or Intune to install the client.
Note:The Deploy New Endpoints operation does not need Two-Factor Authentication (2FA).
Field Description Comment Optional comment about the action. Select the deployment endpoint Select the target endpoint or device where you want to install the Initial Client from the organizational tree.
CAUTION:The target device must not be the same as the source device.
Endpoint version Select the Endpoint Security Client version to install on the target device.
Note:Only Endpoint Security client versions with a corresponding exported package (Manual Deployment of Endpoint Clients) are showed here. You can only push a client version if the package exists in the export packages.
-
Collect Client Logs
Collects CPInfo logs from an endpoint based on the configured settings.
For Windows:
For Endpoint Security Client versions E88.31 and higher, client logs are stored in the directory C:\ProgramData\CheckPoint\Endpoint Security\Temp.
For Endpoint Security Client versions E88.30 and lower, client logs are stored in the directory C:\Windows\SysWOW64\config\systemprofile\CPInfo.
For macOS, client logs are stored in the directory /Users/Shared/cplogs.
Field Description Comment Optional comment about the action. Log set to collect Select the scope of information for the logs. Debug Info upload Select the location to upload the logs: -
Upload CPInfo reports to AWS S3 - If the push operation is successful, the administrator will receive a download link in the Endpoint Security Administrator Portal to download the logs.
Note:This option is supported only with the Endpoint Security client for Windows version E88.30 and higher and for macOS version E88.50 and higher.
To enable this option, select a single user.
You can create and copy the link to download the logs using the copy to clipboard icon in the Operation output section of the Push Operation Endpoint Details. The copied link will be valid for 30 minutes.
Upload CPInfo reports to Check Point servers
Upload CPInfo reports to Corporate server - Update the relevant corporate server information.
Note:The Collect Client Logs operation does not need Two-Factor Authentication (2FA).
-
Repair Client
Repairs the Endpoint Security client installation. This requires a computer restart.
Note:This push operation applies only to Endpoint Security clients that have been upgraded to a newer version at least once after the installation.
The Repair Client operation does not need Two-Factor Authentication (2FA).
-
Shutdown Computer
Shuts down the computer or computers based on the configured settings.
Note:The Shutdown Computer operation does not need Two-Factor Authentication (2FA).
-
Restart Computer
Shuts down the computer or computers based on the configured settings.
Note:The Restart Computer operation does not need Two-Factor Authentication (2FA).
-
Uninstall Client
Uninstalls the Endpoint Security client remotely on the selected devices. This feature is supported for E84.30 client and above.
Note:The Uninstall Client operation needs Two-Factor Authentication (2FA).
-
Application Scan
Collects all available applications in a certain folder on a set of devices and then adds them to the application repository of the Application Control blade on that specific tenant.
Note:The Application Scan operation does not need Two-Factor Authentication (2FA).
-
Kill Process
Remotely kills/ terminate the processes.
Note:The Kill Process operation does not need Two-Factor Authentication (2FA).
-
Remote Command
Allows administrators to run both signed (introduced by CP) and unsigned (ones the customer creates) scripts on the Endpoint Security Client devices.
Especially useful in a non-AD environment.
Supplies tools/fixes to customers without the need to create new EP client/server versions.
Saves passwords securely when provided.
Note:- The Remote Command operation needs Two-Factor Authentication (2FA).
- The Remote Command feature is supported only in Windows clients running version E85.30 and above.
-
Registry Actions
Add or remove a registry key.
Field Description Comment Optional comment about the action. Action Select an action. - Add Key to Registry
-
Remove Key From Registry
CAUTION:Removing a registry might impact the endpoint's operating system.
Add Key to Registry Key Full path where you want to add the registry key. For example, Computer\HKEY_LOCAL_MACHINE\SOFTWARE\Citrix\Secure Access Endpoint Analysis
Subkey Enter the key name to add in the registry. For example, ProductVersion.Value Type Select the registry type. Value Enter the registry value. Is redirected Indicates that virtualization is enabled and add the registry to 32-bit. By default, the registry is added for 64-bit. Remove Key From Registry Key Full path of registry key that you want to delete. For example, Computer\HKEY_LOCAL_MACHINE\SOFTWARE\Citrix\Secure Access Endpoint Analysis
CAUTION:Removing a registry might impact the endpoint's operating system.
Subkey Enter the key name to remove from the registry. For example, ProductVersion.Is redirected Indicates that virtualization is enabled and delete the registry in 32-bit. By default, the registry is deleted for 64-bit. To change the working hours to allow the Anti-Malware signature updates on a DHS compliant Endpoint Security client, see sk180559.
Note:The Registry Actions operation does not need Two-Factor Authentication (2FA).
-
File Actions
Copy, move or delete the file or folder.
Note:The File Actions operation does not need Two-Factor Authentication (2FA).
The folder actions are supported only with the Endpoint Security Client version 87.20 and higher.
Field Description Comment Optional comment about the action. Action Select an action. - Copy File
- Move File
-
Delete File
CAUTION:Deleting a file might impact Endpoint Security's protected files.
Copy File File path Full path of the file or folder you want to copy, including the file or folder name. Example:
- For File - C:\Users\<user_name>\Desktop\test.doc
- For Folder - C:\Users\Username\Desktop\
Target file path Full path where you want to paste the file or folder. Example:
- For File - C:\Users\<user_name>\Documents
- For Folder - C:\Users\Username2\
Note:The file or folder name you specify is used to rename the copied file.
If you provide the folder path only, the file is copied with the original file name.
If the file or folder already exists, the file is not overwritten and the operation fails.
If the file path or target folder does not exist, it is created during the operation.
Move File File path Full path of the file or folder you want to move, including the file or folder name. Example:
- For File - C:\Users\<user_name>\Desktop\test.doc
- For Folder - C:\Users\Username>\Desktop\
Target file path Path where you want to move the file or folder. Example:
- For File - C:\Users\<user_name>\Documents
- For Folder - C:\Users\Username1\Documents\
Note:If you provide the full file path, the is moved with the specified name.
If you provide the folder path only, the file is moved with the original file name.
If the file or folder already exists, the file or folder is not overwritten and the operation fails.
If the file path or target folder does not exist, it is created during the operation.
Delete File File path Full path of the file you want to delete, including the file name. For example, C:\Users\<user_name>\Desktop\test.doc
CAUTION:Deleting a file might impact Endpoint Security's protected files.Note:Delete folder action is not supported.
-
VPN Site
Adds or removes a VPN site.
Note:The VPN Site operation does not need Two-Factor Authentication (2FA).
If the operation fails with timeout, see sk179798 for troubleshooting instructions.
Limitations:
This is not supported with Linux operating system.
You cannot create separate VPN sites for each user that access the endpoint. The same VPN site applies to all users.
SoftID and challenge-response authentication methods are not tested.
The system does not validate the entries (for example, Server Name or Fingerprint) that you specify.
Only one fingerprint operation is supported at a time.
You cannot add a new VPN site or remove a VPN site if a VPN site is already connected in the Endpoint Security client. Disconnect the VPN site before you add a new VPN site.
-
This operation is not supported if the firewall policy for the client is configured through the on-premise Security Gateway ( > When using Remote Access, enforce Firewall Policy from is Remote Access Desktop Security Policy). To enable the operation on such a client:
In the Security Gateway, change the parameter
allow_disable_firewalltotruein the $FWDIR/conf/trac_client_1.ttm file.Install the policy on the Security Gateway.
Reboot the Endpoint Security client.
Perform the push operation.
Field Description Comment Optional comment about the action. Action Select an action: - Add VPN Site
- Remove VPN Site
Add VPN Site Server Name Enter the IP address or FQDN of the remote access gateway. Note:Ensure the endpoint can resolve the FQDN to the IP address of the gateway.Use Custom Display Name Select the checkbox if you want to change the display name of the server in the Endpoint Security client. Display Name Server name displayed in the Endpoint Security client. By default, it uses the Server Name. To change the display name, select the Use Custom Display Name checkbox and enter a display name.
Use Custom Login Option Select the checkbox if you want to use a custom login option. Login Option Login option for the server. By default, Standard login option is selected. To use a custom login option, select Use Custom Login Option checkbox, and enter the login option. This must match the Display Name specified in the in the SmartConsole. For example, SAML IDP.

For the Standard login option, make sure that the Authentication Method is Defined on User Record (Legacy). Otherwise, Standard: does not need authentication method error appears.
Authentication Method Select an authentication method. The options displayed depend on the Login Option.
Authentication methods for the Standard login option:
- username-password
- certificate (for a certificate stored in the CAPI store)
- p12-certificate
- securityIDKeyFob
- securityIDPinPad
- SoftID (not tested)
- challenge-response (not tested)
Authentication methods for the custom login option:
- Select certificate from hardware or software token (CAPI)
- Use certificate from Public-Key Cryptographic Standard (PKCS #12) file
- Other
Note:Select the relevant certificate authentication method if your custom login uses a certificate. Otherwise, select Other.
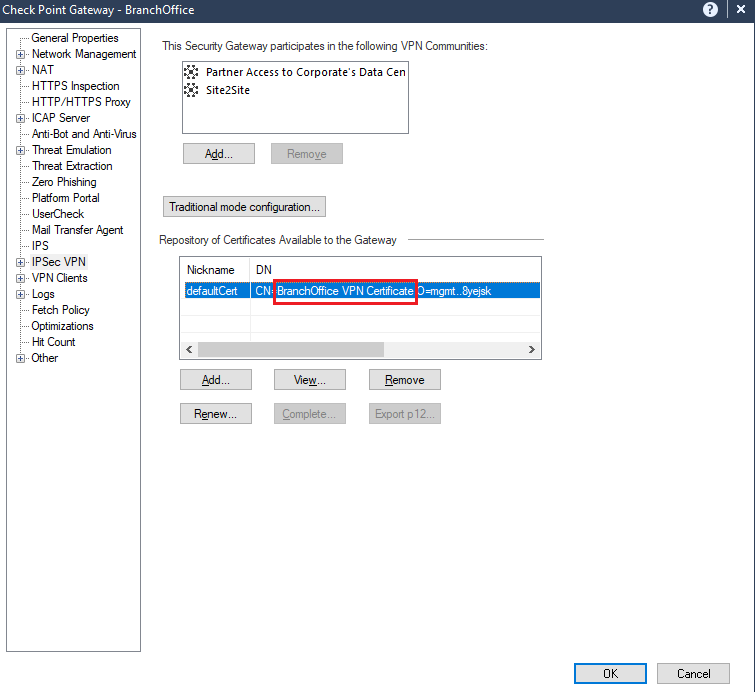
Remote Access Gateway Name Enter the remote access gateway name. To get the remote access gateway name from SmartConsole:
In SmartConsole, go to Gateways and Servers.
Double-click the gateway.
The Check Point Gateway window appears.
Double-click IPSec VPN.
Under Repository of Certificates Available to the Gateway, in the table, expand the DN column. The value after
CN=indicates the remote access gateway name.
To get the remote access gateway name from the device:
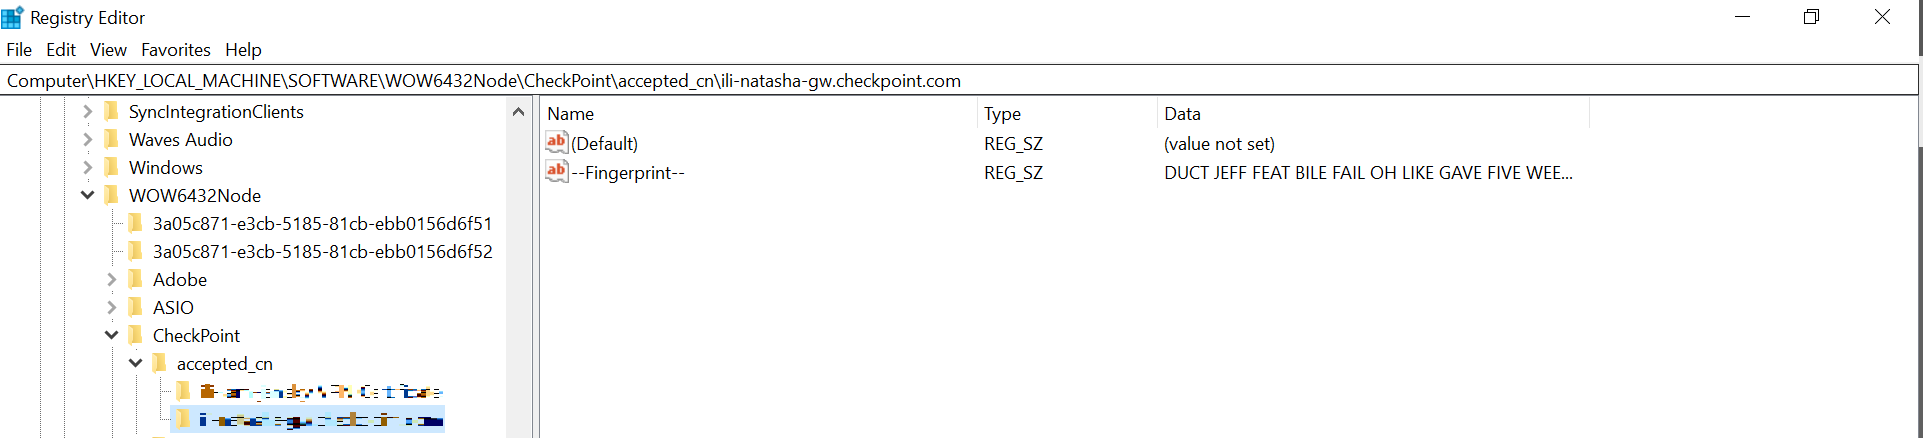
In Registry Editor, go to Computer\HKEY_LOCAL_MACHINE\SOFTWARE\WOW6432Node\CheckPoint\accepted_cn.
It shows a folder with the display name of your VPN site. Copy the folder name and paste it in the Remote Access Gateway Name field.
Remove VPN Site Display Name Enter the display name for the server. -
Collecting Fingerprint details for a VPN Site:
-
To get the fingerprint from SmartConsole
-
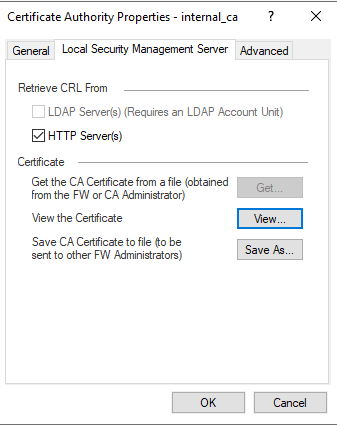
In SmartConsole, in the right pane, under Object Categories, click .

The Certificate Authority Properties window appears.
-
Click the Local Security Management tab.
-
Under Certificate, click View.
The Certificate Authority Certificate View window appears.
-
Scroll down to SHA-1 Fingerprints. The fingerprint is on line number 2.

-
-
To get the fingerprint from the device
Manually add the VPN site in the client.
After you add and connect to the VPN site successfully, In Registry Editor, go to Computer\HKEY_LOCAL_MACHINE\SOFTWARE\WOW6432Node\CheckPoint\accepted_cn.
-
It displays a folder with the display name of your VPN site.
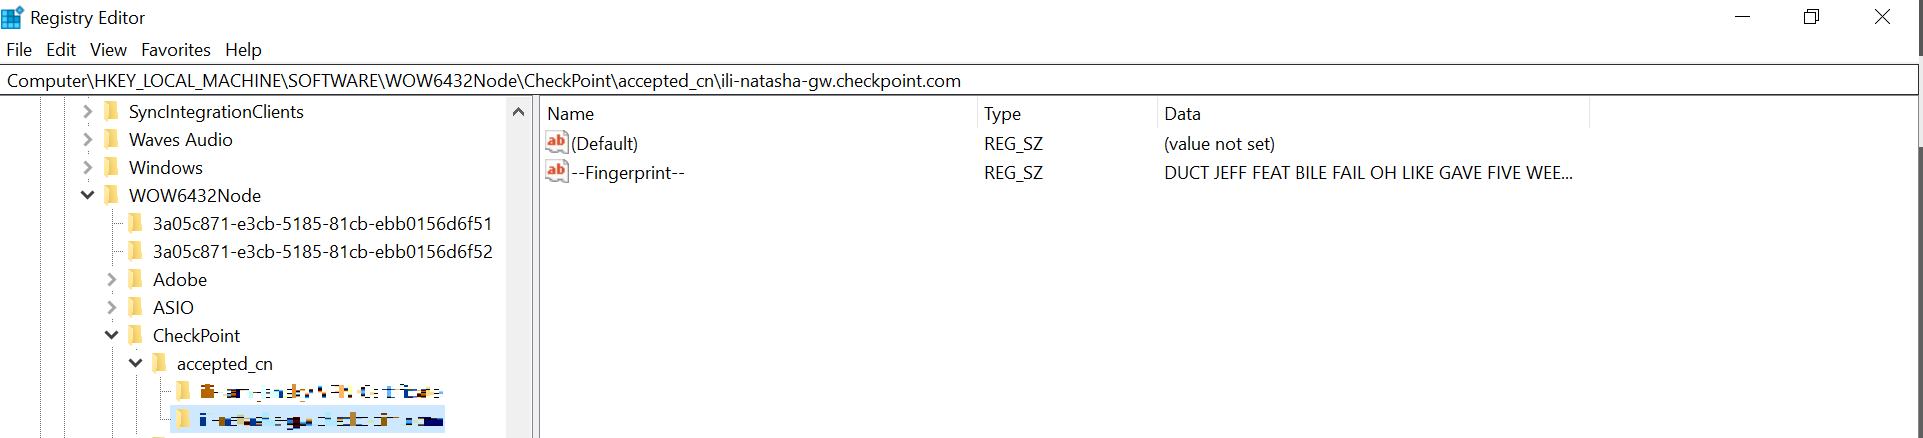
- Double-click the folder.
-
In the right pane, under Name, double-click --Fingerprint--.
The Edit String window appears.

Copy the fingerprint key from the Value data field.
Click Cancel to close the window.
Paste the fingerprint key in the Fingerprint field.
-
-
Collect Processes
Collects information about the process running on the endpoint.
Field Description Comment Optional comment about the action. Collect all processes Collects information about all the processes running on the endpoint. Collect process by name Collects information about a specific process on the endpoint. Process name Enter the process name. Case-sensitive. Additional output fields Select the additional information you want to view in the collected information. Note:The Collect Processes operation does not need Two-Factor Authentication (2FA).
-
Run Diagnostics
Runs diagnostics on an endpoint to collect this information:
- Total CPU and RAM usage in the last 12 hours.
-
CPU usage by processes initiated in the last 12 hours. For example, the CPU used by Anti-Malware to scan files.
You can review the CPU usage data to identify processes (scans) that consume CPU more than the specified threshold and exclude such processes from future scans.
Note:This is supported with Endpoint Security client version E86.80 and higher.
Warning:Only exclude a process if you are sure that the file is not malicious and is not vulnerable to cyber-attacks.
To view the latest diagnostics report.
-
Enable / Disable Self Protection
The Enable / Disable Self Protection push operation allows the administrator to enable or disable the self protection capabilities on endpoints.
Limitations:
Enable - Enables the self protection capabilities.
Disable - Disables the self protection capabilities.
-
Timeout Command Expiration - Select the expiration time for the command.
Note:After the timeout, the command expires, and the self protection capabilities will be enabled automatically.
-
Collect Memory Dump
Collects Memory Dump from an endpoint based on the configured settings. Memory dump is a snapshot of system memory at specific instance of the active process and the operating system.
Note:The Collect Memory Dump push operation can be executed on one device at an instance.
Limitations:
Enable - Enables the self protection capabilities.
Disable - Disables the self protection capabilities.
-
Timeout Command Expiration - Select the expiration time for the command.
Note:After the timeout, the command expires, and the self protection capabilities will be enabled automatically.
Field Description Comment Optional comment about the action. Type Select the type of memory dump to be collected. -
Process - Captures memory dumps for one or more processes using process name or PID.
Note:- The system generates multiple memory dumps if several processes share the same name.
- Memory dumps are not supported for Protected Process Light (PPL) processes.
-
Kernel - Collects a kernel memory dump without requiring a system reboot.
Note:Kernel memory dump is not supported on Windows 7 devices.
-
Full - Initiates a BSOD to collect a full or active memory dump (requires prior configuration on the target device). For more information, see Dell documentation.
Note:It is optional to reboot the endpoint to collect the Full memory dump.
Process name Enter the process name of the process memory dump. Process PID Enter the process PID of the process memory dump. Dump info upload Select the location to upload the memory dump: Upload Memory Dump to AWS S3 - After the push operation is successful, the system shows a download option in the Operation output column of the Push Operation Endpoint Details section.
-
Upload Memory Dump to Check Point servers - After the push operation is successful, the system uploads the memory dump to this location:
For Windows Endpoint Security Client versions E88.31 and higher, client logs are stored in the directory C:\ProgramData\CheckPoint\EndpointSecurity\Temp.
For Windows Endpoint Security Client versions E88.30 and lower, client logs are stored in the directory C:\Windows\SysWOW64\config\systemprofile\CPInfo.
For macOS, client logs are stored in the directory /Users/Shared/cplogs.
Upload Memory Dump to Corporate server - Enter your corporate server details. After the push operation is successful, the system uploads the memory dump to the configured location in the corporate server.
Note:Automated packaging and upload of memory dump - All memory dumps are automatically zipped, segmented if necessary, and uploaded to the designated destination (Check Point FTP, Amazon S3, or custom FTP servers).
On 32-bit Windows systems, the ZIP file name is not displayed when uploading full memory dumps to an FTP server.
The Memory Dump feature is supported only on Endpoint Security for Windows client version E89.05 and later.
-
-
- Optional:
In the Schedule tab, configure the schedule to run the
operation.

-
The Summary tab shows a summary of the selected
operation.
