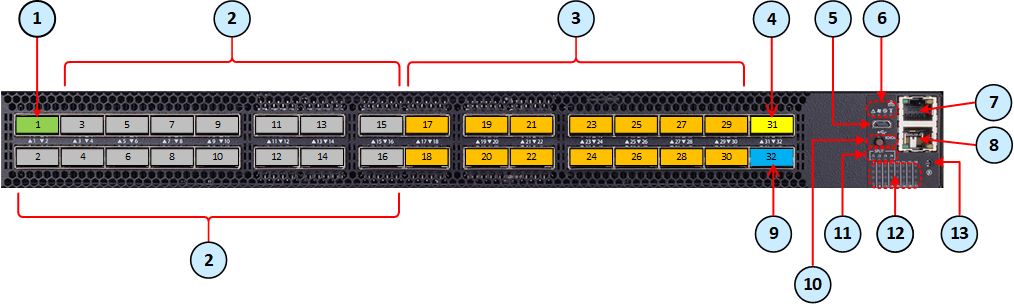
MHO-175 Front Panel
|
|
Important - This section describes the default configuration. It is possible to change the port type (Management, Uplink, and Downlink) in the Gaia Operating System on the Quantum Maestro Orchestrator |

|
Item |
Description |
||
|---|---|---|---|
|
1 |
To this port you connect:
|
||
|
2 |
Ports 2 - 16 (colored gray) are the Uplink ports To these ports you connect your external traffic and internal traffic networks. You use DAC or Fiber cables (with transceivers).
|
||
|
3 |
Ports 17 - 30 (colored orange) are the Downlink ports. To these ports you connect your Check Point Security Appliances. You use DAC or Fiber cables (with transceivers).
|
||
|
4 |
Port 31 (colored yellow) is the External Synchronization port in the Dual Site configuration. You connect a DAC cable In the Port Split mode (see MHO-175 Splitting Options):
|
||
|
5 |
Micro USB 2.0 port. See USB Port. |
||
|
6 |
LEDs. See LEDs. |
||
|
7 |
RJ45 port with the label To this port you connect a client, from which you configure the Gaia Operating System on the Quantum Maestro Orchestrator (in Gaia Portal, or Gaia Clish). |
||
|
8 |
RJ45 port with the label To this port you connect a client, from which you configure the Gaia Operating System on the Quantum Maestro Orchestrator (in Gaia Clish). |
||
|
9 |
Reset button with the label (R). See Reset Button. |
||
|
10 |
Port 32 (colored blue) is the Internal Synchronization port. You connect a DAC cable between ports 32 on two Quantum Maestro Orchestrators MHO-175 for redundancy on the same site.
|
||
|
11 |
Button to select indication states for the splitting control LEDs. See MHO-175 Splitting Options. |
||
|
12 |
Splitting control LEDs that show the indication state for Port LEDs:
|
||
|
13 |
Port LEDs that show the status of all ports (including the split ports). |

 . See
. See  . See
. See |
|
Notes:
|
|
|
Warning - Only ports 1, 2, 31, and 32 support transceivers that require more than 5W (for example, CPAC-TR-100ERL4). |
