Using Anti-Spam and Mail
Introduction to Anti-Spam and Mail Security
The relentless and unprecedented growth in unwanted email now poses an unexpected security threat to the network. As the amount of resources (disk space, network bandwidth, CPU) devoted to handling unsolicited emails increases from year to year, employees waste more and more time sorting through unsolicited bulk email commonly known as spam. Anti-Spam and Mail provides network administrators with an easy and central way to eliminate most of the spam reaching their networks.
Anti-Spam and Mail Features
Feature
|
Explanation
|
Content based Anti-Spam
|
The core of the Anti-Spam functionality is the content based classification engine.
|
IP Reputation Anti-Spam
|
Using an IP reputation service, most of the incoming spam is blocked at connect time.
|
Block List Anti-Spam
|
Block specific senders based on IP address or sender's address.
|
Mail Anti-Virus
|
Scan and filter mail for malware.
|
Zero Hour Malware Protection
|
Filter mail using rapid response signatures.
|
IPS
|
Intrusion prevention system for mail protection.
|
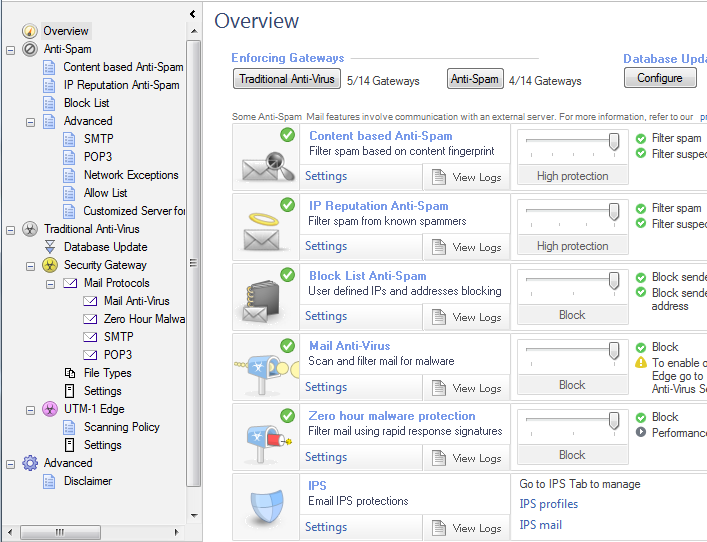
Mail Security Overview
On the Anti-Spam & Mail tab:
- Select gateways that enforce Anti-Virus checking
- Select gateways that enforce Anti-Spam protection
- Enable automatic updates
- View settings and logs
Anti-Spam
The Anti-Spam functionality employs unique licensed technology. Unlike many Anti-Spam applications that rely on searching for keywords and a lexical analysis of the content of an email message, Check Point Anti-Spam identifies spam by analyzing known and emerging distribution patterns. By avoiding a search for key words and phrases that might classify a legitimate email as spam and instead focusing on other message characteristics, this solution offers a high spam detection rate with a low number of false positives.
To preserve personal privacy and business confidentiality, only select characteristics are extracted from the message envelope, headers, and body (no reference to actual content or attachments are included). Hashed values of these message characteristics are sent to a Detection Center for pattern analysis. The Detection Center identifies spam outbreaks in any language, message format, or encoding type. Responses are returned to the enterprise gateway within 300 milliseconds.
Once identified, the network of spam generating machines is blacklisted. If the network changes its behavior, it is removed from the black list.
Adaptive Continuous Download
To avoid delays, Adaptive Continuous Download starts delivering the email to the recipient while Anti-Spam scanning is still in progress. If the email is designated as Spam, it is flagged as spam before it is completely transferred to the recipient. Both the SMTP and POP3 protocols support Adaptive Continuous Download for the entire email message.
Configuring Anti-Spam
Configuring a Content Anti-Spam Policy
A content Anti-Spam policy is set on the Anti-Spam & Mail tab of SmartDashboard > Anti-Spam > Content based Anti-Spam.
- Use the slider to select an Anti-Spam policy protection level.
- Select flagging options.
- In the Security Gateway Engine settings section, set a maximum data size to scan.
- In the UTM-1 Edge Engine settings section, set a confidence level for spam and suspected spam.
A spam confidence level is a grade or rating (usually between zero and a hundred) used decide whether a particular email message should be treated as spam. For example, if the confidence level is set to 70, then all email messages rated at 70 or above will be treated as spam.
UTM-1 Edge devices contain their own Anti-Spam engines. Values entered in the UTM-1 Edge Engine settings section are used to correlate SofaWare Anti-Spam engine ratings with Check Point Anti-Spam engine ratings. For example if a particular email message is rated by the SofaWare Anti-Spam engine as 90, and this value, once translated into Check Point ratings, means the email should be treated as spam, then the Actions defined for Spam or Suspected spam on the Anti-Spam Policy page are enforced.
- Select Tracking Options for Spam, Suspected Spam, or Non Spam. Tracking options include:
- None (no logging)
- Log
- Popup Alert
- Mail Alert
- SNMP trap alert
- Three custom user-defined scripts.
Configuring an IP Reputation Policy
This window enables IP reputation, an Anti-Spam mechanism that checks the IP address of the message sender (contained in the opening SYN packet) against a dynamic database of suspect IP addresses. If, according to the IP reputation service, the originating network has a reputation for sending spam, then the spam session is blocked at connect time. In this way, the IP reputation feature creates a list of trusted email sources.
- Use the slider to select an IP Reputation Policy:
- - IP Reputation service is disabled
- - Monitors known and suspected spam but does not block it
- - Blocks known spam and monitors suspected spam
- - Blocks known and suspected spam
- Select tracking options for Spam, Suspected Spam, or Non spam. Tracking options include
- None (no logging)
- Log
- Popup Alert
- Mail Alert
- SNMP trap alert
- Three custom user-defined scripts.
Configuring a Block List
A list of email sources to block can be configured according to the senders name, domain name, or IP address.
- Use the slider to select a Block Policy:
- - Not blocked
- Only - Not Blocked, but monitors senders by IP address and email address
- - Blocks senders by IP address and email address
- In the Blocked senders\domains section, click Add and enter the name of a sender or domain to be rejected.
- In the Blocked IPs section, click Add and enter an IP address that should be blocked.
- From the drop-down list in the Tracking section, select a tracking option for blocked mail or non-spam.
Configuring Anti-Spam SMTP
SMTP traffic can be scanned according to direction.
- Select a scanning direction for:
- Incoming files
- Outgoing files
- Internal files through the gateway
- Select Activate Continuous download to avoid client time-outs when large files are scanned.
See Adaptive Continuous Download for further information.
Configuring Anti-Spam POP3
POP3 traffic can be scanned according to direction.
- Select a scanning direction for:
- Incoming files
- Outgoing files
- Internal files
- Select Activate Continuous download to avoid client time-outs when large files are scanned.
See Adaptive Continuous Download for further information.
Configuring Network Exceptions
An Anti-Spam policy can be enforced on all email traffic or only on traffic that has not been deliberately excluded from the policy.
To exclude sources and destinations:
- In the Anti-Spam & Mail tab, click Anti-Spam > Advanced > Network Exceptions.
- Select Enforce the Anti-Spam policy on all traffic except for traffic between the following sources and destinations.
- Click Add. The Network Exception window opens.
- For Source and Destination, select Any, or select Specific and one gateway from each list.
- Click OK.
Configuring an Allow List
A list of email sources to allow can be configured according to either the senders name and domain name, or IP address.
- In the Anti-Spam & Mail tab, click Anti-Spam > Advanced > Allow List.
- In the Allowed Senders / Domains section, click Add and enter the name of a sender or domain to be allowed.
- In the Allowed IPs section, click Add and enter an allowed IP address.
- From the drop-down list in the Tracking section, select a tracking option.
Selecting a Customized Server
You can select an alternative data center for Anti-Spam analysis.
To select a data center:
- In the Anti-Spam & Mail tab, click Anti-Spam > Advanced > Customized Server.
- Select Use Customized Server.
- From the drop-down list, select a server.
Anti-Spam on UTM-1 Edge Devices
Anti-Spam protection is available on UTM-1 Edge devices.
To configure Anti-Spam on UTM-1 Edge devices:
- Open the window of the UTM-1 Edge gateway.
- Select .
Bridge Mode and Anti-Spam
If an UTM-1 appliance is configured to run in bridge mode, Anti-Spam is supported providing that:
- The bridge interface has an IP address
- The bridge interface has a default gateway
Configuring Anti-Virus Protection for Mail
Configuring Mail Anti-Virus
The Mail Anti-Virus policy prevents email from being used as a virus delivery mechanism.
To configure a mail Anti-Virus policy:
- In the Anti-Spam & Mail tab, click Traditional Anti-Virus > Security Gateway > Mail Protocols > Mail Anti-Virus.
- Set the slider to Block.
- Select tracking options for either all POP3 and SMTP mail, or just blocked mail. Tracking options include:
- None (no logging)
- Log
- Popup alert
- Mail alert
- SNMP trap alert
- Three custom user-defined scripts
Configuring Zero Hour Malware Protection
By proactively scanning the Internet, the Data Center identifies massive virus outbreaks as soon as they occur. This Zero-Hour solution provides protection during the critical time it takes to discover a new virus outbreak and assign it a signature.
- In the Anti-Spam & Mail tab, click Traditional Anti-Virus > Security Gateway > Mail Protocols > Zero Hour Malware Protection.
- Using the slider, select a Zero hour malware protection level:
- Select tracking options for blocked, SMTP and POP3 mail. Tracking options include:
- None (no logging)
- Log
- Popup alert
- Mail alert
- SNMP trap alert
- Three custom user-defined scripts
Configuring SMTP and POP3
SMTP and POP3 traffic can be scanned according to direction or by IPs.
- In the Anti-Spam & Mail tab, click Traditional Anti-Virus > Security Gateway > Mail Protocols > SMTP or POP3.
- Using the slider, select a protection level:
- Off
- Monitor Only - SMTP and HTTP are the only protocols that support this protection level
- Block
- When scanning by File Direction, select a scanning direction for:
- Incoming files
- Outgoing files
- Internal files through the gateway
- When scanning by IPs, create rules for the Rule Base to specify the source and destination of the data to be scanned.
- For SMTP and HTTP, select the Activate Proactive Detection (impacts performance) checkbox to enable file-based Traditional Anti-Virus detection. Clear the checkbox to enable stream mode detection. See Understanding Proactive and Stream Mode Detection for further information. FTP and POP3 are set to Proactive Detection mode automatically.
- If Proactive Detection has been configured, select the Activate Continuous Download checkbox to avoid client time-outs when large files are scanned.
See Continuous Download for further information.
Configuring File Types
You can set an action to take place when a file of a certain type passes through the gateway. Certain file types can pass through the gateway without being scanned for viruses. For example, picture and video files are normally considered safe. Other formats can be considered safe because they are relatively hard to tamper with. Update the list as necessary.
- In the Anti-Spam & Mail tab, click Traditional Anti-Virus > Security Gateway > File Types page and set the actions.
Configuring Settings
Define maximum sizes for files and archives that should be scanned. Configure actions to take if the set limits are exceeded, or when a scan fails.
- In the Anti-Spam & Mail tab, click Traditional Anti-Virus > Security Gateway > Settings page, configure the fields.
Configuring a Disclaimer
You can create your own custom disclaimer notice.
- In the Anti-Spam & Mail tab, click Advanced > Disclaimer.
- Select Add disclaimer to email scanned by Anti-Virus and Anti-Spam engines.
- In the text box, type your disclaimer notice.
Anti-Spam Logging and Monitoring
Logs derived from Anti-Spam scanning are sent to Security Management Server, and viewed using SmartView Tracker.
Anti-Spam status is monitored using SmartView Tracker. The Anti-Spam status appears under the Firewall product. The status contains information such as the Anti-Spam engine version. Anti-Spam status also includes statistics regarding scanned files. See also: Tracking and Reporting Options.
Reporting False Positives to Check Point
A small number of genuine emails will inevitably be classified as spam. To help Check Point fine-tune the Anti-Spam service, please report them to Check Point support.
The sender of an email that is falsely classified as spam will receive an email notification that the email could not be delivered. This email contains an Email session ID.
- Request the email session ID from the sender.
- Open SmartView Tracker.
- On the Log tab > Content-based Anti-Spam section locate the email session ID.
- Open the Record Details and click Copy.
- At the Check Point Support Center, open a Service Request and paste in the record details.
For more information on how to create and view Service Requests, refer to sk31615.
Anti-Spam Tracking and Reporting Options
Anti-Spam tracking and reporting options are available in:
- SmartView Tracker
- SmartView Monitor
- SmartReporter
SmartView Tracker
SmartView Tracker logs Anti-Spam activity. Record details exist for Number, Date, Time, Product, Interface, Origin, Type, Action, Service, Source, Source country, Destination, Sender, Original sender, Recipients, Original recipients, Spam category, Control, and Information.
Right-clicking on a row displays a new Follow Email Session ID option. Following the session provides granular information.

SmartView Monitor
SmartView Monitor reports on Anti-Spam and Anti-Virus activity.
SmartReporter
New express reports for content inspection have been added to SmartReporter:
|
|

