Getting Started with Threat Emulation
Threat Emulation Analysis Locations
You can choose a location for the emulation analysis that best meets the requirements of your company. Run the file emulation in the ThreatCloud or on a Threat Emulation Private Cloud Appliance (Emulation appliance) in the internal network.
- - You can send all files to the Check Point ThreatCloud for emulation. Network bandwidth is used to send the files and there is a minimal performance impact on the Security Gateway.
- - You can use an Emulation appliance to run emulation on the files.
ThreatCloud Emulation
You can securely send files to the Check Point ThreatCloud for emulation. The ThreatCloud is always up-to-date with the latest Threat Emulation releases.
Sample ThreatCloud Emulation Workflow
- The Security Gateway gets a file from the Internet or an external network.
- The Security Gateway compares the cryptographic hash of the file with the database.
- If the file is already in the database, no additional emulation is necessary
- If the file is not in the database, it is necessary to run full emulation on the file
- The file is sent over an SSL connection to the ThreatCloud.
- The virtual computers in the ThreatCloud run emulation on the file.
- The emulation results are sent securely to the Security Gateway for the applicable action.
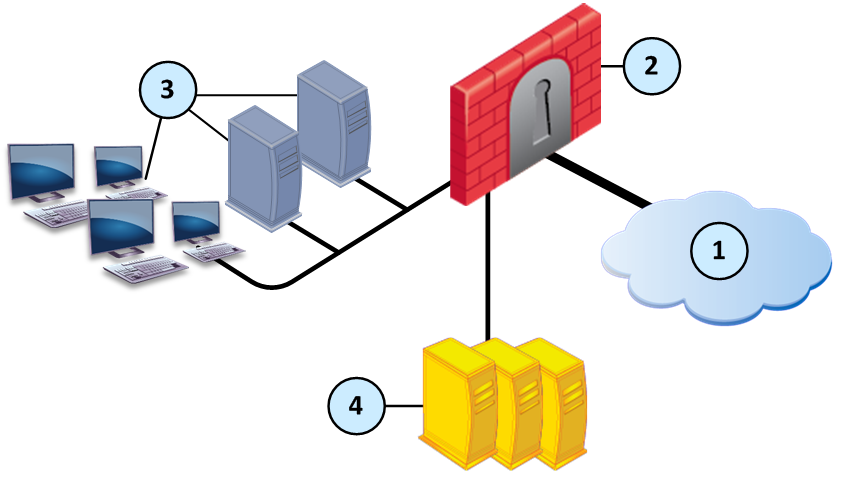
Sample ThreatCloud Deployment
Item
|
Description
|
1
|
Internet and external networks
|
2
|
Perimeter Security Gateway
|
3
|
Computers and servers in the internal network
|
4
|
Check Point ThreatCloud servers
|
Local or Remote Emulation
You can install an Emulation appliance in the internal network.
Sample Workflow for Emulation Appliance in a Local Deployment
- The Emulation appliance receives the traffic, and aggregates the files.
- The Emulation appliance compares the cryptographic hash of the file with the database.
- The file is already in the database, no more emulation is necessary.
- If the file is not in the database, the virtual computers in the Emulation appliance run full emulation on the file.
Item
|
Description
|
1
|
Internet and external networks
|
2
|
Perimeter Security Gateway
|
3
|
Computers and servers in the internal network
|
4
|
TE1000 Threat Emulation Private Cloud Appliance
|
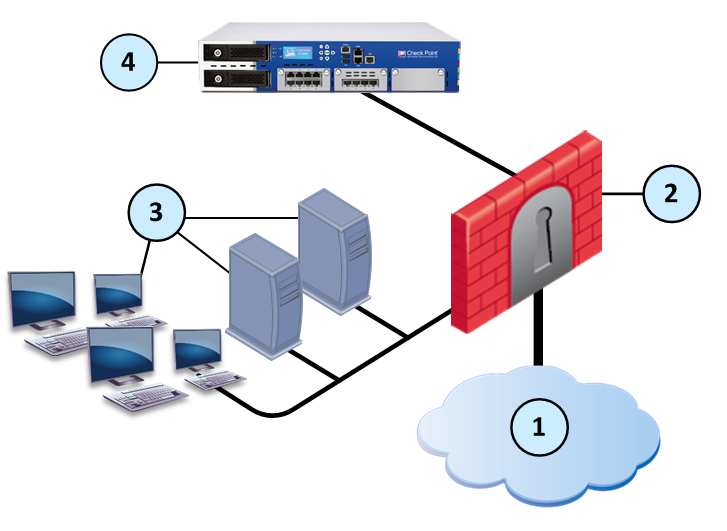
Sample Workflow for Emulation Appliance in a Remote Deployment
- The Security Gateway aggregates the files, and the files are sent to the Emulation appliance.
- The Emulation appliance compares the cryptographic hash of the file with the database.
- The file is already in the database, no more emulation is necessary.
- If the file is not in the database, the virtual computers in the Emulation appliance run full emulation on the file.

Item
|
Description
|
1
|
Internet and external networks
|
2
|
Perimeter Security Gateway
|
3
|
Computers and servers in the internal network
|
4
|
TE250 Threat Emulation Private Cloud Appliance
|
Optimizing File Emulation
Files have unique cryptographic hashes, these file hashes are stored in a database after emulation is complete. Before emulation is run on a file, the appliance compares the file hash to the database:
- If the hash is not in the database, the file is sent for full emulation
- If the hash is in the database, then it is not necessary to run additional emulation on the file
This database helps to optimize emulation and give better network performance.
Threat Emulation Deployments
You can use inline or monitor deployments for file emulation.
- Use and actions to block traffic before it goes to the internal computer. You can configure how Threat Emulation handles connections while it finishes the emulation of a file:
- - The traffic is allowed to enter the internal network
- - The traffic is blocked and does not enter the internal network until after emulation is finished
- Use a SPAN or TAP configuration to duplicate network traffic. The files are then sent directly to Threat Emulation and the computer in the internal network. If Threat Emulation discovers that a file contains malware, the applicable log action is done. Monitor deployments support only the action.
Inline Deployments (Prevent and Ask)
Use the Prevent or Ask UserCheck action to quarantine a malicious file.
Sample Inline Emulation Workflow (Prevent Action)
- The ThreatCloud or Emulation appliance gets a file from the Security Gateway.
- Emulation is run on the file.
- The file is safe, and it is sent to the computer in the internal network.
- If the file contains malware, it is quarantined and logged.
Monitor Deployments
Sample Monitor Emulation Workflow
- The ThreatCloud or Emulation appliance gets a copy of a file from the Security Gateway. The original file goes to the computer in the internal network.
- Emulation is run on the file.
- The file is safe, no other action is done
- If the file is identified as malware, it is logged according to the action of the Threat Prevention rule
Deployments with a Mail Transfer Agent
If you use the Prevent action to block traffic, we recommend that you enable the Security Gateway as an MTA (Mail Transfer Agent) for SMTP traffic. You can use the MTA to help manage the emulation of emails and attachments.
Preparing for Local or Remote Emulation
Prepare the network and Emulation appliance for a Local or Remote deployment in the internal network.
- Open SmartDashboard.
- Create the network object for the Emulation appliance.
- If you are running emulation on HTTPS traffic, configure the settings for HTTPS Inspection.
- Make sure that the traffic is sent to the appliance according to the deployment:
- Local Emulation - The Emulation appliance receives the traffic. The appliance can be configured for traffic the same as a Security Gateway.
- Remote Emulation - The traffic is routed to the Emulation appliance.
Running the First Time Configuration Wizard
Use the First Time Configuration Wizard in SmartDashboard to enable Threat Emulation in the network. Configure the Security Gateway or Emulation appliance for your deployment.
Using Cloud Emulation
Files are sent to the Check Point ThreatCloud over a secure SSL connection for emulation. The emulation in the ThreatCloud is identical to emulation in the internal network, but it uses only a small amount of CPU, RAM, and disk space of the Security Gateway. The ThreatCloud is always up-to-date with all available operating system environments.

|
Note - For ThreatCloud emulation, it is necessary that the Security Gateway can connect to the Internet. We recommend that you make sure that the DNS and proxy settings are configured correctly in .
|
To enable ThreatCloud emulation:
- Double-click the perimeter Security Gateway.
The window opens.
- From the tab, select .
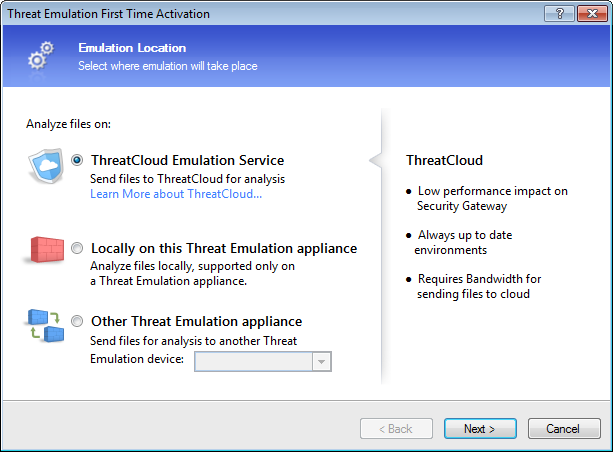
The opens and shows the page.
- Select .
- Click .
The page opens.
- Click to enable Threat Emulation and close the First Time Configuration Wizard.
- Click .
The window closes.
- Install the policy on the Security Gateway.
Using Local or Remote Emulation
This section is for deployments that use an Emulation appliance and run emulation in the internal network.
To enable an Emulation appliance for Local and Remote emulation:
- Double-click the Emulation appliance.
The window opens.
- From the tab, select .
The opens and shows the page.
- Select .
- Click .
The page opens.
- Click to enable Threat Emulation on the Emulation appliance and close the First Time Configuration Wizard.
- Click .
The window closes.
- For Local emulation, install the policy on the Emulation appliance.
To enable Threat Emulation on the Security Gateway for Remote emulation:
- Double-click the Security Gateway.
The window opens.
- From the tab, select .
The opens and shows the page.
- Configure the Security Gateway for Remote Emulation:
- Select .
- From the drop-down menu, select the Emulation appliance.
- Click .
The page opens.
- Click to enable Threat Emulation on the Security Gateway close the First Time Configuration Wizard.
- Click .
The window closes.
- Install the policy on the Security Gateway and the Emulation appliance.
Using an MTA
You can enable the Security Gateway as an MTA (Mail Transfer Agent) to manage the emulation of SMTP traffic. It is possible that during file emulation, the email server cannot keep the connection open for the time that is necessary for full emulation. When this happens, there is a timeout for the email. A Threat Emulation deployment with an MTA avoids this problem, the MTA completes and closes the connection with the source email server and then sends the file for emulation. After the emulation is complete, the MTA sends the email to the mail server in the internal network.
- For topologies that use TLS between the Security Gateway and the mail server, Threat Emulation must use an MTA to decrypt emails for emulation.
- When Threat Emulation identifies that an email attachment is malicious, the MTA removes the attachment and sends the safe email.
- We recommend that you use an MTA for Threat Emulation profile settings that block SMTP traffic. Without an MTA, it is possible that safe emails are dropped and do not reach the computers in the internal network.
To use the Security Gateway as an MTA:
- Enable the Security Gateway as an MTA.
- Configure the network to forward emails to the MTA.
Enabling MTA on the Security Gateway
For a topology that uses TLS between the Security Gateway and the mail server, you must import the mail server certificate to the Security Gateway.
To enable the Security Gateway as an MTA:
- Double-click the Security Gateway and from the navigation tree select .
The page opens.
- Select .
- In the section, add one or more rules.
- Click the add rule button.
- Right-click the cell and select .
- Enter the domain for the SMTP traffic for this rule. The default setting is to use the wildcard to send all traffic.
- Click .
- Click the cell and select the node object that is the mail server for this rule.
You can also configure the MTA to only run emulation and not forward emails to the mail server.
- Optional: Select and enter the message to add to emails when emulation is finished.
- If the mail server uses TLS inspection, do these steps to enable the MTA to support it:
- Click .
The window opens.
- Click and select the certificate file.
- Enter the for the certificate.
- Click .
- Select .
- Optional: In the section, click and configure the MTA interface and email settings.
- Click and then install the policy.
Configuring the Network to Use an MTA
After you configure the Security Gateway as an MTA, change the settings to send SMTP traffic from external networks to the Security Gateway. Each organization has an MX record that points to the internal mail server, or a different MTA. The MX record defines the next hop for SMTP traffic that is sent to the organization. These procedures explain how to change the network settings to send SMTP to the Check Point MTA.
To configure an MTA for email that is sent to the internal mail server:
- Connect to the DNS settings for the network.
- Change the MX records, and define the Security Gateway as the next hop.
To configure an MTA for email that is sent to a different MTA:
- Connect to the SMTP settings on the MTA that sends email to the internal mail server.
- Change the SMTP settings and define the Security Gateway as the next hop.
Deploying MTA in BCC Mode
You can use the Check Point MTA to only monitor SMTP traffic. Configure the MTA to send emails only for emulation, but not to forward them to the mail server.
|
Note - Make sure that the mail relay in the network can send a copy of the emails to the Check Point MTA.
|
To configure the MTA not to forward emails:
- Double-click the Security Gateway and from the navigation tree select .
The page opens.
- Make sure that all the rules are deleted.
- Click the add rule button.
- Click the cell and click .
The window opens.
- Configure these settings:
- - For example,
No_Forward - - Enter
0.0.0.0
- Click .
The window closes, and the server object is added to the cell.
- Click and then install the policy.
Sample Workflow - Creating a Threat Emulation Profile
This is a sample workflow to create a Threat Prevention profile that includes Threat Emulation. To run emulation on HTTPS traffic, enable and configure HTTPS inspection.
To create a Threat Prevention profile for Threat Emulation:
- From > , click .
- Select the Threat Prevention Software Blades for the profile.
- Configure the settings for the traffic.
- From the page, set the and UserCheck settings.
- Configure the Threat Emulation for this profile, and define how traffic from external and internal networks is sent for emulation.
- Select one or more protocols for this profile.
The Software Blade runs emulation only for files and traffic that match the selected protocols.
- Configure the file types for this profile.
The Software Blade runs emulation only for files that match the selected file types.
- Save the profile.
|

