Managing Users and Administrators Locally
SmartDashboard administrators with permissions can manage user accounts and the permissions of other administrators. You can use the Check Point Users and Administrators objects.
Glossary
This glossary contains important terms that are used in this chapter.
- Administrator — Personnel responsible for managing the Security Management environment. Administrators have permissions to use the SmartConsole clients.
- Administrator Groups — Named groups of administrators with permissions to install policies on specified gateways.
- External Users — Users defined on external servers. External users are not defined in the Security Management database or on an LDAP server. External user profiles tell the system how to identify and authenticate externally defined users.
- LDAP Groups — Groups of users defined on an LDAP account unit. You can specify an LDAP group in policy rules in the same way as individual users or user groups.
- Permissions Profiles — Predefined set of access permissions that you assign to individual administrators. This feature lets you assign and manage complex, granular permissions for many administrators with one definition.
- Templates — Predefined sets of user properties that let you quickly define new users.
- Users — Personnel authorized to use network resources and applications.
- User Database — Check Point internal database that contains all users and administrators defined and managed using SmartDashboard. The Check Point User Database does not contain users defined in LDAP groups or external users.
- User Groups — Named groups of users with related responsibilities or who do related tasks. You can specify a user group in policy rules in the same way as individual users.
SmartDashboard
The Check Point user management solution is part of SmartDashboard. Users, Administrators and their groups are managed as objects, using the standard object administration tools: the Objects Tree pane and the Objects Manager window.
- The Objects Tree pane (Users and Administrators tab):
- Provides a graphical overview of all users and administrators.
- Allows you to manage users and administrators by right-clicking the relevant folder (for example, Administrator, Administrator Groups, External User Profiles, etc.) and selecting the appropriate command (Add, Edit, Delete, etc.) from the menu.
- The Objects Manager (Users and Administrators window):
- Lists all users and administrators (you can filter this list to focus on specific types of users or administrators).
- Allows you to define new objects using the New... menu, and to delete or modify an object by selecting them in the list and clicking Remove or Edit (respectively).
The user's definition includes access permissions to and from specific machines at specific times of the day. The user definition can be used in the Rule Base's Authentication Rules and in Remote Access VPN.
SmartDashboard further facilitates user management by allowing you to define user and administrator templates. Templates serve as prototypes of standard users, whose properties are common to many users. Any user you create based on a template inherits all of the template's properties, including membership in groups.
Users Database
The users defined in SmartDashboard (and their authentication schemes and encryption keys) are saved to the proprietary Check Point Internal Users Database (the Users Databases) on the Security Gateway.
The Users Database is automatically downloaded to Check Point hosts with installed Management Software Blades as part of the Policy installation process. Alternatively, you can manually install the Users Database by selecting Policy > Install Database from the menu. Security Gateways that do not include a Management Software Blade do not receive the Users Database.
The Users Database does not contain information about users defined externally to the Security Gateway (such as users in external User Directory groups), but it does contain information about the external groups themselves (for example, on which Account Unit the external group is defined). For this reason, changes to external groups take effect only after the Security Policy is installed or after the Users Database is downloaded.
User Templates
A user template lets you to create a prototype of a standard user, whose properties are common to many users. Any user you create based on this template will inherit all the properties of the user template, including memberships in groups. Changes in the template do not affect existing users, only future ones.
To create a new user template:
- Click the tab in the tree.
- Click .
- Click Properties and enter a template name in the field.
This property is required and is case sensitive. - Do one of these steps to set the expiration date:
- Select to use the default expiration date.
- Select to manually set the expiration date. Select a date using the calendar control.
- Define the remaining user properties.
To use this template to create a new user:
- Right-click the folder and select > [].
- In the tab, enter the . The user name is not inherited from the template.
- Define or change other properties as required.
Other properties are inherited from the template.
Configuring Users
Users are personnel responsible for managing the Security Management environment. Administrators have permissions to use the SmartConsole clients.
This section includes procedures for configuring users using SmartDashboard.
Creating or Changing a User
This section shows you how to create, change or delete a user.
To create a new user:
- In SmartDashboard, click the tab.
- Right-click .
The window opens. - Configure the properties as necessary.
To change an existing user:
- In SmartDashboard, click the tab.
- Double-click a user.
The window opens. - Configure the properties as necessary.
To delete a user:
- In SmartDashboard, click the tab.
- Select a user.
- Press Delete and then press in the confirmation window.
If the user is a member of a group, one more confirmation windows opens. Press to continue.
General Properties
General properties include the name and other optional properties.
To configure the General Properties:
- In the User Properties window, click General Properties.
- Enter a unique name in the User Name field.
The user name property is required and is case sensitive.
- Optionally, enter the email address and mobile phone number in the specified fields.

|
Note - If you generate a user certificate with a non-Check Point Certificate Authority, enter the Common Name (CN) component of the Distinguished Name (DN).
For example, if the DN is: [CN = James, O = My Organization, C = My Country],
enter James as the user name.
If you use Common Names as user names, they must contain exactly one string with no spaces.
|
Setting the Expiration Date
You can assign an expiration date for each User. After this expiration date, the user is no longer authorized to access network resources and applications. SmartDashboard includes tools for managing expiration dates and warning users of impending expirations.
To configure the expiration date:
- Open the pane.
- In the section, click the arrow and select an expiration date using the calendar control.
The default expiration date shows, as defined in the Default Expiration Settings.
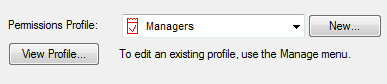
Assigning a Permissions Profile
A permission profile is a predefined set of Security Management and SmartConsole administrative permissions that you can assign to administrators. You can assign a permission profile to more than one administrator. Only administrators with applicable permissions can create and manage permission profiles.
To assign permissions to an administrator:
- In SmartDashboard, create a new administrator or double-click an existing administrator.
- In the window, go to the pane.
- Select a permissions profile from the list.
You can also do these actions in the window:
- Click to create a new permissions profile.
You must have the applicable permissions to do this. - Click to see the selected permissions profile.
Authentication
All users must authenticate to access network resources. Select and configure an authentication method for this administrator. If you do not select an authentication method, the administrator cannot log in or use network resources.
To select an authentication scheme for this user:
- In the window, click .
- In the window, select an authentication scheme.
- If prompted, enter and confirm a password.
- For RADIUS or TACACS authentication, select a server.
Locations
To add user network locations:
- In the User Properties window, click Location.
- Select one or more Network Objects from the list.
- Click Add, to add these locations to the source or to the destination list.
To remove locations from the user permissions:
- In the User Properties window, click Location.
- Select one or more locations from the Source or Destination list.
- Click Remove.
Connection Times
Configure the days and the times during which this user can connect to network resources and applications.
To configure days and times:
- In the window, click .
- Select or clear the days of the week on which this user can connect to network resources.
- Enter the time range during which this user can connect in the specified fields.
Certificates
You can create and manage certificates for this user. From this pane, you can:
- Send a registration key that lets the user activate a certificate.
- Create a certificate (.p12) file with a private key password for this user.
- Change or Revoke an existing certificate.
To create and Revoke certificates for this user:
- In the User Properties window, click Certificates.
- To create a new certificate click New or to edit an existing certificate, double-click it. Do one of these steps:
- Click Registration Key to send a registration key that activates the certificate. When prompted, select the number of days the user has to activate the certificate before the registration key expires.
- Click Certificate file to create a .p12 certificate file. Enter and confirm the certificate password when prompted.
Encryption
Select and configure an encryption method for this user.
To select an encryption method:
- In the User Properties window, click Encryption.
- Select an encryption method.
- Click Edit to change the settings for this encryption method.
- Select Password if this user authenticates with a pre-shared secret password. Enter and confirm the password.
- Select Public Key if this user authenticates with a public key contained in a certificate file.
Managing User Groups
User groups are collections of related user accounts. These groups let you manage and do operations on many user accounts at the same time.
To create a new user group:
- In SmartDashboard, click the tab.
- Right-click from the options menu.
The window opens.
To change user group settings:
- In SmartDashboard, click the tab.
- Double-clicka user group.
The window opens.
To add users or user groups to a group:
- In the window, select users or user groups in the list.
- Click .
- If you are adding a group to the list, do one of these tasks when the message window opens:
- Click to add each member of the group instead of the group.
- Click to add only the group.
To remove users or user groups from the group:
- In the window, select users or user groups in the list.
- Click .
To delete a user group:
- In SmartDashboard, click the tab.
- Select a group.
- Press and then click to confirm.
Configuring Administrators
Administrators are personnel responsible for managing the Security Management environment. Administrators have permissions to use SmartConsole clients.
Creating or Changing an Administrator
This section shows you how to create, change or delete an administrator.
To create a new user:
- In SmartDashboard, click the Users and Administrators tab.
- Right-click Administrators.
The Administrator Properties window opens. - Configure the user properties as necessary.
To change an existing user:
- In SmartDashboard, click the Users and Administrators tab.
- Double-click an existing administrator.
The Administrator Properties window opens. - Configure the user properties as necessary.
To delete a user:
- In SmartDashboard, click the tab.
- Select an administrator.
- Click and then click in the confirmation window.
If the administrator is a member of a group, another confirmation window opens. Click to continue.
Configuring General Properties
To configure the General Properties:
- In the Administrator Properties window, click General Properties.
- Enter a unique name in the User Name field.
The user name property is required and is case sensitive.
- Optionally, enter the email address and mobile phone number in the specified fields.
|
Note - If you generate a user certificate with a non-Check Point Certificate Authority, enter the Common Name (CN) component of the Distinguished Name (DN).
For example, if the DN is: [CN = James, O = My Organization, C = My Country],
enter James as the user name.
Common names used as user names must have exactly one string with no spaces.
|
Setting the Expiration Date
You can assign an expiration date for each User. After this expiration date, the user is no longer authorized to access network resources and applications. SmartDashboard includes tools for managing expiration dates and warning users of impending expirations.
To configure the expiration date:
- Open the pane.
- In the section, click the arrow and select an expiration date using the calendar control.
The default expiration date shows, as defined in the Default Expiration Settings.
Selecting a Permissions Profile
A permission profile is a predefined set of Security Management and SmartConsole administrative permissions that you can assign to administrators. You can assign a permission profile to more than one administrator. Only administrators with applicable permissions can create and manage permission profiles.
To assign a permissions profile:
- In the window, click .
- Select a profile from the list.
You also can do these actions in the window:
Administrator Groups
Administrator groups are collections of related administrator accounts. These groups let you manage and do operations on many administrator accounts the same time.
To create a new user group:
- In SmartDashboard, click the tab.
- Right-click and select p
The window opens. - To add users or user groups to this group, select them and then click .
If you select a group, a pop-up window shows. Do one of these steps:- Click to add each member of the group instead of the group itself.
- Click to add only the group.
- Optionally enter information in the , or fields.
To change a user group definition:
- In SmartDashboard, click the tab.
- To add users or user groups to this group, select them and then click .
If you select a group, a pop-up window shows. Do one of these steps:- Click to add each member of the group instead of the group itself.
- Click to add only the group.
- Optionally enter information in the , or fields.
Configuring Authentication
Administrators must authenticate to access network resources. Select and configure an authentication method for this administrator. If you do not select an authentication method, the administrator cannot log in to SmartConsole clients.
To select an authentication scheme for this administrator:
- In the Administrator Properties window, click Authentication.
- In the Authentication window, select an authentication scheme.
- If prompted, enter and confirm a password.
- For RADIUS or TACACS authentication, select a server.
Certificates
To create and revoke certificates for this user:
- In the Administrator Properties window, click Certificates.
- To create a new certificate, click Generate and save.
- To revoke an existing certificate, click Revoke.
Configuring Administrator Groups
Administrator groups are collections of related administrators. These groups let you manage and do operations on many administrators at the same time.
To create a new administrator group:
- In the SmartDashboard, click the tab.
- Right-click and select .
The window opens. - Add or remove administrators from the group:
- To add administrators and other administrator groups to this group, select them and then click .
Note - If you add a group, a pop-up window shows. Do one of these steps:
- Click to add each member of the group instead of the group itself.
- Click to add only the group.
- To remove administrators or other administrator groups, select them and then click .
Optionally, configure the other settings in this window.
To change administrator group definition:
- In SmartDashboard, click the tab.
- Double-clickan administrator group.
The window opens. - Add or remove administrators from the group:
- To add administrators and other administrator groups to this group, select them and then click .
Note - If you add a group, a pop-up window shows. Do one of these steps:
- Click to add each member of the group instead of the group itself.
- Click to add only the group.
- To remove administrators or other administrator groups, select them and then click .
- Optionally, configure the other settings in this window.
To delete an administrator group:
- In SmartDashboard, click the tab.
- Select a group.
- Press and then click to confirm.
Managing User and Administrator Expiration
You must assign an expiration date to each administrator. After this expiration date, the administrator cannot log in to the SmartConsole clients or do actions in the Security Management environment.
|
Note - Account expiration has no effect on operating system administrators. Operating system administrators are different from administrators defined in SmartDashboard and can access the command line.
|
SmartDashboard includes tools for managing expiration dates and warning administrators of impending expirations.
Configuring Default Expiration Parameters
The default expiration settings show when you define a new administrator account. These settings include:
- The default expiration date
- The number of days before expiration that warnings show after log in
- The number of days before expiration that the administrator account shows in the window.
To set the default expiration Parameters:
- In SmartDashboard, select > .
- Select or .
- In the or window, set the expiration date using one of these options:
- - Enter the number of days (from today) before this user account expires.
- - Click the arrow on the text box and then select the expiration date using the calendar control.
- For Administrator accounts, select to show an expiration warning message when the administrator logs in. Enter the number of days before expiration that this warning shows.
- Select to show expiration warnings in the window. Enter the number of days before expiration that this warning shows.
Assigning Permission Profiles to Administrators
A permission profile is a predefined set of Security Management and SmartConsole administrative permissions that you can assign to administrators. You can assign a permission profile to more than one administrator. Only administrators with applicable permissions can create and manage permission profiles.
Creating and Changing Permission Profiles
This section includes procedures for creating, changing and deleting permission profiles.
Administrators with the applicable permissions can create, edit or delete permissions profiles.
To create a new permissions profile:
- In SmartDashboard, select > .
- In the window, click and then select l.
- In the window, configure permissions profile settings.
To change an existing permissions profile:
- In SmartDashboard, select > .
- In the window, click .
- In the window, configure permissions profile settings.
To delete an existing permissions profile:
- In SmartDashboard, select > .
- In the window, click .
- Click to confirm.
To configure permissions profile settings:
- In the section, select one of these options:
- enables access to the Security Management server and SmartConsole applications and Management Portal.
- enables access to the Security Management server using only Management Portal.
- In the section, select one of these options:
- - Full access to all Check Point products.
- - Can manage other administrators.
- lets an administrator with this Permissions Profile:
See all fields of DLP logs in SmartView Tracker.
See the messages or this incident. This includes permissions to read captured data, therefore, users must understand that their emails can be read if they violate corporate Data Loss Prevention rules.
Send or discard quarantined user emails from SmartView Tracker. With the option you can assign a subset of these permissions if necessary. You can give administrator permissions to only see the content of fields in DLP logs in SmartView Tracker and not see/send the actual content of incidents.
- gives read-only access to all Check Point products.
- gives user-defined access to the selected Check Point products and select permissions for each application.
Configuring Customized Permissions
If you select , you can define permissions for each Security Management resource (object, Policy and feature) separately. The resources show on four different panes in the window. Each pane contains a list of related resources.
To configure customized permissions:
- In the section, select and then click .
- Select a pane in the window:
- - Security Policy, blades and features
- - Monitoring and logging options
- - SmartEvent and SmartReporter features
- - SmartProvisioning features and scripting
- - Endpoint Security Policy management and Endpoint Security client deployment and management
- Set permissions for the resources:
- To prevent an administrator from seeing or configuring a resource, clear its checkbox.
- To let the administrator see a resource (but not change it), select its checkbox and then select .
- To let the administrator see and configure a resource, select its checkbox and then select .
Notes:
- You cannot prevent administrators from seeing some resources. These resources options are disabled.
- Some resources do not have permission selections. You can only select or clear them.
Managing Permissions Profiles
Security Management includes tools to help you manage permissions profiles. You can see information about the latest changes made to a permissions profile and see which administrators are using a permissions profile.
To see information about the latest changes to a permission profile:
- In SmartDashboard, select > .
- Select a permissions profile.
- In the window, click > .
The window opens.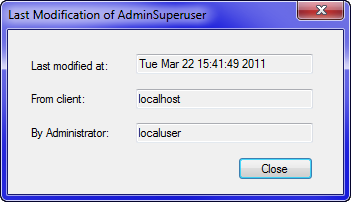
This window shows:
- Date of the latest change
- Administrator who made the change
- GUI client used to make the change
To see which administrators are using a permissions profile:
- In SmartDashboard, select > .
- Select a permissions profile.
- In the window, click > .
The window opens.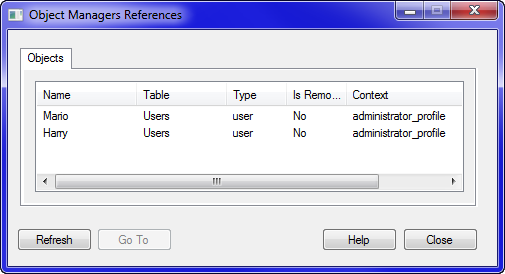
This window shows:
- All administrators using this permissions profile
- If you can delete this permissions profile


