


|
|
|
In This Section: |
As corporate structures grow in size, more network resources, machines, servers, routers etc. are deployed. It stands to reason that as the Security Policy possesses more and more network objects and logical structures (representing these entities), used in an increasing number of rules, it becomes more complex and more of a challenge for the system administrator to manage.
Because of the complexity of the Security Policy, many system administrators operate according to the "if it ain't broke, don't fix it" axiom:
These practices clutter and inflate the Security Policy and the databases unnecessarily, which invariably affects the performance of the Security Policy and the ability of the system administrator to manage it properly.
A simple, seamless solution is needed to facilitate the administration and management of the Security Policy by the system administrator. This easy-to-use policy management tool needs to take into account:
The Security Management server provides a wide range of tools that address the various policy management tasks, both at the definition stage and at the maintenance stage:
It is recommended to define a set of object naming and coloring conventions, which can significantly facilitate locating the object(s) you need. For example, if you use a prefix indicating the object's location (e.g. NYC_Mail_Server), you can easily group all objects by their location, by simply sorting the Object List pane's Name column. Similarly, you can implement a coloring convention that indicates which site an object belongs to, and then sort the relevant Object Tree's tab by color.
The New Policy Package window opens.
This below shows the Rule Base tabs corresponding to each policy type.
Policy Type |
Rule Base Tabs Displayed |
|---|---|
Firewall, Address Translation and Application Control and URL Filtering |
Welcome, Firewall, NAT, Application Control and URL Filtering, IPS, Data Loss Prevention, Anti-Spam & Mail, Mobile Access, and IPSec VPN |
Threat Prevention |
Welcome, Data Loss Prevention, IPS, Anti-Bot, Anti-Virus, Anti-Spam & Mail, Mobile Access The Threat Prevention policy package cannot be added to the global policy. It is a separate policy. |
QoS |
Welcome, IPS, Data Loss Prevention, Anti-Spam & Mail, Mobile Access, and QoS |
Desktop Security |
Welcome, IPS, Data Loss Prevention, Anti-Spam & Mail, Mobile Access, and Desktop |
SmartDashboard displays the new Policy Package, consisting of the selected policy type tabs.
The Select Policy Package Installation Targets window is displayed.
The selected modules will be available as installation targets whenever you install or uninstall this Policy Package.
The Add Policy to Package window appears.
The Header window is displayed.
The new section title is displayed in the appropriate location. All rules between this title and the next title (or the end of the Rule Base) are now visually grouped together.
The Rule Base Query Clause / View Policy of Gateway window is displayed.
The rules matching the query clause are displayed in the Rule Base, while all other rules are hidden.
The Save Query window is displayed.
The Rule Base Queries window is displayed, showing the new query in the SmartDashboard Queries List.
The Rule Base Queries window is displayed.
The rules matching this query are displayed in the Rule Base, while all other rules are hidden.
The Rule Base Query window is displayed.
The Rule Base Query Clause / View Policy of Gateway window is displayed.
The query is added to the Clause list.
The Network Objects window is displayed, showing All network objects in your system (the default selection) in the Network objects section. Alternatively, you can narrow down the display to the relevant object type (e.g. firewall installed, Check Point QoS installed etc.).
The objects that match the search criteria are displayed.
You can now easily locate the object(s) in question. For example, you can find services that are using the same port.
Policy Packages allow you to address the specific needs of your organization's different sites, by creating a specific Policy Package for each type of site. The following diagram illustrates an example organization's network, consisting of four sites.
Each of these sites uses a different set of Check Point Software Blades installed on the Security Gateways:
Even sites that use the same product may have very different security needs, requiring different rules in their policies.
To manage these different types of sites efficiently, you need three different Policy Packages. Each Package should include a combination of policies that correspond to the products installed on the site in question.
Accordingly, a Policy Package is composed of one or more of the following policy types, each controlling a different Check Point blade:
Unlike the above Policies, the Security Rule Base does not apply to a specific site but to the relationship between sites. Therefore, this Rule Base is common to all sites.
The Web Access Rule Base is independent of Policy Packages, since it applies to the organization as a whole (as opposed to a specific site). Its appearance in the Rule Base pane is determined by the Global Properties settings in SmartDashboard (see the SmartDashboard Customization page of the Global Properties window).
File operations (New, Open, Save etc.) are performed at the Policy Package level (as opposed to the single policy level).
|
Note - To back up a Policy Package before you modify it, use the Database Revision Control feature. Do not use File operations for backup or testing purposes, since they clutter the system with extraneous Packages. In addition, as there are multiple Packages but only one Objects Database, the saved Package may not correspond to changes in the Objects Databases. |
To install (and uninstall) Policy Packages correctly and eliminate errors, each Policy Package is associated with a set of appropriate installation targets. This association both eliminates the need to repeat the gateway selection process per installation, and ensures that Policy Package is not mistakenly installed on any inappropriate target.
The installation targets are defined for the whole Policy Package, thereby eliminating the need to specify them per-rule in each policy. The selected targets are automatically displayed every time you perform an Install or Uninstall operation.
You can set the Package's Policies to be either checked or unchecked by default for all installation targets (in the SmartDashboard customization page of the Global Properties window), and then modify these settings as needed per-installation.
Section Titles enable you to visually group rules according to their subjects. For example, medium-size organizations may have a single policy for all of their sites, and use Section Titles to differentiate between the rules of each site (larger organizations with more complex Policies may prefer to use Policy Packages). Arranging rules in sections must not come at the expense of placing the most commonly matched rules at the beginning of the Rule Base.
Querying rules can deepen your understanding of the policy and help you identify the most appropriate place for new rules. You can run queries on the Security, Desktop Security and Web Access Rule Bases.
A query consists of one or more clause statements. Each statement refers to the relationship between the selected object(s) and a specific column in the rule. You can apply the query to single objects, groups of objects or both. To further enhance the query, you can use the appropriate logical condition ("Negate", "And" or "Or").
Once you apply the query, only rules matching its criteria are displayed in the Rule Base. Rules that do not match the query are hidden, but remain an integral part of the policy and are included in its installation. You can refine these query results by running additional queries.
An example scenario in which Rule Base queries are useful is when a server running on host A is moved to host B. Such a change requires updating the access permissions of both hosts. To find the rules you need to change, you can run a query that searches for all rules where host A or host B appear in the Destination column.
By default, the query searches not only for rules that include these hosts, but also for rules that include networks or groups that contain them, as well as rules whose Destination is Any. Alternatively, you can search only for rules that explicitly include these objects.
The Network Objects query allows you to find objects that match the query criteria. You can use this query tool to both control and troubleshoot object-related issues.
The query lists either All objects in your system (the default selection) or a specific type of object (e.g. firewall installed, QoS installed, Security Clusters etc.). You can refine this list using a variety of filters (e.g. Search by Name, Search by IP etc.) and use wildcards in the string you search for.
In addition to these basic searches, you can also perform more advanced queries for:
|
Note - Objects that are used by entities defined on an LDAP server are considered by the query as "not used". |
You can further benefit from the query results by defining them as a group. For example, you may wish to create a group of all Mail Servers in your system and use this group in your Rule Base. If your naming convention is to include the word "Mail" in a Mail Server's name, you can easily find these objects by showing All network objects, choosing the Search by Name filter and entering the string *Mail*. Then create a group out of the results and use it in the appropriate rule.
This group object is also available through other Check Point SmartConsoles. For example, if you are using the SmartReporter, you can include this group as the source of connections in the Email Activity report.
The Objects Tree features a right-click Sort menu, allowing you to sort each tab by type (the default selection), name or color. This sort parameter applies to the Objects List pane as well. In addition, the Objects List pane can be sorted by clicking the relevant column's title.
Sorting can be a useful troubleshooting tool, for example:
A Policy Package is a set of Policies that are enforced by the Security Gateways. They can be installed or uninstalled together on selected Security Gateways. The Policy Package components include:
The installation process does the following:
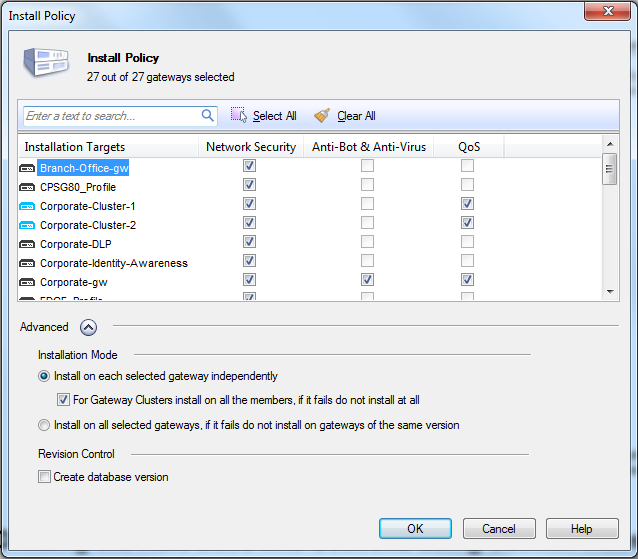
To install a Policy Package:
The Install Policy window is displayed.
|
Note - The Policy to be installed includes implied rules, resulting from the Global Properties settings. To view the implied rules, select View > Implied Rules from the menu. |
- Install on each gateway independently, or
- Install on all gateways, or on none of the gateways
|
Note - If you are installing the Policy on a gateway Cluster, specify if the installation must be successful for all Cluster Members. |
The Installation Process window is displayed, allowing you to monitor the progress of the verification, compilation and installation.
If the verification is completed with no errors and the Security Management server is able to connect to the gateway securely, the Policy installation succeeds.
If there are verification or installation errors, the installation fails (in which case you can view the errors to find the source of the problem).
If there are verification warnings, the installation succeeds with the exception of the component specified in the warning.
To find out which Policy is installed on each Gateway, select File > Installed Policies...
To uninstall a Policy Package:
The Uninstall Policy window is displayed.
|
Note - Uninstalling the Policy removes its implied rules as well. |
The Uninstall window is displayed, allowing you to monitor the progress of the operation. You are notified whether the uninstall has been completed successfully or has failed, and if so, for what reason.
The changes you make through SmartDashboard to user or administrator definitions are saved to the User Database on the Security Management server.
To provide your Check Point hosts with installed Management Software Blades with the latest user definitions, you must install the User Database on all relevant targets. Security Gateways that do not have an installed Management Software blade do not receive the User Database.
Choose one of the following options:
Policies are created by the system administrator and managed via the Security Management server. Different versions of these policies can be saved. Each version includes backups of the various databases (objects, users, Certificate Authority data, etc.). This information is zipped and saved.
The existing versions are recorded in a "Version table". This table can be viewed and the versions which are displayed can be modified. It is possible to:
Versions can be created manually by the system administrator, or the system can be set to automatically create a new version every time Security Policy installation takes place.
Important - The Revision Control feature is not supported when the Security Management database contains VSX objects. You must not select the Create database version option in SmartDashboard when you install a policy.
A new version can be created manually by the system administrator, or the system can be set to create new versions automatically every time a new policy is installed. Each new version has the following attributes:
|
Note - It is recommended to create a version before upgrading the system. This enables the administrator to back out to a functioning environment in case of problems during the upgrade operation. |
It is possible to export existing versions using the Command Line. This can be useful in order to save disk space. When the exported version is necessary, it can be imported back into the Versions table. The imported version appears in the version table as a regular maintained version.
A saved version can be viewed in SmartDashboard. For every saved version you can view certain entities such as objects, users, rules. Various operations, such as queries can be executed on these entities.
The revert operation allows you to revert to a previously saved version. Once you initiate the revert operation, the selected version overwrites the current policy. The one type of information that is not overwritten, is Certificate Authority (CA) data. For security reasons, CA data is not overwritten, but it is merged with the CA data of the current policy.
Before the revert operation is done, the system administrator can expect to receive a report on the expected outcome of the revert operation. For example, information certificates that are going to be revoked is supplied. At this point it is necessary for the system administrator to decide whether or not to continue with the revert operation. Of all the entities included in the reverted version, the user database is not automatically reverted. This is because the users database is extremely dynamic; users are added and deleted frequently. The user database is always changing regardless of the policy version. The system administrator can decide to revert to a selected Policy version, but to maintain the current users database. In this manner, the current user base is used with the restored Policy.
A previously saved version can be deleted. This operation will also delete the various databases included in the policy version.
Version Operations are performed via the Database Revision Control window. This window can be accessed by selecting File > Database Revision Control.
In this window you can:
You can configure how to automatically delete old database versions by selecting one of the four options:
|
Note - SmartWorkflow versions are not affected by this feature. They are neither counted nor deleted. |
After upgrade, the DataBase revision control cannot be used to restore versions created by the previous management server. Previous versions can be opened in Read Only mode for viewing purposes only.
The success or failure of version operations that require modification of the Versions table (such as creating, reverting to or deleting a version) are audited in the audit log of the SmartView Tracker. It is recommended to make use of these logs to ensure that operations have taken place successfully.
Saved versions require disk space. If the existing disk space is exhausted, a threshold alert is sent to the SmartView Monitor. Use this SmartConsole in order to make sure that you meet the disk space requirements needed to implement the versioning feature.
It is possible to create a new version of the current policy by clicking Create in the Database Revision Control window.
Alternately, new versions can be configured to be created automatically every time a policy is installed. You can do this by selecting Create new version upon install policy operation in the Install Policy window. You can access this window by selecting Policy > Install.
The Backup and Restore operation exports the Security Management server environment from the Security Management server, and allows it to be imported to another machine. This other machine is a working clone of the Security Management server. It has identical functionalities and capabilities as the original Security Management server. This operation supports Operating System (OS) migration, meaning that the OS of the original, as well as the clone machines can be different.
Using the Backup and Restore feature it is possible to:

