


|
|
|
In This Section: |
R77 SmartDashboard introduces a new Gateways view that lets you:
A compressed .tgz
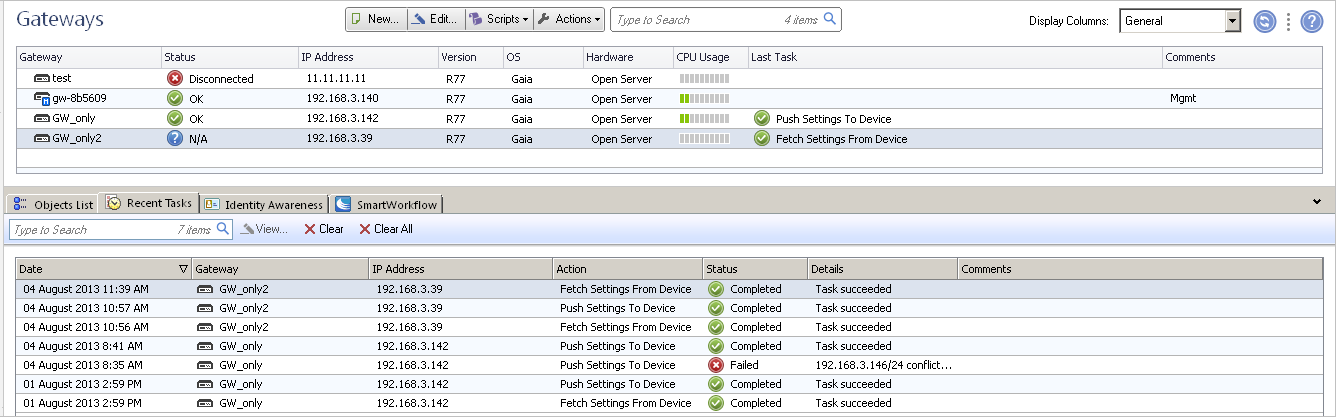
The Recent Tasks tab, located in the bottom section of SmartDashboard, shows recent Gaia Security Gateway management tasks done using SmartDashboard.
Output from the commands shows in the Recent Tasks window. Double-click the task to see the complete output.
The Status column in the Gateways view indicates changes in the device configuration
To enable central device management:
Open the gateway Properties window.
Below Topology:
Note:
For more on creating Gaia Cloning Groups, see the R77 Gaia Administration Guide.
From the Firewall tab > Gateways view, you can:
The Gateways view has configurable Display Columns:
Display Column |
Shows |
|---|---|
General |
|
Network Services |
|
Monitoring |
|
Device info |
|
After enabling Central management, Gaia gateways can be more effectively managed through SmartDashboard.
One Time scripts
You can manually enter and run a command line script on the selected Gaia Security Gateways. This feature is useful for scripts that you do not have to run on a regular basis.
To run a one time script:
You can:
Note:
The output from the script shows in the Recent Tasks tab > Details column.
Note:
Run Repository Script
You can run a predefined script from a repository.
To run a Repository script:
You can:
Note: The Select Script window does not support interactive or continuous scripts. To run interactive or continuous scripts, open a command shell.
The output from the script shows in the Recent Tasks tab > Details column.
Manage repository scripts
You can create new scripts, edit or delete scripts from the script repository.
To manage scripts:
Note: You can also run and manage scripts by clicking Scripts in the Gateways view.
These options let you:
To back up a configuration:
The Backup window opens.
The backup location can be on the local gateway or a remote server.
If the location is a remote server, enter the:
For example: /ftproot/backup/
Or just (/) for the root directory of the server.
The status of the Backup operation shows in Recent Tasks.
When the task is complete, double-click the entry to see the file path and name of the backup file.
Note: This name is necessary to do a system restore.
To backup multiple Security Gateways, select them in the Gateways view and click Actions > Backup and Restore > Backup.
To restore a configuration:
The Restore window opens.
If you cannot find the name of the file in Recent Tasks, or did not save the file name after completing the backup process:
show backup logsThe file will be named according to this convention:
backup_<name of gateway object>_<date of backup>.tgz
If the location is a remote server, enter the:
For example: /ftproot/backup/
Or just (/) for the root directory of the server.
The status of the restore operation shows in Recent Tasks.
Maintenance has four options:
You can select them from the right-click menu of a gateway, or from the Actions button.
Open Shell
From SmartDashboard, you can open a command line window on the gateway.
To open a command line window on the gateway:
A command line window opens.
Open WebUI
From SmartDashboard, you can open a gateway WebUI.
To open a gateway WebUI:
The WebUI opens in the default browser.
The URL is taken from the Gateway Properties > Platform Portal page.
Fetch Settings from Device
Settings on the device can be changed through the WebUI or by opening the Gaia command shell, clish. After settings have been changed on the device, a mismatch exists between the actual device settings and those shown in SmartDashboard. The Status column in the Gateways view shows one of these messages:
Status Message |
Meaning |
|---|---|
OK |
The settings shown in SmartDashboard match those of the device. |
SIC not established |
No Secure Internal Communication between the management and the Security Gateway. |
Disconnected |
No connection between the Security Management and the gateway |
Local Change Detected |
Device settings have been changed through the WebUI or command shell (clish).
|
Device Settings Conflict |
Device settings changed simultaneously in SmartDashboard and WebUI/ clish.
|
No license |
No License or License Expired. See SmartView Monitor for more details. |
Policy is Not installed |
|
Attention |
See SmartView Monitor for more details. |
Above Threshold |
See SmartView Monitor for more details. |
Refreshing... |
|
Waiting... |
|
To update the settings shown in SmartDashboard:
The settings fetched are:
The status of the fetch operation shows in Recent Tasks.
Note: You must run Fetch settings from device after creating a new Gaia gateway from the Gateways view.
Push Settings to device
Settings configured in SmartDashboard can be transferred to the Gaia device by:
The recommended method.
An advanced option that only installs device settings, not the full security policy. This is useful for changing DNS or NTP server settings without the overhead of a full policy install. Only the configuration changes are pushed.
Note: If you change an IP interface address, do a full policy install rather than push the settings to the device.
To push settings to the device:
The settings pushed are:
The status of the push operation shows in Recent Tasks.
The Central Device Management Actions that you can run on a Gaia gateway can also be run on a Gaia cluster, but with these differences:
Action |
On a gateway |
On a cluster object in SmartDashboard |
|---|---|---|
Backup |
Backs up the Gaia OS configuration and the firewall database to a compressed file |
This option is:
|
Restore |
Restores the Gaia OS configuration and the firewall database from a compressed file |
This option is:
|
Fetch settings from device |
Gets these settings from the device:
|
This option is:
|
Push settings to device |
Pushes these settings to the device:
|
This option is:
|
Gaia Cloning Groups let you manage multiple Gaia devices from the Gateways view in SmartDashboard.
A Cloning Group is a collection of Gaia gateways that share the same OS configuration and settings for a set of shared features. DNS or ARP are examples of shared features. OS configuration and the configuration of shared features is automatically synchronized between the member gateways.
To run Central Device Management Actions on a cluster (ClusterXL or VRRP), you must first configure the cluster as a Gaia Cloning Group.
This table summarizes the relation between the Gaia Cloning Group feature and SmartDashboard Central Device Management capabilities:
SmartDashboard object type |
When Central Device Management enabled |
When Central Device Management disabled |
|---|---|---|
Single gateway object |
Do not add gateways to a Cloning Group if you want to run Central Device Management Actions on them. |
In the WebUI or through clish, optionally configure a Cloning Group to manage Gaia features across several gateways. |
Cluster Object |
Members must be part of the same Cloning Group |
In the WebUI or through clish, optionally configure a Cloning Group to manage Gaia features across several gateways. |
Important: When managing a cluster, a matching Cloning Group must be defined consisting of the exact same members as the cluster. Do not add other gateways.
For more on creating Gaia Cloning Groups, see the R77 Gaia Administration Guide.

