Upgrading Security Management Server and Security Gateways
Upgrading Standalone
This section explains how to upgrade a standalone (Security Management Server and Security Gateway installed on one appliance or computer). A Security Management Server upgraded to R77 can enforce and manage Gateways from earlier versions. Some new features are not available on earlier versions (see the "Compatibility Tables" in the Release Notes).
Upgrading Standalone Appliances
You can upgrade a Standalone deployment on UTM-1 appliances, certain 2012 Models, and IP appliances.
UTM-1 and 2012 Models
When you upgrade the Check Point release version on the appliance you can also upgrade from SecurePlatform to Gaia. Alternatively, you can upgrade Check Point release version and stay with the SecurePlatform operating system.
SecurePlatform to Gaia

|
Note - When upgrading from SecurePlatform to Gaia, the size of the disk partitions does not change. To have larger disk partitions, you need to do a clean installation of Gaia.
|
You can upgrade from the SecurePlatform operating system to the Gaia operating system.
To upgrade a SecurePlatform appliance:
- Upgrade product licenses to R75 or higher, and attach the licenses to the appliance.
- Download the appliance upgrade package.
Check_Point_upg_WEBUI_and_SmartUpdate_R77.Gaia.tgz - Connect to the SecurePlatform appliance from a Web browser to
https://<appliance_ip_address> - In the login page, enter an administrator username and password.
- Go to the page.
- Upload the appliance upgrade package to the appliance.
- Ignore any warning messages.
- Continue according to the on-screen instructions.
After the upgrade is complete, the appliance boots to Gaia.
|
Note - The connection to the SecurePlatform Portal closes after Gaia is installed.
|
- Install the Policy on the Security Gateway. This is highly recommended. The Security Gateway enforces the Initial Policy until you install the Policy:
- Using SmartDashboard of the correct version, connect to the Security Management Server.
- Open the page of the Gateway object.
- Click to update the details.
- Install the policy on the Gateway.
If the Gaia appliance has more than 4 GB of memory, it automatically boots to the 64-bit edition. Otherwise, it boots to the 32-bit edition.
If you upgrade and the appliance has more than 4 GB, the appliance boots to the 32-bit edition. You can configure Gaia to automatically boot to the 64-bit edition.
To configure Gaia to automatically boot to the 64-bit edition:
- Run
set edition default 64-bit - Run
save config - Reboot
|
Note - The appliance must have at least 6 GB of memory for this to work.
|
To see which edition is running:
- Go to the Portal pane. The edition shows in the widget.
- OR: Run
show version os edition
SecurePlatform to SecurePlatform
Use the Portal of the appliance to upgrade Standalone UTM-1 and 2012 Model appliances.
To upgrade appliances using the Portal:
- Open Internet Explorer and log in to the appliance.
- Select > .
- Click .
The Internet browser opens to the Check Point Support Center.
- Search for and download the R77 upload package file.
- In the Portal, click Upload upgrade package to appliance.
The Upload Package to Appliance window opens.
- Select the upgrade file:
Check_Point_upg_Portal_and_SmartUpdate_R77.SecurePlatform.tgz - Click .
- Click Start Upgrade.
- Before the upgrade begins, an image is created of the system and is used to revert to in the event the upgrade is not successful.
The Save an Image before Upgrade page, displays the image information.
Click Next.
- In the Safe Upgrade section, select Safe upgrade to require a successful login after the upgrade is complete. If no login takes place within the configured amount of time, the system will revert to the saved image.
Click Next.
- The Current Upgrade File on Appliance section displays the information of the current upgrade.
- To begin the upgrade, click Start.
IP Appliances
IPSO to Gaia
To learn how to upgrade an IP Appliance from IPSO to Gaia, see sk69643.
IPSO to IPSO
IPSO 6.2 MR4 or above is required. To learn how to upgrade IPSO, see the IPSO 6.2 MR4 Release Notes.
Before upgrading from R75.4x, you must disable and delete unnecessary packages.
To disable and delete unnecessary packages:
- In Network Voyager, go to .
- Disable these packages:
- Management Enhancements plugin
- SFW R75 Plug-in Blade
- CPSG 80 Series compatibility package R71.20
- Click .
- Delete the disabled plugins and compatibility package.
Downloading the Package
After you download the correct package to an FTP site or local disk, use Network Voyager to put the package on the appliance. In Network Voyager of the appliance, open . Use the upload procedure that fits: FTP or local disk (the Network Voyager computer).
To upload from an FTP site:
- In the Voyager Install Package window, select FTP.
- Enter the name or IP address of the FTP server.
- Enter the path to the directory on the FTP server where the packages are stored.
- If necessary, enter the applicable user name and password.
- Click . The names of the available packages show in the window.
- Select the package and click .
- In the window, click .
To upload from a local disk:
- In the Voyager Install Package window, select Upload.
- Click Browse and navigate to the package .tgz file.
- Click Apply.
- Select the package .tgz file in the Unpack Package window and click Apply.
- In the window, click .
To upgrade Security Management Server with Network Voyager:
- Click the Click here to install/upgrade link to continue with the installation.
- In the Package Installation and Upgrade pane, select Upgrade and then click Apply.
- Click the Install Package branch in the Voyager tree to see the installation progress.
- Go to the page.
- The R77 and Check Point CPInfo packages are automatically activated during installation (disk-based appliances only).
- Enable other packages, with the compatibility packages, as needed for your deployment.

|
Important - When you install a package using Network Voyager, this message shows:
Voyager environment has been updated with the latest package info.
The telnet session environment will be updated by:
logging out and logging in again the telnet session.
|
This message can be misleading. Click to verify that the package is actually installed correctly. Refresh the page periodically until you see that the installation is complete.
|
- Log out of Network Voyager and then log in again.
To upgrade Security Management Server with clish:
- Access the CLI console, and log in.
- Type
newpkg - Use the FTP menu option to transfer the R77 package. Choose the option:
Upgrade from an old package - Upgrade to the R77 package.
Wait until a message informs you that the process is complete.
- Type
rebootThe package is activated after the reboot.
To verify that R77 is active and is the current version:
- Verify that R77 is active. Run
newpkg –q - Verify that R77 is the current version. Run
fw verfwm ver
Upgrading Standalone Open Servers
Before you upgrade:
SecurePlatform to Gaia
Use this procedure to upgrade a SecurePlatform computer on to a Gaia computer. Upgrade the operating system and the installed products.
Important: SecurePlatform cannot be upgraded to Gaia if you have dynamic routing configured. For more, see: sk76840.
|
Note - When upgrading from SecurePlatform to Gaia, the size of the disk partitions does not change. To have larger disk partitions, you need to do a clean installation of Gaia.
|
To upgrade an open server using the DVD:
- Upgrade your product licenses to R75 or higher, and attach the licenses to the Security Gateway or standalone server.
- Insert the R77 DVD into the drive.
- At the command prompt, enter:
patch add cd - Select the Gaia upgrade package.
- Confirm the MD5 checksum.
- If relevant, when prompted, create a backup image for automatic revert.
- After extracting files, the Installation program opens.
- Accept the license agreement.
- Select .
- Configure your contract options.
You can also continue without contract information and configure it later using SmartUpdate.
- Select a source for the upgrade utilities.
Wait for the pre-upgrade verifier to complete successfully.
- Select .
- Select , or , and confirm.
- Wait while the required installation files are extracted.
- Part one of the upgrade procedure saves data and upgrades the operating system.
- Part two upgrades Check Point products.
- After the upgrade completes successfully, remove the DVD from the drive.
- Reboot when prompted.
- Install the Policy on the Security Gateway. This is highly recommended. The Security Gateway enforces the Initial Policy until you install the Policy:
- Using SmartDashboard of the correct version, connect to the Security Management Server.
- Open the page of the Gateway object.
- Click to update the details.
- Install the policy on the Gateway.
To upgrade a SecurePlatform Open Server using the Portal:
- Open Internet Explorer and log in to the SecurePlatform Portal.
- Select > .
- Click .
The Internet browser opens to the Check Point Support Center.
- Search for and download the R77 file for upgrades via the Portal.
- Click and select the upgrade file:
Check_Point_upg_Portal_and_SmartUpdate_R77.Gaia.tgz - Click .
The package is uploaded to the SecurePlatform computer.
After the shows that the Uploading is Completed you can start the upgrade.
- Recommended: In the section, click . The snapshot is used to revert the system if the upgrade is not successful.
- Click .
Follow the . After the upgrade, the computer automatically reboots.
|
Note - The connection to the SecurePlatform Portal closes after Gaia is installed.
|
- Install the Policy on the Security Gateway. This is highly recommended. The Security Gateway enforces the Initial Policy until you install the Policy:
- Using SmartDashboard of the correct version, connect to the Security Management Server.
- Open the page of the Gateway object.
- Click to update the details.
- Install the policy on the Gateway.
SecurePlatform to SecurePlatform
Use this procedure to upgrade a SecurePlatform installation on the same computer. Upgrade the operating system and the installed products.
To upgrade a SecurePlatform Open Server using a DVD:
- Insert R77 DVD into the drive.
- At the command prompt, enter:
patch add cd - Select SecurePlatform R77 Upgrade Package
Check_Point_Install_and_Upgrade_R77.SecurePlatform_Open_Server.iso - Press
- Optional: When prompted, create a backup image so that you can restore the old version.
|
Note - Creating the snapshot image can take a long time. Check Point products are stopped during this time.
|
- Press at the welcome message.
- Press to accept the license agreement.
- In the next window, select and then press .
- In the next window, press to continue.
- If prompted to download or import a valid support contract, select . Press to continue.
- If a message shows that says your gateway is not eligible for upgrade, press to continue.
You can safely ignore this message and use SmartUpdate to update your service contract later.
- In the next window, select .
- In the window, press to continue.
If the Pre-Upgrade Verification fails, do the suggested steps to correct the problem. Start this procedure again from step 2.
- When prompted, select processes and press to continue.
- When prompted, select and press to continue
- In the window, press .
- When the upgrade completes successfully, restart the computer.
To upgrade a SecurePlatform Open Server using the Portal:
- Open Internet Explorer and log in to the SecurePlatform Portal.
- Select > .
- Click .
The Internet browser opens to the Check Point Support Center.
- Search for and download the R77 file for upgrades via the Portal.
- Click and select the upgrade file:
Check_Point_upg_Portal_and_SmartUpdate_R77.SecurePlatform.tgz - Click .
The package is uploaded to the SecurePlatform computer.
After the shows that the Uploading is Completed you can start the upgrade.
- Recommended: In the section, click . The snapshot is used to revert the system if the upgrade is not successful.
Your browser will automatically try to perform the first login immediately after the upgrade. To allow this, do not close the browser window or browse to another page.
- Click .
Follow the . After the upgrade, the computer automatically reboots.
- Install the Policy on the Security Gateway. This is highly recommended. The Security Gateway enforces the Initial Policy until you install the Policy:
- Using SmartDashboard of the correct version, connect to the Security Management Server.
- Open the page of the Gateway object.
- Click to update the details.
- Install the policy on the Gateway.
Windows to Windows
Use this procedure to upgrade a Windows installation on the computer. Upgrade the installed products.
To upgrade a Windows standalone computer:
- Insert the R77 DVD into the drive. The Installation Wizard starts automatically.
If the wizard does not start automatically, manually run setup.exe from the DVD drive.
- Click at the welcome message.
- Accept the license agreement and click .
- Select and click .
- On the next screen, click .
- If prompted to download or import a valid support contract, select . Click to continue.
- If a message shows that says your gateway is not eligible for upgrade.
You can safely ignore this message and use SmartUpdate to update your service contract later. Click .
- Select and click .
- In the window, click .
If the Pre-Upgrade Verification fails, do the suggested steps to correct the problem. Start this procedure again from step 2.
- When prompted to add new products, clear and then click .
You can add new products at a later time.
- Click at the confirmation message.
- When the installation completes successfully, click .
- When prompted, restart the computer.
Upgrading the Security Management Server
You do not have to upgrade the Security Management Server and all of the Gateways at the same time. When the Security Management Server is upgraded, you can still manage Gateways from earlier versions (though the Gateways may not support new features).
|
Important - To upgrade to R77 Gaia, make sure there is enough free disk space in /var/log
|
Use the Pre-Upgrade Verification tool to reduce the risk of incompatibility with your existing environment. The Pre-Upgrade Verification tool generates a detailed report of the actions to take before an upgrade.
There are different upgrade methods for the Security Management Server:
- Upgrade Production Security Management Server
- Migrate and Upgrade to a New Security Management Server
|
Important - After upgrade, you cannot restore a version with a database revision that was made with the old version. You can see old version database saves in Read-Only mode.
|
Upgrading Security Management Server on Appliances
You can upgrade a Security Management Server on some Smart-1 appliances and open servers.
Smart-1
You can upgrade a Smart-1 appliance from SecurePlatform to Gaia, or you can upgrade the SecurePlatform version.
SecurePlatform to Gaia
|
Note - When upgrading from SecurePlatform to Gaia, the size of the disk partitions does not change. To have larger disk partitions, you need to do a clean installation of Gaia.
|
You can upgrade from the SecurePlatform operating system to the Gaia operating system.
To upgrade a SecurePlatform appliance:
- Upgrade product licenses to R75 or higher, and attach the licenses to the appliance.
- Download the appliance upgrade package.
Check_Point_upg_WEBUI_and_SmartUpdate_R77.Gaia.tgz - Connect to the SecurePlatform appliance from a Web browser to
https://<appliance_ip_address> - In the login page, enter an administrator username and password.
- Go to the page.
- Upload the appliance upgrade package to the appliance.
- Ignore any warning messages.
- Continue according to the on-screen instructions.
After the upgrade is complete, the appliance boots to Gaia.
|
Note - The connection to the SecurePlatform Portal closes after Gaia is installed.
|
- Install the Policy on the Security Gateway. This is highly recommended. The Security Gateway enforces the Initial Policy until you install the Policy:
- Using SmartDashboard of the correct version, connect to the Security Management Server.
- Open the page of the Gateway object.
- Click to update the details.
- Install the policy on the Gateway.
SecurePlatform to SecurePlatform
Use the WebUI of the appliance to upgrade Security Management Server Smart-1 and 2012 Model appliances.
To upgrade appliances using the Portal:
- Open Internet Explorer and log in to the appliance.
- Select > .
- Click .
The Internet browser opens to the Check Point Support Center.
- Search for and download the R77 upload package file.
- In the Portal, click Upload upgrade package to appliance.
The Upload Package to Appliance window opens.
- Select the upgrade file:
Check_Point_upg_Portal_and_SmartUpdate_R77.SecurePlatform.tgz - Click .
- Click Start Upgrade.
- Before the upgrade begins, an image is created of the system and is used to revert to in the event the upgrade is not successful.
The Save an Image before Upgrade page, displays the image information.
Click Next.
- In the Safe Upgrade section, select Safe upgrade to require a successful login after the upgrade is complete. If no login takes place within the configured amount of time, the system will revert to the saved image.
Click Next.
- The Current Upgrade File on Appliance section displays the information of the current upgrade.
- To begin the upgrade, click Start.
IP Appliances
For the IP Appliance models that are supported for this release, see the R77 Release Notes.
IPSO to Gaia
To learn how to upgrade an IP Appliance from IPSO to Gaia, see sk69643.
IPSO to IPSO
IPSO 6.2 MR4 or above is required. To learn how to upgrade IPSO, see the IPSO 6.2 MR4 Release Notes.
Before upgrading from R75.4x, you must disable and delete unnecessary packages.
To disable and delete unnecessary packages:
- In Network Voyager, go to .
- Disable these packages:
- Management Enhancements plugin
- SFW R75 Plug-in Blade
- CPSG 80 Series compatibility package R71.20
- Click .
- Delete the disabled plugins and compatibility package.
Downloading the Package
After you download the correct package to an FTP site or local disk, use Network Voyager to put the package on the appliance. In Network Voyager of the appliance, open . Use the upload procedure that fits: FTP or local disk (the Network Voyager computer).
To upload from an FTP site:
- In the Voyager Install Package window, select FTP.
- Enter the name or IP address of the FTP server.
- Enter the path to the directory on the FTP server where the packages are stored.
- If necessary, enter the applicable user name and password.
- Click . The names of the available packages show in the window.
- Select the package and click .
- In the window, click .
To upload from a local disk:
- In the Voyager Install Package window, select Upload.
- Click Browse and navigate to the package .tgz file.
- Click Apply.
- Select the package .tgz file in the Unpack Package window and click Apply.
- In the window, click .
To upgrade Security Management Server with Network Voyager:
- Click the Click here to install/upgrade link to continue with the installation.
- In the Package Installation and Upgrade pane, select Upgrade and then click Apply.
- Click the Install Package branch in the Voyager tree to see the installation progress.
- Go to the page.
- The R77 and Check Point CPInfo packages are automatically activated during installation (disk-based appliances only).
- Enable other packages, with the compatibility packages, as needed for your deployment.
|
Important - When you install a package using Network Voyager, this message shows:
Voyager environment has been updated with the latest package info.
The telnet session environment will be updated by:
logging out and logging in again the telnet session.
|
This message can be misleading. Click to verify that the package is actually installed correctly. Refresh the page periodically until you see that the installation is complete.
|
Log out of Network Voyager and then log in again.
To upgrade Security Management Server with clish:
- Access the CLI console, and log in.
- Type
newpkg - Use the FTP menu option to transfer the R77 package. Choose the option:
Upgrade from an old package - Upgrade to the R77 package.
Wait until a message informs you that the process is complete.
- Type
rebootThe package is activated after the reboot.
To verify that R77 is active and is the current version:
- Verify that R77 is active. Run
newpkg –q - Verify that R77 is the current version. Run
fw verfwm ver
Upgrading Security Management Server on Open Servers
A Security Management Server on any computer that meets the minimum requirements can be upgraded. You can upgrade from SecurePlatform to Gaia, or you can upgrade the SecurePlatform version. On Windows and Linux Security Management Servers, you can upgrade the installed Check Point products.
Before you upgrade:
It is recommended to back up your configuration.
SecurePlatform to Gaia
Use this procedure to upgrade the SecurePlatform operating system to Gaia, and to upgrade the installed products.
Important: SecurePlatform cannot be upgraded to Gaia if you have dynamic routing configured. For more, see: sk76840.
|
Note - When upgrading from SecurePlatform to Gaia, the size of the disk partitions does not change. To have larger disk partitions, you need to do a clean installation of Gaia.
|
To upgrade Security Management Server on Gaia open servers:
- Upgrade product licenses to R75 or higher, and attach the licenses to the appliance.
- Connect a DVD drive to the USB port on the computer.
- Run:
patch add cd - Select the Gaia upgrade package.
- Confirm the MD5 checksum.
- When prompted, create a backup image for automatic revert.
After extracting files, the Installation program opens.
- Accept the license agreement.
- Select .
- Configure your contract options.
You can also continue without contract information and configure it later using SmartUpdate.
- Select a source for the upgrade utilities.
Wait for the pre-upgrade verifier to complete successfully.
- Select .
- Select , or , and confirm.
- Wait while the required installation files are extracted.
- Part one of the upgrade procedure saves data and upgrades the operating system.
- Part two upgrades Check Point products.
- After the upgrade completes successfully, remove the DVD from the drive.
- Restart when prompted.
- Install the Policy on the Security Gateway. This is highly recommended. The Security Gateway enforces the Initial Policy until you install the Policy:
- Using SmartDashboard of the correct version, connect to the Security Management Server.
- Open the page of the Gateway object.
- Click to update the details.
- Install the policy on the Gateway.
To upgrade a SecurePlatform Open Server using the Portal:
- Open Internet Explorer and log in to the SecurePlatform Portal.
- Select > .
- Click .
The Internet browser opens to the Check Point Support Center.
- Search for and download the R77 file for upgrades via the Portal.
- Click and select the upgrade file:
Check_Point_upg_Portal_and_SmartUpdate_R77.Gaia.tgz - Click .
The package is uploaded to the SecurePlatform computer.
After the shows that the Uploading is Completed you can start the upgrade.
- Recommended: In the section, click . The snapshot is used to revert the system if the upgrade is not successful.
- Click .
Follow the . After the upgrade, the computer automatically reboots.
|
Note - The connection to the SecurePlatform Portal closes after Gaia is installed.
|
SecurePlatform to SecurePlatform
Use this procedure to upgrade a SecurePlatform installation on the same computer. Upgrade the operating system and the installed products.
To upgrade a SecurePlatform Open Server using a DVD:
- Insert R77 DVD into the drive.
- At the command prompt, enter:
patch add cd - Select SecurePlatform R77 Upgrade Package
Check_Point_Install_and_Upgrade_R77.SecurePlatform_Open_Server.iso - Press
- Optional: When prompted, create a backup image so that you can restore the old version.
|
Note - Creating the snapshot image can take a long time. Check Point products are stopped during this time.
|
- Press at the welcome message.
- Press to accept the license agreement.
- In the next window, select and then press .
- In the next window, press to continue.
- If prompted to download or import a valid support contract, select . Press to continue.
- If a message shows that says your gateway is not eligible for upgrade, press to continue.
You can safely ignore this message and use SmartUpdate to update your service contract later.
- In the next window, select .
- In the window, press to continue.
If the Pre-Upgrade Verification fails, do the suggested steps to correct the problem. Start this procedure again from step 2.
- When prompted, select processes and press to continue.
- When prompted, select and press to continue
- In the window, press .
- When the upgrade completes successfully, restart the computer.
To upgrade a SecurePlatform Open Server using the Portal:
- Open Internet Explorer and log in to the SecurePlatform Portal.
- Select > .
- Click .
The Internet browser opens to the Check Point Support Center.
- Search for and download the R77 file for upgrades via the Portal.
- Click and select the upgrade file:
Check_Point_upg_Portal_and_SmartUpdate_R77.SecurePlatform.tgz - Click .
The package is uploaded to the SecurePlatform computer.
After the shows that the Uploading is Completed you can start the upgrade.
- Recommended: In the section, click . The snapshot is used to revert the system if the upgrade is not successful.
Your browser will automatically try to perform the first login immediately after the upgrade. To allow this, do not close the browser window or browse to another page.
- Click .
Follow the . After the upgrade, the computer automatically reboots.
Linux to Linux
To upgrade a Linux Open Server using a DVD:
- Before upgrading, make sure your Security Management Server is eligible for upgrade. Go to the User Center and make sure you have a valid license and support contract.
- Download the ISO file for upgrading to R77 from the R77 home page.
- Burn the ISO file onto a DVD.
- Insert DVD into the drive.
- At the root prompt, create a mount point and mount the DVD. Run:
mkdir /mnt/cdrom
mount -ro loop /dev/cdrom /mnt/cdrom
- Go to the mount directory, and look at the files. Run:
cd /mnt/cdrom/
ls -l - Run:
./UnixInstallScript - Press to accept the license agreement.
- In the next window, select and press to continue.
- The upgrade script does a check to see if the Security Management Server is eligible for upgrade.
If your Security Management Server does not have a valid license and contract you are required to either or .
Install a contract file and restart the upgrade script.
- If contract verification succeeds, press to continue.
- In the next window, select and press .
- The pre-upgrade verifier runs.
If the verification fails, we recommend that you review the file, fix the problems, and restart the upgrade.
- If the Pre-Upgrade Verification succeeds, press to continue.
- When prompted, select s and press .
- When prompted, select and press
- In the window, press .
- When the upgrade completes successfully, restart the computer.
Windows to Windows
Before you begin, back up the server.
To upgrade a Windows Security Management Server:
- Insert the R77 DVD.
- If the upgrade does not start automatically, run Setup.exe from the DVD.
- Click Next to start the installation wizard.
- Accept the license agreement and click Next.
- Click Next to check your license information.
- From the Upgrade Options screen, select Upgrade and click Next.
- Follow the support contract and upgrade utility screens.
- When the pre-upgrade verification recommendation appears, select to execute the Pre-upgrade Verification Tool.
- Select Add new products and click Next.
Note - SmartReporter is installed by default, if it was not installed before.
Depending on the components you have chosen to install, you may need to install other components. Follow the instructions.
A list of the products that will be upgraded appears. Click Next.
The new components are installed and the Security Management Server is upgraded. The progress of each component is indicated in the progress bar. Upon completion, a summary appears.
Note - In Windows Server 2003, if Microsoft.Net framework 2.0 is not installed, it will be installed before the Check Point components.
- Follow the instructions for license management and fingerprint handling.
- Click Finish.
- When prompted, restart the Security Management Server.
Upgrading Endpoint Security
To upgrade to R77 with E80.50 from E80.40 or higher, use the upgrade or advanced upgrade and migration procedures for Security Management Servers in this guide.
Upgrading Security Gateways
You can upgrade Security Gateways using one of these methods:
- SmartUpdate: Centrally upgrade and manage Check Point software and licenses from a SmartConsole client.
- Local Upgrade: Do a local upgrade on the Security Gateway itself.
Upgrading Gateways using SmartUpdate
SmartUpdate is the primary tool used for upgrading Check Point Gateways. The following features and tools are available in SmartUpdate:
- Upgrade All Packages: This feature upgrades all packages installed on a gateway. For IPSO and SecurePlatform, this feature also upgrades your operating system as a part of the upgrade procedure. The SmartUpdate "Upgrade all Packages" option supports HFAs, i.e., it will suggest upgrading the gateway with the latest HFA if a HFA package is available in the Package Repository. "Upgrade All" is the recommended method. In addition, there is an advanced method to install (distribute) packages one by one.
- Add Package to Repository: SmartUpdate provides three "helper" tools for adding packages to the Package Repository:
- From CD/DVD: Adds a package from the Check Point DVD.
- From File: Adds a package that you have stored locally.
- From Download Center: Adds a package from the Check Point Download Center.
- Get Check Point Gateway Data: This tool updates SmartUpdate with the current Check Point or OPSEC third-party packages installed on a specific gateway or for your entire enterprise.
- Check for Updates: This feature, available from the SmartDashboard Tools menu, locates the latest HFA on the Check Point Download Center, and adds it to the Package Repository.
Configuring the Security Management Server for SmartUpdate
To configure the Security Management Server for SmartUpdate:
- Install the latest version of SmartConsole, including SmartUpdate.
- Define the remote Check Point Gateways in SmartDashboard (for a new Security Management Server installation).
- Verify that your Security Management Server contains the correct license to use SmartUpdate.
- Verify that the Administrator SmartUpdate permissions (as defined in the
cpconfig - To enable SmartUpdate connections to the Gateways, make sure that Policy Global Properties > FireWall > Firewall Implied Rules > Accept SmartUpdate Connections (SmartUpdate) is selected. By default, it is selected.
Add Packages to the Package Repository
Use SmartUpdate to add packages to and delete packages from the Package Repository:
- directly from the Check Point Download Center website (Packages > Add > From Download Center),
- by adding them from the Check Point DVD (Packages > Add > From CD/DVD),
- by importing a file (Packages > Add > From File).
When adding the package to the Package Repository, the package file is transferred to the Security Management Server. When the Operation Status window opens, you can verify the success of the operation. The Package Repository is then updated to show the new package object.
Gateway Upgrade - SmartUpdate
To update a gateway using SmartUpdate:
- From SmartUpdate > Packages > Upgrade All Packages select one or more Gateways and click Continue.
The Upgrade All Packages window opens, and in the Upgrade Verification list you can see which Gateways can or cannot be upgraded.
- To see a list of which packages will be installed on the Gateways that can be upgraded, select the gateway and click the Details button.
- For an explanation as to why a gateway cannot be upgraded, select the relevant gateway and click the Details button.
- From the list provided, select the Gateways that can be upgraded and click Upgrade.
|
Note - The Allow reboot option (selected by default) is required in order to activate the newly installed packages.
|
The Operation Status pane opens and shows the progress of the installation. Each operation is represented by a single entry. Double click the entry to open the Operation Details window, which shows the operation history.
The following operations are performed during the installation process:
- The Check Point Remote Installation Daemon connects to the Check Point gateway.
- Verification for sufficient disk space.
- Verification of the package dependencies.
- The package is transferred to the gateway if it is not already there.
- The package is installed on the gateway.
- Enforcement policies are compiled for the new version.
- The gateway is rebooted if the Allow Reboot option was selected and the package requires it.
- The gateway version is updated in SmartDashboard.
- The installed packages are updated in SmartUpdate.
Upgrading Security Gateways on Appliances
UTM-1, Power-1, and 2012 Models
SecurePlatform to Gaia
You can upgrade from the SecurePlatform operating system to the Gaia operating system.
To upgrade a SecurePlatform appliance:
- Upgrade product licenses to R75 or higher, and attach the licenses to the appliance.
- Download the appliance upgrade package.
Check_Point_upg_WEBUI_and_SmartUpdate_R77.Gaia.tgz - Connect to the SecurePlatform appliance from a Web browser to
https://<appliance_ip_address> - In the login page, enter an administrator username and password.
- Go to the page.
- Upload the appliance upgrade package to the appliance.
- Ignore any warning messages.
- Continue according to the on-screen instructions.
After the upgrade is complete, the appliance boots to Gaia.
|
Note - The connection to the SecurePlatform Portal closes after Gaia is installed.
|
- Install the Policy on the Security Gateway. This is highly recommended. The Security Gateway enforces the Initial Policy until you install the Policy:
- Using SmartDashboard of the correct version, connect to the Security Management Server.
- Open the page of the Gateway object.
- Click to update the details.
- Install the policy on the Gateway.
SecurePlatform to SecurePlatform
Use the Portal to upgrade Security Gateways on appliances.
To upgrade appliances using the Portal:
- Open Internet Explorer and log in to the appliance.
- Select > .
- Click .
The Internet browser opens to the Check Point Support Center.
- Search for and download the R77 upload package file.
- In the Portal, click Upload upgrade package to appliance.
The Upload Package to Appliance window opens.
- Select the upgrade file:
Check_Point_upg_Portal_and_SmartUpdate_R77.SecurePlatform.tgz - Click .
- Click Start Upgrade.
- Before the upgrade begins, an image is created of the system and is used to revert to in the event the upgrade is not successful.
The Save an Image before Upgrade page, displays the image information.
Click Next.
- In the Safe Upgrade section, select Safe upgrade to require a successful login after the upgrade is complete. If no login takes place within the configured amount of time, the system will revert to the saved image.
Click Next.
- The Current Upgrade File on Appliance section displays the information of the current upgrade.
- To begin the upgrade, click Start.
IP Appliances
IPSO to Gaia
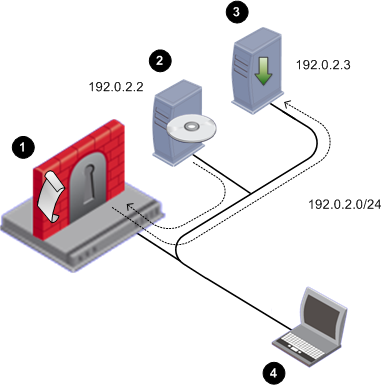
You can upgrade from IPSO to Gaia with R77 on all IP appliance platforms (IP150, IP280, IP290, IP390, IP560, IP690, IP1280, IP2450) using FTP over a network connection. You can also upgrade to R77 on all of these IP appliance platforms except IP390 and IP560 using a USB removable device and the Check Point ISOmorphic utility.
- To upgrade using a removable device see sk83200.
- To upgrade over the network using FTP, continue with these instructions.
Preparing for Upgrade
Set up this environment.
Item
|
|
1
|
IP Appliance with
- IPSO
- IPSO to Gaia installation package or upgrade package.
|
2
|
FTP Server with a Gaia ISO image mounted. The ISO is copied to the IP Appliance as part of the installation or upgrade process. The FTP server can be Linux-based or Windows-based.
In this example, the FTP Server is at 192.0.2.2.
|
3
|
Optional: FTP Server used as a location for one or more of the following:
- Backup of IPSO and the Security Gateway configuration. (recommended)
- A special SmartUpdate package that can be used to distribute the IPSO to Gaia installation and upgrade package to multiple Security Gateways.
- A special package that can be used to install or upgrade Security Gateways, one at a time, without having to answer any questions. This package is created using the answers supplied when running the installation and upgrade package.
You can use the same FTP server as for the Gaia ISO, or a different one. In this example, the FTP Server is at 192.0.2.3.
|
4
|
Computer with console access to the IP appliance and to the FTP server(s).
Console access is recommended because it allows you to keep the connection to the IP Appliance throughout the installation or upgrade. If you connect via SSH you lose the connection after the IP Appliance reboots, and you will not be able to track the installation or upgrade progress.
|
Upgrade Procedure Overview
|
|
|
|
Important - This is an overview of the steps, not the actual instructions. Detailed instructions follow.
|
Step 1: Get the IPSO to Gaia installation and upgrade package (tgz) and the Gaia ISO image.
Step 2: Put the Gaia ISO on an FTP server.
Step 3: Install the installation and upgrade package on the IP Appliance using Network Voyager or Clish.
Step 4: Run the script:
- Clean install -
run-install-gaia - Upgrade -
run-upgrade-to-Gaia
Step 5: Enter FTP server details and the ISO location. The script tests the FTP Server environment:
- Route to the FTP server
- Interface speed and duplex settings
- FTP access with the given credentials
- FTP access to the specified path
- Path contains the Gaia ISO and the user has Read/Write access to the directory
- Multiple simultaneous connections (>20) to the FTP server are allowed
- Timeout on FTP server is not too low
- FTP access to files downloaded by the Gaia boot manager
Step 6: Optional, but recommended: Enter data for an FTP server to hold IPSO system and configuration backup.
Step 7: Optional: Enter data to make a customized IPSO to Gaia upgrade package. Use this to upgrade multiple Security Gateways with SmartUpdate.
- Upgrade one Security Gateway with the standard IPSO to Gaia upgrade package. Enter the required data to create the special upgrade package.
- Upgrade all other Security Gateways simultaneously, using the special upgrade package, without more data. All IP Appliances must be able to access the same ftp servers as the first Security Gateway.
Step 8: Confirm your selections.
Step 9: The installation or upgrade package now runs automatically:
- If you made a backup package: The backup tar files are copied from the IP Appliance to the FTP server.
- If you made a customized installation or upgrade package: The package is copied from the IP Appliance to the FTP server.
- The Gaia image is copied from the FTP server to the IP Appliance.
- The Gaia image is installed.
- The Gaia boot manager is installed.
- The IP Appliance reboots.
You see the Gaia prompt on the IP Appliance.
|
Step 10: Make sure the upgrade succeeded.
|
Step 1: Getting the Upgrade Package and the Gaia Image
- Download the Gaia packages for IP Appliance from the R77 home page on the Check Point Support Center.
You will see two packages:
- Gaia ISO image
- IPSO to Gaia installation and upgrade package. The file name is
Check_Point_Install_and_Upgrade_IPSO6.2_to_Gaia_R77.tgz
- Prepare the installation and upgrade packages:
Copy the packages to an FTP server, in a directory of your choice. Or transfer the packages by FTP to the IP Appliance.
Step 2: Putting the Gaia ISO on an FTP Server
Network Requirements
|
Important - High network traffic or large transfers (more than 10/100 Mbps links) can interfere with the FTP transfers for installation.
|
- Make sure the appliance can reach the FTP server.
- Make sure there is no Firewall which blocks incoming FTP requests from the appliance to the FTP server.
- Configure the FTP server to allow more than 100 (or an unlimited number of) concurrent connections.
- Make sure the Gaia ISO file is mounted on a directory to which the user has access permissions.
On a Linux-based FTP Server:
- Upload the Gaia ISO file to the FTP server
- On the FTP server, run:
mount -o loop -t iso9660 <ISO_filename> <mounting_destination_dir>
On a Windows-based FTP Server:
- Upload the Gaia ISO file to the FTP server
- Extract the Gaia ISO file to a folder on the FTP Server. Use 7-zip, Winzip, WinRAR or similar.
- In the folder, run the file
copyrpms.batThis batch file copies installation files, to give a required workaround to Windows' inability to support soft links.
- Give FTP credentials to the folder, so the folder can be accessed via FTP.
|
Step 3: Installing the Package on the IP Appliance
- Log in to the IP Appliance using a console.
- Run
Clish - Install the IPSO to Gaia installation and upgrade package on the IPSO appliance using
Clish or using Network Voyager (see the Network Voyager Reference Guide.
To use Clish:Note - If using anonymous ftp, change ftp anonftp
The installation and upgrade package is installed.
Trying to install package: ./.tgz
Package Information --
Name : IPSO to Gaia Upgrade
Version : <version>
Release : <Release>
Description: IPSO to Gaia Upgrade Package (<package_version>)
Package will be installed under: /opt
Package installed and activated successfully.
End of package installation.
|
The installation success message is Package installed and activated successfully
The package is reported to be activated, but there are no background processes running.
- Show the installed and active packages by running:
show package active
Name Ver Rel Dir Desc
{Check Point CPinfo } 10 00 /opt/CPinfo-10 {Check Point CPinfo}
{Check Point R70} R70 00 /opt/CPsuite-R70 {Check Point R70}
{IPSO to Gaia Upgrade} <ver> <rel> /opt/<package_name> {IPSO to Gaia Upgrade Package (<upgrade_package_version>)}
|
- Exit Clish. Run:
exit
Step 4: Running the Installation and Upgrade Script
- Go to the location of the package
cd /opt/<package_name>/
- To upgrade, run
./run-upgrade-to-Gaia To do a clean installation, run
./run-install-Gaia
If you are upgrading multiple appliances from a special upgrade package that was previously saved, the installation or upgrade runs automatically. Continue with Step 9.
If you are upgrading or installing one appliance, continue here.
The script runs. The following shows an upgrade. If you do a clean installation, the IPSO configuration is not transferred to Gaia.
Welcome to the IPSO to Gaia Install/Upgrade procedure.
Checking platform...OK
Checking IPSO OS version ...OK
Checking hostname ...
Checking your configuration
Summary:
Errors: 0
Warnings: 0
Information: 14
Total Grade: 94
Details in file "/var/tmp/verify-IPSO-for-Gaia.msgs".
A newer version of this script may be available.
Contact the Check Point UserCenter at https://usercenter.checkpoint.com
and see SK66569.
Do you want to continue with the upgrade ? [y] y
=========================================================
The following types of information are needed to prepare
your IPSO appliance for the upgrade:
- info about downloading the Gaia image.
- info about transferring the verification reports (optional).
- info about transferring an IPSO backup (optional).
- info about transferring a special upgrade package with your answers (optional).
Answer the prompts for this info and then the upgrade is performed.
Hit 'Enter' to continue or Ctrl-C to exit
|
- Supply the information for downloading the Gaia image
|
Note - If you have run the upgrade script before, the previously entered values are shown in square brackets [ ]. Press Enter to accept the values, or type in the new values and press Enter.
|
Step 5: Verifying the FTP Server
Enter the requested FTP server data and the path to the Gaia installation file.
|
Required Directory Value
|
If ISO is mounted to a non-FTP directory
|
Enter full path to ISO.
A relative path or shortcut link will not work.
Example: if , ./gaia
|
If ISO is mounted to , and FTP user account is used to install
|
Enter path to ISO. A shortened path will work.
Example: if , gaia
|
If ISO is mounted to , and non-FTP user account is used to install
|
Enter full path to ISO.
A relative path or shortcut link will not work.
|
The script runs some tests to verify the FTP environment. If errors are detected, correct the FTP server configuration and then instruct the program to verify the FTP environment again.
Here is an example of a successful test:
Info for download of the Gaia image:
Info for download of the Gaia image:
IP address of FTP server [192.0.2.2]:
User name [gwhite]:
Password [******]:
Directory [/mnt/gaia_image]:
Performing tests of access to FTP server and Gaia ISO
Checking route to 192.0.2.2 ... OK
Interface: eth-s4p1 speed 100M, duplex full
Checking FTP access with given credentials ... OK
Checking FTP access to /mnt/gaia_image ... OK
Checking /mnt/gaia_image is Gaia ISO ... Yes
Checking multiple simultaneous connections to 192.0.2.2 ... OK
Checking timeout to 192.0.2.2 ... OK
Checking FTP access to files downloaded by Gaia boot-manager
system/ramdisk.pxe ... OK
system/base/stage2.img ... OK
|
Step 6 (Optional, Recommended): Supplying Reports and Backup Server Information
The script will request details of the FTP server to store reports and backup data. The same path-rules apply here as in Step 5. The backup creates two tgz files, for:
- IPSO operating system configuration files, user directories, and log files.
- Security Gateway backup files.
Here is an example:
A complete backup of the IPSO system can performed
including system configuration, user home directories,
log files and files from packages.
Do you want to perform this backup ? [y]
Use IP address '192.0.2.2' and user 'root' for the backup? [n]
Details for transferring the IPSO Backup:
IP address of FTP server []: 192.0.2.3
User name []: ftp
Password []: ***
Directory []: /backupdir
Checking FTP access to 192.0.2.3 (it may take a minute) ... done
|
Step 7: (Optional): Supplying Special Package Server Information
Enter data of the destination FTP server for the special upgrade package. Enter a destination directory, with the same rules as in Step 5.
A package with your answers to the previous prompts can be created.
This package can be used on other IPSO Gateways for
unattended conversion to Gaia.
Do you want to create such a package? [y]
Details for transferring the package with your answers:
IP address of FTP server [192.0.2.3]:
User name [ftp]:
Password [***]:
Directory [packagedir]:
Checking FTP access to 192.0.2.3 (it may take a minute) ... done
|
Step 8: Confirming Your Selections
You see a summary of all your answers.
Information for download of the Gaia image:
FTP Server IP Address = 192.0.2.2
FTP Server user name = root
Directory on FTP Server = /imagedir
Information for transferring the IPSO Backup:
FTP Server IP Address = 192.0.2.3
FTP Server user name = ftp
Directory on FTP Server = /backupdir
Information for transferring the package with your answers:
FTP Server IP Address = 192.0.2.3
FTP Server user name = ftp
Directory on FTP Server = /packagedir
Are these values correct? [y]
|
- Click
nThe backup file and the special upgrade package file, if you chose to create them, are created.
Writing values to file
Performing IPSO backup (file <ipso_backup_file_name>.tgz) ... done
Performing Check Point Security Gateway backup (file <Security Gateway_backup_file_name>.tgz) ... done
Transferring IPSO and Check Point Security Gateway backup files ... done
Creating a package with your answers (<package_name>_AUTO.tgz) ... done
Transferring package with your answers ... done
Installing Gaia Boot Manager ... done
|
- You have 30 seconds to abort. To stop the upgrade, press .
IP appliance reboots in 30 seconds to complete the upgrade.
Hit 'Enter' to abort.
|
|
Important - If you want to make changes, press Enter now.
This stops the upgrade to Gaia. To complete the upgrade to Gaia, reboot the IP Appliance.
|
Step 9: Upgrade Runs Automatically
The upgrade runs unattended.
- The IP Appliance reboots.
- The Gaia Boot Manager runs.
|
Important - It is possible that after the reboot the system will show the Boot Manager prompt. To complete the upgrade, type INSTALL
|
- The Gaia image is installed.
- The IPSO and R77 configuration is imported into Gaia, including the SIC trust settings.
- You now see the Gaia prompt.
Congratulations. Gaia and R77 are installed on the IP Appliance.
|
Important - The HTTPS port for the Portal is set to 443 after an installation or upgrade. To change this, you must use SmartDashboard > > .
|
Step 10: Making Sure the Upgrade Succeeded
To check the Security Gateway configuration:
- At the Gaia prompt, log in with your IPSO credentials.
The system logs you in to the expert mode. That is, you will be in csh bash
- Type
clish - Run
fw ver - Run
fw stat - Launch R77 SmartDashboard.
- In the Security Gateway object:
- Click . SIC status should be .
- Change the version to R77.
- Install a policy on the Security Gateway.
Rollback from Gaia to IPSO
You can roll back from Gaia to IPSO 6.2. You can also restore the Check Point Security Gateway and/or Security Management Server configuration.
Before doing a rollback from Gaia to IPSO:
Make sure that:
- The IPSO boot manager installer is available. Download it from the R77 home page.
- An IPSO image is available. Put the IPSO image on an FTP server, and make sure that the FTP server is accessible from the Gaia IP Appliance.
- A backup of the Check Point Security Gateway on the Gaia IP Appliance is available. Put the backup tar file on an FTP server, and make sure the FTP server is accessible from the Gaia IP Appliance.
To roll back from Gaia to IPSO:
- At the Gaia command line prompt, login as the administrator.
- Go to expert mode. Type
expert. - From the R77 home page on the Support Center, download the IPSO boot manager installer:
Check_Point_R77_Install_IPSOBootmanager.sh
- Copy the IPSO boot manager installer to the Gaia IP Appliance. For example, to:
/var/tmp - Change file attributes to give executable permissions. Run:
chmod 777 Check_Point_R77_Install_IPSOBootmanager.sh
- Install the IPSO boot manager by running:
./Check_Point_R77_Install_IPSOBootmanager.sh
The script asks if you want to roll back to:
1. IPSO 4.2
2. IPSO 6.2
- Choose
2. - Type
reboot.After the reboot, the system is running the IPSO boot manager.
- At the
BOOTMGR>install - Enter the:
- IP address of the IP Appliance.
- Default gateway of the IP Appliance.
- IP address of the FTP server with the IPSO image.
- User credentials.
- Directory path.
- Answers to various configuration questions regarding:
- The chassis serial number
- Whether the system is part of a VRRP cluster
- Whether IGMP and BGP are enabled
The system automatically reboots into IPSO.
- Configure the IP Appliance:
- Hostname
- New password for
admin - The management port physical interface (enable)
- IP address for the management interface
- Default gateway
To restore the Check Point Security Gateway configuration:
In the following example:
CP_archive_<hostname and timestamp>.tgz i2g_backup_<hostname and timestamp>.tgz
|
Important - If the IPSO backup contains IPSO and Check Point configuration data, the Check Point packages must be restored before the IPSO configuration.
|
To Restore:
- Make sure the backup IPSO and CP archives are on an FTP server with connectivity to the IP appliance.
- Log in to the IP Appliance as
admin. - Copy the backup archive file containing the Check Point Security Gateway to the IP Appliance:
cd /var/tmp
ftp <ftp-address>
username: <ftp-user>
password: <ftp-password>
>bin
>cd <PATH>
>get CP_archive_<hostname and timestamp>.tgz
>bye
|
- Unpack the archive to the root directory
tar xzf CP_archive_<hostname and timestamp>.tgz -C /
|
- Copy and restore the IPSO backup file to the appliance using the
set restore
Clish
set restore remote ftp-site <ftp-address>
set restore remote ftp-user <username>
set restore remote ftp-pass <password>
set restore remote ftp-dir <PATH>
set restore remote filename i2g_backup_<hostname and timestamp>.tgz
|
IPSO automatically reboots.
- Log out.
- Log in as
admin
Verify the configuration has been restored.
IPSO to IPSO
For the IP Appliance models that are supported for this release, see the R77 Release Notes. After you download the correct package to an FTP site or local disk, use Network Voyager to put the package on the appliance. In Network Voyager of the appliance, open . Use the upload procedure that fits: FTP or local disk (the Network Voyager computer).
To upload from an FTP site:
- In the Voyager Install Package window, select FTP.
- Enter the name or IP address of the FTP server.
- Enter the path to the directory on the FTP server where the packages are stored.
- If necessary, enter the applicable user name and password.
- Click . The names of the available packages show in the window.
- Select the package and click .
- In the window, click .
To upload from a local disk:
- In the Voyager Install Package window, select Upload.
- Click Browse and navigate to the package .tgz file.
- Click Apply.
- Select the package .tgz file in the Unpack Package window and click Apply.
- In the window, click .
To upgrade Security Management Server with Network Voyager:
- Click the Click here to install/upgrade link to continue with the installation.
- In the Package Installation and Upgrade pane, select Upgrade and then click Apply.
- Click the Install Package branch in the Voyager tree to see the installation progress.
- Go to the page.
- The R77 and Check Point CPInfo packages are automatically activated during installation (disk-based appliances only).
- Enable other packages, with the compatibility packages, as needed for your deployment.
|
Important - When you install a package using Network Voyager, this message shows:
Voyager environment has been updated with the latest package info.
The telnet session environment will be updated by:
logging out and logging in again the telnet session.
|
This message can be misleading. Click to verify that the package is actually installed correctly. Refresh the page periodically until you see that the installation is complete.
|
- Log out of Network Voyager and then log in again.
To upgrade Security Management Server with clish:
- Access the CLI console, and log in.
- Type
newpkg - Use the FTP menu option to transfer the R77 package. Choose the option:
Upgrade from an old package - Upgrade to the R77 package.
Wait until a message informs you that the process is complete.
- Type
rebootThe package is activated after the reboot.
To verify that R77 is active and is the current version:
- Verify that R77 is active. Run
newpkg –q - Verify that R77 is the current version. Run
fw verfwm ver
Upgrading Security Gateways on Open Servers
Before you upgrade:
It is recommended to back up your configuration.
SecurePlatform to Gaia
You can upgrade Security Gateways on SecurePlatform to R77 Security Gateways on Gaia.
Important: SecurePlatform cannot be upgraded to Gaia if you have dynamic routing configured. For more, see: sk76840.
To upgrade an open server using the DVD:
- Upgrade product licenses to R75 or higher, and attach the licenses to the computer.
- Connect a DVD drive to the USB port on the computer.
- Run:
patch add cd - Select the Gaia upgrade package.
- Confirm the MD5 checksum.
- If relevant, when prompted, create a backup image for automatic revert.
- After extracting files, the Installation program opens.
- Accept the license agreement.
- Select .
- Configure your contract options.
You can also continue without contract information and configure it later using SmartUpdate.
- Select a source for the upgrade utilities.
Wait for the pre-upgrade verifier to complete successfully.
- Select .
- Select , or , and confirm.
- Wait while the required installation files are extracted.
- Part one of the upgrade procedure saves data and upgrades the operating system.
- Part two upgrades Check Point products.
- After the upgrade completes successfully, remove the DVD from the drive.
- Restart when prompted.
- Install the Policy on the Security Gateway. This is highly recommended. The Security Gateway enforces the Initial Policy until you install the Policy:
- Using SmartDashboard of the correct version, connect to the Security Management Server.
- Open the page of the Gateway object.
- Click to update the details.
- Install the policy on the Gateway.
To upgrade a SecurePlatform Open Server using the Portal:
- Open Internet Explorer and log in to the SecurePlatform Portal.
- Select > .
- Click .
The Internet browser opens to the Check Point Support Center.
- Search for and download the R77 file for upgrades via the Portal.
- Click and select the upgrade file:
Check_Point_upg_Portal_and_SmartUpdate_R77.Gaia.tgz - Click .
The package is uploaded to the SecurePlatform computer.
After the shows that the Uploading is Completed you can start the upgrade.
- Recommended: In the section, click . The snapshot is used to revert the system if the upgrade is not successful.
- Click .
Follow the . After the upgrade, the computer automatically reboots.
|
Note - The connection to the SecurePlatform Portal closes after Gaia is installed.
|
- Install the Policy on the Security Gateway. This is highly recommended. The Security Gateway enforces the Initial Policy until you install the Policy:
- Using SmartDashboard of the correct version, connect to the Security Management Server.
- Open the page of the Gateway object.
- Click to update the details.
- Install the policy on the Gateway.
SecurePlatform to SecurePlatform
Use this procedure to upgrade a SecurePlatform installation on the same computer. Upgrade the operating system and the installed products.
To upgrade a SecurePlatform Open Server using a DVD:
- Insert R77 DVD into the drive.
- At the command prompt, enter:
patch add cd - Select SecurePlatform R77 Upgrade Package
Check_Point_Install_and_Upgrade_R77.SecurePlatform_Open_Server.iso - Press
- Optional: When prompted, create a backup image so that you can restore the old version.
|
Note - Creating the snapshot image can take a long time. Check Point products are stopped during this time.
|
- Press at the welcome message.
- Press to accept the license agreement.
- In the next window, select and then press .
- In the next window, press to continue.
- If prompted to download or import a valid support contract, select . Press to continue.
- If a message shows that says your gateway is not eligible for upgrade, press to continue.
You can safely ignore this message and use SmartUpdate to update your service contract later.
- In the next window, select .
- In the window, press to continue.
If the Pre-Upgrade Verification fails, do the suggested steps to correct the problem. Start this procedure again from step 2.
- When prompted, select processes and press to continue.
- When prompted, select and press to continue
- In the window, press .
- When the upgrade completes successfully, restart the computer.
To upgrade a SecurePlatform Open Server using the Portal:
- Open Internet Explorer and log in to the SecurePlatform Portal.
- Select > .
- Click .
The Internet browser opens to the Check Point Support Center.
- Search for and download the R77 file for upgrades via the Portal.
- Click and select the upgrade file:
Check_Point_upg_Portal_and_SmartUpdate_R77.SecurePlatform.tgz - Click .
The package is uploaded to the SecurePlatform computer.
After the shows that the Uploading is Completed you can start the upgrade.
- Recommended: In the section, click . The snapshot is used to revert the system if the upgrade is not successful.
Your browser will automatically try to perform the first login immediately after the upgrade. To allow this, do not close the browser window or browse to another page.
- Click .
Follow the . After the upgrade, the computer automatically reboots.
- Install the Policy on the Security Gateway. This is highly recommended. The Security Gateway enforces the Initial Policy until you install the Policy:
- Using SmartDashboard of the correct version, connect to the Security Management Server.
- Open the page of the Gateway object.
- Click to update the details.
- Install the policy on the Gateway.
Windows
This section describes the upgrade process using the R77 Installation DVD.
To upgrade a gateway in a Windows platform:
- Insert the R77 DVD.
- If the upgrade does not start automatically, run from the DVD.
- Click Next to start the installation wizard.
Note: On QoS enabled gateways, you will be asked to manually run etmstopetmstopetmstop
- Run
etmstop - Restart the upgrade procedure by running again (step 2).
- Accept the license agreement and click Next.
- Click Next to check your license information.
- Select one of the license options and click Next.
- To add Check Point products that were not installed previously, select Install additional Check Point products and click Next.
- Select the new products to install.
- A list of the products that will be upgraded or installed. Click Next to start the installation.
- When the installation is finished, click Next to continue.
- In Licenses and Contracts, select a licensing option and click Next.
- In Secure Internal Communication, verify the SIC details and click Next.
- In Clustering, select whether this Security Gateway is part of a cluster.
- Click Finish to close the installation wizard.
When the upgrade process is complete:
- Using SmartDashboard, log in to the R77 Security Management Server that controls the upgraded gateway.
- Open the gateway object properties window that represents the upgraded gateway and change the version to R77.
- Install the policy on the upgraded gateway.
If necessary, you can restore the previous configuration.
Upgrading a VSX Gateway
|
Important - Before you begin, make sure no other administrators are connected to the management server.
In a Multi-Domain Security Management deployment, make sure administrators are not connected to Domain Servers. Upgrade and reconfigure operations skip locked Domain Servers. Run the procedure again when they become available.
The vsx_util
|
To upgrade a VSX Gateway to R77:
- Close SmartDashboard.
- On the management server, log in to Expert mode.
- Run:
vsx_util upgradeWhen prompted, enter this information:
- Security Gateway or main Domain Server IP address
- Administrator name and password
- Cluster name (if the VSX Gateway is a cluster member)
- Version to upgrade to: R77
- Wait for the message.
If you use CPUSE to upgrade the VSX Gateway, skip the next step.
- Run:
vsx_util reconfigure When prompted, enter this information:
- Management server or main Domain Server IP address
- Administrator name and password
- SIC activation key for the upgraded member
The security policy is installed and configured on the upgraded VSX Gateway, and this message shows:
Reconfigure module operation completed successfully
- Install the necessary licenses.
- Reboot.
Upgrading Standalone Full High Availability
The server and the gateway are in a standalone configuration and each has High Availability to a second standalone machine. If there is a failure, the server and the gateway failover to the secondary machine. In the standalone configuration the server and gateway can failover independently of each other. For example, if only the server has an issue, only that server fails over. There is no effect on the gateway in the standalone configuration.
To upgrade Full High Availability for cluster members in standalone configurations, there are different options:
- Upgrade one machine and synchronize the second machine with minimal downtime.
- Upgrade with a clean installation on one machine and synchronize the second machine with system downtime.
Upgrading with Minimal Downtime
You can do a Full High Availability upgrade with minimal downtime to the cluster members.
To upgrade Full High Availability with minimal downtime:
- Make sure the primary cluster member is active and the secondary is standby: check the status of the members.
- Start failover to the second cluster member.
The secondary cluster member processes all the traffic.
- Log in with SmartDashboard to the management server of the secondary cluster member.
- Click .
- Configure the secondary cluster member to be the active management server.
|
Note - We recommend that you export the database using the Upgrade tools.
|
- Upgrade the primary cluster member to the appropriate version.
- Log in with SmartDashboard to the management server of the primary cluster member.
Make sure version of the SmartDashboard is the same as the server.
- Upgrade the version of the object to the new version.
- Install the policy on the cluster object.
The primary cluster member processes all the traffic.
|
Note - Make sure that the option is cleared. Selecting this option causes the installation to fail.
|
- Upgrade the secondary cluster member to the appropriate version.
- Synchronize for management High Availability.
Upgrading with a Clean Installation
You can do a Full High Availability upgrade with a clean installation on the secondary cluster member and synchronize the primary cluster member. This type of upgrade causes downtime to the cluster members.
To upgrade Full High Availability with a clean installation:
- Make sure the primary cluster member is active and the secondary is standby: check the status of the members.
- Start failover to the second cluster member.
The secondary cluster member processes all the traffic.
- Log in with SmartDashboard to the management server of the secondary cluster member.
- Click .
- Configure the secondary cluster member to be the active management server.
|
Note - We recommend that you export the database using the Upgrade tools.
|
- Upgrade the primary cluster member to the appropriate version.
- Log in with SmartDashboard to the management server of the primary cluster member.
Make sure version of the SmartDashboard is the same as the server.
- Upgrade the version of the object to the new version.
- Install the policy on the cluster object.
The primary cluster member processes all the traffic.
|
Note - Make sure that the option is cleared. Selecting this option causes the installation to fail.
|
- Install the secondary member.
- From SmartDashboard, configure the cluster object.
- Change the secondary details (if necessary).
- Establish SIC.
- Synchronize for management High Availability.
The primary management database synchronizes to the secondary management database.
Upgrading Clusters
If the appliance to upgrade was not the primary member of a cluster before, export its database before you upgrade. If it was the primary member before, you do not have to do this.
To upgrade an appliance and add it to a cluster:
- If the appliance was not the primary member of a cluster, export the Security Management Server database.
- Upgrade the appliance.
- If the appliance was not the primary member of a cluster, Import the database.
- Using the Portal, on the page, configure the appliance to be the primary member of a new cluster.
- Connect a second appliance to the network.
- If the second appliance is based on an earlier version: get the relevant upgrade package from the Download Center, save it to a USB stick, and reinstall the appliance as a secondary cluster member.
- If the second appliance is upgraded: run the first-time wizard and select .
Enabling IPv6 on Gaia
IPv6 is automatically enabled if you configure IPv6 addresses in the First Time Configuration Wizard.
If you did not do this, enable IPv6 in one of the following ways:
To enable IPv6 using Clish:
# set ipv6-state on
# save config
# reboot
To enable IPv6 using the Portal:
- In the Portal navigation tree, select .
- For , select .
- When prompted, select to reboot.
Changing to an IPv6-Only Management IP Address
To remove the IPv4 management address from a Security Management Server with a dual-IP management addresses (IPv4 and IPv6):
- Open SmartDashboard using the IPv6 address.
- Edit the Security Management Server object.
- In the page, delete the IPv4 address.
- Go to the page, window, and delete the IPv4 address.
- Save.
- Open the Gaia Portal by connecting to the IPv6 address https://<IPv6 address>.
- Delete the management IPV4 address from these pages:
Deleting the IPV4 address from Management HA
You can remove the IPv4 address from one member in a management High Availability environment and keep the IPv6 and IPv4 addresses on the second member.
To remove the IPv4 address from a management HA member:
- Open the Portal.
- In the page, delete the IPV4 address.
- Open SmartDashboard.
- Reset SIC.
- Install the database ().
- Reboot.
- Synchronize the databases of the Security Management Servers.


