|
|
|
In This Section: |
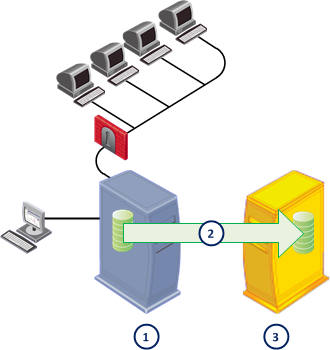
Before Database Migration
|
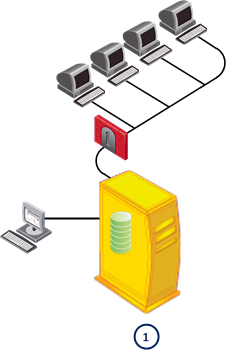
After Database Migration
|
Item |
Description |
Item |
Description |
||
1 |
Source computer |
1 |
Target R77 computer connected to network |
||
2 |
Management database migration path |
|
|
||
3 |
R77 target computer, not connected to the network |
|
|
||
|
Important - If the source environment uses only IPv4 or only IPv6, you cannot migrate to an environment that uses only the other type of addresses. |
||||
Make sure that the upgrade version and products are supported on the target operating system and hardware platform. For a list of supported upgrade paths, platforms and products, see the R77 Release Notes.
Solaris: You can migrate a Solaris database to Gaia.
A legacy platform is a hardware platform unsupported for new installations but still supported for database migration.
Solaris is a legacy platform. You can migrate the Solaris database to Windows and SecurePlatform and Gaia. But only from Check Point versions in the supported upgrade path. See the R77 Release Notes.
The database migration procedure for Solaris is the same as for SecurePlatform and Gaia, as described in this chapter.
To export the SmartDomain Manager database from a legacy platform, use the R77 SecurePlatform DVD. Only two menu options are available:
Required Disk Space:
/var/log/var/ logRequired Network Access:
IPv4 or IPv6:
If the source environment uses only IPv4 or only IPv6, the target must use the same IP address configuration. You cannot migrate to an environment that uses only the other type of addresses.
Target Version and Products:
You can only upgrade or migrate the version of the server or set of products. The target must have the same or higher version and the same set of installed products.
In this section: |
This section includes a procedural overview for database migration and continues with detailed procedures for each platform. Also included are special procedures for migrating:
Migration Workflow
On the source server:
|
Important - Put all extracted files in the same directory, and run the tools from this directory. |
chmod 777 *fw logswitchAlternatively, if this is a computer that is not in production, run cpstop
|
Important - If you do not close the GUI clients or run |
ifconfig pre_upgrade_verifier command. On the target server:
$FWDIR/bin/upgrade_tools%FWDIR%\bin\upgrade_toolsIf the target server is a different platform that the source server, edit the database.
Licenses are related to the Security Management Server IP address. If you migrate the Security Management Server database to a server with a new IP address, there will be licensing issues. We recommend that you keep the same IP address for the target Security Management Server. If this is not possible, you must prepare the source database before the export and edit the target database after the import.
There are additional steps for a Security Management Server that manages VSX Gateways in these configurations:
On the source computer before migration:
Source |
Destination |
Service |
|---|---|---|
new server |
any |
FW1 (TCP 256) CPD (TCP 18191) FW1_CPRID (TCP 18208) |
If you migrate from a Security Management Server or Domain Server to a target with a different IP address configuration, you must configure the source before you export the database:
After you import the database, add or remove IPv4 and IPv6 addresses as required.
When migrating from a Security Management Server with only IPv4 addresses to:
Target |
You need to: |
|---|---|
Security Management Server with only IPv4 addresses |
Follow the normal migration process. |
Security Management Server with only IPv6 addresses |
|
Security Management Server with a mixture of IPv4 and IPv6 addresses. |
|
Domain Server with IPv4 addresses |
Follow the normal migration process. |
Domain Server with a mixture of IPv4 and IPv6 addresses |
|
When migrating from a Security Management Server with only IPv6 addresses to:
Target |
You need to: |
|---|---|
Security Management Server with only IPv4 addresses |
After importing the database, change the IPv6 address of the management to IPv4 |
Security Management Server with only IPv6 addresses |
Follow the normal migration procedure |
Security Management Server with a mixture of IPv4 and IPv6 addresses. |
After importing the database, add the IPv4 addresses |
Domain Server with IPv4 addresses |
After importing the database, remove IPv6 addresses from the management object in SmartDashboard and add IPv4 |
Domain Server with a mixture of IPv4 and IPv6 addresses |
After importing the database:
|
When migrating from a Security Management Server with a mixture of IPv4 and IPv6 addresses to:
Target |
You need to: |
|---|---|
Security Management Server with only IPv4 addresses |
After importing the database:
|
Security Management Server with only IPv6 addresses |
After importing the database, remove the IPv4 address from the management |
Security Management Server with a mixture of IPv4 and IPv6 addresses. |
Follow the normal migration procedure |
Domain Server with IPv4 addresses |
After importing the database, remove the IPv6 address from the management object in SmartDashboard |
Domain Server with a mixture of IPv4 and IPv6 addresses |
Follow the normal migration procedure |
When migrating from a Domain Server with only IPv4 addresses to:
Target |
You need to: |
|---|---|
Security Management Server with only IPv4 addresses |
Follow the normal migration procedure |
Security Management Server with only IPv6 addresses |
After importing the database:
|
Security Management Server with a mixture of IPv4 and IPv6 addresses. |
|
Domain Server with IPv4 addresses |
Follow the normal migration procedure |
Domain Server with a mixture of IPv4 and IPv6 addresses |
After importing the database:
|
When migrating from a Domain Server with a mixture of IPv4 and IPv6 addresses to:
Target |
You need to: |
|---|---|
Security Management Server with only IPv4 addresses |
|
Security Management Server with only IPv6 addresses |
After importing the database, remove the IPv4 address from the management. |
Security Management Server with a mixture of IPv4 and IPv6 addresses. |
Follow the normal migration procedure |
Domain Server with IPv4 addresses |
|
Domain Server with a mixture of IPv4 and IPv6 addresses |
Follow the normal migration procedure |
It is important that you use the correct migration tools package. Download the latest version of the migration tools from the Support Center. This is the best way to make sure that you get the most recent version.
Alternatively, you can get the migration tools package from the target computer.
To get the migration tools package from the target computer:
$FWDIR/bin/upgrade_tools%FWDIR%\bin\upgrade_toolsUse FTP, SCP or similar. The source directory can be anywhere, such as /var/tmp
The migration tool files are contained in a compressed package. The files in the package are:
migratemigrate_confmigrate exportmigrate importWe recommend that you run the pre-upgrade verifier on the source server before exporting the management database. The pre-upgrade verifier analyzes compatibility of the management database and its current configuration. A detailed report shows the steps to do before and after the upgrade.
The pre-upgrade verifier can only verify a database that is intended for import into a different major version (for example, R77.xx to R77). It cannot be used on a database that is intended for import into the same major version.
To create a management database export file on the source computer:
<>/migrate export<>.tgz.<>.tgzTo create a management database export file on the source computer:
patch add cd
|
Note - Creating a backup image can take up to twenty minutes, during which time Check Point products are stopped. |
We recommend that you select Download the most updated files from the Check Point website to get the latest files. You can also select Use the upgrade tools contained on the CD.
Press N to continue.
/var/tmp/cpexport.tgzTo create a management database export file on the source computer:
<>/migrate export<>.tgz.<>.tgzTo create a management database export file on the source computer:
<path to migration tools directory>\migrate.exe export .tgz.To create a management database export file on the source computer:
If the wizard does not start automatically, run setup.exe
c:\temp\cp_db_configuration.tgzTo import the management database file to the target computer:
<>/migrate import/<>.tgz.To import the management database file to the target computer:
<>/migrate import/<>.tgz.To import the management database file to the target computer:
<>/migrate import/<>.tgz.To import the management database file to the target computer:
\migrate.exe import .tgzIf the Primary Security Management Server is not available, convert the Secondary Security Management Server to a Primary Security Management Server. To get assistance with this step, contact Check Point Support or your vendor.
Licenses are related to the Security Management Server IP addresses. You must update the license and configure the environment to recognize the new Security Management Server.
cpstop cpstartevstop evstart If you migrate the management database to a server with a platform or operating system that is different from the source server, you must update the primary management object's properties accordingly.
|
Warning - Failure to do so may cause security issues. |
After migration:
Example:
If you migrate from a Windows Security Management Server to an appliance:
To migrate the SmartReporter and SmartEvent database from a non-Windows platform to a non-Windows platform, use this procedure. You can also use this procedure to backup and restore the databases.
Tools
evs_backup utility to back up the SmartEvent and SmartReporter database and configuration files, and place them in a compressed file. Use the version suitable for the target platform. Download it from the Support Center, or from the $RTDIR/binevs_backup_extractor utility to restore the backup file.$FWDIR/bin/upgrade_tools/Backup Procedure
Run the following commands in Expert mode. Use different file name for each of the utilities:
# cd $FWDIR/bin/upgrade_tools/ # ./migrate export <file name 1> # cd $RTDIR/bin # ./evs_backup [-filename <file name 2>] -ExportPreUpgrade
|
Restore Procedure
Copy the backup files to the target platform and run these commands in Expert mode:
# cd $FWDIR/bin/upgrade_tools/ # ./migrate import <file name 1> # cd $RTDIR/bin # ./evs_backup_extractor [-filename <file name 2>] -ImportPostUpgrade
|
If you have SmartReporter or SmartEvent reports on the source server, you can back them up and copy them to the target server.
Use this procedure to back up reports from a Windows platform or to a Windows platform.
To backup and restore SmartReporter and SmartEvent reports:
On the source server:
%FWDIR%/conf/reporting_configuration.C$FWDIR/conf/reporting_configuration.Cgeneration_result_locationFor example::generation_result_location ("/var/opt/CPrt-R77/Results")
/var/opt/CPrt-R77/Results<results dir>.cd <results dir>tar zcvf /var/tmp/results.tgz <results dir>
/var/tmp/results.tgzOn the target server:
<results dir>mkdir –p <results dir>results.tgzcd <results dir>tar xzvf results.tgz
To migrate SmartReporter database from a Windows platform or to a Windows platform use this procedure.
The database migration procedure automatically migrates the SmartReporter management database to the target server. However, it does not migrate the SmartReporter consolidation database. If you have SmartReporter installed on the source server, you must do several additional steps to migrate the database to the target.
Starting R75.40VS and R75.45, SmartReporter can have MySQL or PostgreSQL as the underlying database for consolidated records data. MySQL is still used for upgrades, and PostgreSQL is used in new installations.
To export and import the SmartReporter database, use the procedure that is appropriate for the underlying database: MySQL or PostgreSQL.
To determine the database that SmartReporter is using, run:
%CPDIR%/bin/cpprod_util CPPROD_GetValue "Reporting Module" DefaultDatabase 1
To create the SmartReporter MySQL database export file on the source server:
cpstop$RTDIR/Database/conf/my.cnf%RTDIR%\Database\conf\my.iniUse this file to locate directory names for use in the next steps.
.datadir.tgzThis directory contains the database files.
tar zcvf datadir.tgz <datadir setting>
mycnfmy.ini.oldmy.cnf my.cnf.old$RTDIR/binRTDIR%\bin$RTDIR/DistributionScripts RTDIR%\DistributionScripts.On the target server:
cpstop: my.cnf.old to $RTDIR/Database/conf/ my.ini.oldRTDIR%\Database\conf
|
Note - If you are migrating to a platform where the name of configuration file is different (for example, migrating from Windows to SecurePlatform) rename the configuration file accordingly. |
$RTDIR/bin: %RTDIR%\bin$RTDIR/binRTDIR%\bin$RTDIR/DistributionScripts RTDIR%\DistributionScripts.To complete the SmartReporter upgrade:
cpstopcpprod_util CPPROD_SetValue "Reporting Module" DefaultDatabase 1 "MySQL" 1
EVR_DB_Upgrade -mysql "<absolute path to file>/<SmartReporter database export file>.tgz"For example, if datadir.tgz is located in $RTDIR/binEVR_DB_Upgrade -mysql "$RTDIR/bin/datadir.tgz"
MySQLdatadir=
innodb_log_group_home_dir=
innodb_data_file_path=
cpstartTo create the SmartReporter Postgresql database export file on the source server:
cpstopcd $RTDIR/binOn Windows, runcd %RTDIR%\bin
eva_db_backup.csh -filename <backupfilename> -database EvrDbOn Windows run:eva_db_backup.bat -filename <backupfilename> -database EvrDb
Where <backupfilename>/var/log
On the target server:
cpstopbackupfilename/var/$RTDIR%RTDIR%\bin$RTDIR/bin/eva_db_restore.csh -filename <backupfilename> -database EvrDbOn Windows run:%RTDIR%/bin/eva_db_restore.bat -filename <backupfilename> -database EvrDb
Where <backupfilename>
cpstartTo migrate SmartEvent Events database from a Windows platform or to a Windows platform use this procedure.
While the database migration procedure automatically migrates the SmartEvent management database to the target computer, it does not migrate the SmartEvent events database. If you have SmartEvent installed on the source server, you must do more to migrate the events database to the target.
Note - The Events Database can be very large, and the manual migration take time. These steps explain how to use the eva_db_backupeva_db_restore
To see more options:
$RTDIR/bin/eva_db_backup.csh --help%RTDIR%\bin\eva_db_backup.bat --helpWhen upgrading from R70.20 and higher:
cd /var/*cd \$RTDIR/bin/eva_db_backup.csh %RTDIR%\bin\eva_db_backup.exe-events_db.backupcpstartcpwd_admin listcpstop$RTDIR/bin/eva_db_restore.csh -filename %RTDIR%\bin\eva_db_restore.exe -filename eventia_upgrade.C $RTDIR/conf%RTDIR%\confIf it has DONE in online_status or background_status attribute of the Database section, delete DONE and save the file.
cpstartWhen upgrading from a version older than R70.20:
On Source server:
Copy the database file ($RTDIR/events_db/events.sql%RTDIR%/events_db/events.sql
On Destination server:
cpstopPostgreSQL$CPDIR/database/postgresql/util/PostgreSQLCmd start"%CPDIR%\database\postgresql\util\PostgreSQLCmd.bat" start PostgreSQLpostgres$CPDIR/database/postgresql/bin/psql -U cp_postgres -p 18272 postgres"%CPDIR%\database\postgresql\bin\psql.exe" -U cp_postgres -p 18272 postgres drop database events_db; If you get an error that the database does not exist, ignore it.
"\q"DbUpgradeSqliteToPostgres onlineDbUpgradeSqliteToPostgres backgroundThe second action may take a long time, depending on the Source machine database size.
PostgreSQL$CPDIR/database/postgresql/util/PostgreSQLCmd stop"%CPDIR%\database\postgresql\util\PostgreSQLCmd.exe" stop eventia_upgrade.C$RTDIR/conf%RTDIR%\conf If it shows DONE in the online_status or background_status attribute of the Database section, delete DONE and save the file.
cpstart events.sqlThe migrate command exports a source Security Management Server database to a file, or imports the database file to a target Security Management Server. Use absolute paths in the command, or relative paths from the current directory.
Before you run this command for export, close all SmartConsole clients or run cpstop
Before you run this command for import, run cpstop
Syntax:
migrate {export | import} [-l] [-n] <filename> [--exclude-uepm-postgres-db--include-uepm-msi-files
Parameters |
Description |
|
One of these actions must be used. Make sure services are stopped. |
|
Optional. Export or import SmartView Tracker logs and SmartLog data. Only closed logs are exported. Use the |
|
Optional. Run silently (non-interactive) using the default options for each setting. |
|
Skip over backup/restore of PostgreSQL database of the Endpoint product. |
|
Export/import the uepm msi files. |
|
Required. Enter the name of the archive file with the server database. The path to the archive must exist. |