Administrator Management
Multi-Domain Security Management Administrators use SmartDomain Manager and SmartConsole clients to manage the Multi-Domain Security Management deployment. Each administrator has permissions to manage different aspects of the environment.
Creating or Changing an Administrator Account
This procedure lets you add a new administrator account or change an existing administrator account.
To add a new administrator account:
- In the SmartDomain Manager, go to the view.
- Right-click an empty area in the pane.
The window opens. - Continue to configure administrator properties as necessary.
To edit an existing new administrator account:
- In the SmartDomain Manager, go to the view.
- Double-click an existing administrator in the Administrators pane.
The window opens. - Continue to configure administrator properties as necessary.
Administrator - General Properties
The administrator general properties include basic information such as the administrator name, type and the administrator expiration date.
To configure administrator general properties:
- In the or window, go to the pane.
- Enter a unique .
The administrator name cannot contain spaces or special characters. - Select if this administrator can see but not change settings in the Global SmartDashboard.
- Optionally, add an email address or comment to this administrator definition.
Selecting an Administrator Type
Multi-Domain Security Management uses different administrator types, each with a different scope of administrative authority. This table shows the different administrator types:
Administrator
|
Permissions
|
|
|
Manages the Multi-Domain Security Management deployment, including all Domains, Multi-Domain Servers, Domain Management Servers, and administrator accounts.
Multi-Domain superusers can do these tasks for Multi-Domain Servers:
- Add, edit or delete Multi-Domain Servers and Multi-Domain Log Servers.
- Allow or block access the SmartDomain Manager.
|
|
|
Manages networks for all Domains using the SmartDomain Manager and SmartConsole clients. Domain superusers can create, edit and delete Domains as well as see all Domain network objects.
Domain superusers can manage Global Managers, Domain Managers and administrators. They cannot configure the Multi-Domain Server environment or manage Multi-Domain Superusers.
|
|
|
Manages global policies, global objects and specified Domain networks. Global managers can see information or do actions according to their permissions profile settings.
Global managers can manage Domain Managers and administrators. Global managers can only see network objects in their assigned Domains. They cannot create new Domains.
|
|
|
Manages specified Domain networks. Domain managers can use SmartConsole clients to see information or do actions according to their permissions profile settings.
Domain Managers can manage administrators. They cannot access the Global SmartDashboard to manage global objects and global policies.
|
|
|
Do not have permissions to manage Multi-Domain Security Management or use the SmartDomain Manager. None administrators can manage specified Domain networks, using the SmartConsole clients.
|
To select an administrator type:
- In the or window, go to the pane.
- Select to prevent this administrator from changing global properties.
- Select an administrator type.
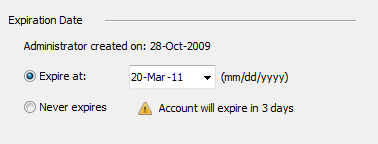
Configuring the Expiration Date
You can assign an expiration date to each administrator account. After this expiration date, the administrator cannot:
- Log in to the SmartDomain Manager,
- Do actions in the Multi-Domain Security Management environment.
- Use the SmartConsole clients.

|
Note - Multi-Domain Security Management account expiration has no effect on operating system administrators. Operating system administrators, which are different from Multi-Domain Security Management administrators, can always access the Multi-Domain Server command line.
|
Multi-Domain Security Management includes tools for managing expiration dates and warning administrators of impending expirations. Administrators can manage expiration dates for other administrators with a lower level administrator type. Typically, Multi-Domain Security Management or Domain superusers do these management tasks.
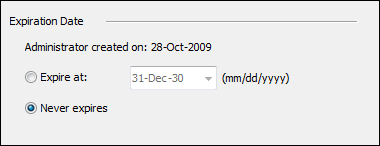
To configure the expiration date:
- In the or window, go to the pane.
- Do one of these steps to set the expiration date:
- Select and then select an expiration date using the calendar control.
OR
- Select to prevent this administrator account from expiring.
You can configure the default expiration dates that appear in this window in the Multi-Domain Security Management window.
Configuring Authentication
All administrators must authenticate to log in to the SmartDomain Manager and manage the Multi-Domain Security Management deployment. Select and configure an authentication method for this administrator.
To select and configure the authentication method:
- In the SmartDomain Manager, create a new administrator or double-click an existing administrator.
- In the or window, go to the pane.
- Select and configure one of these authentication methods:
- Undefined - Administrators are not authenticated or are authenticated by a certificate created in the Certificates pane.
- SecurID - Administrators enter a one-time password as displayed on the SecurID smart card.
- Check Point Password - Administrators enter the Check Point products password.
Enter and confirm the password. - OS Password - Administrators authenticate using their operating system password.
- RADIUS - Administrators authenticate by a password defined on the specified RADIUS server.
- TACACS - Administrators authenticate by a password defined on the specified TACACS server.
Configuring Certificates
You can create a certificate that let administrators connect to the Multi-Domain Server and Domain Management Servers. You can also revoke an existing certificate.
To create a certificate:
- In SmartDomain Manager, create a new administrator or double-click an existing administrator.
- In the or window, go to the pane.
- Click .
- In the message box, click to continue.
- Enter and confirm the certificate password.
- Save the certificate.
To revoke an existing certificate:
- In SmartDomain Manager, create a new administrator or double-click an existing administrator.
- In the or window, go to the pane.
- Click .
- In the message box, click to confirm.
Entering Administrator Properties - Flow
The Administrator Properties pane contains optional information, typically contact information or other descriptive data. Administrators with applicable permissions (typically superusers) define the fields that show in the Administrator Properties pane.
To enter administrator properties information:
- In SmartDomain Manager, create a new administrator or double-click an existing administrator.
- In the or window, go to the pane.
- Enter information in the property fields as necessary.
Deleting an Administrator
To delete an administrator:
- In the SmartDomain Manager, go to the pane.
- Right-click an existing administrator and then select .
- Click Yes in the confirmation window.
Defining Administrator Properties
The Administrator Properties pane includes optional information fields, typically contact information or other descriptive data. Administrators, with applicable permissions, define the fields that show in the Administrator Properties pane.
To define the fields that show in the Administrator Properties pane:
- Select from the SmartDomain Manager menu.
- Go to the pane.
- Do one or more of these actions:
- To add a new property field, click and then enter the field name in the pop-up window.
- To delete a property field, select an existing field and then click .
- To change a property field name, click and then enter a new field name.
- To change the display order of a property field, select a field and then click the or arrow to move it.
Defining Administrator Groups - Flow
Administrator groups are related collections of administrator accounts. This lets you manage and do operations on many administrators simultaneously.
Creating a New Group
To create a new administrator selection group:
- In the SmartDomain Manager, select .
- In the window, click .
- In the window, enter a unique group name.
Group names cannot contain spaces or special characters. - Select administrators from the list and then click .
The administrators show in the list.
Changing or Deleting a Group
To change an administrator selection group:
- In the SmartDomain Manager, select .
- In the window, select a group and then click .
- Select administrators from the list and then click .
The administrators show in the list.
To delete an administrator selection group:
- In the SmartDomain Manager, select .
- In the window, select a group and click .
- In the confirmation window, click .
Managing Administrator Account Expiration
You can assign an expiration date to each administrator. After this expiration date, the administrator cannot log in to the SmartConsole clients or do actions in the Security Management Server environment.
|
Note - Account expiration has no effect on operating system administrators. Operating system administrators are different from administrators defined in SmartDomain Manager and can continue access the command line.
|
SmartDomain Manager includes tools for managing expiration dates and warning administrators of impending expirations.
Working with Expiration Warnings
There are different methods to give warnings that administrator accounts will expire in a short time or have already expired. This section gives explanations for these warnings and procedures for correcting the issue.
Log In Warning
This warning message opens after you log in to the SmartDomain Manager if your administrator account is about to expire.
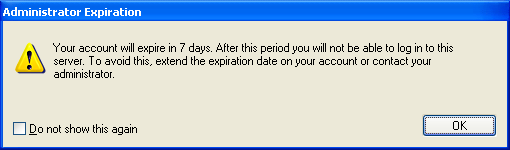
Speak to the administrator responsible for managing your administrator account to update the expiration date. If you have the applicable permissions, you can change the expiration date in your own account.
The administrator can disable this warning message by selecting the option. She can re-enable the warning by selecting administrator expiration warning from the SmartDomain Manager menu.
Using the Expired Accounts Window
Theshows all administrator accounts that have expired or are near their expiration date. If there are administrators in this condition, the link shows in the SmartDomain Manager status bar.

To use the window, you must activate this feature in the Administrator Global Properties pane in the window. By default, the window is activated.
To open the Accounts window, click the link.
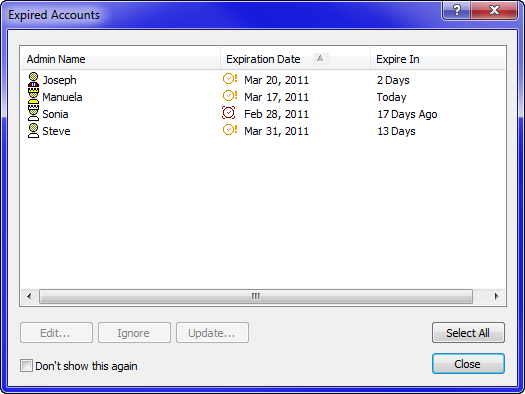
These icons show the current status of each account.
Icon
|
Description
|

|
Account is active.
|

|
Account will expire soon.
|

|
Account has expired.
|

|
Expiration warning ignored.
|
By default, the window is enabled.
To disable the window, select the option. Alternatively, you can select from the Selection bar and then select > from the menu.
To re-enable the window, select from the Selection bar and then select > from the menu.
To change the expiration date from this window:
- Select an administrator account and then click .
- In the window, do one of these steps to change the expiration date:
- Select and then select an expiration date from the calendar control.
OR
- Select to prevent this administrator account from expiring.
To change administrator account settings, select an administrator and then click .
To deactivate expiration warnings for one administrator account, select the account and then click .
To deactivate expiration warnings for all administrator accounts, do the procedure for setting default expiration parameters.
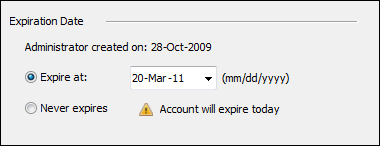
Add or Change Administrator Window Warning
This warning shows in the administrator General Properties pane if the account is about to expire. Make sure that the expiration date is correct and update if necessary.
Configuring Default Expiration Settings
The default expiration settings show when you define a new administrator account. These settings include:
- The default expiration date.
- The number of days before expiration that warnings show after log in.
- The number of days before expiration that the administrator account shows in the window.
To configure the default expiration parameters:
- In the SmartDomain Manager, select .
- In the window, select .
- In the window, set the expiration date using one of these options:
- - Select if this administrator account does not expire.
- - Select and then click the arrow on the text box. Select the expiration date using the calendar control.
- - Select and enter the number of days (from today) before this account expires.
- Select to show an expiration warning message when an administrator logs in. Enter the number of days before expiration that a warning shows.
- Select to activate the s link. This link opens thewindow.
- Select to let these administrators create or change other administrator accounts. Global and Domain managers must have the permission profile assigned to them to be able to edit an administrator with a lower permission level. For example:
- A Global Manager can edit a Domain Manager and None administrators.
- A Domain Manager can only edit None administrators.
Working with Permission Profiles
A permissions profile is a predefined set of SmartConsole administrative permissions that you assign to administrators and Domains. This feature lets you manage complex, granular permissions for many administrators with one definition. Permission profiles do not apply to SmartDomain Manager activities.
When you assign an administrator account to a domain, you must assign a permissions profile. You can assign a predefined permissions profile or you can create a unique, Domain-specific permissions profile for the administrator.
Administrators with applicable permissions can create and manage permissions profiles. By default, only superusers can create or configure permissions profiles. You can change the global properties to let global and Domain managers create and configure permission profiles for their assigned Domains.
Multi-Domain Security Management includes default permissions profiles:
- - Administrators cannot use SmartConsole applications to see or configure settings.
- - Administrators can use SmartConsole only to see information. They cannot configure settings.
- - Administrators can use SmartConsole applications to see and configure all settings.
- - Administrators can use SmartConsole applications to see and configure all settings with the exception of DLP.
You can assign one of the default permissions profiles to any administrator and domain.
Configuring Permissions
This section includes procedures for creating, changing and deleting permission profiles. Administrators with the applicable permissions can create, edit or delete permissions profiles.
To create or change a permissions profile:
- Select the icon > > .
- In the window, click or select an existing .
- In the window, configure permissions profile settings.
Note - You can also create a new permissions profile while assigning a profile to an administrator in a Domain.
To delete an existing permissions profile:
- In SmartDashboard, select > .
- In the window, click .
- Click to confirm.
To configure permissions profile settings:
- In the section, select one of these options:
- - Permissions to use SmartConsole applications and the Management Portal to connect a Domain Management Server.
- - Permissions to connect to a Domain Management Server only with the Management Portal.
- In the section, select one of these options:
- - Full access to all Check Point products.
- - Permissions to:
- See all fields of DLP logs in SmartView Tracker.
- See incident messages and captured data. User emails can be read if they violate corporate Data Loss Prevention rules.
- Send or discard quarantined user emails from SmartView Tracker. With the option you can assign a subset of these permissions as necessary. For example, administrators can see the field content in DLP logs but not see the actual content of incidents.
- - Read-only access to all Check Point products.
- - Configure access to specified Check Point products and select the access type for each product or blade.
Configuring Customized Permissions
If you select , you can define permissions for each Security Management Server resource (object, Policy and feature) separately. The resources show on four different panes in the window. Each pane contains a list of related resources.
To configure customized permissions:
- In the section, select and then click .
- Select a pane in the window:
- - Security Policy, blades and features
- - Monitoring and logging options
- - SmartEvent and SmartReporter features
- - SmartProvisioning features and scripting
- - Endpoint Security Policy management and Endpoint Security client deployment and management.
- Set permissions for the resources:
- To prevent an administrator from seeing or configuring a resource, clear its checkbox.
- To let the administrator see a resource (but not change it), select its checkbox and then select .
- To let the administrator see and configure a resource, select its checkbox and then select .
Notes:
- You cannot prevent administrators from seeing some resources. These resources options are disabled.
- Some resources do not have permission selections. You can only select or clear them.
Managing Permission Profiles
By default, only Global and Domain superusers can create and configure permissions profiles. You can optionally let Global and Domain managers create and configure permissions profiles. Administrators with None permissions cannot manage permission profiles.
To let Global and Domain administrators manage permissions profiles:
- Select > properties from the SmartDomain Manager menu.
- In the window, select .
- In the pane, select the option.
To See the Latest Changes to Permissions Profiles
To see information about the latest changes to a permissions profile:
- In the SmartDomain Manager, select (in the Selection Bar) > > .
- Select a permissions profile.
- In the window, click > .
The window opens.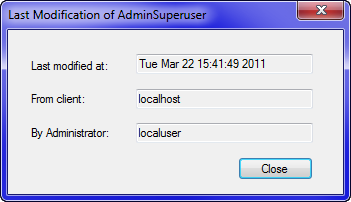
This window shows:
- Date of the last change
- Administrator who made the change
- GUI client used to make the change
Seeing Administrators Using a Permissions Profile
To see which administrators are using a permissions profile:
- In SmartDomain Manager, select (in the Selection bar)> > .
- Select a permissions profile.
- In the window, click > .
The window opens.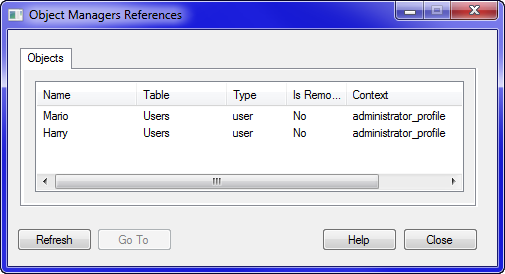
Merging Identical Permissions Profiles
It is a security best practice to remove identical permissions profiles and to keep the number of permissions profiles to a minimum. This makes the maintenance of permissions profiles easier.
Multi-Domain Security Management lets you find identical permissions profiles and merge them into one profile.
To find and merge identical permissions profiles:
- In the SmartDomain Manager, select .
- Select > from the menu.
- Select a permissions profile.
- Click and then select .
- Click or
- If the selected profile or profiles are identical to a default profile, they automatically merge with the default profile. Duplicate profiles are deleted.
- If the selected profile or profiles are not identical to a default profile, they automatically merge with the selected profile. Duplicate profiles are deleted.
- If you select the option, enter a profile name (or accept the default name). The selected profile or profiles merge with the name you entered. Duplicate profiles are deleted.
|
Note - You cannot merge a default profile with an administrator-defined profile. If you try to do this, an error message shows.
|
Showing Connected Administrators
In the view, you can see all administrators currently connected to Multi-Domain Security Management. To show connected administrators information, select in the SmartDomain Manager Selection bar.
This information shows in the pane:
- - Type of GUI Client connected to the SmartDomain Manager.
- - Domain that the administrator connects to.
- - Administrator name.
- - Type of GUI client that the administrator is using.
- - GUI client IP address or DNS host name.
- - Date and time that the administrator logged in.
- - Database status:
- - The administrator is using SmartDashboard and has exclusive access permissions to the Domain Management Server. The database is locked.
- - The administrator is using SmartDashboard with access permissions or is using a different GUI client.
- - Status of requests to disconnect a GUI client:
- - Disconnection request is being processed. This status shows only to the user who is disconnecting.
- - Shows the date and time when the GUI client is to be disconnected.
- - Request to cancel a disconnection request. The disconnection request can occur up to 60 minutes from the current time. Administrators can only disconnect connections for other administrators.
|

