Deploying Multi-Domain Security Management
This chapter shows you how to deploy Multi-Domain Security Management in your environment.
Deployment Overview
This topic summarizes the steps to deploy Multi-Domain Security Management.
- Install and create the Primary Multi-Domain Server. You also configure Multi-Domain Server administrators and GUI Clients at this time. See the R77 Installation and Upgrade Guide for detailed procedures.
- Install SmartDomain Manager and SmartConsole Clients.
- Install the Multi-Domain Server license. You can postpone this step until the trial period ends after 15 days. See Licensing to learn more.
- Install and configure Multi-Domain Log Servers and secondary Multi-Domain Servers as needed. See Multiple Multi-Domain Server Deployments to learn more.
- Install and configure Security Gateways to protect your Multi-Domain Security Management network. Define and install the security Policy.
Setting Up Your Network Topology
The Multi-Domain Server and Security Gateways should be TCP/IP ready. A Multi-Domain Server should contain at least one interface with a routable IP address and should be able to query a DNS server in order to resolve the IP addresses of other computer names.
Multi-Domain Security Management supports IPv4 and IPv6. You must always define an IPv4 address. The IPv6 address is optional.
Make sure that routing is configured to allow IP communication between:
- The Domain Management Server and Domain Log Server and its managed Security Gateways.
- A Multi-Domain Server and other Multi-Domain Servers in the system.
- A Domain Management Server and Log Servers of the same Domain.
- A Domain Management Server and its High Availability Domain Management Server peer.
- A GUI client and Multi-Domain Servers.
- A GUI client and Domain Management Servers and Log Servers.
Protecting the Multi-Domain Security Management Environment
You should always deploy a Check Point Security Gateway to protect your Multi-Domain Security Management network, including your Multi-Domain Server, Multi-Domain Log Server and management platforms. This section presents the procedures for installing and defining Check Point Security Gateways to protect your Multi-Domain Security Management network. You can manage your Security Gateway using either a Security Management Server (configured as a standalone Security Gateway/Security Management combination) or a Domain Management Server and the SmartDomain Manager.
Standalone Security Gateway/Security Management Server
In this scenario the Security Gateway that protects your Multi-Domain Security Management deployment and a Security Management Server are installed on a single Linux or SecurePlatform computer.
To deploy a Security Gateway/Security Management standalone installation:
- Install and configure a Check Point Security Gateway and Security Management Server on a single computer as described in the R77 Installation and Upgrade Guide.
- Verify connectivity between the Security Gateway/Security Management Server, the Multi-Domain Server, the SmartDashboard client and any other Multi-Domain Security Management network components.
- Verify that SIC trust has been successfully established.
- Log on to SmartDashboard.
- Create and configure the Security Gateway object to protect your Multi-Domain Security Management deployment.
- Define and install a Security Policy for the Security Gateway.
Domain Management Server and SmartDomain Manager
In this scenario, the Security Gateway that protects your Multi-Domain Security Management deployment is installed on a SecurePlatform or Linux computer and is managed by Domain Management Server on the Multi-Domain Server itself.
- Install Check Point Security Gateway on a SecurePlatform or Linux computer, without the Security Management Server, as described in the R77 Installation and Upgrade Guide.
- Verify connectivity with the Multi-Domain Server.
- Launch the SmartDomain Manager and log into the Multi-Domain Server.
- Define a Domain for the Security Gateway and create a Domain Management Server for this Domain. For more information, refer to Configuring a New Domain.
- In the SmartDomain Manager, launch SmartDashboard from the Domain Management Server and create the network object representing the Security Gateway on the Domain Management Server.
- Right-click the Network Objects icon, and from the drop-down menu select New > Check Point > Gateway .
- Enter configuration details for the Security Gateway, including an IP address. The external Security Gateway should have a routable IP address.
- The products installed on this computer should be Firewall and SVN Foundation. You can install additional products as required.
- Establish SIC trust with the Security Gateway.
- Define and install a Security Policy for the Security Gateway.
Security Gateways Protecting a Multi-Domain Server
A Security Gateway that protects a Multi-Domain Server must have an installed security policy that allows connections between:
- The Active and Standby Domain Management Servers and their Domain Security Gateways.
- Log transfers between Domain Security Gateways and Log Servers.
- Domain Security Gateways and their specified Domain Management Servers (Active and Standby).
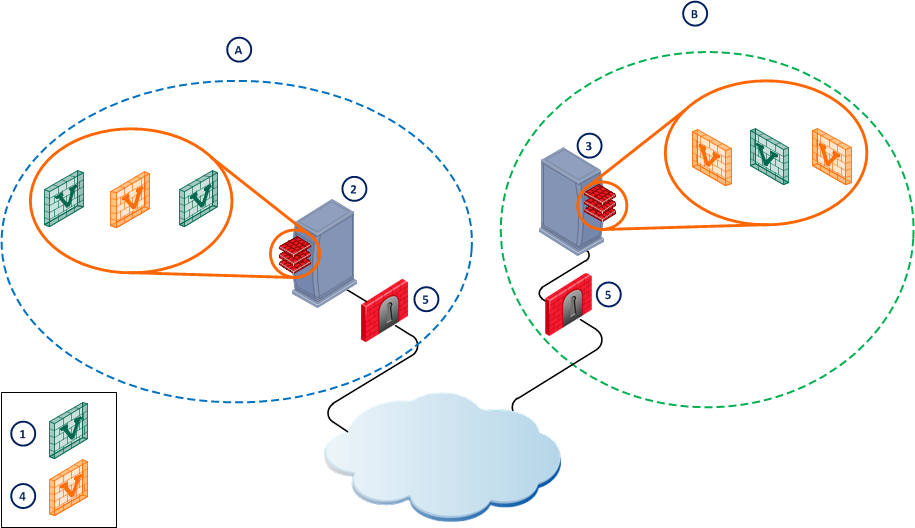
Item
|
Description
|
A
|
Primary Domain
|
B
|
Mirror Domain
|
1
|
Active Domain Management Servers
|
2
|
Primary Multi-Domain Server
|
3
|
Mirror Multi-Domain Server
|
4
|
Mirror Domain Management Servers
|
5
|
Security Gateways
|
The Security Policy must also allow connections between:
- The Multi-Domain Security Management network Domain Management Server and the Security Gateway.
- Between Multi-Domain Servers, if they are distributed between several management networks.
- GUI Clients and the Multi-Domain Server, according to which GUI Clients are allowed SmartDomain Manager access.
To learn more about creating Security Policies using SmartDashboard, see the R77 Security Management Administration Guide.
Making Connections Between Different Components of the System
To make secure communication and proper access between different system components:
- Open SmartDashboard and connect to the Domain Management Server. Create objects to represent each Domain Management Server, Domain Management Server-HAs, Log Servers, and Domain Security Gateways.
- Examine the implied rules for the Domain Management Server. These rules allow Domain Log Server and Domain Management Server communication with Security Gateways, for CPMI communication with management servers.
- Use the implied rules as a template to create rules for each Domain, permitting services between the source Domain Management Servers/Log Servers and the Domain Security Gateways.
- Examine your network deployment and decide which components should be used in rules to enable communications. Run status collections and push/pull certificates. For example, if the Multi-Domain Security Management network is distributed, with different Multi-Domain Servers in remote locations and Security Gateways protecting a remote Multi-Domain Security Management network, define rules to enable the Multi-Domain Servers to communicate with one another. In such a rule, the Multi-Domain Servers are in both the Source and Destination column of the rule.
Use this table to create rules that allow connections between specified components:
Description
|
Source
|
Destination
|
Enable connections between the SmartDomain Manager and the Multi-Domain Server.
|
GUI Client
|
Multi-Domain Server
|
Enable connections between Multi-Domain Servers with the same ICA.
|
Multi-Domain Servers
|
Multi-Domain Servers
|
Domain Management Server status collection. Each Domain Management Server collects status data from its Domain Security Gateways. If a Domain has two or more Domain Management Servers, the first Domain Management Server collects status from the peer ("Mirror") Domain Management Servers.
|
Domain Management Server, Domain Management Server-HA
|
Security Gateway
Domain Management Server-HA
|
With more than one Multi-Domain Server, enable each Multi-Domain Server to collect status data from the others.
|
Multi-Domain Servers
|
Multi-Domain Servers
|
Enable passing a certificate to a Multi-Domain Server. A new Multi-Domain Server must have a SIC certificate created by the Primary Multi-Domain Server.
|
Multi-Domain Servers
|
Multi-Domain Servers
|
Enable certificate push to a Domain Management Server. A Mirror Domain Management Server for a Domain must get a certificate.
|
Domain Management Server
|
Domain Management Server-HA
|
Enable Domain level High Availability synchronization protocol, for Mirror Domain Management Servers and for synchronizing Domain Management Servers of the same Domain.
|
Domain Management Server
Domain Management Server-HA
|
Domain Management Server-HA
Domain Management Server
|
The Multi-Domain Security Management Trust Model
Introduction to the Trust Model
Multi-Domain Servers and Domain Management Servers establish secure communication between system components with full data integrity. This is a critical component for making sure that system management commands and system information are delivered securely.
Multi-Domain Security Management systems must establish safe communication between the various components of the Multi-Domain Security Management deployment. Secure Internal Communication (SIC) makes sure that this communication is secure and private.
Secure Internal Communication (SIC)
Secure Internal Communication (SIC) defines trust between all Multi-Domain Security Management system components. A basic explanation of how SIC operates is in the R77 Security Management Administration Guide.
Secure communication makes sure that the system can receive all the necessary information it needs to run correctly. Although information must be allowed to pass freely, it also has to pass securely. This means that all communication must be encrypted so that an imposter cannot send, receive or intercept communication meant for someone else, be authenticated, so there can be no doubt as to the identity of the communicating peers, and have data integrity, not have been altered or distorted in any way. Of course, it is helpful if it is also user-friendly.
Trust Between a Domain Management Server and its Domain Network
To ensure authenticated communication between Multi-Domain Security Management and Domain networks, each Domain Management Server has its own Internal Certificate Authority (ICA). The ICA issues certificates to the Domain Management Server Security Gateways. The Domain Management Server ICA is part of the Domain Management Server data hosted by Multi-Domain Server. Each Domain Management Server ICA is associated with a specific Domain. A high availability Domain secondary Domain Management Server shares the same Internal Certificate Authority with the primary Domain Management Server.
The Domain Management Server ICA issues certificates to Security Gateways. SIC trust can then be established between the Domain Management Server and each of its Security Gateways.
Different Domain Management Servers have different ICAs to ensure that a Domain Management Server establishes secure communication with its own Domain Security Gateways. Other Domain Management Servers cannot access the internal networks and establish communication with other Domain Security Gateways.
Trust Between a Domain Log Server and its Domain Network
The Domain Log Server also receives a certificate from the Domain Management Server ICA. This is so that the Security Gateways can establish communication with the Domain Log Server, for tracking and logging purposes. The Security Gateways and Log Servers must be able to trust their communication with each other, but only if they belong to the same Domain. Otherwise, different Domains could monitor each other, which would be a security breach.
Multi-Domain Server Communication with Domain Management Servers
Every Multi-Domain Server communicates with the Domain Management Servers that it hosts locally using the SIC local protocol. SIC local is managed by Multi-Domain Security Management and activates trusted Multi-Domain Server communication.
SIC is used for remote communication, whereas SIC local is used for a host's internal communication. SIC local communication does not make use of certificates.
Trust Between Multi-Domain Server to Multi-Domain Server
The primary Multi-Domain Server (the first Multi-Domain Server defined) has its own Internal Certificate Authority. This ICA issues certificates to all other Multi-Domain Servers, so that trusted communication can be authenticated and secure between Multi-Domain Servers. All Multi-Domain Servers share one Internal Certificate Authority.
The ICA creates certificates for all other Multi-Domain Servers, and for Multi-Domain Security Management administrators. Administrators also need to establish trusted communication with the Multi-Domain Servers.
Using External Authentication Servers
Multi-Domain Security Management supports external authentication methods. When an administrator authenticates all authentication requests are sent to the external authentication server. The external server authenticates the user and sends a reply to the Multi-Domain Server. Only authenticated administrators can connect to the Multi-Domain Server or the Domain Management Server.
Multi-Domain Security Management supports the following external authentication methods:
- RADIUS
- TACACS
- RSA SecurID ACE/Server
TACACS and RADIUS authentication methods, when authenticating an administrator connecting to a Domain Management Server, use the Multi-Domain Server as a proxy between the Domain Management Server and the external authentication server. Therefore, each Multi-Domain Server must be defined on the authentication server, and the authentication server must be defined in the global database. In addition, if the Multi-Domain Server is down, the Domain Management Server will not be able to authenticate administrators.
Configuring External Authentication
To configure External Authentication:
- Open the SmartDomain Manager and select Administrators.
- Define a new administrator.
- In the General tab, enter the same user name that was created on the authentication server.
- Mark the administrator's permission.
- On the Authentication tab, select the Authentication Scheme. If using RADIUS or TACACS, choose the appropriate server that was configured in Global SmartDashboard.
- If using SecurID, do the following:
- Generate the file
sdconf.rec - Copy
sdconf.rec /var/ace/ - Edit the file
/etc/servicessecurid 5500/udp
securidprop 5510/tcp
- Reboot the Multi-Domain Server computers.
Alternatively, steps 3, 4, and 5 can be done from the command line interface (CLI):
mdscmd setadminauth <adminName>
<undefined | os | fw1 | securid | tacacs | radius> [authenticationServerName]
[-m serverName -u user -p password]
|
Re-authenticating when using SmartConsole Clients
When one SmartConsole client runs another SmartConsole client, Multi-Domain Security Management uses the credentials entered when the administrator logged into the first client.
However, there are cases where it is useful to require administrators to re-authenticate for each SmartConsole client they launch. When using RSA SecurID to authenticate Multi-Domain Security Management administrators, for instance, it is common to require re-authentication when SmartConsole Clients connect to Multi-Domain Servers or Domain Management Servers.
You can compel administrators to re-authenticate every time a new GUI client is launched and connects to:
- a specific Domain Management Server
- all Domain Management Servers created on this system in the future
- this Multi-Domain Server or Multi-Domain Log Server
The instructions for each are listed below.
...When Connecting to a Specific Domain Management Server
Run these commands from a root shell on the Multi-Domain Server that hosts the specified Domain Management Server:
dbedit -s-u <name of administrator with edit permissions for this Domain Management Server> -p
< administrator password>
modify properties firewall_properties fwm_ticket_ttl 0
update properties firewall_properties
quit
If the relevant Domain has more than one Domain Management Server, synchronize the Domain Management Servers for the change to take effect on both. If the Domain owns one or more Log Servers, the Install Database operation should be performed on each Domain Log Server for the change to take effect.
...When Connecting to all Domain Management Servers Created on This System in the Future
Do these steps in the root directory of each Multi-Domain Server:
- Run
mdsenv. - Open
$MDS_TEMPLATE/conf/objects_5_0.C - Find the line that contains:
fwm_ticket_ttl - Replace it with the line:
fwm_ticket_ttl (0)
...When Connecting to this Multi-Domain Server or Multi-Domain Log Server
Run these command in a root shell on the Multi-Domain Server hosting the Domain Management Server:
dbedit -s <IP of the Multi-Domain Server or Multi-Domain Log Server> -u <name of the administrator with edit permissions for the Global Policy of the Multi-Domain Server> -p <password of the administrator>modify properties firewall_properties fwm_ticket_ttl 0update properties firewall_propertiesquit
If the Multi-Domain Security Management configuration consists of more than one Multi-Domain Server or Multi-Domain Log Server, synchronize the Global Policy for this change to take effect on all Multi-Domain Server or Multi-Domain Log Server machines.
CPMI Protocol
The CPMI (Check Point Management Interface) protocol is a generic open protocol that allows third party vendors to interoperate with Check Point management products. The client side of CPMI is included in the OPSEC SDK documentation, so third-party products can integrate with the Domain Management Servers. See the CPMI guide in the OPSEC SDK documentation.
Configuring the Primary Multi-Domain Server
This procedure assumes that you have already installed your new Primary MDS on Gaia or SecurePlatform. See the R77 Installation and Upgrade guide to learn more about the installation procedures.
To configure the Primary Multi-Domain Server:
- Log into the SmartDomain Manager using the SmartDomain Manager management IP address.
- Go to the tab > .
The newly installed Primary MDS shows automatically under .
- Right-click the Primary Multi-Domain Server object and select .
- In the window > tab, define these parameters:
- On the tab, add a valid license for this Multi-Domain Server.
- On the tab:
Enabling IPv6 Support
If your environment uses IPv6 addresses, you first must enable IPv6 support for the Multi-Domain Server and for any existing Domain Management Servers. It is not necessary to enable IPv6 support for Domain Management Servers that are created after IPv6 is enabled on the Multi-Domain Server, because this is done automatically.
Before enabling IPv6 support for the Multi-Domain Server:
- Enable IPv6 on Gaia and assign an IPv6 address to the management interface.
- Write down the Multi-Domain Server IPv6 address and the names and IPv6 address for all Domain Management Servers. This is necessary because the procedures disconnect the SmartDomain Manager.
To enable IPv6 support for the Multi-Domain Server:
- From the Multi-Domain Server command line, run
mdsconfig - Select .
- Press when asked to change the IPv6 preferences for the Multi-Domain Server.
Press again to confirm.
- Enter the management interface name (typically eth0).
- Enter the Multi-Domain Server IPv6 address.
- Press to start Check Point services.
After a few moments, the mdsconfig
To enable IPv6 support for all existing Domain Management Servers:
- From the
mdsconfig - Press when asked to change the IPv6 preferences for Domain Management Servers.
- Press to add support to an existing Domain Management Server.
- Press to add Support to all Domain Management Servers at once.
- Press to manually add IPv6 addresses
Or
Press to automatically assign IPv6 address from a specified range.
- Do the instructions on the screen to enter the IPv6 address or a range of IPv6 addresses when prompted.
To manually enable IPv6 support for specified Domain Management Servers.
- From the
mdsconfig - At the prompt, press to change the IPv6 preferences for Domain Management Servers.
- Press to add support to an existing Domain Management Server.
- Press when asked to enable IPv6 support for all Domain Management Servers at once.
Press to confirm.
- At the prompt, enter the Domain Management Server name.
The available Domain Management Servers show above prompt. You can copy and paste the name.
- Enter the IPv6 address.
- At the prompt, press to enable another Domain Management Server or to complete the procedure.
Disabling IPv6 Support
The procedure for disabling IPv6 support includes these steps:
- Disable IPv6 support for all Domain Management Servers.
- Disable IPv6 support for the Multi-Domain Server.
You must disable IPv6 support for all Domain Management Servers before you can disable IPv6 support for the Multi-Domain Server.
To disable IPv6 support for all Domain Management Servers:
- At the Multi-Domain Server CLI, run
mdsconfig - Select .
This command disables IPv6 for all currently defined Domain Management Servers on this Multi-Domain Server.
- Press at the prompt to disable IPv6 support for all Domain Management Servers.
Press again to confirm.
To disable IPv6 support for a Multi-Domain Server:
- From the
mdsconfig - Press at the prompt to change IPv6 preferences for Domain Management Servers.
- Press to disable IPv6 support for Domain Management Servers.
- Press disable IPv6 support for all Domain Management Servers.
Press again to confirm.
- Enter the interface name at the prompt.
You can also disable IPv6 support for some (but not all) Domain Management Servers. In this case, you cannot disable IPv6 support for the Multi-Domain Server.
To disable IPv6 for individual Domain Management Servers:
- From the
mdsconfig - Press at the prompt to change IPv6 preferences for Domain Management Servers.
- Press to disable IPv6 support for Domain Management Servers.
- Press when asked to disable IPv6 support for all Domain Management Servers. Press again to confirm.
- Press at the prompt to enable another Domain Management Server or to complete the procedure.
Using SmartDomain Manager
After you set up your primary Multi-Domain Server, use the SmartDomain Manager to configure and manage the Multi-Domain Security Management deployment. Ensure that you have installed the SmartDomain Manager software on your computer and that your computer is a trusted GUI Client. You must be an administrator with appropriate privileges (Superuser, Global Manager, or Domain Manager) to run the SmartDomain Manager.
Launching the SmartDomain Manager
To start the SmartDomain Manager:
- Click > > > .
- Optional: Select .
- If you are not using the Demo mode:
- Enter the SmartDomain Manager host name or IP address.
- Do one of these authentication steps:
- Enter an administrator name and password.
- Click and then select or navigate to the applicable certificate.
- Optional: Enter a session description in the applicable field.
- Click .
- The SmartDomain Manager connects to the Multi-Domain Server.
- The SmartDomain Manager opens, showing all network objects and menu commands that you have permission to work with.
- If necessary, confirm the connection using the fingerprint generated during installation.
This only occurs the first time that you log in to a Security Management Server or SmartDomain Manager from a client computer.
Demo Mode
You can open the SmartDomain Manager in Demo mode. This mode does not require authentication or a connection to the Multi-Domain Server. Use the Demo mode to experiment with different objects, views, modes and features before you create a production system. The Demo mode includes several pre-configured sample Domains, Domain Management Servers, Security Gateways and policies.
Operations performed in Demo mode are stored in a local database. You can continue a Demo session from the point at which you left off in a previous session.
Multiple Multi-Domain Server Deployments
In Multi-Domain Security Management systems where more than one Multi-Domain Server is installed, you need to take various configuration factors into account. The following section describes what in detail you need to know.
Synchronizing Clocks
All Multi-Domain Server system clocks must be synchronized to the second to ensure proper operation. Before creating a new Multi-Domain Server, you must first synchronize the new computer clock with other Multi-Domain Server platforms in the system.
You can synchronize Multi-Domain Server clocks using any synchronization utility. It is recommended that all the Multi-Domain Server clocks be synchronized automatically at least once a day to compensate for clock drift.
Configuring Secondary Multi-Domain Server or a Multi-Domain Log Server
The procedure for creating a Secondary Multi-Domain Server or a Multi-Domain Log Server is similar installing a new Multi-Domain Server, but with some additional steps. This procedure assumes that you already installed and configured the Primary Multi-Domain Server and installed the new Secondary Multi-Domain Server or Multi-Domain Log Server on a supported platform. See the R77 Installation and Upgrade guide to learn more about the installation procedures.

|
Important - You must synchronize existing Multi-Domain Server clocks with the newly installed Secondary Multi-Domain Server before starting this procedure.
|
To configure a secondary Multi-Domain Server or a Multi-Domain Log Server:
- In the SmartDomain Manager go to the tab > .
- Right-click and elect .
- In the window, enter the Multi-Domain Server computer name.
The computer name must match the computer name defined when you installed the Multi-Domain Server.
- Define these IP address parameters:
- Click to establish SIC trust. Enter the Activation Key that you defined while installing the Multi-Domain Server or Multi-Domain Log Server.
- Click . If SIC trust succeeds, the field shows
Trust establishedIf you are setting up a High Availability deployment, a prompt appears asking you to do an Initial synchronization. This operation synchronizes the primary and secondary Multi-Domain Servers.
- Optional: Click to enable the SmartLog feature for all Domains on this Multi-Domain Server.
- Click to start the synchronization. When the synchronization finishes, click OK to continue.
- If you created a new Multi-Domain Server, you can now connect directly to it.
- On the tab, add a valid license for this Multi-Domain Server.
- On the tab:
Multi-Domain Log Server Configuration - Additional Step
If you created a Multi-Domain Log Server, set up your Log Servers for Domain activity logging. See Logging in Multi-Domain Security Management.
Changing an Existing Multi-Domain Server or Multi-Domain Log Server
This procedure assumes that the Multi-Domain Server or Multi-Domain Log Server has already been installed and configured.
To change an existing Multi-Domain Server or Multi-Domain Log Server:
- In the SmartDomain Manager view mode, double-click the applicable Multi-Domain Server.
- In the window, define these IP address parameters as necessary:
- - Enter a range of valid IPv4 addresses for automatic assignment to new Domain Management Servers.
- - Enter the IPv6 address.
- - Enter a range of valid IPv6 addresses for automatic assignment to new Domain Management Servers.
- If your Multi-Domain Server is installed on Gaia, make sure that you also activate IPv6 with the Gaia WebUI or CLI. See the R77 Installation and Upgrade Guide for instructions.
- If there is no SIC trust, do these steps to re-establish SIC trust:
- From the Multi-Domain Server CLI, run the
mdsconfig - From themenu, do the instructions on the screen to re-initialize SIC communication.
- In the SmartDomain Manager window, click .
- In the window, click .
- Enter the that you specified with the
mdsconfig - Click .
If SIC trust succeeds, the field shows .
- On the tab, add a valid license for this Multi-Domain Server.
- On the tab:
Deleting a Multi-Domain Server
If you want to delete an Multi-Domain Server, do so only if you are certain that you no longer need it. If you delete a Multi-Domain Server in error, you will have to reconfigure it from the beginning (including its Domain Management Servers and Security Gateways).
To delete one Multi-Domain Server:
- In the SmartDomain Manager view mode, right click a Multi-Domain Server and select Delete Multi-Domain Server.
- Confirm the deletion and click OK.
To delete more than one Multi-Domain Server or Multi-Domain Log Server:
- In the SmartDomain Manager view mode, right click each Multi-Domain Server or Multi-Domain Log Server and then select .
- Confirm the deletions and click .
- Open SmartDashboard for each Domain Management Server on the primary Multi-Domain Server on which you had a High Availability Domain Management Server or Multi-Domain Log Server installed.
- Delete the applicable High Available Domain Management Servers and Domain Log Server.
Confirm license detach and that the fact that the object is still defined in the database.
- Install the database on all defined Domain Management Servers and log servers.
- Install policies on Security Gateways used as a source for getting policies or log receivers.
Licensing
Licensing Overview
This Multi-Domain Security Management version uses a simplified licensing model that matches its scalable architecture. This lets you purchase licenses according to the size and complexity of your deployment. You only purchase the management Software Blade licenses that you need. You can always add additional licenses as your deployment grows.
Multi-Domain Security Management uses the Check Point Software Blade architecture. You install and license management Blades on the Multi-Domain Server. For an environment that uses multiple Multi-Domain Servers, you must install the Blades on each Multi-Domain Server.
Dedicated log servers (Multi-Domain Log Servers and Log Servers) have their own special licenses.
The Trial Period
All Check Point products have a 15 day trial period. During this period the software is fully functional and all features are available without a license. After this period, you must obtain an extended evaluation license or a permanent license to continue using the software.
The Multi-Domain Security Management trial period begins as soon you install a Multi-Domain Server (regardless of its type). The trial license has a limit of 200 Domain Management Servers.
Each Domain Management Server has its own trial license for a primary Domain Management Server managing an unlimited number of Security Gateways. This license supports the Check Point SmartUpdate and SmartMap features. It expires on the same day as the Multi-Domain Server trial license.
License Types
This section includes details about the various license types in a Multi-Domain Security Management deployment. Refer to the User Center for current information about license types and bundles.
Multi-Domain Server Licenses
You must install a Global Policy Software Blade license on all Multi-Domain Servers. You can add blade licenses for other Check Point management features according to your requirements. In a high availability deployment, the same Blade licenses must be installed on all Multi-Domain Servers.
All Multi-Domain Servers in your deployment must have licenses attached for the same optional Software Blades. You cannot attach an optional software blade to one Multi-Domain Server and not the others.
If you are upgrading to R77 from an earlier version, you can attach a free license to your existing Multi-Domain Server licenses that lets you use the new functionality. You must still attach Software Blade licenses for optional features.
Domain Management Server Licenses
Each Domain Management Server requires a Domain Management Server license. In a High Availability deployment, you must attach a full license to the first Domain Management Server. You can then attach licensees to any additional Domain Management Servers. Each additional Domain Management Server must be maintained on a different Multi-Domain Server.
Domain Management Servers are licensed according to the number of Security Gateways they manage. Domain Management Server licenses are available in these bundles:
- A Domain with up 2 Security Gateways.
- A Domain with up to 10 Security Gateways.
- A Domain with an unlimited number of Security Gateways.
Domain Management Server licenses are associated with their Multi-Domain Server. You can freely move licenses among Domain Management Servers on the same Multi-Domain Server, but you cannot move licenses to a different Multi-Domain Server.
The number of QoS Security Gateways managed by a Domain Management Server is unlimited and requires no special license.
VSX Licenses
VSX Virtual Systems can use Domain Management Server licenses without any additional licensing requirements. If you are managing only one Virtual System in a Domain, you can purchase a special one-Domain license.
Log Server Licenses
A Multi-Domain Log Server is a specialized Multi-Domain Server that can only host Log Servers. Each Domain Log Server requires its own Domain Log Server license, whether it is hosted by a Multi-Domain Log Server or a Multi-Domain Server.
Security Gateway Licenses
Each Domain Security Gateway requires the appropriate Software Blade licenses. Security Gateways are licensed according to the number of nodes at a site. A node is any computing device with an IP address connected to the protected network.
Multi-Domain Security Management also supports Quality of Service (QoS) Security Gateways.
Managing Licenses
You can use SmartUpdate to manage licenses for Multi-Domain Servers, Domain Management Servers, Domain Security Gateways, and Software Blades. SmartUpdate lets you add licenses to a central repository and assign them to components as necessary.
You can also manage Domain Management Server component and blade licenses directly from the from the SmartDomain Manager view. If you save your licenses in the SmartUpdate central repository, you can get these licenses from the repository by using this window.
License Violations
A license violation occurs when the trial license or an evaluation, or other time-limited license expires. When a license violation occurs, syslog messages are sent, pop-up alerts show in the SmartDomain Manager, and audit entries in SmartView Tracker show the nature of the violation. In addition, the status bar of the SmartDomain Manager shows a license violation message.
If a Multi-Domain Server is in the license violation state, you cannot define any new Domain Management Servers. Otherwise the system continues to function normally. Licenses are enforced separately for each Multi-Domain Server. This means that if there is a license violation for one Multi-Domain Server, all other Multi-Domain Servers will continue to operate normally if their licenses are valid.
Managing Licenses Using SmartUpdate
To manage licenses using SmartUpdate, select the SmartUpdate view in the SmartDomain Manager Selection Bar. If you loaded SmartUpdate, you can also right-click a Multi-Domain Server object and select Applications > SmartUpdate from the Options menu. Licenses for components and blades are stored in a central repository.
To view repository contents:
- Select SmartUpdate from the SmartDomain Manager Main menu.
- Select >> . The repository pane shows in the SmartUpdate view.
To add new licenses to the repository:
- Select SmartUpdate from the SmartDomain Manager Main menu.
- Select >> .
- Select a method for adding a license:
- From User Center - Obtain a license file from the User Center.
- From file - Import a license file to the repository.
- Manually - Open the window and enter licenses information manually. You can copy the license string from a file and click to enter the data.
You can now see the license in the repository.
To attach a license to a component:
- Select SmartUpdate from the SmartDomain Manager Main menu.
- Select >> .
- Select a license from the window. The license shows as attached in the repository.
You can manage other license tasks with SmartUpdate. See the R77 Security Management Administration Guide.
Adding Licenses from the Configure Domain Management Server Window
This section shows the procedure for adding Domain Management Server component and blade licenses from the Window.
To add a license to a Multi-Domain Server:
- In the SmartDomain Manager, go to the iew.
- Double-click a Domain Management Server. The opens.
- Clickand select one of these options:
Add License Information Manually
- Click .
- In the email message that you received from Check Point, select the entire license string (starting with
cplic putlic... - In the Add License window, click to paste the license details you have saved on the clipboard into the Add License window.
- Click to display your Validation Code. Compare this value with the validation code that you received in your email. If validation fails, contact the Check Point licensing center, providing them with both the validation code contained in the email and the one displayed in this window.
Import a License File
- Click .
- In the Open window, browse to and double-click the desired license file.
Get from the License Repository
- Click .
This option is only available if you have valid, unattached licenses in the repository. - In the select, click a Domain Management Server license.
The license automatically attaches to the Domain Management Server and the window closes.
|

