Advanced Deployment
Introduction
You can deploy Check Point Security Gateways enabled with Identity Awareness in various scenarios that provide a maximum level of security for your network environment and corporate data. This section describes recommended deployment scenarios and options available with Identity Awareness.
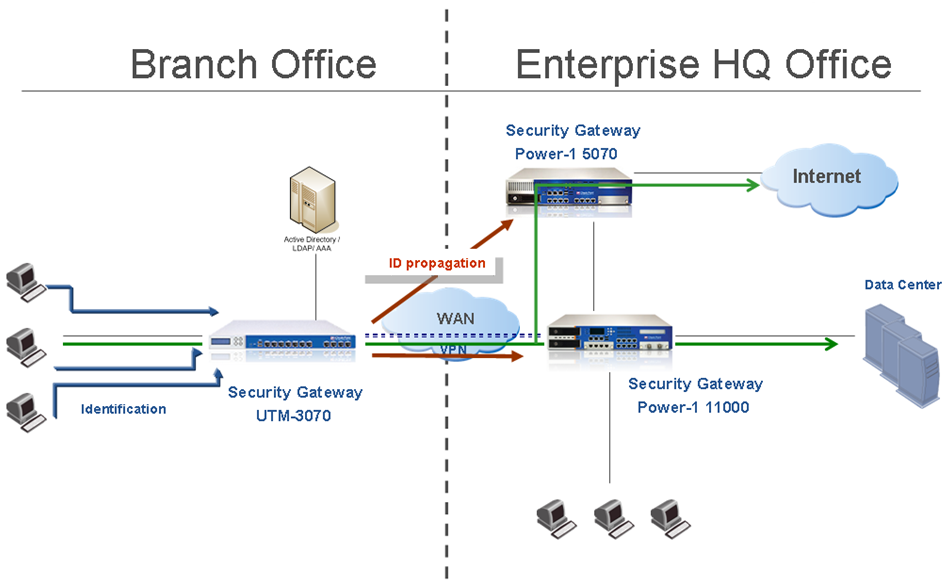
- Perimeter Security Gateway with Identity Awareness – This deployment scenario is the most common scenario, where you deploy the Security Gateway at the perimeter where it protects access to the DMZ and the internal network. The perimeter Security Gateway can also control and inspect outbound traffic, targeted to the Internet. In this case, you can create an identity-based Firewall security Rule Base together with Application Control.
- Data Center protection – If you have a Data Center or server farm, segregated from the users' network, you can protect access to the servers with the Security Gateway. To do this, deploy the Security Gateway inline in front of the Data Center. All traffic that flows is then inspected by the Security Gateway. You can control access to resources and applications with an identity-based access policy. You can deploy the Security Gateway in transparent mode (bridge mode) to avoid significant changes in the existing network infrastructure.
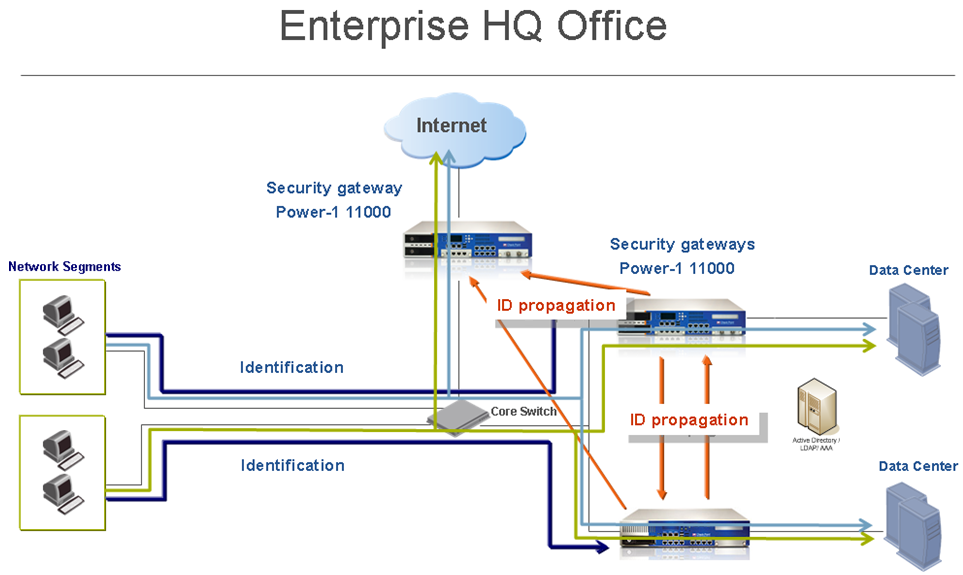
- Large scale enterprise deployment – In large scale enterprise networks, there is a need to deploy multiple Security Gateways at different network locations, such as the perimeter Firewall and multiple Data Centers. Identity Awareness capability is centrally managed through the Security Management Server and SmartDashboard. You can distribute the identity-based policy to all identity aware Security Gateways in the network. Identity information about all users and computers obtained by each Security Gateway is shared between all Security Gateways in the network to provide a complete Identity Awareness infrastructure.
- Network segregation – The Security Gateway helps you migrate or design internal network segregation. Identity Awareness lets you control access between different segments in the network by creating an identity-based policy. You can deploy the Security Gateway close to the access network to avoid malware threats and unauthorized access to general resources in the global network.
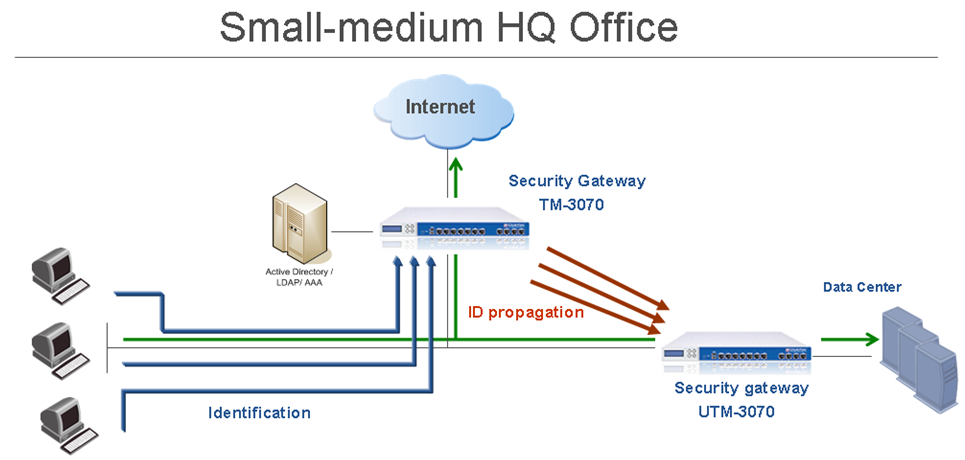
- Distributed enterprise with branch offices – The distributed enterprise consists of remote branch offices connected to the headquarters through VPN lines. You can deploy the Security Gateway at the remote branch offices to avoid malware threats and unauthorized access to the headquarters' internal network and Data Centers. When you enable Identity Awareness at the branch office Security Gateway you make sure that users are authenticated before they reach internal resources. The identity information learned from the branch office Security Gateways is shared between internal Security Gateways to avoid unnecessary authentications.
- Wireless campus – Wireless networks are not considered secure for network access, however they are intensively used to provide access to wireless-enabled corporate devices and guests. You can deploy a Security Gateway enabled with Identity Awareness inline in front of the wireless switch, provide an identity aware access policy and inspect the traffic that comes from WLAN users. Identity Awareness gives guests access by authenticating guests with the web Captive Portal.

|
Important - NAT between two Security Gateways with Identity Awareness that share information with each other is not supported.
|
Deployment Options
You can deploy a Security Gateway enabled with Identity Awareness in two different network options:
- IP routing mode
- Transparent mode (bridge mode)
IP routing mode – This is a regular and standard method used to deploy Security Gateways. You usually use this mode when you deploy the Security Gateway at the perimeter. In this case, the Security Gateway behaves as an IP router that inspects and forwards traffic from the internal interface to the external interface and vice versa. Both interfaces should be located and configured using different network subnets and ranges.
Transparent mode – Known also as a "bridge mode". This deployment method lets you install the Security Gateway as a Layer 2 device, rather than an IP router. The benefit of this method is that it does not require any changes in the network infrastructure. It lets you deploy the Security Gateway inline in the same subnet. This deployment option is mostly suitable when you must deploy a Security Gateway for network segregation and Data Center protection purposes.
Deploying a Test Environment
If you want to evaluate how Identity Awareness operates in a Security Gateway, we recommend that you deploy it in a simple environment. The recommended test setup below gives you the ability to test all identity sources and create an identity-based Policy.
The recommendation is to install 3 main components in the setup:
- User host (Windows)
- Check Point Security Gateway R75.20 or higher
- Microsoft Windows server with Active Directory, DNS and IIS (Web resource)
Deploy the Security Gateway in front of the protected resource, the Windows server that runs IIS (web server). The user host computer will access the protected resource via the Security Gateway.
Testing Identity Sources
To configure the test environment:
- Install the user host computer with Windows XP or 7 OS.
- Install Windows Server and configure Active Directory and DNS.
- Install IIS with a sample Web Server.
- Deploy a Security Gateway either in routing or bridge mode.
- Test connectivity between the host and the Windows server.
- Add the user host computer to the Active Directory domain.
- Enable Identity Awareness in the Security Gateway.
- Follow the wizard and enable the AD Query and Browser-Based Authentication identity sources.
- Create an Access Role and define access for all authenticated users or select users with the Users picker.
- Create 3 rules in the Firewall Rule Base:
- Any to Any Negate HTTP accept log
- Access Role to Any HTTP accept log
- Any to Any Drop
- Install policy.
- Logout and login again from the user host computer.
- Open SmartView Tracker > Identity Awareness section and check whether the user is authenticated using the AD Query method.
- Use the user host computer to test connectivity to the Web Server.
- Check logs. The user and computer names show in the connections logs.
- From the Security Gateway CLI revoke the authenticated user by: pdp control revoke_ip IP_ADDRESS
- On the user host computer open an Internet browser and try to connect to the web resource.
You should be redirected to the Captive Portal, use the user credentials to authenticate and access the web resource.
Testing Endpoint Identity Agents
Enable and configure Identity Agents, and configure Identity Agents self-provisioning through Captive Portal.
- Open a browser and connect to the web resource.
You are redirected to the Captive Portal.
- Enter user credentials.
- Install the client as requested by the Captive Portal.
When the client is installed wait for an authentication pop-up to enter the user credentials via the client.
- Test connectivity.
The SSO method using Kerberos authentication can be tested too.
Deployment Scenarios
Perimeter Security Gateway with Identity Awareness
Security Challenge
The Security Gateway at the perimeter behaves as a main gate for all incoming and outgoing traffic to and from your corporate network. Users located in the internal networks access the Internet resource and applications daily. Not all Internet applications and web sites are secure and some are restricted according to corporate policy. Blocking all internal access may impact productivity of certain employees that must have access in the context of their daily work definition. Controlling access to the allowed applications is possible through the Application Control blade. However, you may require a more granular access policy that is based also on user and computer identity – i.e. access roles.
Access roles let you configure an identity aware policy together with Application Control to allow access only to specified user groups to the applications on the Internet.
In this case Identity Awareness should be enabled on the perimeter Security Gateway.
Deployment scenario
- Deploy the Security Gateway at the perimeter in routing mode and define an external interface towards the ISP (the Internet) and an internal interface points to the internal corporate network LAN. Optional: you can define another internal interface which protects DMZ servers.
- Make sure that NAT or Proxy devices do not exist between the Security Gateway and LAN (the recommendation is to have proxy in the DMZ network).
- Check that the Security Gateway has connectivity to the internal AD domain controllers.
- Make sure that users can reach the Security Gateway’s internal interface.
- Configure the Application Control blade. See the R76 Application Control and URL Filtering Administration Guide.
- If you have several perimeter Security Gateways leading to the Internet, we recommend that you manage these Security Gateways with one Security Management Server and SmartDashboard to deploy the relevant security policy.
Configuration
- Enable Identity Awareness and select the appropriate identity sources.
- Create access roles based on users and computers. You can create multiple access roles that represent different departments, user and computer groups and their location in the network.
- Add the access roles to the source column of the relevant Firewall and application control policies.
Data Center Protection
Security Challenge
The Data Center contains sensitive corporate resources and information that must be securely protected from unauthorized access. You must also protect it from malwares and viruses that can harm databases and steal corporate information. Access to the Data Center and particularly to certain applications must be granted only to compliant users and computers.
Deployment Scenario
- Deploy the Security Gateway inline in front of the Date Center core switch, protecting access to the Data Center from the LAN.
- We recommend that you deploy the Security Gateway in the bridge mode, to avoid any changes in the network. However, IP routing mode is also supported.
- Define at least two interfaces on the Security Gateway and configure them to be internal or bridged.
- Make sure that the Security Gateway has connectivity to the Active Directory and all relevant internal domain controllers in the network (LAN).
- Make sure that users from the LAN can connect to the Data Center through the Security Gateway with an ANY ANY Accept policy.
- Make sure that you do not have a proxy or NAT device between the Security Gateway and users or the LAN.
Configuration
- Enable Identity Awareness on the Security Gateway and select identity sources.
- Create access roles for users and apply the access roles to relevant Firewall security rules.
Large Scale Enterprise Deployment
Security Challenge
In complex large scale enterprise networks you must control access from the local network to the Internet and to multiple Data Center resources. Access should be granted only to compliant users and computers. The Data Center contains sensitive corporate resources and information that must be securely protected from unauthorized access. You must also protect it from malwares and viruses that can harm databases and steal corporate information.
Users located in the internal networks access the Internet resource and applications daily. Not all Internet applications and web sites are secure and some are restricted according to corporate policy.
Blocking all internal access may impact productivity of certain employees that must have access in the context of their daily work definition. Controlling access to the allowed applications is possible through the Application Control blade. However, you may require a more granular access policy that is based also on user and computer identity – i.e. access roles.
Deployment Scenario
- Deploy or use existing Security Gateways at the perimeter and in front of the Data Center.
- Install the Security Gateway at the perimeter in routing mode, and use at least one external interface to the Internet and one to the internal network (define it as an internal interface).
- Deploy the Security Gateway as an inline device in front of the Data Center in bridge mode to avoid network changes. This is not required, but is recommended. Nonetheless, IP routing mode is also supported.
- Make sure that all Security Gateways in the Data Centers and perimeter can communicate directly with each other.
- We recommend that you manage the Security Gateway from one Security Management Server and SmartDashboard.
- Make sure that there is connectivity from each Security Gateway to the Active Directory internal domain controllers.
- Make sure that in an "Any Any Accept" Policy, users from the LAN can connect to the desired resources.
- Make sure that there is no NAT or proxy devices installed between the Security Gateways and LAN segment. If there are such devices, consider moving them to DMZ if possible.
Configuration
- Enable Identity Awareness on the Security Gateway and choose the appropriate identity source method for each Security Gateway, at the perimeter and at the Data Center.
- Create access roles for users and apply access roles to the applicable Firewall security rules.
- Use the Application Control Policy in the perimeter Security Gateway and add access roles to the Policy.
- In the tab, make sure to select .
AD Query Recommended Configuration
When you enable AD Query to obtain user and computer identity, we recommend that you enable the feature on all Security Gateways that participate in the network environment. All Security Gateways should have the Active Directory domain defined with the list of all applicable domain controllers in the internal network.
Endpoint Identity Agents Recommended Configuration
If you choose to use Endpoint Identity Agents to authenticate users and computers, you have to select the Security Gateway that will be used to maintain Endpoint Identity Agents.
For a single Data Center and perimeter Security Gateway it is recommended to define Endpoint Identity Agents that connect to a single Security Gateway. Then the identity obtained by the Security Gateway is shared with the other Security Gateways in the network. Select a high capacity / performance Security Gateway, which can also behave as an authentication server, and configure this Security Gateway’s IP / DNS on the Endpoint Identity Agents (see Endpoint Identity Agents section).
For complex multi Data Center environments where there are several Security Gateways that protect different Data Centers and the perimeter, we recommend that you balance Endpoint Identity Agents authentication using different Security Gateways. You can configure a list of Security Gateways in the Endpoint Identity Agent settings, where the Endpoint Identity Agent will connect to different Security Gateways. This provides load balancing across the Security Gateways. Identities learned from the agents are shared between all Security Gateways in the network.
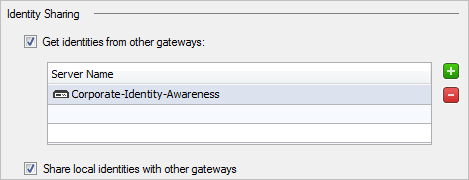
Identity Sharing Advanced Settings
To define a list of Security Gateways between which identity information is shared:
- Go to > tab and select .
- Select the Security Gateways you want to obtain identities from.
Network Segregation
Security Challenge
Networks consist of different network segments and subnets where your internal users reside. Users that connect to the network can potentially spread viruses and malwares across the network that can infect other computers and servers on the network. You want to make sure that only compliant users and computers can pass and connect across multiple network segments, as well as authenticate users connecting to the servers and the Internet.
Deployment scenario
- We recommend that you deploy Security Gateways close to access networks before the core switch.
- Access between the segments is controlled by the Security Gateway.
- Access between the LAN and Data Center is controlled by the Security Gateway.
- Access between the LAN and the Internet is controlled by the Security Gateways either at each segment or at the perimeter Security Gateway.
- We recommend that you deploy the Security Gateway in bridge mode to avoid network and routing changes.
- Each Security Gateway of a particular segment authenticates users with the selected method.
- Share identities learned from the segment Security Gateways with the perimeter Firewall to create an outgoing traffic Firewall policy or use an Application Control policy as well.
Configuration
- Deploy Security Gateways in each segment in bridge mode.
- Make sure that there is no proxy or NAT device between the Security Gateways and the LAN.
- Make sure that the Security Gateways can communicate with the Active Directory domain controller deployed in each segment (replicated domain controllers).
If there is a general domain controller that serves all users across the segments, make sure that all Security Gateways can connect to this domain controller.
- Enable Identity Awareness on each Security Gateway and select an appropriate identity source method.
- In the Identity Awareness tab, clear the option.
If you want to share identities with one Security Gateway, for example, the perimeter Security Gateway, keep this option selected and disable in the segment Security Gateway. Then go to the perimeter Security Gateway and select .
- If you want to use Endpoint Identity Agents, then define the particular Security Gateway DNS/IP in the agent Security Gateway configuration per access segment.

Distributed Enterprise with Branch Offices
Security Challenge
In distributed enterprises there is a potential risk of malware and viruses spreading from remote branch offices over VPN links to the corporate internal networks. There is also a challenge of how to provide authorized access to users that come from remote branch offices that request and want to access the Data Center and the Internet.
Deployment Scenario
- We recommend that you deploy Security Gateways at the remote branch offices and at headquarters in front of the Data Center and at the perimeter.
- At remote branch offices, you can deploy low capacity Security Gateways due to a relatively low number of users.
Deploy the remote branch Security Gateways in IP routing mode and have them function as a perimeter Firewall and VPN gateway, establishing a VPN link to the corporate Security Gateways.
- At the corporate headquarters, we recommend that you deploy Data Center Security Gateways to protect access to Data Center resources and applications, as well as a perimeter Security Gateway. You can install the Data Center Security Gateway in bridge mode to avoid changes to the existing network.
- In this scenario, users from the branch office are identified by the local branch office Security Gateway before connecting to the corporate network over VPN.
- The identities learned by the branch office Security Gateways are then shared with the headquarters' internal and perimeter Security Gateways. When a user from a branch office attempts to connect to the Data Center, the user is identified by the Security Gateway at the headquarters Data Center without the need for additional authentication.
Configuration
- Select a Security Gateway according to a performance guideline for your remote branch offices.
- Deploy the Security Gateways at the branch offices in routing mode. Define VPN site-to-site if necessary.
- Deploy Security Gateways inline at the Data Center. We recommend using bridge mode.
- Deploy a Security Gateway at the perimeter that protects the internal network in routing mode. The perimeter Security Gateway can serve as a VPN Security Gateway for branch offices as well.
- If you have Active Directory domain controllers replicated across your branch offices make sure that local Security Gateways can communicate with the domain controller. In case you do not have a local domain controller, make sure that the Security Gateways can access the headquarters' internal domain controller over VPN.
- Enable Identity Awareness and select the appropriate methods to get identity.
- Create an access role and apply the roles in the security policy on the branch office Security Gateways, perimeter and Data Center Security Gateway.
- Make sure that you share identities between the branch offices with the headquarter and Data Center Security Gateways, by selecting these settings on the Identity Awareness tab:
AD Query Recommended Configuration
When you use AD Query to authenticate users from the local and branch offices, we recommend that you only configure a local domain controller list per site in the relevant Security Gateways. For example, if you have a branch office Security Gateway and a Data Center Security Gateway, enable AD Query on all Security Gateways. On the branch office Security Gateway, select the Active Directory domain controllers replications installed in the branch office only. On the Data Center Security Gateway, configure a list of domain controllers installed in the internal headquarters network.
It is not necessary to configure all domain controllers available in the network, since the identity information is shared between branch and internal Security Gateways accordingly.
Endpoint Identity Agents Recommended Configuration
When using Endpoint Identity Agents, we recommend that you configure the local branch office Security Gateway DNS/IP on the agent. The agents connect to the local Security Gateway and the user is authenticated, identities are shared with the internal headquarter Security Gateways.
Wireless Campus
Security Challenge
You use wireless networks to grant access to employees that use Wi-Fi enabled devices, guests and contractors. Guests and contractors in some cases cannot use the corporate wired network connection and must connect through WLAN. Furthermore, it is not intended for guests and contractors to install any endpoint agents on their devices.
Wireless access is also intensively used to connect mobile devices such as smart phones where agents can be installed. These devices are not part of the Active Directory domain. Wireless networks do not give a desired level of security in terms of network access.
Deployment Scenario
- Deploy the Security Gateway in bridge mode in front of the Wireless Switch.
- Make sure that the Security Gateway can access the Internet or any other required resource in the network.
- Make sure that the Security Gateway can communicate with the authentication server, such as Active Directory or RADIUS.
- Check that there is no NAT or proxy device between the Security Gateway and the WLAN network.
Configuration
- Enable Identity Awareness on the Security Gateway.
- Select Browser-Based Authentication as an identity source.
- In the Gateway properties > Identity Awareness tab > Browser-Based Authentication Settings, select and in Settings, select the fields you want guests to fill when they register.
- Select .
Dedicated Identity Acquisition Security Gateway
Security Challenge
You have several Security Gateways that protect the Data Center or Internet access where access is based on identity acquisition. These Security Gateways run different blades and deal with heavy traffic inspection.
To avoid an impact on performance of the Security Gateways in terms of user identity acquisition and authentication, it is possible to offload this functionality to a separate Security Gateway. The dedicated Security Gateway is responsible for acquiring user identity, performing authentication and sharing learned identities with all enforcing Security Gateways in the network.
Deployment Scenario
In this deployment scenario, you have to choose an appropriate appliance to deploy as the dedicated Identity Awareness enabled Security Gateway. All users authenticate with this Security Gateway.
If you enable AD Query, the dedicated Security Gateway should communicate with all Active Directory domain controllers over WMI.
- On the dedicated identity acquisition Security Gateway, enable the Identity Awareness feature and select the identity method.
- Make sure to configure the Security Gateway to share identities with other Security Gateways in the network.
- On the enforcement Security Gateways, enable Identity Awareness and select Get identities from other Security Gateways.
Advanced Endpoint Identity Agent Options
Kerberos SSO Configuration
Kerberos SSO Compliance
The Identity Awareness Single Sign-On (SSO) solution for Endpoint Identity Agents gives the ability to transparently authenticate users that are logged in to the domain. This means that a user authenticates to the domain one time and has access to all authorized network resources without additional authentication.
Using Endpoint Identity Agents gives you:
- User and computer identity
- Minimal user intervention - All necessary configuration steps are done by administrators and does not require user input.
- Seamless connectivity - Transparent authentication using Kerberos Single Sign-On (SSO) when users are logged in to the domain. If you do not want to use SSO, users enter their credentials manually. You can let them save these credentials.
- Connectivity through roaming - Users stay automatically identified when they move between networks, as the client detects the movement and reconnects.
- Added security - You can use the patented packet tagging technology to prevent IP Spoofing. Endpoint Identity Agents also gives you strong (Kerberos based) user and computer authentication.
You get SSO in Windows domains with the Kerberos authentication protocol. Kerberos is the default authentication protocol used in Windows 2000 and above.
The Kerberos protocol is based on the idea of tickets, encrypted data packets issued by a trusted authority which in this case is the Active Directory (AD). When a user logs in, the user authenticates to a domain controller that provides an initial ticket granting ticket (TGT). This ticket vouches for the user’s identity. When the user needs to authenticate against the Security Gateway with Identity Awareness, the Endpoint Identity Agent presents this ticket to the domain controller and requests a service ticket (SR) for a specific resource (Security Gateway that Endpoint Identity Agents connect to). The Endpoint Identity Agent then presents this service ticket to the Security Gateway that grants access.
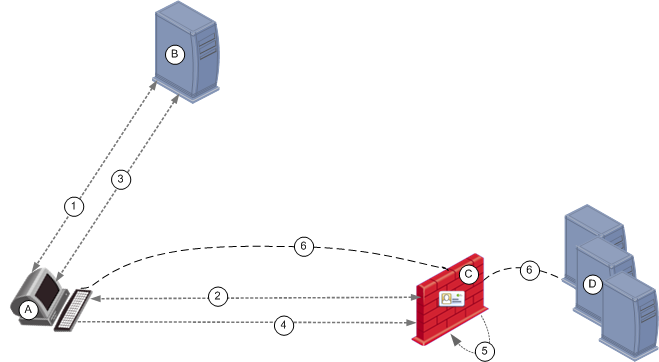
How SSO Works
Item
|
Description
|
A
|
User
|
B
|
Active Directory Domain Controller
|
C
|
Security Gateway that Endpoint Identity Agents connect to
|
D
|
Data Center servers
|
1
|
a) A logs in to B
b) B sends an initial ticket (TGT) to A
|
2
|
a) The Endpoint Identity Agent connects to C
b) C asks A for user authentication
|
3
|
a) The Endpoint Identity Agents requests a service ticket (SR) for C and presents the TGT to B
b) B sends the SR (encrypting the user name with the shared secret between B and C)
|
4
|
The Endpoint Identity Agent sends the service ticket to C
|
5
|
C decrypts the ticket with the shared secret and identifies A
|
6
|
A gets access to D based on identity
|
References
For more about Kerberos SSO, see:
SSO Configuration
SSO configuration includes two steps:
- AD Configuration - Creating a user account and mapping it to a Kerberos principal name.
- SmartDashboard Configuration - Creating an LDAP Account Unit and configuring it with SSO.
AD Configuration
Creating a New User Account
- In Active Directory, open Active Directory Users and Computers (Start->Run->dsa.msc)
- Add a new user account. You can choose any username and password. For example: a user account named ckpsso with the password 'qwe123!@#' to the domain corp.acme.com.
- Clear User must change password at next logon and select Password Never Expires
Mapping the User Account to a Kerberos Principal Name
This step uses the ktpass utility to create a Kerberos principal name that is used by both the Security Gateway and the AD. A Kerberos principal name consists of a service name (for the Security Gateway that Endpoint Identity Agents connect to) and the domain name to which the service belongs.
Ktpass is a command-line tool available in Windows 2000 and higher.
Retrieve the correct executable
You must install the correct ktpass.exe version on the AD. Ktpass.exe is not installed by default in Windows 2003.
- If you are using Windows 2003:
- Retrieve the correct executable for your service pack from the Microsoft Support site prior to installation. It is part of the Windows 2003 support tools. For example, AD 2003 SP2 requires support tools for 2003 sp2.
- Download the support.cab and suptools.msi files to a new folder on your AD server.
- Run the suptools.msi.
- If you’re using Active Directory with Windows Server 2008 and higher, the ktpass utility is already installed on your server in the Windows\System32 folder and you can run the command line. You need to open the command prompt as an administrator by right clicking it and selecting "run as an Administrator".
Use Ktpass
- Open a command line to run the ktpass tool (Start > Run > cmd).
- At the command prompt, run ktpass with this syntax:
C:> ktpass -princ ckp_pdp/domain_name@DOMAIN_NAME -mapuser username@domain_name -pass password -out unix.keytab –crypto RC4-HMAC-NT
|
Important - Make sure to enter the command exactly as shown. Mapping the username to the Kerberos principal name with ktpass is case-sensitive.
|
This is an example of running ktpass with these parameters:
Parameter
|
Value
|
domain_name@DOMAIN_NAME
|
corp.acme.com@CORP.ACME.COM
|
username@domain_name
|
ckpsso@corp.acme.com
|
password
|
qwe123@#
|
The AD is ready to support Kerberos authentication for the Security Gateway.
|
Important - If you have used the ktpass utility before for the same principal name (ckp_pdp/domain_name@DOMAIN_NAME) but with a different account, you must either delete the different account beforehand or remove its association to the principal name (by using setspn –D ckp_pkp/domain_name old_account name – i.e. setspn –D ckp_pdp/corp.acme.com ckpsso).
Failure to do this will cause the authentication to fail.
|
The example above shows the ktpass syntax on Windows 2003. When using Windows Server 2008 or higher, the ktpass syntax is slightly different. Parameters start with a forward slash "/" instead of a hyphen "-".
Example (Windows 2008 and higher):
ktpass /princ ckp_pdp/corp.acme.com@CORP.ACME.COM /mapuser ckpsso@corp.acme.com /pass qweQWE!@# /out unix.keytab /crypto RC4-HMAC-NT
SmartDashboard Configuration
This section describes how to configure an LDAP Account Unit to support SSO.
Configuring an Account Unit
- Add a new host to represent the AD domain controller. Go to Network Objects tab > Nodes > Node > Host.
- Enter a name and IP address for the AD object and click OK.
For example, ADServer. - Add a new LDAP Account Unit. Select Servers and OPSEC Applications in the Objects Tree. Right-click Servers > New > LDAP Account Unit.
- In the General tab of the LDAP Account Unit:
- Enter a name.
- In the Profile field, select Microsoft_AD.
- In the Domain field, enter the domain name. It is highly recommended to fill this field for existing account units that you want to use for Identity Awareness. Entering a value into this field will not affect existing LDAP Account Units.
- Select CRL retrieval and User management.
- Click Active Directory SSO configuration and configure the values (see example):
- Select Use Kerberos Single Sign On.
- Enter the domain name.
For example, CORP.ACME.COM - Enter the account username you created in Creating a New User Account.
For example, ckpsso. - Enter the account password for that user (the same password you configured for the account username in AD) and confirm it.
- Leave the default settings for Ticket encryption method.
- Click OK.
- In the Servers tab:
- Click Add and enter the LDAP Server properties.
- In the Host field, select the AD object you configured in step 4 above.
- In the Login DN field, enter the login DN of a predefined user (added in the AD) used for LDAP operations.
- Enter the LDAP user password and confirm it.
- In the section, select Read data from this server.
- In the Encryption tab, select Use Encryption (SSL), fetch the fingerprint and click OK.
Note - LDAP over SSL is not supported by default. If you have not configured your domain controller to support LDAP over SSL, either skip step f or configure your domain controller to support LDAP over SSL.
- In the Objects Management tab:
- In the Manage objects on field, select the AD object you configured in step 4 above.
- Click Fetch Branches to configure the branches in use.
- Set the number of entries supported.
- In the Authentication tab, select Check Point Password in the Default authentication scheme and click OK.
Server Discovery and Trust
Introduction
The Endpoint Identity Agent client needs to be connected to a Security Gateway with Identity Awareness. For this to happen, it must discover the server and trust it.
Server discovery refers to the process of deciding which server the client should connect to. We offer several methods for configuring server discovery – from a very basic method of simply configuring one server to a method of deploying a domain wide policy of connecting to a server based on your current location. This section describes these options.
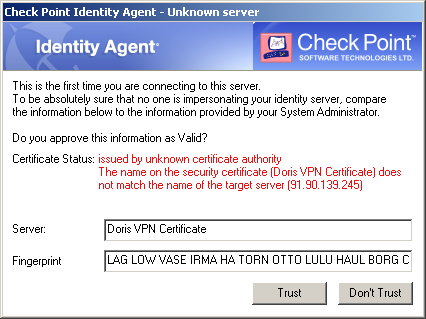
Server trust refers to the process of validating that the server the end user connects to is indeed a genuine one. It also makes sure that communication between the client and the server was not tampered with by a Man In The Middle (MITM) attack.
The trust process compares the server fingerprint calculated during the SSL handshake with the expected fingerprint. If the client does not have the expected fingerprint configured, it will ask the user to verify that it is correct manually. This section describes the methods that allow the expected fingerprint to be known, without user intervention.
Discovery and Trust Options
These are the options that the client has for discovering a server and creating trust with it:
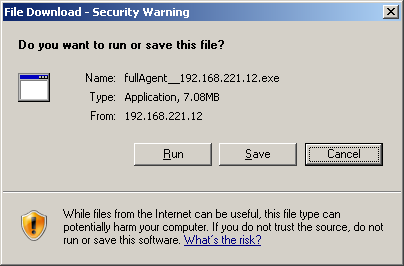
- – If no other method is configured (default, out-of-the-box situation), any Endpoint Identity Agent downloaded from the portal will be renamed to have the portal computer IP in it. During installation, the client uses this IP to represent the Security Gateway with Identity Awareness. Note that the user has to trust the server by himself (the trust dialog box opens).
- – If client computers are members of an Active Directory domain, you can deploy the server addresses and trust data using a dedicated tool.
- – It is possible to configure the server addresses in the DNS server. Because the DNS is not secure, we recommend that you do not configure trust this way. Users can authorize the server manually in a trust dialog box that opens. This is the only server discovery method that is applicable for the MAC OS Endpoint Identity Agent.
- – All client configuration, including the server addresses and trust data are in the registry. You can deploy the values before installing the client (by GPO, or any other system that lets you control the registry remotely). This lets you use the configuration from first run.
- – You can create a custom version of the Endpoint Identity Agent installation package that includes the server IP and trust data.
Option Comparison
|
Requires AD
|
Manual User Trust Required?
|
Multi-
Site
|
Client Remains Signed?
|
Allows Ongoing Changes
|
Level
|
Recommended for...
|
File name based
|
No
|
Yes
|
No
|
Yes
|
No
|
Very Simple
|
Single Security Gateway deployments
|
AD based
|
Yes
|
No
|
Yes
|
Yes
|
Yes
|
Simple
|
Deployments with AD that you can modify
|
DNS based
|
No
|
Yes
|
Partially (per DNS server)
|
Yes
|
Yes
|
Simple
|
Deployments without AD or with an AD you cannot modify, but the DNS can be changed
|
Remote registry
|
No
|
No
|
Yes
|
Yes
|
Yes
|
Moderate
|
Where remote registry is used for other purposes
|
Pre-
packaging
|
No
|
No
|
Yes
|
No
|
No
|
Advanced
|
When both DNS and AD cannot be changed, and there is more than one Security Gateway
|
File Name Based Server Discovery
This option is the easiest to deploy, and works out-of-the-box if the Captive Portal is also the Security Gateway with Identity Awareness. If your deployment consists of one Security Gateway with Identity Awareness and a Captive Portal running on the same Security Gateway and it is OK with you that the user needs to verify the server fingerprint and trust it once, you can use this option, which works with no configuration.
How does it work?
When a user downloads the Endpoint Identity Agent client from the Captive Portal, the address of the Security Gateway with Identity Awareness is embedded into the file name. During the installation sequence, the client checks if there is any other discovery method configured (prepackaged, AD based, DNS based or local registry). If no method is configured and the server can be reached, it will be used as the Security Gateway with Identity Awareness. You can make sure that this is the case by looking at the client settings and seeing that the server that is shown in the file name is present in the Endpoint Identity Agent dialog box.

Why can't we use this for trust data?
As the file name can be changed, we cannot be sure that the file name wasn’t modified by an attacker along the way. Therefore, we cannot trust data passed in the file name as authentic, and we need to verify the trust data by another means.
AD Based Configuration
If your endpoint computers are members of an Active Directory domain and you have administrative access to this domain, you can use the Distributed Configuration tool to configure connectivity and trust rules.
The Distributed Configuration tool has three windows:
- - This window describes the tool and lets you to enter alternate credentials that are used to access the AD.
- – This window lets you configure which Security Gateway with Identity Awareness the client should use, depending on its source location.
- – This window lets you view and change the list of fingerprints that the Security Gateways with Identity Awareness consider secure.
Server Configuration Rules
If you use the Distributed Configuration tool and you configure ‘Automatically discover’ the server, the client fetches the rule lists and each time it needs to connect to a server, it tries to match itself against a rule, from top to bottom.
When it matches a rule, it uses the servers shown in this rule, according to the priority specified.
For example:
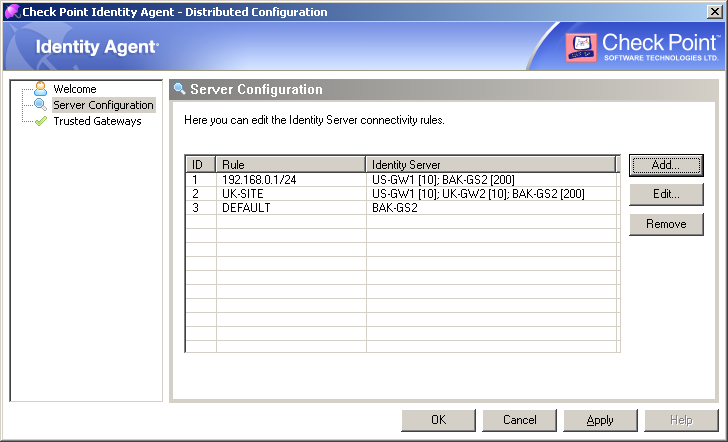
This configuration means:
- If the user is coming from ‘192.168.0.1 – 192.168.0.255’, then try to connect to US-GW1. If it isn’t available, try BAK-GS2 (it will be used only if US-GW1 is not available, as its priority is higher).
- Otherwise, if the user is connected from the Active Directory site ‘UK-SITE’, connect either to UK-GW1 or UK-GW2 (choose between them randomly, as they both have the same priority). If both of them are not available, connect to BAK-GS2.
- Otherwise, connect to BAK-GS2 (the default rule is always matched when it is encountered).
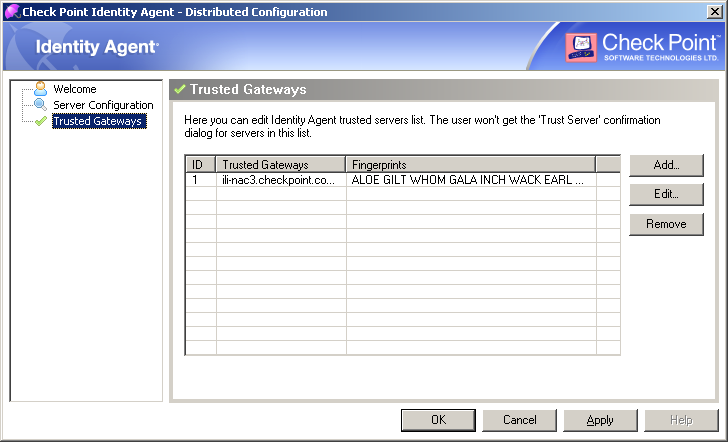
Trusted gateways
The trusted gateways window shows the list of servers considered trusted – no popups will open when trying to connect to them.
You can add, edit or delete a server. If you have connectivity to the server, you can get the name and fingerprint by entering its address and clicking ‘Fetch Fingerprint’. Otherwise, you should enter the same name and fingerprint that is shown when connecting to that server.

|
Note - The entire configuration is written in a hive named ‘Check Point’ under the ‘Program Data’ Branch in the AD database that is added in the first run of the tool. Adding this hive won’t have any effect on other AD based applications or features.
|
DNS Based Configuration
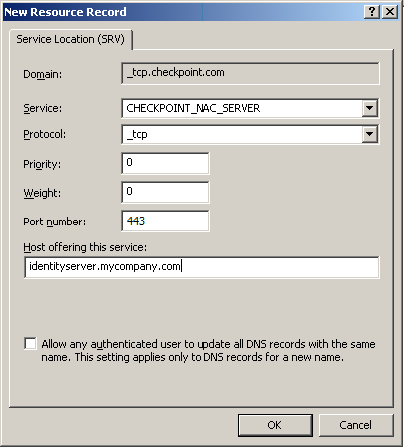
If you configure the client to ‘Automatic Discovery’ (the default), it looks for a server by issuing a DNS SRV query for the address ‘CHECKPOINT_NAC_SERVER._tcp’ (the DNS suffix is added automatically). You can configure the address in your DNS server.
To configure the automatic discovery address on the DNS server:
- Go to > > > .
- Go to and select the applicable domain.
- Right click and select .
- Select > .
- In the field, enter CHECKPOINT_NAC_SERVER.
- Set the to
443. - In the field, select
_tcp. - In the field, enter the Security Gateway (with Identity Awareness) IP address.
- Click .
|
Note - Security Gateway with Identity Awareness Load Sharing can be achieved by creating several SRV records with the same priority and High Availability can be achieved by creating several SRV records with different priorities.
|
|
Note - If you configure AD based and DNS based configuration, the results are combined according to the specified priority (from the lowest to highest).
|
Troubleshooting - Displaying SRV Record Stored in the DNS Server
Run the following commands:
C:\> nslookup
> set type=srv
> checkpoint_nac_server._tcp
Server: dns.company.com
Address: 192.168.0.17
checkpoint_nac_server._tcp.ad.company.com SRV service location:
priority = 0
weight = 0
port = 443
svr hostname = idserver.company.com
idserver.company.com internet address = 192.168.1.212
>
Remote Registry
If you have another way to deploy registry entries to your client computers (such as Active Directory GPO updates), you can deploy the Security Gateway with Identity Awareness addresses and trust parameters before installing the clients. That way, they will use the already deployed settings immediately after installation.
To use the remote registry option:
- Install the client on one of your computers. Make sure it is installed in the same mode that will be installed on the other computers. – the ‘full agent’ installs itself to your program files directory, and saves its configuration to HKEY_LOCAL_MACHINE, while the light Endpoint Identity Agent installs itself to the users directory, and saves its configuration to HKEY_CURRENT_USER.
- Connect manually to all of the servers that are configured, verify their fingerprints, and click ‘trust’ on the fingerprint verification dialog box.
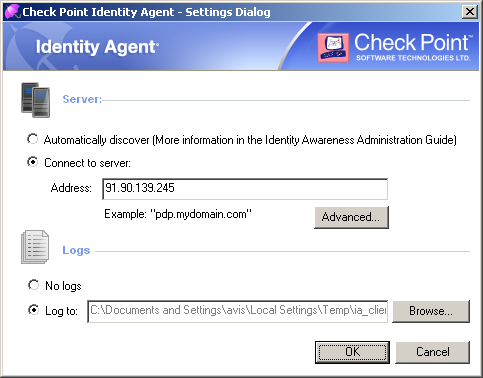
- Configure it manually to connect to the requested servers (Use the settings dialog box). If you need the client to choose a server based on the client location, you can click ‘Advanced’ and configure it that way. See AD Based Configuration to understand how these rules are interpreted.
- Export the following registry keys (from HKEY_LOCAL_MACHINE / HKEY_CURRENT_USER, according to the client type installed):
- SOFTWARE\CheckPoint\IA\TrustedGateways (the whole tree)
- SOFTWARE\CheckPoint\IA\ (32 bit) or SOFTWARE > Wow6432Node > Checkpoint > IA (64 bit)
- DefaultGateway
- DefaultGatewayEnabled
- PredefinedPDPConnRBUsed
- PredefinedPDPConnectRuleBase
- Deploy the exported keys to the workstations before installing the client on your workstations.
Prepackaging Identity Agents
Introduction
The Check Point Endpoint Identity Agent has many advanced configuration parameters. Some of these parameters relate to the installation process and some relate to the actual operation of the agent. All of the configuration parameters have default values that are deployed with the product and can remain unchanged.
There are the types of Endpoint Identity Agents:
- Full agent – The Endpoint Identity Agent is available for all users who use the computer, with packet tagging and computer authentication.
- Light agent – The Endpoint Identity Agent is available for the single user that is running this installation and does not include packet tagging and computer authentication.
- Custom - The installation process and the product configuration can be customized via prepackaging. The customization tool is called cpmsi_tool.exe and it is deployed with the agent (Program Files > Check Point > Identity Agent).
|
Important - The Endpoint Identity Agents come digitally signed by Check Point Software Technologies Ltd. Any modification to the Endpoint Identity Agents, including prepackaging, will invalidate the signature, and will result in security warnings displayed to the user downloading them from the Captive Portal.
|
Custom Endpoint Identity Agent msi
You can find a customizable msi version of the Endpoint Identity Agent (for distribution via a software distribution tool or Captive Portal) in these places:
- Installed Security Gateway - in
/opt/CPNacPortal/htdocs/nac/nacclients/customAgent.msi - SecurePlatform installation CD - in
/linux/windows/Check_Point_Custom_Nac_Client.msi
Using the cpmsi_tool.exe
The cpmsi_tool.exe is a shell tool. To use it, store it in the same location as the installation package and type:
cpmsi_tool <installation package name> readini <INI file name>
From the INI file you can control the configuration. You can use the template INI file for quick configuration.
The INI file is divided into these sections:
- The Properties section controls the installation process.
- The Features section controls the installed features.
- The AddFiles section controls the deployed Endpoint Identity Agent configuration.
The tool has some other options that are not used for Identity Awareness.
Configuring Installation - [Properties] Section
You can configure these Endpoint Identity Agent installation properties in the INI file:
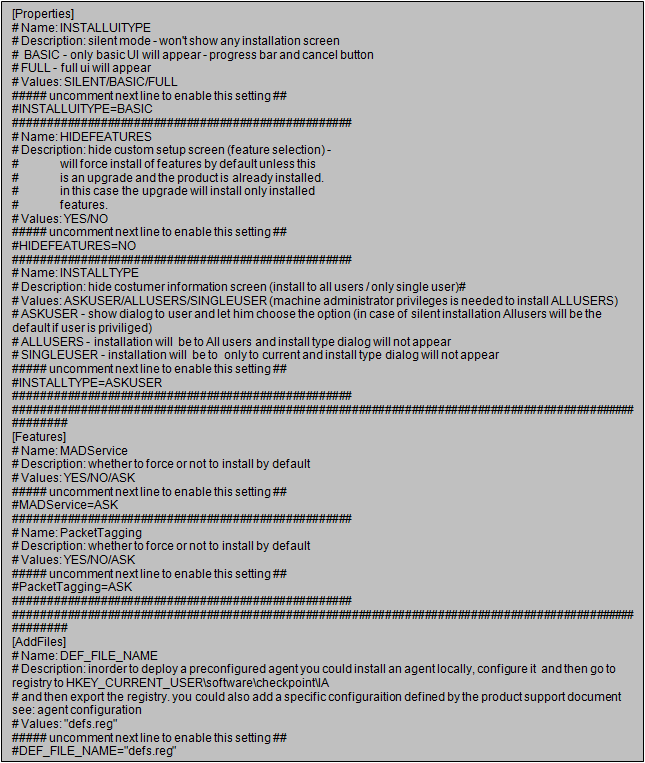
INSTALLUITYPE
This property has these values:
- SILENT - No user interface is shown to the user.
- BASIC - An installation progress bar is shown while installation takes place. This is the default value.
- FULL - The user sees a full installation user interface.
HIDEFEATURES
This property determines the visibility of the Custom Setup (feature selection) dialog box in the installation process. If this dialog box is hidden then the installation process behaves as if the user clicked Next without changing anything. Values for this property:
- Yes
- No - By default, the Custom Setup dialog box is shown (it is not hidden).
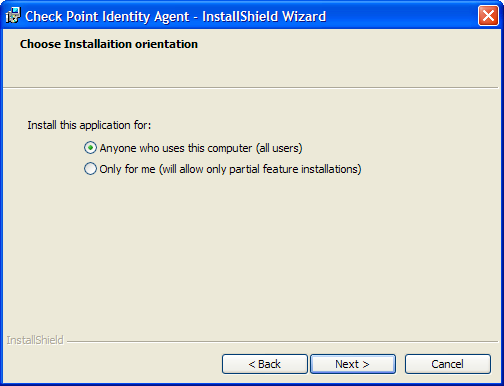
INSTALLTYPE
This property lets you can choose one of these installation type values:
- ALLUSERS - Anyone who uses the computer
- SINGLEUSER - Only for the user who is installing the Endpoint Identity Agent
- ASKUSER - Leaves the dialog box in the installation for the end user to decide. By default, the Choose Installation orientation dialog box is shown.
Configuring Installed Features - [Features] Section
You can configure the following properties and decide whether or not to install these features, or let users decide on their own.
MADService
This property relates to the Managed Asset Detection service. This is a service that handles computer authentication and enables managed asset detection prior to logon authentication.
This property is required if you Access Roles in the Rule Base that relate to computers.
For example, if you set MADService=Yes then the feature dialog box will force install the Managed Asset Detection service.
Values:
- Yes
- No
- Ask - the dialog box is shown to the end user who can decide whether to install or not. This is the default value.
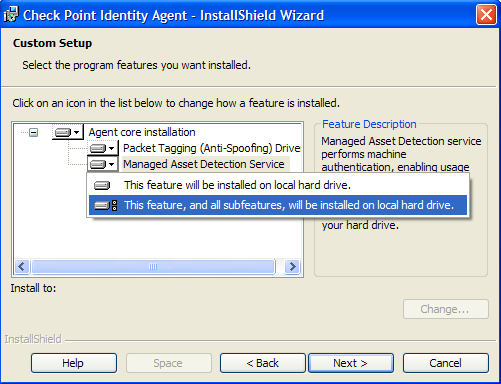
PacketTagging
This property relates to the Packet Tagging driver. This driver signs every packet that is sent from the computer.
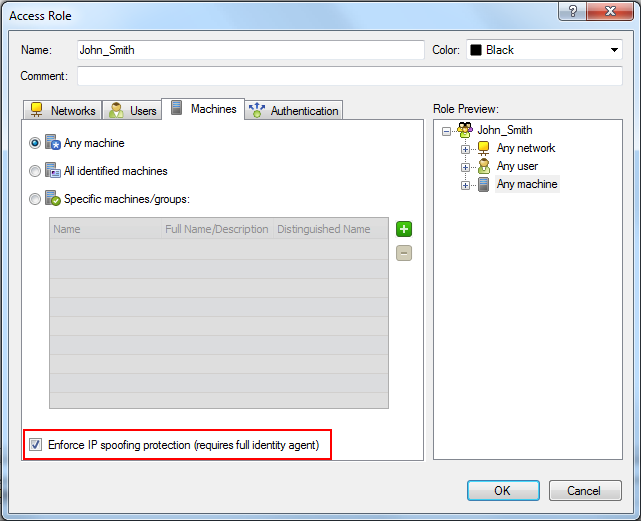
This setting is required if you have rules in the Rule Base that use Access Roles and are set to enforce IP spoofing protection on the Machine tab.
Values:
- Yes
- No
- Ask - the dialog box is shown to the end user who can decide whether to install or not. This is the default value.
Configuring Deployed Endpoint Identity Agents - [AddFiles] Section
You can add a defs.reg file to the installation that lets you change the deployed Endpoint Identity Agent configuration.
The defs.reg file is a simple registry file. The registry values are located in these branches:
- - HKEY_LOCAL_MACHINE > SOFTWARE > Wow6432Node > Checkpoint > IA
- - HKEY_LOCAL_MACHINE > SOFTWARE > Checkpoint >IA
- - HKEY_CURRENT_USER > SOFTWARE > Checkpoint > IA.
After you create the defs.reg file, you must:
- Copy it to the same directory as the installation package and the cpmsi_tool.
- Uncomment the DEF_FILE_NAME line in the INI file.
|
Note - If the defs.reg file does not exist the installation will fail.
|
Registry file values:
|
Registry Key
|
Accepted Values
|
Description
|
1
|
DisableSettings
|
DWORD:1,0
|
If the value is set to 1 then the settings button will not appear in the Identity Agent's tray menu.
0 is the default value.
|
2
|
DisableQuit
|
DWORD:1,0
|
If the value is set to 1 then the quit button will not appear in the Identity Agent's tray menu.
0 is the default value.
|
3
|
HideGui
|
DWORD:1,0
|
If the value is set to 1 then the Identity Agent's tray icon will not appear and there will be no client GUI.
0 is the default value.
|
4
|
SendLogsTO
|
String: <email addresses delimited by ”;”>
|
Allows defining the default email addresses to send logs to if an error occurs or if a user chooses to send logs in from the agent’s status dialog box.
For example, to send error logs to MYEmail and disable the agent's settings dialog box:
[HKEY_LOCAL_MACHINE\SOFTWARE\CheckPoint\IA]
"SendLogsTO"=MYEmail@corp.acme.com
"DisableSettings"=dword:00000001
|
Automatic Server Discovery
You can define a default gateway and trusted Security Gateways by defining a defs.reg file with the relevant parameters.
For example:

|
Note - If a default gateway is not defined and the automatic server discovery fails during installation, the user will be asked to define the Security Gateway with Identity Awareness manually.
|
Sample INI File
Below is a sample INI file with the default configuration.
Deploying a Prepackaged Endpoint Identity Agent with the Captive Portal
To deploy a prepackaged Endpoint Identity Agent via the Captive Portal:
- Upload the modified customAgent.msi to your identification portal at /opt/CPNacPortal/htdocs/nacclients.
- Configure the Captive Portal to distribute the custom agent.
- In SmartDashboard, go to the Security Gateway with Identity Awareness.
- Go to the Identity Awareness page.
- Click on the Browser-Based Authentication button.
- Change the value to .
|
