Configuring Identity Awareness
Enabling Identity Awareness on the Security Gateway
When you enable Identity Awareness on a Security Gateway, a wizard opens. You can use the wizard to configure one Security Gateway that uses the AD Query, Browser-Based Authentication, and Terminal Servers for acquiring identities. You cannot use the wizard to configure a multiple Security Gateway environment or to configure Endpoint Identity Agent and Remote Access acquisition (other methods for acquiring identities).
When you complete the wizard and install a Policy, the system is ready to monitor Identity Awareness. You can use SmartView Tracker and SmartEvent to see the logs for user and computer identity.
To enable Identity Awareness:
- Log in to SmartDashboard.
- From the Network Objects tree, expand the branch.
- Double-click the Security Gateway on which to enable Identity Awareness.
- In the Software Blades section, select on the Network Security tab.
The Configuration wizard opens.
- Select one or more options. These options set the methods for acquiring identities of managed and unmanaged assets.
- - Lets the Security Gateway seamlessly identify Active Directory users and computers.
- - Sends users to a Web page to acquire identities from unidentified users. If Transparent Kerberos Authentication is configured, AD users may be identified transparently.
- - Identify users in a Terminal Server environment (originating from one IP address).
See Choosing Identity Sources.
Note - When you enable Browser-Based Authentication on a Security Gateway that is on an IP Series appliance, make sure to set the Voyager management application port to a port other than 443 or 80.
- Click .
The Integration With Active Directory window opens.
When SmartDashboard is part of the domain, SmartDashboard suggests this domain automatically. If you select this domain, the system creates an LDAP Account Unit with all of the domain controllers in the organization's Active Directory.
Note - We highly recommend that you go to the LDAP Account Unit and make sure that only necessary domain controllers are in the list. If AD Query is not required to operate with some of the domain controllers, delete them from the LDAP Servers list.
With the Identity Awareness configuration wizard you can use existing LDAP Account units or create a new one for one AD domain. If you create a new domain, the LDAP account unit that the system creates contains only the domain controller you set manually. If it is necessary for AD Query to fetch data from other domain controllers, you must add them at a later time manually to the LDAP Servers list after you complete the wizard.
To view/edit the LDAP Account Unit object, select in the objects tree > .
The LDAP Account Unit name syntax is: <domain name>_ _ AD
For example, CORP.ACME.COM_ _ AD.
- From the list, select the Active Directory to configure from the list that shows configured LDAP account units or create a new domain. If you have not set up Active Directory, you need to enter a , and credentials.
- Enter the Active Directory credentials and click to verify the credentials.
Important - For AD Query you must enter domain administrator credentials. For Browser-Based Authentication standard credentials are sufficient. - If you selected Browser-Based Authentication or Terminal Servers and do not wish to configure Active Directory, select and click
- Click .
If you selected Browser-Based Authentication on the first page, the page opens.
- In the page, select a URL for the portal, where unidentified users will be directed.
All IP addresses configured for the Security Gateway show in the list. The IP address selected by default is the Security Gateway main IP address>. The same IP address can be used for other portals with different paths. For example:
- Identity Awareness Browser-Based Authentication - 143.100.75.1/connect
- DLP Portal - 2.2.2.2/DLP
- Mobile Access Portal - 2.2.2.2/sslvpn
- By default, access to the portal is only through internal interfaces. To change this, click . We do not recommend that you let the portal be accessed through external interfaces on a perimeter Security Gateway.
- Click . The page opens with a summary of the acquisition methods.
If you selected Terminal Servers, the page includes a link to download the agent. See Terminal Servers Configuration.
- Click .
- Select > from the SmartDashboard menu.
Results of the Wizard
These are the results of the wizard:
- Depending on the acquisition methods you set, Active Directory and / or Browser-Based Authentication become active.
- When you set an Active Directory domain, the system creates an LDAP Account Unit object for the Active Directory domain.
To view/edit the LDAP Account Unit object, select in the objects tree > .
The LDAP Account Unit name syntax is: <domain name>_ _ AD
For example, CORP.ACME.COM_ _ AD.
- If you configured Terminal Servers, you need additional configuration. See Terminal Servers Configuration.
Working with Access Roles
After you enable Identity Awareness, you can create access role objects.
You can use Access Role objects as source and/or destination parameter in a rule. Access role objects can include one or more of these objects:
- Users and user groups
- Computers and computer groups
- Networks
To create an access role:
- Select in the Tree.
- Right-click > .
The window opens.
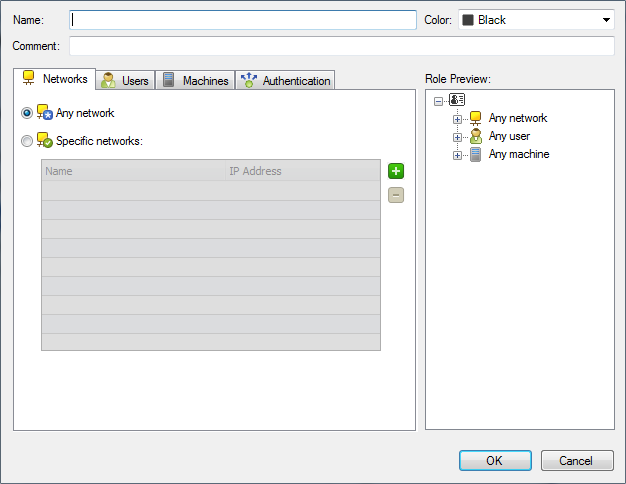
- Enter a and (optional) for the access role.
- In the tab, select one of these:
- In the tab, select one of these:
- In the tab, select one of these:
- For computers that use Full Endpoint Identity Agents, from the tab select .
- Click .
The access role is added to the tree.
Using Identity Awareness in the Firewall Rule Base
The Security Gateway examines packets and applies rules in a sequential manner. When a Security Gateway receives a packet from a connection, it examines the packet against the first rule in the Rule Base. If there is no match, it then goes on to the second rule and continues until it matches a rule.
In rules with access roles, you can add a property in the Action field to redirect traffic to the Captive Portal. If this property is added, when the source identity is unknown and traffic is HTTP, the user is redirected to the Captive Portal. If the source identity is known, the in the rule (Allow or Block) is enforced immediately and the user is not sent to the Captive Portal. After the system gets the credentials from the Captive Portal, it can examine the rule for the next connection.

|
Important - When you set the option to redirect http traffic from unidentified IP addresses to the Captive Portal, make sure to place the rule in the correct position in the Rule Base to avoid unwanted behavior.
|
In rules with access role objects, criteria matching works like this:
- When identity data for an IP is known:
- If it matches an access role, the rule is enforced and traffic is allowed or blacked based on the action.
- If it does not match an access role, it goes on to examine the next rule.
- When identity data for an IP is unknown and:
- All rule fields match besides the source field with an access role.
- The connection is http.
- The action is set to redirect to the Captive Portal.
If all the conditions apply, the traffic is redirected to the Captive Portal to get credentials and see if there is a match.
If not all conditions apply, there is no match and the next rule is examined.

|
Note - You can only redirect http traffic to the Captive Portal.
|
To redirect http traffic to the Captive Portal:
In a rule that uses an access role in the column, right-click the column and select .
The Action Properties window opens.
- Select the checkbox.
- Click .
The Action column shows that a redirect to the Captive Portal occurs.
This is an example of a Firewall Rule Base that describes how matching operates:
No.
|
Source
|
Destination
|
Service
|
Action
|
1
|
Finance_Dept (Access Role)
|
Finance_Web_ Server
|
Any
|
Accept (display Captive Portal)
|
2
|
Admin_IP
|
Any
|
Any
|
Accept
|
3
|
Any
|
Any
|
Any
|
Drop
|
Example 1 - If an unidentified Finance user tries to access the Finance Web Server with http, a redirect to the Captive Portal occurs. After the user enters credentials, the Security Gateway allows access to the Finance Web Server. Access is allowed based on rule number 1, which identifies the user through the Captive Portal as belonging to the Finance access role.
Example 2 - If an unidentified administrator tries to access the Finance Web Server with http, a redirect to the Captive Portal occurs despite rule number 2. After the administrator is identified, rule number 2 matches. To let the administrator access the Finance Web Server without redirection to the Captive Portal, switch the order of rules 1 and 2 or add a network restriction to the access role.
Access Role Objects
You can use Access Role objects as source and/or destination parameter in a rule. For example, a rule that allows file sharing between the IT department and the Sales department access roles.
Name
|
Source
|
Destination
|
VPN
|
Service
|
Action
|
IT and Sales File Sharing
|
IT_dept
|
Sales_dept
|
Any Traffic
|
ftp
|
accept
|
Negate and Drop
When you negate a source or destination parameter, it means that a given rule applies to all sources/destinations of the request except for the specified source/destination object. When the object is an access role, this includes all unidentified entities as well.
When you negate an access role, it means that the rule is applied to "all except for" the access role and unidentified entities. For example, let's say that the below rule is positioned above the Any, Any, Drop rule. The rule means that everyone (including unidentified users) can access the Intranet Web Server except for temporary employees. If a temporary employee is not identified when she accesses the system, she will have access to the Intranet Web Server. Right-click the cell with the access role and select . The icon that represents the access role object is shown crossed out.
Source
|
Destination
|
VPN
|
Service
|
Action
|
Temp_employees
|
Intranet_web_server
|
Any Traffic
|
http
|
accept
|
To prevent access to unidentified users, add another rule that ensures that only identified employees will be allowed access and that attempts by a temporary employee will be dropped.
Source
|
Destination
|
VPN
|
Service
|
Action
|
Temp_employees
|
Intranet_web_server
|
Any Traffic
|
http
|
drop
|
Any_identified_employee
|
Intranet_web_server
|
Any Traffic
|
http
|
accept
|
Using Identity Awareness in the Application and URL Filtering Rule Base
The Security Gateway inspects Application and URL Filtering requests and applies rules in a sequential manner. When a Security Gateway receives a packet from a connection, it examines the packet against the first rule in the Rule Base. If there is no match, it goes on to the second rule and continues until it completes the Rule Base. If no rule matches, the packet is allowed.
In rules with access roles, you can add a property in the Action field to redirect traffic to the Captive Portal. If this property is added, when the source identity is unknown and traffic is HTTP, the user is redirected to the Captive Portal. If the source identity is known, the in the rule (Allow or Block) is enforced immediately and the user is not sent to the Captive Portal. After the system gets the credentials from the Captive Portal, it can examine the rule for the next connection.
In rules with access role objects, criteria matching works like this:
- When identity data for an IP is known:
- If it matches an access role, the rule is enforced and traffic is allowed or blocked based on the specified action.
- If it does not match an access role, it goes on to examine the next rule.
- When identity data for an IP is unknown and:
- All rule fields match besides the source field with an access role.
- The connection protocol is HTTP.
- The action is set to redirect to the Captive Portal.
If all the conditions apply, the traffic is redirected to the Captive Portal to get credentials and see if there is a match.
If not all conditions apply, there is no match and the next rule is examined.
- When the criteria does not match any of the rules in the Rule Base, the traffic is allowed.
To redirect HTTP traffic to the Captive Portal:
- In a rule that uses an access role in the column, right-click the column and select .
The Action Properties window opens.
- Select .
- Click .
The Action column shows that a redirect to the Captive Portal occurs.
This is an example of an Application and URL Filtering Rule Base that shows how criteria matching operates:
No.
|
Source
|
Destination
|
Service
|
Applications/Sites
|
Action
|
1
|
Finance_Dept (Access Role)
|
Internet
|
Any
|
Salesforce
|
Allow
(display Captive Portal)
|
2
|
Any_identified_user
(Access Role)
|
Internet
|
Any
|
Remote Administration Tool (non-HTTP category)
|
Allow
|
3
|
Any_identified_user
(Access Role)
|
Internet
|
Any
|
Any recognized
|
Block
|
When browsing the Internet, different users experience different outcomes:
Example 1 - An unidentified Finance user that attempts to access Salesforce is sent to the Captive Portal. This happens because the action is set to redirect to the Captive Portal. After entering credentials and being identified, the user is granted access according to rule number 1.
Example 2 - An unidentified user that attempts to access the Remote Administration Tool matches rule 2, but not the Source column. Because the application is not HTTP, traffic cannot be redirected to the Captive Portal. Since none of the rules match, the user is granted access to the Remote Administration Tool.
Example 3 - An unidentified user that browses to Gmail does not match rules 1 and 2 because of the application. In rule 3 there is also no match because the action is not set to redirect to the Captive Portal. Since none of the rules match, the user is granted access to Gmail.
Source and Destination Fields
These issues are related to Source and Destination fields:
- You can use access role objects in the Source column or the Destination column of a rule. This means you cannot have a rule that uses an access role in both the Source column and the Destination column. Furthermore, you cannot use access roles in both the Source and Destination columns in the same Rule Base.
- In the Source and Destination columns, you can use a network object together with an access role object. But the condition between them is "or" and not "and".
Negate and Block
Negate and block in the Application Control Rule Base operates similarly to Negate and drop in the Firewall Rule Base. Unlike the Firewall Rule Base, if a connection does not match any of the rules, it is not automatically blocked. It is allowed.
Thus, when you use negate on an access role you allow all unidentified users and anyone who is not the access role access. To prevent this you must include an access role that prevents access to unidentified users. This rule makes sure that only identified users will be allowed access and attempts by unidentified users will be blocked.
This example shows rules that block temporary employees from accessing the Internet and allows access for identified employees.
Source
|
Destination
|
Application
|
Action
|
Temp_employees
|
Internet
|
Any Recognized
|
Block
|
Any_identified_employee
|
Internet
|
Any Recognized
|
Allow
|
Configuring Browser-Based Authentication in SmartDashboard
In the section of the Identity Awareness page, select to send unidentified users to the Captive Portal.
If you configure Transparent Kerberos Authentication, the browser tries to identify AD users before sending them to the Captive Portal. See Transparent Kerberos Authentication Configuration.
If you already configured the portal in the Identity Awareness Wizard or SmartDashboard, its URL shows below .
To configure the Browser-Based Authentication settings:
- Select and click .
- From the window, configure:
- Portal Network Location
- Access Settings
- Authentication Settings
- Customize Appearance
- Users Access
- Endpoint Identity Agent Deployment from the Portal
|
Note - When you enable Browser-Based Authentication on a Security Gateway that is on an IP Series appliance, make sure to set the Voyager management application port to a port other than 443 or 80.
|
Portal Network Location
Select if the portal runs on this Security Gateway or a different Identity Awareness enabled Security Gateway. The default is that the Captive Portal is on the Security Gateway. The Security Gateway redirects unidentified users to the Captive Portal on the same Security Gateway. This is the basic configuration.
A more advanced deployment is possible where the portal runs on a different Security Gateway. See the Deployment section for more details.
Access Settings
Click to open the window. In this window you can configure:
Authentication Settings
Click to open the window. In this window you can configure:
- - Select if Transparent Kerberos Authentication is used to identify users.
- The URL used to begin the SSO process. If transparent authentication fails, users are redirected to the configured Captive Portal.
- The IP address to which the Portal URL is resolved if DNS resolution fails.
Notes:
The Endpoint Identity Agent download link and the option are ignored when Transparent Kerberos Authentication SSO is successful. This is so because users do not see the Captive Portal.
The option only shows when you select as an identity source.
- Authentication Method - Select one method that known users must use to authenticate.
- Defined on user record (Legacy Authentication) - Takes the authentication method from > > .
- User name and password - This can be configured internally or on an LDAP server.
- RADIUS - A configured RADIUS server. Select the server from the list.
- User Directories - Select one or more places where the Security Gateway searches to find users when they try to authenticate.
- Internal users - The directory of internal users.
- LDAP users - The directory of LDAP users. Either:
- Any - Users from all LDAP servers.
- Specific - Users from an LDAP server that you select.
- External user profiles - The directory of users who have external user profiles.
The default is that all user directory options are selected. You might choose only one or two options if users are only from a specified directory or directories and you want to maximize Security Gateway performance when users authenticate. Users with identical user names must log in with domain\user.
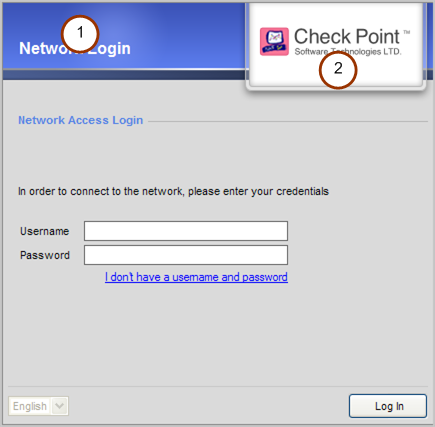
Customize Appearance
Click to open the window and edit the images that users see in the Captive Portal. Configure the labeled elements of the image below.
Label Number
|
Name
|
To do in GUI
|
1
|
Portal Title
|
Enter the title of the portal. The default title is Network Access Login.
|
2
|
Company Logo
|
Select and to select a logo image for the portal.
|
2
|
Company Logo for mobiles
|
Select and to select a smaller logo image for users who access the portal from mobile devices.
|
User Access
Configure what users can do in the Captive Portal to become identified and access the network.
- - Users are prompted to enter an existing username and password. This will only let known users authenticate.
- - Let guests who are not known by the Security Gateway access the network after they enter required data.
Name and Password Login Settings
Click to configure settings for known users after they enter their usernames and passwords successfully.
Unregistered Guest Login Settings
Click to configure settings for guests.
- - For how long can they access network resources before they have to authenticate again.
- - Makes users sign a user agreement. Click to choose an agreement and the End-user Agreement Settings page opens. Select an agreement to use:
- - Select this to use the standard agreement. See the text in the . Replace Company Name with the name of your company. This name is used in the agreement.
- - Paste the text of a customized agreement into the text box. You can use HTML code.
- - Edit the table shown until it contains the fields that users complete in that sequence. Select for each field that guests must complete before they can get access to the network. To add a new field, enter it in the empty field and then click . Use the green arrows to change the sequence of the fields. The first field will show the user name in the SmartView Tracker logs.
Endpoint Identity Agent Deployment from the Portal
If is selected as a method to acquire identities, you can configure that users must download the Endpoint Identity Agent from the Captive Portal. You can also let users choose not to install the Endpoint Identity Agent immediately and instead wait until a specified later date.
- - Select this to make users install the Endpoint Identity Agent. Select which Endpoint Identity Agent they must install. If this option is selected and the option is not selected, users will only be able to access the network if they install the Endpoint Identity Agent.
- - Select this if you want to give users flexibility to choose when they install the Endpoint Identity Agent. Select the date by which they must install it. Until that date a option shows in the Captive Portal.
Configuring Endpoint Identity Agents
Endpoint Identity Agents are dedicated client agents installed on users computers that acquire and report identities to the Security Gateway. All necessary configuration is done by the administrator and does not require user input.
Before you configure Endpoint Identity Agents, you must think about these elements:
- Endpoint Identity Agent type - Full Endpoint Identity Agent, Light Endpoint Identity Agent or Custom Endpoint Identity Agent. For the Full Endpoint Identity Agent you can enforce IP spoofing protection. For the Full Endpoint Identity Agent you can also leverage computer authentication if you define computers in access roles. The Custom Endpoint Identity Agent is a customized installation package.
- Installation deployment methods- You can deploy the Endpoint Identity Agent for installation through the Captive Portal or use other means you use to deploy software in your organization.
- Server discovery and trust - Before the Endpoint Identity Agent can connect to a Security Gateway with Identity Awareness, the Endpoint Identity Agent must discover and trust the server that it connects to. You can configure one of five methods.
- Automatic authentication using Single Sign-On (SSO) - Endpoint Identity Agents installed on endpoint computers authenticate users automatically when they log in to the domain using SSO.
The Endpoint Identity Agent identity source uses SSO to authenticate users when they enter their login credentials (Active Directory or other authentication server). The system securely gets authentication data one time without making users authenticate manually (as is necessary with Captive Portal).
You get SSO with Kerberos, an inherent authentication and authorization protocol in Windows networks that is available by default on all Windows servers and workstations. If you do not use SSO, users enter credentials in another window.
To set up Kerberos, see Kerberos SSO Configuration.
Endpoint Identity Agent Types
These are the Endpoint Identity Agent types that you can install:
- – Predefined Endpoint Identity Agent includes packet tagging and computer authentication. It applies to all users of the computer that it is installed on. Administrator permissions are required to use the Full Endpoint Identity Agent type.
- – Predefined Endpoint Identity Agent that does not include packet tagging and computer authentication. You can install this Endpoint Identity Agent individually for each user on the target computer. Administrator permissions are not required.
- - Predefined Endpoint Identity Agent that installs MAD services and the Multi-user host driver on Citrix and Terminal Servers. This Endpoint Identity Agent type cannot be used for endpoint computers.
- - Configure custom features for all computers that use this agent, such as MAD services and packet tagging.
For more information, see Prepackaging Endpoint Identity Agents.
User identification - Users that log in to the Active Directory domain are transparently authenticated (with SSO) and identified when using an Endpoint Identity Agent. If you do not configure SSO or you disable it, the Endpoint Identity Agent uses username and password authentication with a standard LDAP server. The system opens a window for entering credentials.
Computer identification - You get computer identification when you use the Full Endpoint Identity Agent as it requires installing a service.
IP change detection - When an endpoint IP address changes (interface roaming or DHCP assigns a new address), the Endpoint Identity Agent automatically detects the change. The Endpoint Identity Agent tells the Security Gateway and you stay connected.
Packet tagging - A technology that prevents IP spoofing is available only for the Full Endpoint Identity Agent as it requires installing a driver.
This table shows the similarities and differences of the Light and Full Endpoint Identity Agent types.
|
|
|
|
|
Endpoint Identity Agent Light
|
Endpoint Identity Agent Full
|
Installation Elements
|
Endpoint Identity Agent format
|
Resident application
|
Resident application + service + driver
|
Installation permissions
|
None
|
administrator
|
Upgrade permissions
|
None
|
None
|
Security Features
|
User identification
|
SSO
|
SSO
|
Computer identification
|
No
|
Yes
|
IP change detection
|
Yes
|
Yes
|
Packet tagging
|
No
|
Yes
|
The installation file size is 7MB for both types and the installation takes less than a minute.
Packet Tagging for Anti-Spoofing
IP Spoofing happens when an unauthorized user assigns an IP address of an authenticated user to an endpoint computer. By doing so, the user bypasses identity access enforcement rules. It is also possible to poison ARP tables that let users do ARP "man-in-the-middle attacks" that keep a continuous spoofed connectivity status.
To protect packets from IP spoofing attempts, you can enable Packet Tagging. Packet Tagging is a patent pending technology that prevents spoofed connections from passing through the Security Gateway. This is done by a joint effort between the Endpoint Identity Agent and the Security Gateway that uses a unique technology that sign packets with a shared key.
The Identity Awareness view in SmartView Tracker shows Packet Tagging logs. The Success status indicates that a successful key exchange happened.
|
Note - Packet Tagging can only be set on computers installed with the Full Endpoint Identity Agent.
|
For details, see Packet Tagging.
To enable IP Spoofing protection:
- Make sure users have the Full Endpoint Identity Agent installed.
- Create an Access Role.
- In the tab, select .
- Click OK.
Endpoint Identity Agent Deployment Methods
There are 2 Endpoint Identity Agent deployment methods:
- Using Captive Portal - you can configure that users must download the Endpoint Identity Agent from the Captive Portal. You can also let users choose not to install the Endpoint Identity Agent immediately and instead wait until a specified later date. During installation, the Endpoint Identity Agent automatically knows if there are administrator permissions on the computer or not and installs itself accordingly.
|
Note - When you deploy the Full Endpoint Identity Agent, the user that installs the client must have administrator rights on the computer. If the user does not have administrator permissions, the Light Endpoint Identity Agent is installed instead.
Note - If a user authenticates with the transparent portal, the download link does not show. The user must install the agent from the distribution software.
|
- Using distribution software - you can deploy the Endpoint Identity Agent with distribution software. The msi installation files (Light and Full) can be found in the \linux\windows directory on the supplied DVD.
You can find a customizable msi version of the Endpoint Identity Agent (for distribution via a software distribution tool or Captive Portal) in these places:
- Installed Security Gateway - in
/opt/CPNacPortal/htdocs/nac/nacclients/customAgent.msi - SecurePlatform installation CD - in
/linux/windows/Check_Point_Custom_Nac_Client.msi
For more information, see Prepackaging Identity Agents.
Configuring Endpoint Identity Agent Deployment from Captive Portal
To configure Endpoint Identity Agent deployment from Captive Portal:
- From the Identity Awareness page, select the checkbox.
- Select and click .
- From the window, select the checkbox to make users install the Endpoint Identity Agent. Select which Endpoint Identity Agent they must install. If you select this option and you do not select the defer option, users will can only access the network if they install the Endpoint Identity Agent.
- To give users flexibility to choose when they install the Endpoint Identity Agent, select . Select the date by which they must install it. Until that date a Skip Endpoint Identity Agent installation option shows in the Captive Portal.
- Click .
Configuring Endpoint Identity Agent Deployment for User Groups
When necessary, you can configure specific groups to download the Endpoint Identity Agent. For example, if you have a group of mobile users that roam and it is necessary for them to stay connected as they move between networks.
To configure Endpoint Identity Agent deployment for user groups:
- From the Identity Awareness page, select the checkbox.
- Select and click .
- Select and click .
- Select - You can add user groups and give them settings that are different from other users. Settings specified for a user group here override settings configured elsewhere in the Portal Settings. The options that you configure for each user group are:
- If they must accept a user agreement.
- If they must download the Endpoint Identity Agent and which one.
- If they can defer the Endpoint Identity Agent installation and until when.
- Click .
Server Discovery and Trust
Server Discovery refers to the procedure the Endpoint Identity Agent uses to find which Security Gateway with Identity Awareness to connect to. There are several methods you can use to configure this. The most basic method is to configure one server. Another method is to deploy a domain wide policy of connecting to a Security Gateway with Identity Awareness based on the Endpoint Identity Agent client's current location.
Server Trust refers to the procedure that:
- Makes sure that the Endpoint Identity Agent connects to a genuine Security Gateway with Identity Awareness.
- Makes sure that the communication between the Endpoint Identity Agent and the Security Gateway with Identity Awareness is not being tampered with. For example, an attempt to launch a Man-in-the-middle attack.
Trust is verified by comparing the server fingerprint calculated during the SSL handshake with the expected fingerprint.
There are 5 server discovery and trust methods:
- File name based server configuration - If no other method is configured (out of the box situation), any Endpoint Identity Agent downloaded from the Captive Portal is renamed to include the Captive Portal computer IP address in it. During installation, the Endpoint Identity Agent uses this IP for the Security Gateway with Identity Awareness. When you use this method, users will have to manually trust the server (a trust window opens).
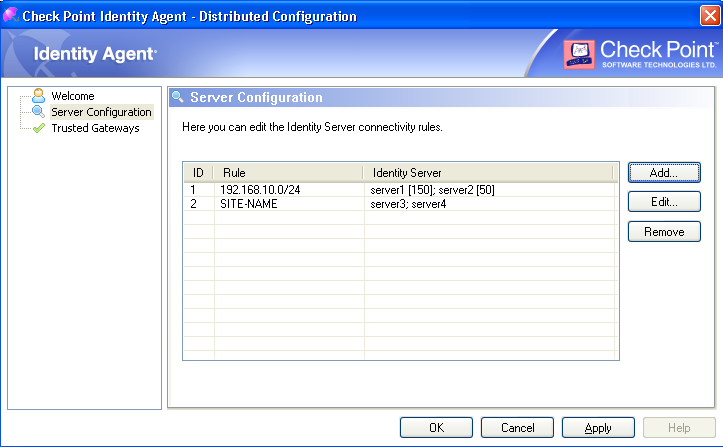
- AD based configuration – If the Endpoint Identity Agent computers are members of an Active Directory domain, you can deploy the server addresses and trust data using a dedicated "Distributed Configuration" tool.
- DNS SRV record based server discovery – You can configure the Security Gateway with Identity Awareness addresses in the DNS server. Because DNS is not secure, users will have to manually trust the server (a trust window opens).
|
Note - This is the only server discovery method that is applicable for the MAC OS Endpoint Identity Agent.
|
- Remote registry – All client configuration resides in the registry. This includes the Identity Server addresses and trust data. You can deploy these values before installing the client (by GPO, or any other method that lets you control the registry remotely). The Endpoint Identity Agent can then use them immediately.
- PrePackaging – You can create a prepackaged version of the client installation that comes with the Security Gateway with Identity Awareness IP and trust data.
For more details, see Server Discovery and Server Trust.
Configuring Endpoint Identity Agents in SmartDashboard
In the section of the Identity Awareness page, select to configure Endpoint Identity Agent settings.
To configure the Endpoint Identity Agent settings:
- Select and click .
- From the window, configure:
- Endpoint Identity Agent Access
- Authentication Settings
- Session details
- Endpoint Identity Agent Upgrades
Endpoint Identity Agent Access
Click to select from where the Endpoint Identity Agent can be accessed. The options are based on the topology configured for the Security Gateway.
Users can communicate with the servers if they use networks connected to these interfaces.
- - the Endpoint Identity Agent is accessible through interfaces associated with source networks that appear in access rules used in the Firewall Policy
Authentication Settings
Click to open the window. In this window you can configure:
- - Select if Transparent Kerberos Authentication is used to identify users.
- The URL used to begin the SSO process. If transparent authentication fails, users are redirected to the configured Captive Portal.
- The IP address to which the Portal URL is resolved if DNS resolution fails.
Notes:
The Endpoint Identity Agent download link and the option are ignored when Transparent Kerberos Authentication SSO is successful. This is so because users do not see the Captive Portal.
The option only shows when you select as an identity source.
- Authentication Method - Select one method that known users must use to authenticate.
- Defined on user record (Legacy Authentication) - Takes the authentication method from > > .
- User name and password - This can be configured internally or on an LDAP server.
- RADIUS - A configured RADIUS server. Select the server from the list.
- User Directories - Select one or more places where the Security Gateway searches to find users when they try to authenticate.
- Internal users - The directory of internal users.
- LDAP users - The directory of LDAP users. Either:
- Any - Users from all LDAP servers.
- Specific - Users from an LDAP server that you select.
- External user profiles - The directory of users who have external user profiles.
The default is that all user directory options are selected. You might choose only one or two options if users are only from a specified directory or directories and you want to maximize Security Gateway performance when users authenticate. Users with identical user names must log in with domain\user.
Session
Configure data for the logged in session using the Endpoint Identity Agent.
- - The interval at which the Endpoint Identity Agent sends a keepalive signal to the Security Gateway. The keepalive is used as the server assumes the user logged out if it is not sent. Lower values affect bandwidth and network performance.
- - For how long can users access network resources before they have to authenticate again. When using SSO, this is irrelevant.
- - When SSO is not enabled, you can let users save the passwords they enter in the Endpoint Identity Agent login window.
Endpoint Identity Agent Upgrades
Configure data for Endpoint Identity Agent upgrades.
- - You can select all users or select specific user groups that should be checked for Endpoint Identity Agent upgrades.
- - the system will only upgrade versions that are no longer compatible.
- - settings made by users before the upgrade are saved.
- - the Endpoint Identity Agent is automatically updated in the background without asking the user for upgrade confirmation.
|
Note - When you install or upgrade the Full Endpoint Identity Agent version, the user will experience a momentary loss of connectivity.
|
Configuring Terminal Servers
The Identity Awareness Terminal Servers solution lets the system enforce identity aware policies on multiple users that connect from one IP address. This functionality is necessary when an administrator must control traffic created by users of application servers that host Microsoft Terminal Servers, Citrix XenApp, and Citrix XenDesktop.
The Terminal Servers solution is based on reserving a set of TCP/UDP ports for each user. Each user that is actively connected to the application server that hosts the Terminal/Citrix services is dynamically assigned a set of port ranges. The Identity Server receives that information. Then, when a user attempts to access a resource, the packet is examined and the port information is mapped to the user.
For more information, see sk66761.
Deploying the Terminal Servers Identity Awareness Solution
To deploy Terminal Servers you must do two steps:
- Install a Terminal Servers Identity Agent - You install this agent on the application server that hosts the Terminal/Citrix services after you enable the Terminal Servers identity source and install policy. Go to the link https://<gateway_IP>/_IA_MU_Agent/download/muhAgent.exe. Make sure you open the link from a location defined in the Terminal Servers Accessibility setting ( > > > > ).
- Configure a shared secret - You must configure the same password on the Terminal Servers Identity Agent and the Identity Server (the Security Gateway enabled with Identity Awareness). This password is used to secure the establish trust between them.
Installing the Terminal Servers Endpoint Identity Agent
The Terminal Servers Endpoint Identity Agent installation installs the Terminal Servers driver and features. A user with administrator rights must run the Terminal Servers installation.
You can download the Terminal Servers Endpoint Identity Agent from a link in SmartDashboard.
To download the Terminal Servers Endpoint Identity Agent:
- On the page, enable the identity source.
- Install policy.
- Go back to the same page and click the download link. Make sure you open the link from a location defined in the Accessibility setting ( > > ).
- Install the Endpoint Identity Agent on the Terminal Server.
Upgrading a Terminal Servers Endpoint Identity Agent
There is no option to upgrade the Terminal Servers Endpoint Identity Agent when you upgrade a Security Gateway to a newer version. You must manually install the new version of the Terminal Servers Endpoint Identity Agent on the Citrix or Terminal Server.
Configuring the Shared Secret
You must configure the same password as a shared secret in the Terminal Servers Endpoint Identity Agent on the application server that hosts the Terminal/Citrix services and on the Security Gateway enabled with Identity Awareness. The shared secret enables secure communication and lets the Security Gateway trust the application server with the Terminal Servers functionality.
The shared secret must contain at least 1 digit, 1 lowercase character, 1 uppercase character, no more than three consecutive digits, and must be eight characters long in length. In SmartDashboard, you can automatically generate a shared secret that matches these conditions.
To configure the shared secret on the Identity Server:
- Log in to SmartDashboard.
- From the Network Objects tree, right-click Check Point and select the Security Gateway enabled with Identity Awareness.
The Identity Awareness page opens.
- In the section, select and click.
- To automatically configure the shared secret:
- Click to automatically get a shared secret that matches the string conditions.
The generated password is shown in the Pre-shared secret field.
- Click .
- To manually configure the shared secret:
- Enter a password that matches the conditions in the field. Note the strength of the password in the Indicator.
- Click .
To configure the shared secret on the application server:
- Open the Terminal Servers Endpoint Identity Agent.
The Check Point Endpoint Identity Agent - Terminal Servers main window opens.
- In the section, click .
- In , enter the shared secret string.
- Click .
Configuring Terminal Servers Accessibility
- On the page, click Terminal Servers - .
- In the section,click to select from where the Terminal Server Identity Agent can connect. The options are based on the topology configured for the gateway.
- Through all interfaces
- Through internal interfaces
- Including undefined internal interfaces
- Including DMZ internal interfaces
- Including VPN encrypted interfaces
- According to the Firewall policy - Select this if there is a rule that states who can access the portal.
Terminal Servers - Users Tab
The Users tab in the Terminal Servers Endpoint Identity Agent shows a table with information about all users that are actively connected to the application server that hosts the Terminal/Citrix services.
Table Field
|
Description
|
ID
|
The SID of the user.
|
User
|
The user and domain name. The format used:
<domain>\<user>
|
TCP Ports
|
The ports allocated to the user for TCP traffic.
|
UDP Ports
|
The ports allocated to the user for TCP traffic.
|
Authentication Status
|
Indicates whether this user is authenticated on the Identity Server.
|
The ID and User field information is automatically updated from processes running on the application server. The Terminal Servers Endpoint Identity Agent assigns TCP and UDP port ranges for each connected user.
Multi User Host Advanced Settings
From the section of the Multi User Host main window, you can access .
Advanced uses can change these settings when necessary. We highly recommend that you keep the default values if you are not an advanced user.
Changed settings only have an effect on new users that log in to the application server after the new settings have been saved. Users that are currently logged in will stay with the older settings.
Advanced Setting
|
Description
|
Excluded TCP Ports
|
Ports included in this range will not be assigned to any user for TCP traffic. This field accepts a port range or list of ranges (separated with a semicolon).
|
Excluded UDP Ports
|
Ports included in this range will not be assigned to any user for UDP traffic. This field accepts a port range or list of ranges (separated with a semicolon).
|
Maximum Ports Per User
|
The maximum number of ports that can be assigned to a user in each of the TCP and UDP port ranges.
|
Ports Reuse Timeout (seconds)
|
The number of seconds the system waits until it assigns a port to a new user after it has been released by another user.
|
Errors History Size
|
N/A
|
Identity Server Shared Secret
|
The same password that is set on Identity Server that enables trusted communication between the Security Gateway and the application server.
|
Working with RADIUS Accounting
You can configure a Security Gateway with Identity Awareness to use to get user and computer identities directly from a RADIUS accounting client. Identity Awareness uses this information to apply access permissions to the connection.
How RADIUS Accounting Works with Identity Awareness
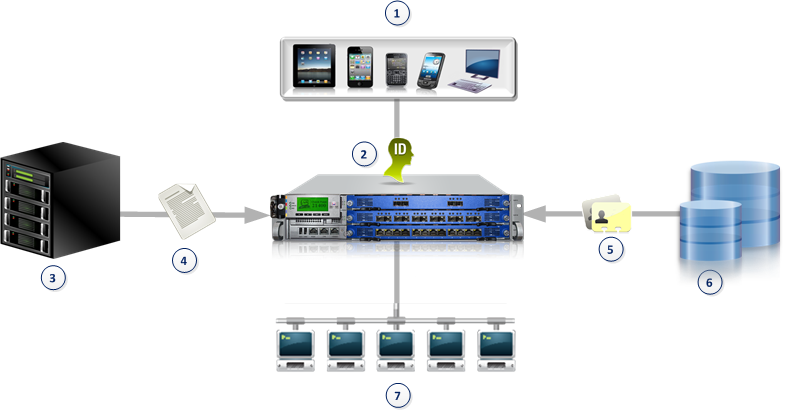
RADIUS Accounting gets identity data from generated by the RADIUS accounting client. Identity Awareness uses the data from these requests and to get user and device group information from the LDAP server. Firewall rules apply these permissions to users, computers and networks.
Item
|
Description
|
1
|
User devices
|
2
|
Security Gateway with Identity Awareness configured as a RADIUS Accounting server
|
3
|
RADIUS authentication server with RADIUS Accounting client enabled
|
4
|
RADIUS Accounting request
|
5
|
User identity information
|
6
|
LDAP server
|
7
|
Protected resources
|
Enabling RADIUS Accounting on a Security Gateway
You must enable RADIUS Accounting on Security Gateways before they can work as a RADIUS Accounting server.
To enable RADIUS Accounting for a Security Gateway:
- In the SmartDashboard tree, open the Security Gateway.
- On the page, make sure that the Blade is enabled.
- On the page, select .
Configuring RADIUS Accounting
Configure RADIUS Accounting in the window.
To Configure RADIUS Accounting:
- In the window > pane, click (to the right of the option).
- In the window, configure the parameters for your environment.
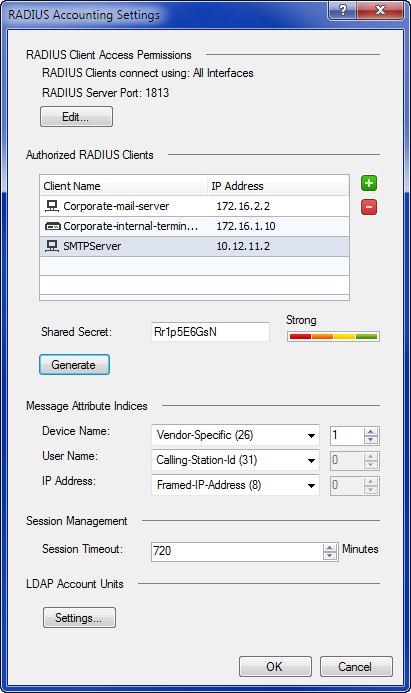
RADIUS Client Access Permissions
Gateway interfaces must be authorized to accept connections from RADIUS Accounting clients.
To select gateway interfaces:
- In the section, click .
- Select Security Gateway interfaces that can accept connections from RADIUS Accounting clients:
- - All Security Gateway interfaces can accept connections from RADIUS Accounting clients (default)
- - Only explicitly defined internal Security Gateway interfaces can accept connections from RADIUS Accounting clients
- - Also accepts connections from internal interfaces without a defined IP address
- - Also accepts connections from clients located in the DMZ
- - Interface connections are allowed according to the Firewall policy.
- Enter or select the RADIUS server port (default = 1813).
|
Important - The and options have priority over Firewall Policy rules. If a Firewall rule is configured to block connections from RADIUS Accounting clients, connections continue to be allowed when one of these options are selected.
|
Authorized RADIUS Clients
An Identity Awareness Security Gateway accepts RADIUS Accounting requests only from authorized RADIUS Accounting clients. A Radius Accounting client is a host with a RADIUS client software installed.
To configure an authorized RADIUS client:
- In the section of the window, click theicon and select a RADIUS Accounting Client from the list.
Click to define a new host object for the RADIUS Accounting client. This host object is selected automatically.
Click theicon to remove an existing RADIUS client from the list.
- Click to create a strong, shared secret for client authentication. This shared secret applies to all host objects in this list.
You can manually enter a shared secret. It is not necessary to generate a new shared secret when you add or remove clients from the list.
Message Attribute Indices
RADIUS Accounting Messages contain identity, authentication and administrative information for a connection. This information is contained in predefined attributes of the RADIUS Accounting Message packet.
The section tells Identity Awareness which attributes in RADIUS Accounting Messages contain identity information used by Identity Awareness:
- - RADIUS device-name attribute
- - RADIUS user-name attribute.
- - RADIUS IP address attribute.
Select a message attribute for each of these values. The default attributes are correct for many Identity Awareness deployments.
|
Note - is a user-defined attribute. There can be more than one attribute in a RADIUS Accounting message, each with a different value.
A sub-index value is assigned to each attribute in a message. This lets Identity Awareness find and use the applicable value.
|
To configure message attributes:
- Select a message attribute from the list for each index field.
- If you use the attribute, select the applicable sub-index value.
Session Timeout and LDAP Servers
You can define the user session timeout. This parameter is the maximum time that a user session stays open without receiving an or message from the RADIUS Accounting client. To define the session timeout, enter or select a value in minutes (default = 720).
You can select which LDAP account units the Security Gateway searches for user or device information when it gets a RADIUS Accounting request. LDAP account units are configured in SmartDashboard.
To define the authorized LDAP account units:
- Click the button, located below the heading.
- In the window, select one these options:
- - Searches all defined LDAP account units for user or device information.
- - Searches only the specified LDAP account units for user or device information.
- Clickto add an authorized LDAP account unit.
- Clickto remove an authorized LDAP account unit.
- If you selected the option, click the icon and then select one or more LDAP account units.
Configuring Remote Access
Identities are acquired for Mobile Access clients and IPSec VPN clients configured to work in Office Mode when they connect to the Security Gateway. This option is enabled by default.
To configure Remote Access:
Select or clear the checkbox to enable it or disable it, respectively.
|
Important - If there is more than one Security Gateway enabled with Identity Awareness that share identities with each other and have Office Mode configured, each gateway must be configured with different office mode ranges.
|
Configuring Identity Logging for a Log Server
When you configure identity logging for a Log Server, you are incorporating user and computer identification into Check Point logs. This is done by enabling Identity Awareness on the Log Server. Administrators can then analyze network traffic and security-related events better.
The Log Server communicates with Active Directory servers and gets user and computer names along with the source IP address information from AD event logs. The data extracted from AD is stored in an association map on the Log Server. When Security Gateways generate a Check Point log entry and send it to the Log Server, the server gets the user and computer name from the association map entry that corresponds to the source IP address. It then adds this identity aware information to the log.
Enabling Identity Awareness on the Log Server for Identity Logging
Before you enable Identity Awareness on the Log Server for identity logging:
- Make sure there is network connectivity between the Log Server and the domain controller of your Active Directory environment.
- Get the Active Directory administrator credentials.
To enable Identity Awareness on the Log Server for logging:
- Log in to SmartDashboard.
- From the Network Objects tree, right-click and select the Security Gateway with the Log Server.
- In the Software Blades section, select and on the Management tab.
The Identity Awareness Configuration wizard opens.
- Click .
The Integration With Active Directory window opens.
When SmartDashboard is part of the domain, SmartDashboard suggests this domain automatically. If you select this domain, the system creates an LDAP Account Unit with all of the domain controllers in the organization's Active Directory.
Note - We highly recommend that you go to the LDAP Account Unit and make sure that only necessary domain controllers are in the list. If AD Query is not required to operate with some of the domain controllers, delete them from the LDAP Servers list.
With the Identity Awareness configuration wizard you can use existing LDAP Account units or create a new one for one AD domain. If you create a new domain, the LDAP account unit that the system creates contains only the domain controller you set manually. If it is necessary for AD Query to fetch data from other domain controllers, you must add them at a later time manually to the LDAP Servers list after you complete the wizard.
To view/edit the LDAP Account Unit object, select in the objects tree > .
The LDAP Account Unit name syntax is: <domain name>_ _ AD
For example, CORP.ACME.COM_ _ AD.
- From the list, select the Active Directory to configure from the list that shows configured LDAP account units or create a new domain. If you have not set up Active Directory, you need to enter a , and credentials.
- Enter the Active Directory credentials and click to verify the credentials.
Important - For AD Query you must enter domain administrator credentials or do the steps in sk43874.
- Click .
|
