Identity Sources
Choosing Identity Sources
Identity sources are different in terms of security and deployment considerations. Depending on your organization requirements, you can choose to set them separately or as combinations that supplement each other.
This section presents some examples of how to choose identity sources for different organizational requirements.
- For logging and auditing with basic enforcement - enable Identity Awareness on the Security Gateway and select AD Query as the identity source.
- For logging and auditing only - select the identity to logs received from Security Gateways without Identity Awareness (requires Active Directory Query).
- For Application Control - set the AD Query and Browser-Based Authentication identity sources. The AD Query finds all AD users and computers. The Browser-Based Authentication identity source is necessary to include all non-Windows users. It also serves as a fallback option if AD Query cannot identify a user. If you configure Transparent Kerberos Authentication then the browser attempts to authenticate users transparently by getting identity information before the Captive Portal username/password page is shown to the user.
- For Data Center/internal server protection - these are some identity source options:
- AD Query and Browser-Based Authentication - When most users are desktop users (not remote users) and easy deployment is important.

|
Note - You can add Endpoint Identity Agents if you have mobile users and also have users that are not identified by AD Query. Users that are not identified encounter redirects to the Captive Portal.
|
- Endpoint Identity Agents and Browser-Based Authentication - When a high level of security is necessary. The Captive Portal is used for distributing the Endpoint Identity Agent. IP Spoofing protection can be set to prevent packets from being IP spoofed.
- For Terminal Servers and Citrix environments - Set the Terminal Servers identity source and install the Terminal Servers Endpoint Identity Agent on each Terminal Server.
- For users that access the organization through VPN - Set the Remote Access identity source to identify Mobile Access and IPsec VPN clients that work in Office Mode.
Advanced AD Query Configuration
Configuring Identity Awareness for a Domain Forest (Subdomains)
You need to create a separate LDAP Account Unit for each domain in the forest (i.e. subdomain). You cannot add domain controllers from two different subdomains into the same account unit.
You can use the Identity Awareness Configuration Wizard to define one of the subdomains. This automatically creates an LDAP Account Unit, but you then must make additional changes as listed below in the LDAP Account Unit. You must manually create all other domains you want Identity Awareness to relate to from Servers and OPSEC in the Objects Tree > Servers > New > LDAP Account Unit.
When you create an LDAP Account Unit for each domain in the forest, note the instructions for these fields:
- Make sure the username is one of these:
- In LDAP Server Properties tab > Add > Login DN - add the login DN.
- In Objects Management tab > Branches in use - Edit the base DN from DC=DOMAIN_NAME,DC=DOMAIN_SUFFIX to DC=SUB_DOMAIN_NAME,DC=DOMAIN_NAME,DC=DOMAIN_SUFFIX.
For example, change DC=ACME,DC=local to DC=SUB,DC=ACME,DC=local
Specifying Domain Controllers per Security Gateway
An organization Active Directory can have several sites, where each site has its own domain controllers that are protected by a Security Gateway. When all of the domain controllers belong to the same Active Directory, one LDAP Account Unit is created in SmartDashboard.
When AD Query is enabled on Security Gateways, you may want to configure each Security Gateway to communicate with only some of the domain controllers.
This is configured in the User Directory page of the . For each domain controller that is to be ignored, the default priority of the Account Unit must be set to a value higher than 1000.
For example, let say that the LDAP Account Unit ad.mycompany.com has 5 domain controllers.
On the Security Gateway we want to enable AD Query only for domain controllers dc2 and dc3. This means that all other domain controllers must be set to a priority higher than 1000 in the Security Gateway properties.
To specify domain controllers for each Security Gateway:
- Log in to SmartDashboard.
- From the Network Objects tree, right-click and select the Security Gateway.
- From the Gateway Properties tree, select > .
- Click and click .
- Select your Account Unit.
- Clear the checkbox and set the priority 1001 to dc1, dc4 and dc5.
- Click OK.
- Install policy.
Checking the Status of Domain Controllers
You can make sure that the domain controllers are set properly by using the adlog CLI. You can see the domain controllers that the Security Gateway is set to communicate with as well as the domain controllers it ignores.
The CLI command is adlog a dc.
Working with AD Query
AD Query extracts user and computer identity information from the Active Directory Security Event Logs. The system generates a Security Event log entry when a user or computer accesses a network resource. For example, this occurs when a user logs in, unlocks a screen, or accesses a network drive. Security Event Logs are not generated when a user logs out because Active Directory cannot detect this action.
When you work with AD Query, it is important that you understand and comply with these limitations:
- After a predefined period of network inactivity, a user session closes automatically. The user must log in again with the Captive Portal.
- - AD Query cannot detect when a user logs out. Therefore, more than one user can have open sessions from the same IP address. When this occurs, the permissions for each account remain active until their occurs. In this scenario, there is a risk that currently connected users can access network resources for which they do not have permissions.
Single User Assumption
You can configure AD Query to allow only one active account per IP address. When user logs out before the timeout and user logs in, the user session closes automatically and his permissions are canceled. User B is the only active user account and only his permissions are valid. This feature is called .
Before you activate Single User Assumption, you must exclude all service accounts used by user computers.
|
Note - Another way to keep these issues to a minimum is to increase the DHCP lease time.
|
To activate single user assumption:
- Exclude any service accounts. See Excluding Users.
- On the page, select for AD Query.
- Select .
- Click .
To deactivate Single User Assumption, clear .
Excluding Users, Computers and Networks
You can manually exclude service accounts as well as other users and computers from the AD Query scan.
To exclude objects from Active Directory queries:
- From the Identity Awareness page, select for Active Directory Query.
- Click .
- In the section, enter the user or computer account name. You can use the and wildcard characters or regular expression to select more than one account. Use this syntax for regular expressions:
regexp:<regular expression>. - In the section:
- Click the and select a network to add the Excluded Network list.
- Select an excluded network and click the to remove a network from the list.
- Click .
- Click
Using AD Query with NTLMv2
this release supports NTLMv2 for AD Query. Earlier releases only supported NTLM. By default, NTLMv2 support is disabled.
To enable NTLMv2 support for AD Query:
- Enable Identity Awareness without using the wizard.
- Install a policy.
- From the Security Management Server command line, go to the expert mode.
Run adlogconfig a.- Select
Use NTLMv2. - Select
Exit and save. - Restart the Identity Awareness wizard and continue configuring Identity Awareness.
Multiple Security Gateway Environments
In environments that use many Security Gateways and AD Query, we recommend that you set only one Security Gateway to acquire identities from a given Active Directory domain controller per physical site. If more than one Security Gateway gets identities from the same AD server, the AD server can become overloaded with WMI queries.
Set these options on the Identity Awareness page:
- One Security Gateway to share identities with other Security Gateways. This is the Security Gateway that gets identities from a given domain controller.
- All other Security Gateways to get identities from the Security Gateway that acquires identities from the given domain controller.
See the Deployment Scenarios section for more details.
Non-English Language Support
To support non-English user names on a Security Gateway enabled with Identity Awareness, you must set a parameter in the LDAP Account Unit object in SmartDashboard.
It is not necessary to set this parameter when you enable Identity Awareness on the Security Management Server or Log Server.
To set non-English language support:
- Select in the Objects Tree.
- Right-click > and select the LDAP Account Unit.
- In the General tab of the LDAP Account Unit, select .
- Click .
Performance
Bandwidth between the Log server and Active Directory Domain Controllers
The amount of data transferred between the Log server and domain controllers depends on the amount of events generated. The generated events include event logs and authentication events. The amounts vary according to the applications running in the network. Programs that have many authentication requests result in a larger amount of logs. The observed bandwidth range varies between 0.1 to 0.25 Mbps per each 1000 users.
CPU Impact
When using AD Query, the impact on the domain controller CPU is less than 3%.
Nested Groups
Identity Awareness supports the use of LDAP nested groups. When a group is nested in another group, users in the nested group are identified as part of the parent group. For example, if you make Group_B a member of Group_A, Group_B members will be identified by Identity Awareness as being part of Group A.
The default nesting depth is configured to 20. This feature is enabled by default. For details on working with nested groups, see sk66561.
Troubleshooting
If you experience connectivity problems between your domain controllers and Security Gateway with Identity Awareness/log servers, perform the following troubleshooting steps:
Connectivity Issues
- Ping the domain controller from the Security Gateway with Identity Awareness/log server.
- Ping the Security Gateway with Identity Awareness/log server from your domain controller.
- Perform standard network diagnostics as required.
- Check SmartView Tracker and see if there are drops between a Security Gateway defined with AD Query (Source) and the domain controller (Destination). If there are drops, see Configuring the Firewall and sk58881.
Use wbemtest to Verify WMI
To use the Microsoft wbemtest utility to verify that WMI is functional and accessible.
- Click Start > Run.
- Enter
wbemtest.exe in the Run window. - In the Windows Management Instrumentation Tester window, click Connect.
- In the Connect window, enter the following information:
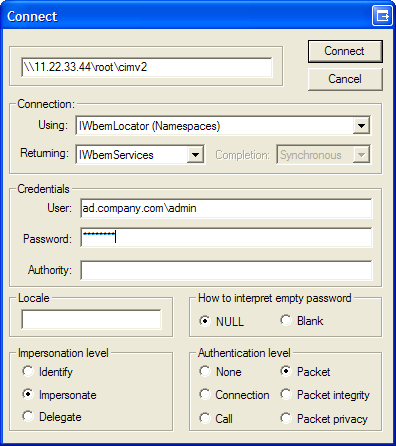
- Domain controller in the following format:
\\<IP address>\root\cimv2 - Fully qualified AD user name. For example: ad.company.com\admin
- Password
- Click Connect.
- If the Windows Management Instrumentation Tester window re-appears with its buttons enabled, WMI is fully functional.
- If the connection fails, or you receive an error message, check for the following conditions:
- Connectivity problems
- Incorrect domain administrator credentials.
- WMI service is not running
- A Firewall is blocking traffic between the Security Gateway with Identity Awareness/log server and domain controller.
Domain administrator Credentials
To verify your domain administrator credentials:
- Click Start > Run.
- Enter
\\<domain controller IP>\c$ in the Run window. For example: \\11.22.33.44\c$. - In the Logon window, enter your domain administrator user name and password.
- If the domain controller root directory appears, this indicates that your domain administrator account has sufficient privileges. An error message may indicate that:
- If the user does not have sufficient privileges, this indicates that he is not defined as a domain administrator. Obtain a domain administrator credentials.
- You entered the incorrect user name or password. Check and retry.
- The domain controller IP is incorrect or you are experiencing connectivity issues.
Verify the WMI Service
To verify if the WMI service is running on the domain controller:
- Click Start > Run.
- Enter
services.msc in the Run window. - Locate the service and verify that the service has started.
If it has not started, right-click this service and select Start from the option menu.
Configuring the Firewall
If a Security Gateway is located between the Security Gateway with Identity Awareness/log server and the Active Directory controller, configure the Firewall to allow WMI traffic.
To create Firewall rules for WMI traffic:
- In SmartDashboard > Firewall, create a rule that allows ALL_DCE_RPC traffic:
- Source = Security Gateways that run AD Query
- Destination = Domain Controllers
- Service = ALL_DCE_RPC
- Action = Accept
- Save the policy and install it on Security Gateways.
Note - If there are connectivity issues on DCE RPC traffic after this policy is installed, see sk37453 for a solution.
Confirm that Security Event Logs are Recorded
If you have checked connectivity but still do not see identity information in logs, make sure that the necessary event logs are being recorded to the Security Event Log.
AD Query reads these events from the Security Event log:
- For Windows Server 2003 domain controllers - 672, 673, 674
- For Windows Server 2008 higher domain controllers - 4624, 4769, 4768, 4770
Make sure you see the applicable events in the Event Viewer on the domain controller (My computer > Manage > Event Viewer > Security).
If the domain controller does not generate these events (by default they are generated), refer to Microsoft Active Directory documentation for instructions on how to configure these events.
Install Database for a Log Server
If you have configured Identity Awareness for a log server, but do not see identities in logs, make sure you installed the database.
To install the database:
- Click Policy > Install Database.
The Install Database window appears.
- Select the computers to install the database on.
- Click OK.
The Install Database script shows.
- Click Close when the script is done.
Advanced Browser-Based Authentication Configuration
Customizing Text Strings
You can customize some aspects of the web interface. This includes changes to the text strings shown on the Captive Portal Network Login page. You can make changes to the default English language or edit files to show text strings in other languages.
You can change English text that is shown on the Captive Portal to different English text through the SmartDashboard. The changes are saved in the database and can be upgraded.
To configure other languages to show text strings in a specified language on the Captive Portal, you must configure language files. These language files are saved on the Security Gateway and cannot be upgraded. If you upgrade the Security Gateway, these files must be configured again.
To help you understand what each string ID means, you can set the Captive Portal to String ID Help Mode. This mode lets you view the string IDs used for the text captions.
Setting Captive Portal to String ID Help Mode
To set the Captive Portal to String ID Help mode:
- On the Security Gateway, open the file:
/opt/CPNacPortal/phpincs/utils/L10N.php
- Replace the line
// return $stringID; with return $stringID;
(delete the two backslashes that you see before the text return $stringID). - Reload the Captive Portal in your web browser.
The Captive Portal opens showing the string IDs.
- To revert to regular viewing mode, open the file
L10N.php and put backslashes before the text return #stringID. See the highlighted text in step number 2 above.
Changing Portal Text in SmartDashboard
To change the text that shows in SmartDashboard:
- Go to Policy > Global Properties > SmartDashboard Customization.
- Click Configure.
- Go to Identity Awareness > Portal Texts.
- Delete the word DEFAULT and type the new English text in the required field.
- Click OK.
- Install the policy.
Adding a New Language
You can configure the Captive Portal to show the Network Login pages in different languages. After you set the language selection list, users can choose the language they prefer to log in with from a list at the bottom of the page.
To configure a language for Captive Portal you must:
- Edit the language array for the new language locale.
- Use the English language file as a template to create new language files. Then translate the strings in the new language file.
- Save the files with UTF-8 encoding and move them to the correct location.
- Set the language selection list to show on the Network Login page.
- Make sure the text strings are shown correctly.
Editing the Language Array
The supported language file contains entries for languages that you can see in the list on the Captive Portal page.
By default, English is the only language entry in the list. It has a corresponding language file. For each new language, you must create an entry in the supported languages file and create a new language file.
To create a new language, add an entry to the supported languages file:
- Open the file:
/opt/CPNacPortal/phpincs/conf/L10N/supportedLanguages.php
- In the
$arLanguages array, create a new locale entry with the syntax: "xx_XX" => "XName". For example: "de_DE" => "German".
To disable a language:
Comment out the line of the specific language or delete the line.
Creating New Language Files
To create new language files, use the English language file (portal_en_US.php) as a template and refer to it for the source language. The file contains the message strings. It is not necessary to translate all strings, but you must include all strings in the new language file.
When you translate a string, make sure that the string's length is almost the same in size as the initial English string. This is important to prevent breaks in the page layout. If this is not possible, consult with technical support.
You cannot use HTML special character sequences such as / < / > in the translated strings.
To create a new language file:
- Make a copy of the English language file:
/opt/CPNacPortal/phpincs/conf/L10N/portal_en_US.php
- Rename it to the new language using the syntax
portal_xx_XX.php.For example, portal_de_DE.php
- Translate the strings in the new language file.
- Make sure that the read permissions for the new language file are the same as those for the original language file. Run this command to set the permissions for read and write:
chmod 666 <file name>.
Saving New Language Files
You must save the language file with UTF-8 encoding.
To save a file with UTF-8 encoding:
- Use Notepad, Microsoft Word or a different editor to save the file with UTF-8 encoding. When using Microsoft Word, save the file as a '.txt' file with UTF-8 as the encoding method and rename it to
portal_xx_XX.php. For example: portal_de_DE.php. - Move the file to
/opt/CPNacPortal/phpincs/conf/L10N if it is not already there.
Showing the Language Selection List
When you only use the English language, the language selection list does not show at the bottom of the Captive Portal Network Login page. When you configure additional languages, you must show the language selection list on the Network Login page. Captive Portal users can then select the language with which to log in.
To see the language list on the Network Login page:
- On the Security Gateway, open the file:
/opt/CPNacPortal/phpincs/view/html/Authentication.php
- Back up the file (for possible future revert).
- Find the
language_selection string which is part of <label for="language_selection">. - Remove these lines:
<?PHP /*
*/?>You can find the first line a few lines above the language_selection string. You can find the second line about 20 lines below the language_selection string.
The lines to remove appear within the square:
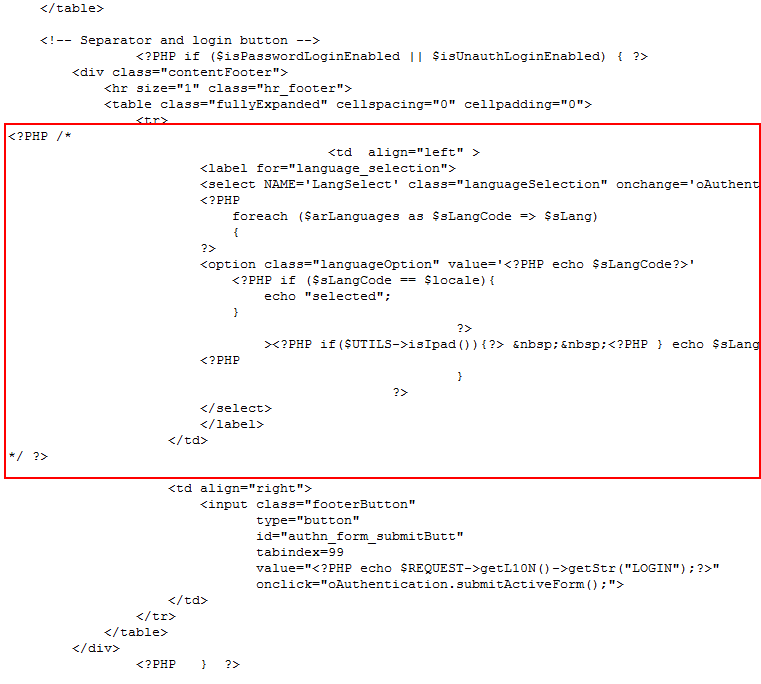
- Save the file.
The language selection list will show on the Network Login page.
- To revert back to not showing the language selection list, replace the current file with the backup of the original file.
Making Sure the Strings Shows Correctly
To make sure the strings show correctly:
- Browse to the Captive Portal and select the new language.
- Browse from different operating systems with different locale setups.
- Make sure that the text is shown correctly on the Captive Portal pages.
- Browse to the Captive Portal from a different browser and use a different font size.
Server Certificates
For secure SSL communication, gateways must establish trust with endpoint computers by showing a Server Certificate. This section discusses the procedures necessary to generate and install server certificates.
Check Point gateways, by default, use a certificate created by the Internal Certificate Authority on the Security Management Server as their server certificate. Browsers do not trust this certificate. When an endpoint computer tries to connect to the gateway with the default certificate, certificate warning messages open in the browser. To prevent these warnings, the administrator must install a server certificate signed by a trusted certificate authority.
All portals on the same Security Gateway IP address use the same certificate.
Obtaining and Installing a Trusted Server Certificate
To be accepted by an endpoint computer without a warning, gateways must have a server certificate signed by a known certificate authority (such as Entrust, VeriSign or Thawte). This certificate can be issued directly to the gateway, or be a chained certificate that has a certification path to a trusted root certificate authority (CA).
The next sections describe how to get a certificate for a gateway that is signed by a known Certificate Authority (CA):
Generating the Certificate Signing Request
First, generate a Certificate Signing Request (CSR). The CSR is for a server certificate, because the gateway acts as a server to the clients.
|
Note - This procedure creates private key files. If private key files with the same names already exist on the computer, they are overwritten without warning.
|
- From the gateway command line, log in to expert mode.
- Run:
cpopenssl req -new -out <CSR file> -keyout <private key file> -config $CPDIR/conf/openssl.cnf
This command generates a private key. You see this output:
Generating a 2048 bit RSA private key
.+++
...+++
writing new private key to 'server1.key'
Enter PEM pass phrase:
- Enter a password and confirm.
Fill in the data.
- The field is mandatory. This field must have the Fully Qualified Domain Name (FQDN). This is the site that users access. For example:
portal.example.com. - All other fields are optional.
- Send the CSR file to a trusted certificate authority. Make sure to request a Signed Certificate in PEM format. Keep the
.key private key file.
Generating the P12 File
After you get the Signed Certificate for the gateway from the CA, generate a P12 file that has the Signed Certificate and the private key.
- Get the Signed Certificate for the gateway from the CA.
If the signed certificate is in P12 or P7B format, convert these files to a PEM (Base64 encoded) formatted file with a CRT extension.
- Make sure that the CRT file has the full certificate chain up to a trusted root CA.
Usually you get the certificate chain from the signing CA. Sometimes it split into separate files. If the signed certificate and the trust chain are in separate files, use a text editor to combine them into one file. Make sure the server certificate is at the top of the CRT file.
- From the gateway command line, log in to expert mode.
- Use the
*.crt file to install the certificate with the *.key file that you generated. - Run:
cpopenssl pkcs12 -export -out <output file> -in <signed cert chain file> -inkey <private key file>
For example:
cpopenssl pkcs12 -export -out server1.p12 -in server1.crt -inkey server1.key
- Enter the certificate password when prompted.
Installing the Signed Certificate
Install the Third Party signed certificate to create Trust between the Mobile Access Software Blade and the clients.
All portals on the same IP address use the same certificate. Define the IP address of the portal in the Portal Settings page for the blade/feature.
- Import the new certificate to the gateway in SmartDashboard from a page that contains the Portal Settings for that blade/feature. For example:
In the section, click or.
- Install the policy on the gateway.
|
Note - The Repository of Certificates on the IPsec VPN page of the SmartDashboard gateway object is only for self-signed certificates. It does not affect the certificate installed manually using this procedure.
|
Viewing the Certificate
To see the new certificate from a Web browser:
The Security Gateway uses the certificate when you connect with a browser to the portal. To see the certificate when you connect to the portal, click the lock icon that is next to the address bar in most browsers.
The certificate that users see depends on the actual IP address that they use to access the portal- not only the IP address configured for the portal in SmartDashboard.
To see the new certificate from SmartDashboard:
From a page that contains the portal settings for that blade/feature, click in the section.
Transparent Kerberos Authentication Configuration
The Transparent Kerberos Authentication Single-Sign On (SSO) solution transparently authenticates users already logged into AD. This means that a user authenticates to the domain one time and has access to all authorized network resources without having to enter credentials again. If Transparent Kerberos Authentication fails, the user is redirected to the Captive Portal for manual authentication.
|
Note -The Endpoint Identity Agent download link andthe option are ignored when Transparent Kerberos Authentication SSO is successful. This is so because the user does not see the Captive Portal.
|
SSO in Windows domains works with the Kerberos authentication protocol.
The Kerberos protocol is based on the concept of tickets, encrypted data packets issued by a trusted authority, Active Directory (AD). When a user logs in, the user authenticates to a domain controller that gives an initial ticket granting ticket (TGT). This ticket vouches for the user's identity.
In this solution, when an unidentified user is about to be redirected to the Captive Portal for identification:
- Captive Portal asks the browser for authentication.
- The browser shows a Kerberos ticket to the Captive Portal.
- Captive Portal sends the ticket to the Identity Server (the Security Gateway enabled with Identity Awareness).
- The Identity Server decrypts the ticket, extracts the user's identity, and publishes it to all Security Gateways with Identity Awareness.
- The authorized and identified user is redirected to the originally requested URL.
- If transparent automatic authentication fails (steps 2-5), the user is redirected to the Captive Portal for identification.
Transparent Kerberos Authentication uses the GSS-API Negotiation Mechanism (SPNEGO) internet standard to negotiate Kerberos. This mechanism works like the mechanism that Endpoint Identity Agents use to present the Kerberos ticket.
You can configure SSO Transparent Kerberos Authentication to work with HTTP and/or HTTPS connections. HTTP connections work transparently with SSO Transparent Kerberos Authentication at all times. HTTPS connections work transparently only if the Security Gateway has a signed .p12 certificate. If the Security Gateway does not have a certificate, the user sees, and must respond to, the certificate warning message before a connection is made.
For more about Kerberos SSO, see:
Configuration Overview
Transparent Kerberos Authentication SSO configuration includes these steps. They are described in details in this section.
- AD configuration - Creating a user account and mapping it to a Kerberos principal name
- For HTTP connections: (
HTTP/<captive portal dns name>@DOMAIN) - For HTTPS connections: (
HTTPS/<captive portal dns name>@DOMAIN)
- SmartDashboard configuration
- Creating an LDAP Account Unit and configuring it with SSO.
- Enabling Transparent Kerberos Authentication on the Security Gateway configured with Identity Awareness.
- Endpoint client configuration - Configuring trusted sites in the browsers.
Where applicable, the procedures give instructions for both HTTP and HTTPS configuration.
Creating a New User Account
- In Active Directory, open Active Directory Users and Computers (Start->Run->dsa.msc)
- Add a new user account. You can choose any username and password. For example: a user account named ckpsso with the password 'qwe123!@#' to the domain corp.acme.com.
- Clear User must change password at next logon and select Password Never Expires
Mapping the User Account to a Kerberos Principal Name
This step uses the ktpass utility to create a Kerberos principal name that is used by the Security Gateway and the AD. A Kerberos principal name contains a service name (for the Security Gateway that Endpoint browsers connect to) and the domain name to which the service belongs.
Ktpass is a command-line tool available in Windows 2000 and higher.
Retrieve the correct executable
You must install the correct ktpass.exe version on the AD. Ktpass.exe is not installed by default in Windows 2003.
- If you are using Windows 2003:
- Retrieve the correct executable for your service pack from the Microsoft Support site prior to installation. It is part of the Windows 2003 support tools. For example, AD 2003 SP2 requires support tools for 2003 sp2.
- Download the support.cab and suptools.msi files to a new folder on your AD server.
- Run the suptools.msi.
- If you’re using Active Directory with Windows Server 2008 and higher, the ktpass utility is already installed on your server in the Windows\System32 folder and you can run the command line. You need to open the command prompt as an administrator by right clicking it and selecting "run as an Administrator".
Use Ktpass
- Open a command line to run the ktpass tool (> > ).
- At the command prompt, run ktpass with this syntax:
For HTTP connections:
C:> ktpass -princ HTTP/captive_portal_dns_name@DOMAIN_NAME -mapuser username@domain_name -pass password -out trans.keytab -ptype KRB5_NT_PRINCIPAL -crypto RC4-HMAC-NT
For HTTPS connections:
C:> ktpass -princ HTTPS/captive_portal_dns_name@DOMAIN_NAME -mapuser username@domain_name -pass password -out trans.keytab -ptype KRB5_NT_PRINCIPAL -crypto RC4-HMAC-NT
Important - Make sure to enter the command exactly as shown as it is case-sensitive. The captive_portal_dns_name is lower case and the DOMAIN_NAME and KRB5_NT_PRINCIPAL are upper case.
ktpass –princ HTTP/mycaptive.com@CORP.ACME.COM –mapuser ckpsso@corp.acme.com –pass qweQWE!@# -out trans.keytab –ptype KRB5_NT_PRINCIPAL -crypto RC4-HMAC-NT
The AD is ready to support Kerberos authentication for the Security Gateway.
Important - If you have used the ktpass utility before for the same principal name (HTTP/captive_portal_dns_name@DOMAIN_NAME) but with a different account, you must either delete the different account beforehand or remove its association to the principal name (by using setspn –D HTTP/domain_name old_account name – i.e. setspn –D HTTP/corp.acme.com ckpsso).
Failure to do this will cause the authentication to fail.
The above example shows the ktpass syntax on Windows 2003. When using Windows Server 2008 higher, the ktpass syntax is slightly different. Parameters start with a forward slash "/" instead of a hyphen "-".
HTTP example:
ktpass /princ HTTP/mycaptive.com@CORP.ACME.COM /mapuser ckpsso@corp.acme.com /pass qweQWE!@# /out trans.keytab /ptype KRB5_NT_PRINCIPAL /crypto RC4-HMAC-NT
HTTPS example:
ktpass /princ HTTPS/mycaptive.com@CORP.ACME.COM /mapuser ckpsso@corp.acme.com /pass qweQWE!@# /out trans.keytab /ptype KRB5_NT_PRINCIPAL /crypto RC4-HMAC-NT
Configuring an Account Unit
- Add a new host to represent the AD domain controller. Go to Network Objects tab > Nodes > Node > Host.
- Enter a name and IP address for the AD object and click OK.
For example, ADServer. - Add a new LDAP Account Unit. Select Servers and OPSEC Applications in the Objects Tree. Right-click Servers > New > LDAP Account Unit.
- In the General tab of the LDAP Account Unit:
- Enter a name.
- In the Profile field, select Microsoft_AD.
- In the Domain field, enter the domain name. It is highly recommended to fill this field for existing account units that you want to use for Identity Awareness. Entering a value into this field will not affect existing LDAP Account Units.
- Select CRL retrieval and User management.
- Click Active Directory SSO configuration and configure the values (see example):
- Select Use Kerberos Single Sign On.
- Enter the domain name.
For example, CORP.ACME.COM - Enter the account username you created in Creating a New User Account.
For example, ckpsso. - Enter the account password for that user (the same password you configured for the account username in AD) and confirm it.
- Leave the default settings for Ticket encryption method.
- Click OK.
- In the Servers tab:
- Click Add and enter the LDAP Server properties.
- In the Host field, select the AD object you configured in step 4 above.
- In the Login DN field, enter the login DN of a predefined user (added in the AD) used for LDAP operations.
- Enter the LDAP user password and confirm it.
- In the section, select Read data from this server.
- In the Encryption tab, select Use Encryption (SSL), fetch the fingerprint and click OK.
Note - LDAP over SSL is not supported by default. If you have not configured your domain controller to support LDAP over SSL, either skip step f or configure your domain controller to support LDAP over SSL.
- In the Objects Management tab:
- In the Manage objects on field, select the AD object you configured in step 4 above.
- Click Fetch Branches to configure the branches in use.
- Set the number of entries supported.
- In the Authentication tab, select Check Point Password in the Default authentication scheme and click OK.
Enabling Transparent Kerberos Authentication
- Log in to SmartDashboard.
- From the Network Objects tree, expand the object.
- Double-click the gateway enabled with .
- Select .
The Portal Settings window opens.
- Select - .
The Authentication Settings window opens.
- Select .
- The URL used to begin the SSO process. If transparent authentication fails, users are redirected to the configured Captive Portal.
- The IP address to which the Portal URL is resolved if DNS resolution fails.
Browser Configuration
To work with Transparent Kerberos Authentication, it is necessary to configure your browser to trust Captive Portal URL. If the portal is working with HTTPS, you must also enter the URL in the field using HTTPS.
Internet Explorer
It is not necessary to add the Captive Portal URL to Trusted Sites.
To configure Internet Explorer for Transparent Kerberos Authentication:
- Open Internet Explorer.
- Go to Internet > > > > > .
- the Captive Portal URL in the applicable and then click .
Google Chrome
If you have already configured Internet Explorer for Transparent Kerberos Authentication, that configuration also works with Chrome. Use this procedure only if you did not configure Internet Explorer for Transparent Kerberos Authentication.
To configure Google Chrome for Transparent Kerberos Authentication:
- Open Chrome.
- Click the menu (wrench) icon and select .
- Click .
- In the section, click .
- In the window, go to > > > .
- the Captive Portal URL in the applicable field.
Firefox
For Firefox, the option is disabled by default. To use Transparent Kerberos Authentication, you must enable this option.
To configure Firefox for Transparent Kerberos Authentication:
- Open Firefox.
- In the URL bar, enter
about:config - Search for the
network.negotiate-auth.trusted-uris parameter. - Set the value to the DNS name of the Captive Portal Security Gateway. You can enter multiple URLs by separating them with a comma.
|
