Legacy IoC Management
With IoC Management, you can view, create and edit Indicators of Compromise (IoCs) that apply to all the products on-boarded with XDR![]() Extended Detection & Response.
Extended Detection & Response.
To view the Legacy IoC Management page, access XDR and go to IoC Management > Legacy IoC Management.
|
|
Note - The legacy IoC Management will be deprecated soon. We recommend that you migrate to the New IoC Management. For the procedure to migrate, see Migrating to the New IoC Management. |

|
|
Note - For the tenants created from July 23, 2023 onwards, the Legacy IoC Management is disabled and only the New IoC Management is supported. |
IoC Management Overview
During the XDR onboarding process, two separate feeds for Detect and Prevent actions are created. To configure these feeds on the Management Server![]() Check Point Single-Domain Security Management Server or a Multi-Domain Security Management Server., see Configuring IoC Management.
Check Point Single-Domain Security Management Server or a Multi-Domain Security Management Server., see Configuring IoC Management.
XDR IoC management requires no new rules or policy installation. IoC management works directly on the Security Gateway![]() Dedicated Check Point server that runs Check Point software to inspect traffic and enforce Security Policies for connected network resources.. After configuration, the Security Gateway continually fetches intelligence data stored in a .cvs file on the Check Point web server. You can use the CSV file link with other products that support intelligence feeds from external sources, such as cloud-based mail protection platforms.
Dedicated Check Point server that runs Check Point software to inspect traffic and enforce Security Policies for connected network resources.. After configuration, the Security Gateway continually fetches intelligence data stored in a .cvs file on the Check Point web server. You can use the CSV file link with other products that support intelligence feeds from external sources, such as cloud-based mail protection platforms.
Working with IoC Management
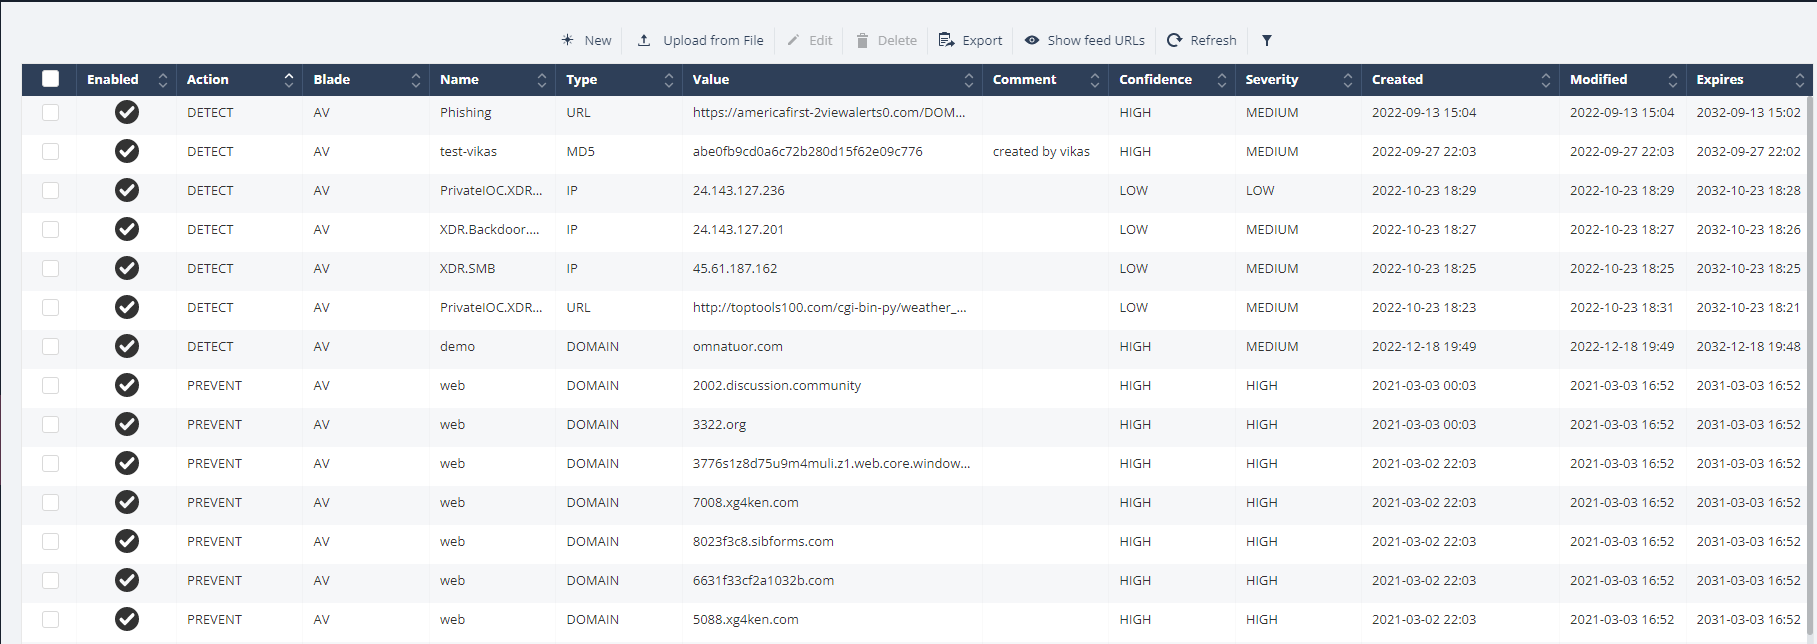
The IoC Management table shows only the latest 30 IoCs added to IoC Management. To view the all IoCs, click Export > Export All. See Exporting IoCs.
|
Item |
Description |
|---|---|
|
Enabled |
Indicates whether the Action is enabled (enforced) on the IoC. |
|
Action |
The action enforced on the IoC:
|
|
Blade |
The software blade that the IoC triggers: |
|
Name |
Name of the IoC. |
|
Type |
IoC type:
|
|
Value |
Value of the IoC. |
|
Confidence |
Confidence level of the IoC detection. |
|
Severity |
Severity of the IoC. |
|
Created |
Date and time on which the IoC was created. |
|
Modified |
Date and time on which the IoC was last modified. |
|
Expires |
Date and time when the IoC expires. After the IoC expires, it is deleted automatically. |
Creating a New IoC
|
|
Note - You can also add IoCs to IoC Management from the Incidents tab. See Adding or Editing an Indicator or Artifact in IoC Management. |
-
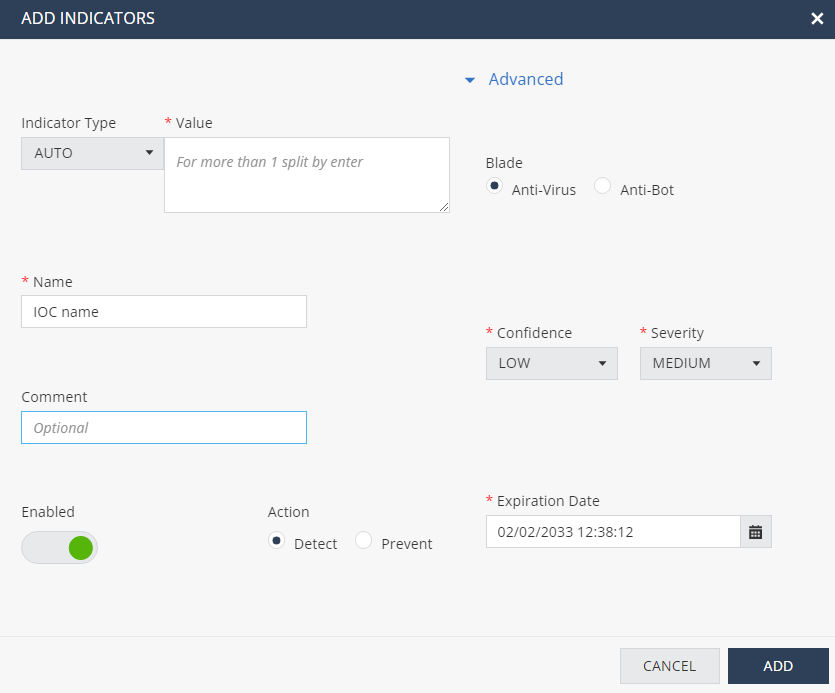
In the Legacy IoC Management menu bar, click New.
The Add Indicators window appears.
-
Enter these:
-
Indicator Type - Select the IoC type.
-
Value - Enter the value of the IoC.
-
Name - Enter a name for the IoC.
-
(Optional) Comment
This name and comment appears in the log created when the relevant blade detects or prevents the IoC.
-
Enable an Action - Detect or Prevent.
-
-
Click Advanced.
-
Select a Blade that the IoC triggers.
-
Select Confidence and Severity levels for the trigger.
-
Select an Expiration Date. After the expiration date, the IoC is deleted automatically.
If the values for these fields are not defined, indicators are added with default values, as shown in the previous screen.
-
-
Click Add.
Adding IoCs by Uploading a CSV File
-
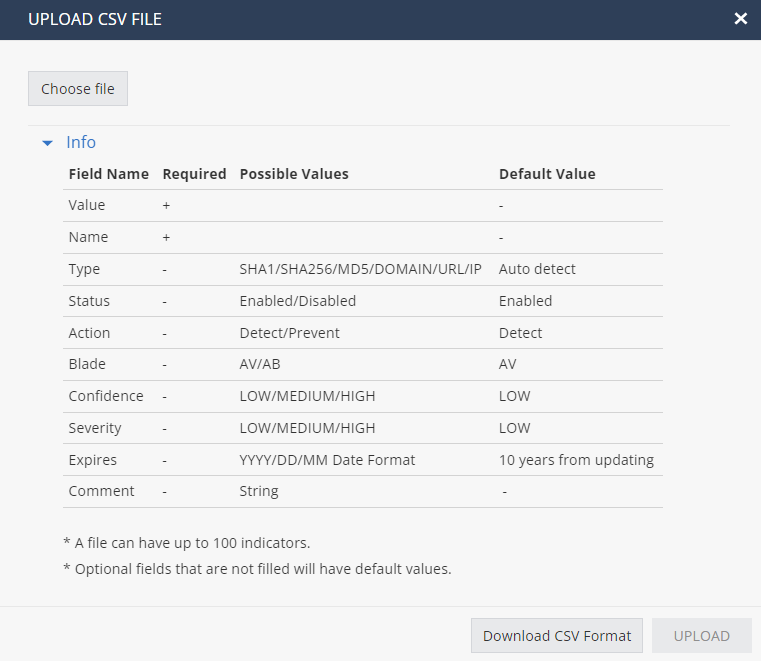
In the Legacy IoC Management menu bar, click Upload from File.
The Upload CSV File window appears.
-
If you have the CSV file to upload:
-
Click Choose file.
-
Browse the select the file and click Upload.
-
-
If you do not know the format of the CSV file:
-
Click Info > Download CSV Format.
The system downloads Upload_Format.xls.
-
Enter the IoC information in Upload_Format.xls and upload this file.
-
Editing and Deleting an IoC
-
To edit an IoC, select the IoC in the IoC Management table.
-
In the Legacy IoC Management menu bar, click Edit.
In the Edit Indicators window, enter the details and click Update.
-
To delete an IoC, select the IoC and click Delete.
Filtering IoCs
-
In the Legacy IoC Management menu bar, click
 .
.The Filter pane appears.
-
Select the parameter to filter the IoCs.
The IoC Management table refreshes and shows only the IoCs relevant to the applied filter.
Exporting IoCs
-
In the Legacy IoC Management menu bar, click Export.
-
Select one of these export options:
-
Export All - To export information of all the IoCs in the IoC Management table.
-
Export Filtered - To export information of the IoCs relevant to the applied filter.
-
Export Selected - To export information of only the selected IoCs in the IoC Management table.
System downloads a CSV file with the IoC information.
-
Configuring IoC Management
After you successfully onboard to XDR:
-
In the Legacy IoC Management menu bar, click Show feed URLs.
The Feed URLS window appears.
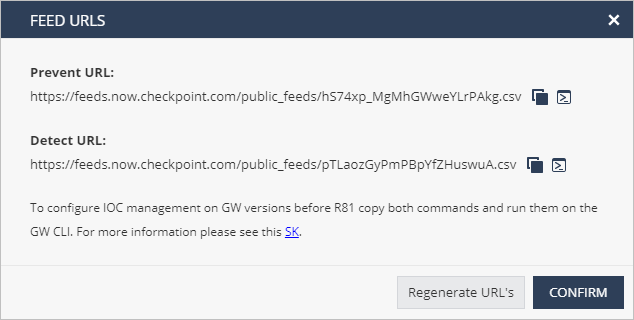
When you onboard to XDR, two feeds in .cvs format are created for Prevent and Detect actions. To create these files again, click Regenerate URLs.
-
Copy the Prevent URL and the Detect URL to a text file.
For example:
https://feeds.now.checkpoint.com/public_feeds/xxxxxxxxxx.csvhttps://feeds.now.checkpoint.com/public_feeds/xxxxxxxxxx.csv -
-
From the left navigation panel, click Security Policies.
-
In the middle top pane, click Threat Prevention > Indicators.
-
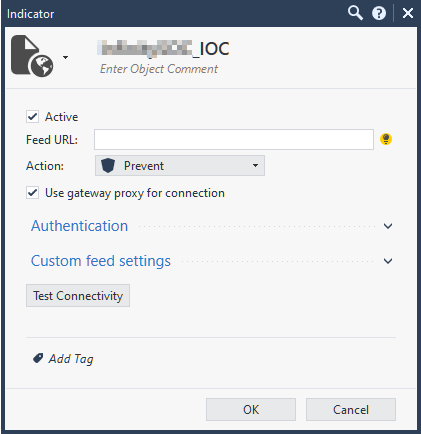
From the top toolbar, click New > External IoC Feed.
The Indicator window appears.
-
In Feed URL, enter the Prevent URL from step 2.
-
In Action, select Prevent and click OK.
-
Create a new External IoC Feed (Follow steps a to c).
-
In Feed URL, enter the Detect URL from step 2.
-
In Action, select Detect and click OK.
You have now created IoC feeds for Prevent and Detect actions.

-
Install the Threat Prevention policy on this Security Gateway.
For more information, see Importing External Custom Intelligence Feeds in SmartConsole.
-
-
In XDR, go to Legacy IoC Management and click Show Feed URLs.
Copy the full Security Gateway commands for Prevent and Detect.
Example:
ioc_feeds add --feed_name InfinitySOCPrevent --transport https --resource "https://feeds.now.checkpoint.com/public_feeds/xxxxxxxxxx1.csv" --feed_action Preventioc_feeds add --feed_name InfinitySOCDetect --transport https --resource "https://feeds.now.checkpoint.com/public_feeds/xxxxxxxxxx2.csv" --feed_action Detect -
In SmartConsole:
-
From the left navigation panel, click Gateways & Servers.
-
Right-click the Security Gateway object and click Actions > Open Shell.
Alternatively, connect to the command line on the Security Gateway through a SSH client.
-
-
Run the commands you copied in step 4 from XDR:
Example:
ioc_feeds add --feed_name InfinitySOCPrevent --transport https --resource "https://feeds.now.checkpoint.com/public_feeds/xxxxxxxxxx1.csv" --feed_action Preventioc_feeds add --feed_name InfinitySOCDetect --transport https --resource "https://feeds.now.checkpoint.com/public_feeds/xxxxxxxxxx2.csv" --feed_action Detect -
Close the shell after the operation completes successfully.
|
|
Note - If you generate the URLs again, the old feeds are no longer accessible. You must update the feeds on the Security Gateway and the indicator URL in SmartConsole. |
Testing IoC Management
As a simple test, block access to a website.
If the site is still accessible after you update the IoC feed:
-
Connect to the command line on the Security Gateway for each Cluster Member
 Security Gateway that is part of a cluster..
 -
Log in to the Expert mode.
-
Fetch feeds in debug mode:
$FWDIR/bin/ioc_feeder -d -f -
Examine this configuration file:
$FWDIR/conf/ioc_feeder.confIf the file is corrupt, delete the feed, make the required changes in the feed, and add the feed again.
-
Examine these files for errors:
-
$FWDIR/log/ioc_feeder.elg -
$FWDIR/log/ext_ioc_push.elg
For example:
Feed log External IOC - External Indicators processing failedInfinitySOCPrevent: Failed to fetch feed. Resource: https://feeds.now.checkpoint.com/public_feeds/PersonalFeed.csv, Reason: Peer certificate cannot be authenticated with given CA certificatesInfinitySOCDetect: Failed to fetch feed. Resource: https://feeds.now.checkpoint.com/public_feeds/PersonalFeed.csv, Reason: Peer certificate cannot be authenticated with given CA certificateshttps://supportcenter.checkpoint.com/supportcenter/portal?eventSubmit_doGoviewsolutiondetails=&solutionid=sk132193 -