Anti-Phishing
The Anti-Phishing security engine detects phishing, suspected phishing, and spam emails. It analyzes various components of an email, such as attachments, links, sender reputation, domain analysis, OCR, URLs behind QR code, and many more.
The Anti-Phishing engine detects phishing in emails in all languages. Language-based detections are supported for languages, as mentioned in Appendix F: Supported Languages for Anti-Phishing.
Phishing Confidence Level (Threshold)
The Anti-Phishing algorithm returns a verdict on each email analyzed with confidence that may go from Lowest to Highest.
Any email categorized as phishing with a confidence level equal to or greater than the phishing confidence level (threshold) generates a Phishing event and triggers the relevant workflow.
Any email categorized as phishing with a confidence level below the defined phishing confidence level (threshold) generates a Suspected Phishing event and triggers the relevant workflow.
For example, if the phishing confidence level (threshold) is High and if the Anti-Phishing engine categorized an email as phishing with phishing confidence level (threshold) as Medium, it triggers the Suspected Phishing workflow.
By default, the phishing confidence level (threshold) is set to High.
To configure the phishing confidence level (threshold):
-
Access the Email Security Administrator Portal.
-
Go to Security Settings > Security Engines.
-
Click Configure for
-
Under Phishing confidence level, select the required threshold.
-
Click Save.
Nickname Impersonation
Protection Against Executive Spoofing
Executive spoofing is a scam in which cyber criminals impersonate the names and emails of company executives to try and fool an internal employee into disclosing sensitive information or executing a payment.
Anti-Phishing has a setting that allows Email Security Administrator Portal administrators to automatically block such spoofing attempts.
Configuring Nickname Impersonation
When Anti-Phishing security engine detects nickname impersonation, administrators can configure the Email Security Administrator Portal to trigger the Phishing or Suspected Phishing workflow.
To configure nickname impersonation:
-
Navigate to Security Settings > Security Engines.
-
Click Configure for
-
Select the scope of users:
Important/key people

Note - By default, Anti-Phishing references the job title of the user to determine the seniority. Examples of senior titles are CEO, CFO, etc. Alternatively, you can define your own senior users by creating a security group (in Office 365 or Gmail) for senior-level users, and entering the exact name of the security group in the designated field. This field is case sensitive.
All internal users
-
Select the Phishing or Suspected Phishing workflow for detections.

Best Practices for Detecting Nickname Impersonation
-
It is recommended to start protecting a small group of senior-level people first and then expand it to other people and/or use the Suspected Phishing workflow.
-
If you wish to extend nickname impersonation workflows for all internal users, it is recommended to use the Suspected Phishing workflow to avoid false positive detections.
-
Protected users must be informed to not use their personal email addresses, as these will be detected as impersonations.
|
|
Note - Anti-Phishing always looks for nickname impersonations for all users. |
Handling False Positives
Many commonly used services like Salesforce or ServiceNow sends legitimate emails on behalf of other users. The Anti-Phishing engine detects these emails as nickname impersonations. Therefore, it’s important to ensure that this configuration is not generating false positive phishing/suspected phishing detections.
To monitor detections, create Custom Queries that filters the detections containing nickname impersonations.
|
|
Note - Since Impersonation detection takes priority, sometimes an Allow-List rule will be overridden due to an SPF failure. If you need to ensure that an email is not overridden by an SPF failure or suspected impersonation, edit the Allow-List rule to Ignore SPF check. |

Ensure to add legitimate services to Allow-List that appear in the query by navigating to Security Settings > Exceptions > Anti-Phishing.
For more details, contact
Phishing Simulation Solutions
Many organizations use phishing simulation solutions to educate their employees on how to detect and report phishing attacks. These solutions send fake phishing emails to employees to try and trick them into performing actions, opening attachments or clicking on phishing URLs.
Email Security automatically detects such emails from commonly-used phishing simulation solutions. Phishing reports from users regarding these emails will be automatically declined.
Email Security detects phishing simulation solutions from the following:
| Phishing Simulation Solutions |
|---|
|
ActiveTrail |
|
Attack simulation training |
|
BenchMark |
|
CybeReady |
|
Hook Security |
|
Hoxhunt |
|
HubSpot |
|
Infosec IQ |
|
KnowBe4 |
|
MailChimp |
|
MailGun |
|
MailJet |
|
MimeCast |
|
Phished |
|
PhishMe |
|
ProofPoint |
|
SendGrid |
|
SendInBlue |
|
Sophos Phish Threat V2 |
|
TargetHero |
|
TerraNova |
|
ZoHo |
If you use a different phishing simulation solution:
-
To avoid detection of phishing simulation emails, add an Anti-Phishing Allow-List rule based on the solution’s IP address.
For information about adding an Allow-List, see Anti-Phishing Exceptions.
-
The phishing reports of known phishing simulation tools are automatically rejected.
-
To request for supporting a new phishing simulation solution, contact
-
To automatically decline end-users' phishing reports regarding phishing simulation emails, contact
To configure the Email Security Administrator Portal to automatically send feedback to users who reported phishing training emails as phishing:
-
Access the Email Security Administrator Portal.
-
Click Security Settings > User Interaction > Phishing Reports.
-
In the Phishing simulation emails section, select the Notify user checkbox.
-
(Optional) To change the default text in the feedback:
-
Click the
 icon next to Notify user checkbox.
The Configure Auto-Reply to Users Reporting Phishing Simulation Emails pop-up appears.
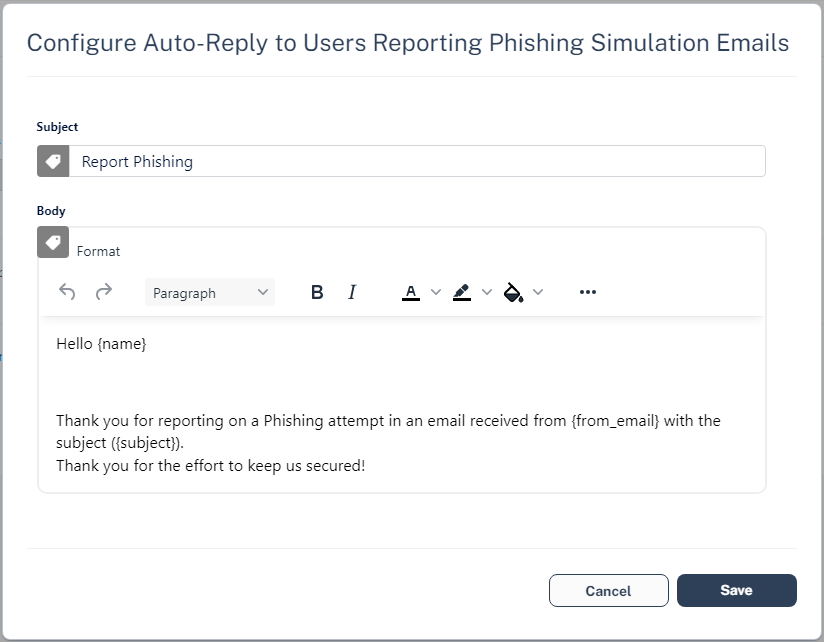
-
Make the necessary changes and click Save.
-
-
Click Save and Apply.
|
|
Note - When a user reports a phishing simulation email, Email Security automatically declines the associated phishing report. |
For Office 365, to see user reported phishing reports from phishing simulation solutions, see Automatic Ingestion of End User Reports.
Upstream Message Transfer Agents (MTAs)
During Learning Mode, to improve the accuracy of the Anti-Phishing engine, Email Security automatically detects MTAs that process emails before they reach Microsoft/Google.
If there are other MTAs that are not detected by Email Security, you can add them manually.
To add MTAs manually:
-
Access the Email Security Administrator Portal.
-
Click Security Settings > Security Engines.
-
Click Configure for
-
Scroll-down to SMTP host/s acting as Mail Transfer Agent/s (MTA) and enter the full DNS names or IP addresses of MTAs separated by comma.
-
Click Save.
Blocking Emails that Fail DMARC
Some organizations configure their DMARC (Domain-based Message Authentication, Reporting and Conformance) record to quarantine or reject emails that fail DMARC checks. Most organizations choose to enforce this rejection for incoming emails with Microsoft/Google.
If you wish to enforce it with Email Security, you may configure to trigger the Suspected Phishing or Phishing workflow for emails that fail DMARC checks.
By default, No extra action is selected for DMARC failed emails in the Anti-Phishing security engine.
To configure the workflow for DMARC failed emails with Quarantine or Reject action:
-
Access the Email Security Administrator Portal.
-
Go to Security Settings > Security Engines.
-
Click Configure for
-
Scroll-down to When emails fail DMARC with action reject/quarantine policy section and select one of these.
-
No additional action - Enforces no extra action.
-
Trigger the "Suspected Phishing" workflow for new senders - Enforces the Suspected Phishing workflow configured in the threat detection policy. See Configuring a Threat Detection Policy Rule and Suspected Phishing Workflow.
-
Trigger the "Phishing" workflow for new senders - Enforces the Phishing workflow configured in the threat detection policy. See Configuring a Threat Detection Policy Rule and Phishing Workflow.
-
Trigger the "Suspected Phishing" workflow for all senders
-
Trigger the "Phishing" workflow for all senders
-
-
Click Save.

Warning - If incoming emails go through a secure email gateway (SEG) before reaching Microsoft/Google, then Microsoft/Google might flag these emails as DMARC violation because the email comes in from the SEG, whose IP might not be authorized in the SPF/DMARC records.
In such cases, selecting to trigger Suspected Phishing or Phishing workflow might result in a high number of false positives and might impact email delivery.
Make sure the DMARC record is configured properly before selecting these workflows.
Configuring the Workflows for Newly Registered Domains
To configure the workflow for newly registered domains:
-
Access the Email Security Administrator Portal.
-
Go to Security Settings > Security Engines.
-
Click Configure for Anti-Phishing.
-
In the Configure Anti-Phishing pop-up, scroll-down to the When a newly registered domain sends an email, apply the following workflow section and select one of these workflows:
-
No extra action
-
Trigger "Suspected Phishing" workflow
-
Trigger "Phishing" workflow
-
-
In the Minimum age of newly registered domain (in days) field, enter the required number of days
Emails sent from domains newer than the specified minimum age will follow the workflows defined above.
-
Click Save.
Impersonation of your Partners
Email Security lists all your partners in the Partner Risk Assessment (Compromised Partners) dashboard.
When a sender from a newly registered domain sends an email to your organization, the Anti-Phishing engine checks if the sender domain resembles your partner domain(s). By default, if such a domain similarity is detected, it is considered an indicator in the AI-based Anti-Phishing security engine. It might or might not yield a Phishing verdict.
Partner Impersonation Attacks - Workflow
Administrators can select to override the AI-based verdict of the Anti-Phishing security engine and trigger a specific workflow when such a similarity is detected.
To configure a specific workflow for emails from domains that resemble a partner domain:
-
Access the Email Security Administrator Portal.
-
Click Security Settings > Security Engines.
-
Click Configure for
-
Scroll-down to When the sender domain resembles the domain of a partner section and select one of these workflows.
-
Consider as an indicator in the standard Anti-Phishing inspection (Default)
-
Trigger Suspected Phishing workflow
-
Trigger Phishing workflow
-
-
Click Save.
Handling Secured (Encrypted) Emails
Administrators can select how to manage incoming encrypted emails for end users, including Microsoft RPMSG and Microsoft 365 Message Encryption and so on.
To view the content of the encrypted emails, the end users must click the link provided in the email and authenticate.
To configure workflow for secured (encrypted) emails:
-
Access the Email Security Administrator Portal.
-
Click Security Settings > Security Engines.
-
Click Configure for
-
Scroll down to the Secured encrypted emails section and select a workflow.
-
Do not trigger any phishing workflow
-
Trigger Suspected Phishing workflow for recurring first time senders
-
Trigger Suspected Phishing workflow for first time senders
-
Trigger Suspected Phishing workflow
-
Trigger Phishing workflow for recurring first time senders
-
Trigger Phishing workflow for first time senders
-
Trigger Phishing workflow
Note - Recurring first-time senders are senders identified as sending multiple emails where they are considered first-time senders, across all the
-
-
Click Save.
Preventing Email Bomb Attacks
An Email Bomb is a social engineering attack that overwhelms inboxes with unwanted emails. Usually, subscription confirmations to newsletters the users never signed up for.
Users targeted by these attacks lose access to their business emails, and the attackers may even use this as a distraction while performing malicious activities on the user's behalf.
To prevent such attacks, administrators must configure these in Email Security:
-
Conditions for detecting and handling an ongoing Email Bomb attack.
-
Workflow to be triggered when such an attack is detected.
Identifying an Email Bomb Attack
Email Security identifies an Email Bomb attack when the number of emails from new senders exceeds a defined threshold in a common attack timeframe.
|
|
Note - The attack timeframe is dynamic and changes depending on the |
To configure the Email Bomb attack threshold:
-
Access the Email Security Administrator Portal.
-
Click Security Settings > Security Engines.
-
Click Configure for
-
Scroll down to Email Bomb – Threshold and enter the threshold value.
-
Click Save.
Once the number of emails from new senders in the common attack timeframe exceeds the threshold, Email Security treats all subsequent emails from any new sender as part of the attack. This continues until the attack timeframe passes without the number of emails from new senders going over the threshold.
For example, if an administrator configured the Email Bomb threshold as 50, Email Security counts emails 51 and above as part of the attack.
Handling Emails of an Email Bomb Attack
By default, when Email Security detects an Email Bomb attack, it individually evaluates every email part of the attack for Spam and Phishing. Administrators can configure a dedicated workflow for these emails.
To configure the workflow for Email Bomb attack:
-
Access the Email Security Administrator Portal.
-
Click Security Settings > Security Engines.
-
Click Configure for
-
Scroll down to Email Bomb – Workflow and select the required workflow.
-
Evaluate each email separately for spam/phishing
-
Trigger Spam workflow
-
Trigger Suspected Phishing workflow
-
Trigger Phishing workflow
-
-
Click Save.
Spam Protection Settings
Spam Confidence Level
Any email categorized as spam with a confidence level equal to or greater than the spam confidence level (threshold) generates a Spam event and triggers the relevant workflow.
To configure the spam confidence level (threshold):
-
Access the Email Security Administrator Portal.
-
Click Security Settings > Security Engines.
-
Click Configure for
-
Scroll down to the Spam confidence level section and select the required threshold.
-
Lowest
-
Low
-
Medium
-
High
-
Highest
Note - Low confidence levels could result in a high number of false positives.
-
-
Click Save.
Trusted Senders - End-User Spam Allow-List
See Trusted Senders - End-User Allow-List.
Detecting Malicious QR Codes
The Anti-Phishing security engine analyzes the links behind the QR codes and reports the malicious links, if any.
To view the links behind QR codes, open the Email Profile page and scroll down to the Link analysis section.
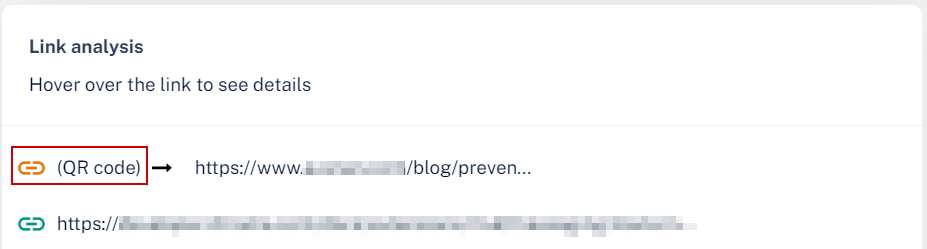
Filtering Emails Containing QR Codes
Using the Detection reason as QR in Custom Queries, the administrators can filter emails with malicious QR code. For more information, see Custom Queries.
Overriding Microsoft False Detections as Spam (Send to Junk)
Administrators can configure Email Security to manage the phishing emails that Microsoft / Google flags as spam and intend to send them to the user's Junk folder, while
-
Go to Security Settings > Security Engines.
-
Click Configure for Anti-phishing.
-
Scroll down to the Emails flagged as Spam by Microsoft / Google but Clean by
-
Treat as Clean emails - The system treats the phishing email that Microsoft detected as clean, applies the workflow, and delivers the email to the user's mailbox.
-
Treat as Spam emails (leave SCL score as is) - The system treats the phishing email that Microsoft detected as spam and sends it to the user's Junk folder. However, the email profile page in Email Security shows that
-
-
Click Save.
|
|
Note - This workflow is applicable only to the emails inspected and enforced by a Prevent (Inline) policy. |