Appendix B: Check Point Manual Integration with Google Gmail
This topic describes the configuration steps required when manual mode is selected to activate Google Workspace in Email Security. See Activating Gmail.
An administrator must make all these changes in the Google Admin Console.
Step 1: Add Groups
After activating Google Workspace, Email Security automatically creates the following user groups.
You can view these user groups in the Directory > Groups in your Google Admin Console.
-
check_point_inline_policy
-
check_point_inline_outgoing_policy
-
check_point_monitor_policy
-
check_point_monitor_outgoing_policy
|
|
Note - If you use GCDS (Google Cloud Directory Sync) to synchronize your user groups on-premises and in the cloud, the synchronization triggers the deletion of these |
Before activating Google Workspace, you must create exclusion rules for these user groups. Select the exclusion type as Group Email Address, match type as Exact Match, and the group email address should be in the groupname@[domain] format.
For example, the group email addresses should be
|
|
Note - If you have activated Google Workspace without creating exclusion rules, contact |
Step 2: Adding a Host
-
Sign in to the Google Admin Console.
-
From the left navigation panel, click Apps > Google Workspace > Gmail.
-
Click Hosts.
-
Click Add Route.
-
In the Name section, enter CLOUD-SEC-AV Service.

-
In the Specify email server section, select Single host.
-
Enter the host name as
To find the portal identifier, see Portal Identifier of Email Security Tenant.
-
Enter the port number as 25.
-
In the Options section, select the Require mail to be transmitted via a secure (TLS) connection (Recommended) checkbox.
-
Click Save.
Step 3: Updating Inbound Gateway
-
From the left navigation panel, click Apps > Google Workspace > Gmail.
-
Scroll down and click Spam, Phishing and Malware.
-
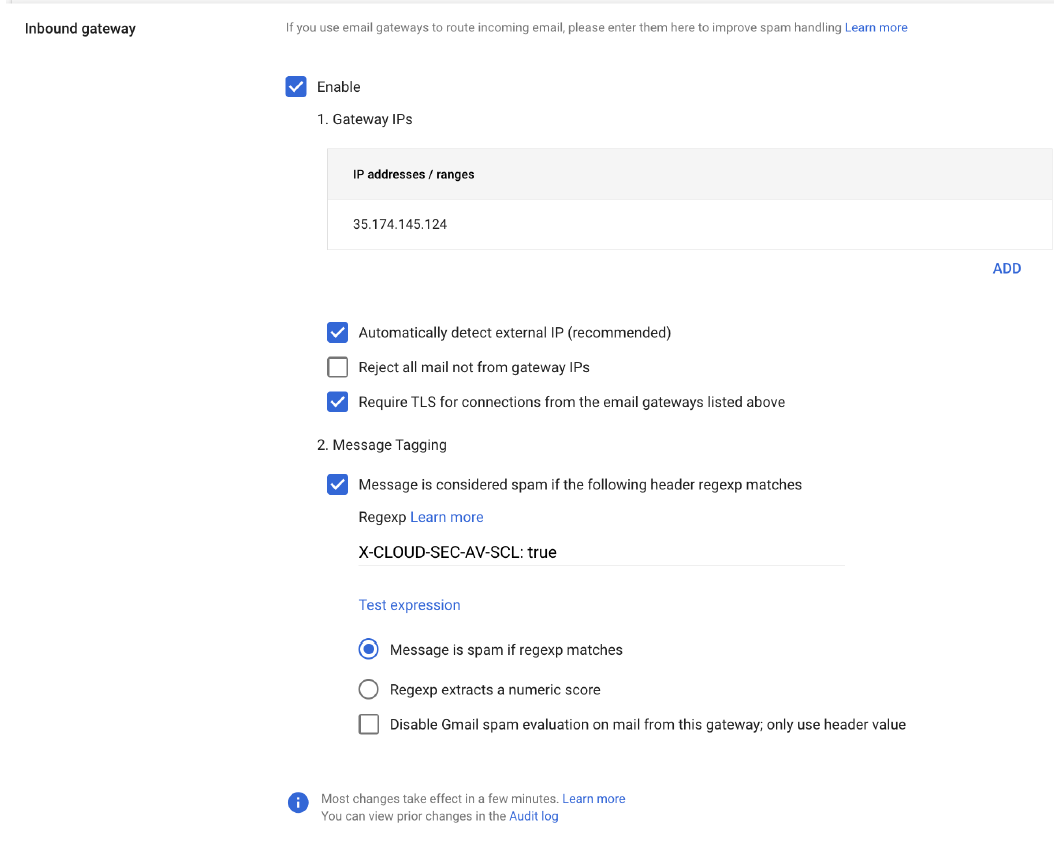
Click Inbound gateway.
-
Select Enable checkbox.
-
In the Gateway IPs section, click Add and enter the IP address or IP address range relevant to your
For the list of supported IP addresses, see IP Addresses Supported Per Region.
-
Select Automatically detect external IP (recommended) checkbox.
-
Select Require TLS for connections from the email gateways listed above checkbox.
-
In the Message Tagging section, select Message is considered spam if the following header regexp matches and enter X-CLOUD-SEC-AV-SCL: true
-
In the Test expression section, select Message is spam if regexp matches option.
-
Click Save.
Step 4: Adding SMTP Relay Host
-
From the left navigation panel, click Apps > Google Workspace > Gmail.
-
Scroll-down and click Routing.
-
In the SMTP relay service, select Configure.
-
Enter CLOUD-SEC-AV Service for description.

-
In the Allow Senders list, select Any Addresses checkbox.
-
In the Authentication section, do these:
-
Select the Only accept mail from the specified IP addresses checkbox.
-
Add all the IP addresses relevant to your
For the list of supported IP addresses, see IP Addresses Supported Per Region.
To add an IP address:
-
Click Add.
-
In the Description field, enter CLOUD-SEC-AV NAT for the IP address.

-
Enter the IP addresses relevant to your
For the list of supported IP addresses, see IP Addresses Supported Per Region.
-
Select the Enable checkbox.
-
Click Save.
-
-
Select the Require SMTP Authentication checkbox.
-
-
In Encryption section, select the Require TLS encryption checkbox.
-
Click Save.
Step 5: Create a Compliance Rule
-
From the left navigation panel, click Apps > Google Workspace > Gmail.
-
Scroll-down and click Compliance.
In the Content compliance section, create the following rules:

- [tenantname]_monitor_ei
-
[tenantname]_monitor_ii
-
[tenantname]_monitor_eo
-
[tenantname]_inline_ei
-
[tenantname]_inline_eo
where ei stands for incoming traffic, ii stands for internal traffic, and eo stands for outgoing traffic.

Note - The [tenantname]_inline_ei rule gets created when the Protect (Inline) mode is enabled. If you remove the Protect (Inline) mode for users in Email Security, the Content Compliance Rule remains in the Google Admin Console but the content of the user group check_point_inline_rule gets updated to reflect that no users are protected in this mode.
-
Create the [tenantname]_monitor_ei rule with these settings:
-
From the Content compliance rules, click Add Another Rule.
-
Enter the Content compliance rule name as [tenantname]_monitor_ei.
-
In the Email messages to affect section, do these:
-
Select Inbound checkbox.
-
In Add expressions that describe the content you want to search for in each message, select If ALL of the following match the message.
-
Click Add.

-
In the Add setting pop-up, select Metadata match.
-
In the Attribute section, select Source IP.
-
In the Match type section, select Source IP is not within the following range.
-
Enter all the IP addresses relevant to your data region.
For the list of supported IP addresses, see IP Addresses Supported Per Region.
-
Click Save.
-
-
Scroll down to the Also deliver to section, select Add more recipients checkbox.

-
Click Add.
-
In the Route section, do these:

-
Select the Change route checkbox.
-
From the list, select CLOUD-SEC-AV Service.
-
-
In the Spam and delivery options section, select Suppress bounces from this recipient checkbox.
-
In the Headers section, do these:

-
Select Add X-Gm-Original-To header checkbox.
-
Select Add X-Gm-Spam and X-Gm-Phishy headers checkbox.
-
Select Add custom headers checkbox and add custom headers with these values.
Header Key
Header Value
X-CLOUD-SEC-AV-Incoming
true
X-CLOUD-SEC-AV-Info
[portal],google_mail,monitor
To add a custom header:
-
Click Add.
-
In Header key, enter the header key.
-
In Header value, enter the header value.
-
Click Save.
-
-
-
-
Scroll-down to the end of the page and click Show options.
-
In the Account types to affect section, select Users and Groups checkbox.
-
In the Envelope filter section, do these:
-
Select the Only affect specific envelope recipient checkbox.
-
From the list, select Group membership (only received mail).
-
Click Select groups and select check_point_monitor_policy.
-
Click Save.
-
-
-
Create the [tenantname]_monitor_ii rule with these settings:
-
From the Content compliance rules, click Add Another Rule.
-
Enter the Content compliance rule name as [tenantname]_monitor_ii.
-
In the Email messages to affect section, do these:
-
Select Internal-Receiving checkbox.
-
In Add expressions that describe the content you want to search for in each message, select If ALL of the following match the message.
-
Click Add.
-
In the Add setting pop-up, select Metadata match.
-
In the Attribute section, select Source IP.
-
In the Match type section, select Source IP is not within the following range.
-
Enter all the IP addresses relevant to your data region.
For the list of supported IP addresses, see IP Addresses Supported Per Region.
-
Click Save.
-
-
Scroll down to the Also deliver to section, select Add more recipients checkbox.
-
Click Add.
-
In the Route section, do these:
-
Select the Change route checkbox.
-
From the list, select CLOUD-SEC-AV Service.
-
-
In the Spam and delivery options section, select Suppress bounces from this recipient checkbox.
-
In the Headers section, do these:
-
Select Add X-Gm-Original-To header checkbox.
-
Select Add X-Gm-Spam and X-Gm-Phishy headers checkbox.
-
Select Add custom headers checkbox and add custom headers with these values.
Header Key
Header Value
X-CLOUD-SEC-AV-Internal
true
X-CLOUD-SEC-AV-Incoming
true
X-CLOUD-SEC-AV-Info
[portal],google_mail,monitor
To add a custom header:
-
Click Add.
-
In Header key, enter the header key.
-
In Header value, enter the header value.
-
Click Save.
-
-
-
-
Scroll-down to the end of the page and click Show options.
-
In the Account types to affect section, select Users and Groups checkbox.
-
Click Save.
-
-
Create the [tenantname]_monitor_eo rule with these settings:
-
From the Content compliance rules, click Add Another Rule.
-
Enter the Content compliance rule name as [tenantname]_monitor_eo.
-
In the Email messages to affect section, do these:
-
Select Outbound checkbox.
-
In Add expressions that describe the content you want to search for in each message, select If ALL of the following match the message.
-
Click Add.
-
In the Add setting pop-up, select Metadata match.
-
In the Attribute section, select Source IP.
-
In the Match type section, select Source IP is not within the following range.
-
Enter all the IP addresses relevant to your data region.
For the list of supported IP addresses, see IP Addresses Supported Per Region.
-
Click Save.
-
-
-
Click Add.
-
In the Route section, do these:
-
Select the Change route checkbox.
-
From the list, select CLOUD-SEC-AV Service.
-
In the Spam and delivery options section, select Suppress bounces from this recipient checkbox.
-
In the Headers section, do these:
-
Select Add X-Gm-Original-To header checkbox.
-
Select Add X-Gm-Spam and X-Gm-Phishy headers checkbox.
-
Select Add custom headers checkbox and add custom headers with these values.
Header Key
Header Value
X-CLOUD-SEC-AV-Sent
true
X-CLOUD-SEC-AV-Info
[portal],google_mail,monitor
To add a custom header:
-
Click Add.
-
In Header key, enter the header key.
-
In Header value, enter the header value.
-
Click Save.
-
-
-
-
Scroll-down to the end of the page and click Show options.
-
In the Account types to affect section, select Users and Groups checkbox.
-
In the Envelope filter section, do these:

-
Select the Only affect specific envelope senders checkbox.
-
From the list, select Group membership (only sent mail).
-
Click Select groups and select check_point_monitor_outgoing_policy.
-
Click Save.
-
-
-
Create the [tenantname]_inline_ei rule with these settings:
-
From the Content compliance rules, click Add Another Rule.
-
Enter the Content compliance rule name as [tenantname]_inline_ei.
-
In the Email messages to affect section, do these:
-
Select Inbound checkbox.
-
In Add expressions that describe the content you want to search for in each message, select If ALL of the following match the message.
-
Click Add.
-
In the Add pop-up, select Advanced Content Match.
-
In the Location section, select Full headers.
-
In the Match type section, select Not matches regex.
-
For Regexp, enter ^Received\: from .* \[35\.174\.145\.124\]\)\s
Enter all the IP addresses relevant to your data region.
For the list of supported IP addresses, see IP Addresses Supported Per Region.
-
For Regexp Description, enter Received header must not contain 'MTA-Incoming-address (NAT-address)' in headers
-
Click Save.
-
-
In the If the above expressions match, do the following section, do these:
-
Select Modify message.
-
In the Headers section, do these:
-
Select Add X-Gm-Original-To header checkbox.
-
Select Add X-Gm-Spam and X-Gm-Phishy headers checkbox.
-
Select Add custom headers checkbox and add custom headers with these values.
Header Key
Header Value
X-CLOUD-SEC-AV-Incoming
true
X-CLOUD-SEC-AV-Info
[portal],google_mail,inline
To add a custom header:
-
Click Add.
-
In Header key, enter the header key.
-
In Header value, enter the header value.
-
Click Save.
-
-
-
In the Route section, do these:

-
Select the Change route checkbox.
-
Select the Also reroute spam checkbox.
-
From the list, select CLOUD-SEC-AV Service.
-
-
-
Scroll-down to the end of the page and click Show options.
-
In the Account types to affect section, select Users and Groups checkbox.
-
In the Envelope filter section, do these:
-
Select the Only affect specific envelope recipients checkbox.
-
From the list, select Group membership (only received mail).
-
Click Select groups and select check_point_inline_policy.
-
Click Save.
-
-
-
Create the [tenantname]_inline_eo rule with these settings:
-
From the Content compliance rules, click Add Another Rule.
-
Enter the Content compliance rule name as [tenantname]_inline_eo.
-
In the Email messages to affect section, do these:
-
Select Outbound checkbox.
-
In Add expressions that describe the content you want to search for in each message, select If ALL of the following match the message.
-
Click Add.
-
In the Add pop-up, select Advanced Content Match.
-
In the Location section, select Full headers.
-
In the Match type section, select Not matches regex.
-
For Regexp, enter ^Received\: from .* \[35\.174\.145\.124\]\)\s
Enter all the IP addresses relevant to your data region.
For the list of supported IP addresses, see IP Addresses Supported Per Region.
-
For Regexp Description, enter Received header must not contain 'MTA-Incoming-address (NAT-address)' in headers
-
Click Save.
-
-
In the If the above expressions match, do the following section, do these:

-
Select Modify message.
-
In the Headers section, do these:
-
Select Add X-Gm-Original-To header checkbox.
-
Select Add X-Gm-Spam and X-Gm-Phishy headers checkbox.
-
Select Add custom headers checkbox and add custom headers with these values.
Header Key
Header Value
X-CLOUD-SEC-AV-Sent
true
X-CLOUD-SEC-AV-Info
[portal],google_mail,sent,inline
To add a custom header:
-
Click Add.
-
In Header key, enter the header key.
-
In Header value, enter the header value.
-
Click Save.
-
-
-
In the Route section, do these:
-
Select the Change route checkbox.
-
Select the Also reroute spam checkbox.
-
From the list, select CLOUD-SEC-AV Service.
-
-
-
Scroll-down to the end of the page and click Show options.
-
In the Account types to affect section, select Users and Groups checkbox.
-
In the Envelope filter section, do these:
-
Select the Only affect specific envelope senders checkbox.
-
From the list, select Group membership (only sent mail).
-
Click Select groups and select check_point_inline_outgoing_policy.
-
Click Save.
-
-
IP Addresses Supported Per Region
-
 United States
-
35.174.145.124
-
3.214.204.181
-
3.216.111.138
-
44.211.178.96/28
-
44.211.178.112/28
-
3.101.216.128/28
-
3.101.216.144/28
-
-
Australia
-
13.211.69.231
-
3.105.224.60
-
3.27.51.160/28
-
3.27.51.176/28
-
18.143.136.64/28
-
18.143.136.80/28
-
-
Canada
-
15.222.110.90
-
52.60.189.48
-
3.99.253.64/28
-
3.99.253.80/28
-
3.101.216.128/28
-
3.101.216.144/28
-
-
Europe
-
52.212.19.177
-
52.17.62.50
-
3.252.108.160/28
-
3.252.108.176/28
-
13.39.103.0/28
-
13.39.103.23/28
-
-
India
-
3.109.187.96
-
43.204.62.184
-
43.205.150.240/29
-
43.205.150.248/29
-
18.143.136.64/28
-
18.143.136.80/28
-
-
United Arab Emirates
-
3.29.194.128/28
-
3.29.194.144/28
-
-
United Kingdom
-
13.42.61.32
-
13.42.61.47
-
13.42.61.32/28
-
13.42.61.47/28
-
13.39.103.0/28
-
13.39.103.23/28
-