Appendix A: Check Point Manual Integration with Office 365
This topic describes how to perform a manual on-boarding and configuration process for Harmony Email & Collaboration where customers bind their Office 365 environment to Harmony Email & Collaboration.
|
|
Note - Automatic mode for onboarding allows for better maintenance, management, and smoother user experience. Check Point recommends only using Manual mode as a last resort. Before using the Manual mode, contact Check Point Support to help resolve any issues raised with the Automatic mode for onboarding. |

After you select to bind Harmony Email & Collaboration to your Office 365, the Office 365 Install Mode window opens.
Select one of these modes:
-
Automatic mode - Harmony Email & Collaboration automatically configures Office 365 emails to operate in Detect modes (Monitor only and Detect and Remediate) and/or Protect (Inline) mode. You only need to authorize the Harmony Email & Collaboration app during the wizard and all configuration changes are applied automatically.
-
Manual mode - You must manually perform the necessary configurations in the Office 365 Admin Exchange Center before you bind the application.
This topic explains the various settings that need to be configured for Manual mode in the Office 365 Exchange Admin Center.
We recommend that you review if any of these scenarios listed below apply to you:
-
You want to choose automatic mode but first want to learn the configuration changes that are automatically applied to Office 365.
-
You want to choose manual mode and need to know what the initial configuration should be.
-
You are already using one of the Detect modes and moving to Protect (Inline) mode (in this case skip to Introduction - Protect (Inline) Protection Mode). Or, you are already in Protect (Inline) mode but changing the scope of the policy groups it applies to (In this case, skip to Step 9 - Transport Rules (Protect (Inline) Mode)). Make the changes in the Protect rule).
|
|
Note - In this guide, {portal} refers to your portal name. The portal name can be found in the Office 365 Install window. For more information, see Portal Identifier of Harmony Email & Collaboration Tenant. |
If you have any queries about how to apply these changes in the configuration, contact the Check Point Support for assistance.
|
|
Note - Manual deployment does not support user blocking or provide visibility into the Microsoft Quarantine. For more information, see Unified Quarantine for Manual Mode of Onboarding. |
Manual Integration with Office 365 Mail - Required Permissions
You can choose Manual mode of integration when you do not want Check Point to automatically add and manage Mail Flow rules, connectors, and other Microsoft configurations for your organization.
As these configurations are not managed by Check Point, Manual mode require less permissions when compared with Automatic mode.
|
API Permissions - Display Name |
Functions performed by Harmony Email & Collaboration |
|
|---|---|---|
|
Read all audit log data |
AuditLog.Read.All |
Used to detect anomalous user behavior and trigger workflows for compromised accounts. Used to protect contacts and scope policies for users. |
|
Read contacts in all mailboxes |
Contacts.Read |
|
|
Read domains |
Domain.Read.All |
Collect protected domains to:
|
|
Real all groups |
Group.Read.All |
Used for mapping users to groups to properly assign policies to users. |
|
Read all published lablels and label policies for an organization |
InformationProtectionPolicy.Read.All |
Read Microsoft Sensitivity Labels to use them as part of the Check PointDLP policy. |
|
Read and write mail in all mailboxes |
Mail.ReadWrite |
Used for these:
|
|
Read and write all user mailboxes settings |
MailboxSettings.ReadWrite |
Used for these:
|
|
Read all hidden memberships |
Member.Read.Hidden |
Used to collect hidden group members to support policy assignment, policy enforcement, and user-based reporting. |
|
Read all directory RBAC settings |
RoleManagement.Read.Directory |
Used to collect users and their roles to scope policies, enforce them, and generate user-specific reports. |
|
Real all users' full profiles |
User.Read.All |
Used to collect all users for the purposes of protection and policy scoping. |
|
Read and write directory data |
Directory.ReadWrite.All (Azure AD Graph) |
Used for these:
|
|
Use Exchange Web services with full access to all mailboxes |
full_access_as_app (Office 365 Exchange Online) |
Required to allow the execution of other Microsoft Exchange APIs. |
|
Read and write mail in all mailboxes |
Mail.ReadWrite (Office 365 Exchange Online) |
Used for these:
|
|
Read activity data for your organization |
ActivityFeed.Read (Office 365 Management APIs) |
Collecting user login events, Microsoft defender events and Active Directory hierarchy changes to detect compromised accounts and maintain an up-to-date user hierarchy. |
|
Send mail as any user |
Send mail as any user |
Used to send notifications to end users in scenarios where Microsoft does not support other delivery methods. |
Policy Modes
These are the policy modes:
-
Monitor only - Monitors the emails and creates the relevant event.
-
Detect and Remediate - Creates an event, and also performs retroactive enforcement for Inbound emails already delivered to users.
-
Protect (Inline) - All emails are reviewed before delivery to the user.
Monitor only and Detect and Remediate have the same configuration and are sometimes referred to as Detect modes in this document.

|
Best Practice - We recommend that you start with the configuration for Detect modes and later change to Protect (Inline). If you are already in one of the Detect modes and want to start with Protect (Inline) mode, skip to Introduction - Protect (Inline) Protection Mode. |
|
|
Note - For the system to work properly, you must follow the steps in the order they appear. |
Step 1 - Authorize the Manual Integration Application
-
From the Getting Started Wizard, click Start for Office 365 Mail.
or
From the left panel, go to Security Settings > SaaS Applications.
-
Click Start for Office 365 Mail.
-
Select Manual mode of operation.

-
In the Office 365 Authorization window that appears, sign in with your Microsoft Global Administrator credentials.
-
In the authorization screen, click Accept to grant permissions for Check Point Cloud Security Platform - Emails - Manual Mode application.
For more information, see Permissions required from Office 365 for manual integration.
Step 2 - On-boarding (Monitor only & Detect and Remediate)
In this step, you are ready to integrate Harmony Email & Collaboration with Office 365 for Monitor only and Detect and Remediate modes.
|
|
Note - This step is applicable only if you want to use Monitor only & Remediate protection mode. |
| Step | Instructions | ||
|---|---|---|---|
|
1 |
Log in to Harmony Email & Collaboration and select the relevant tenant. |
||
|
2 |
Click Let's get started. |
||
|
3 |
Select the Office 365 service and click Start. |
||
|
4 |
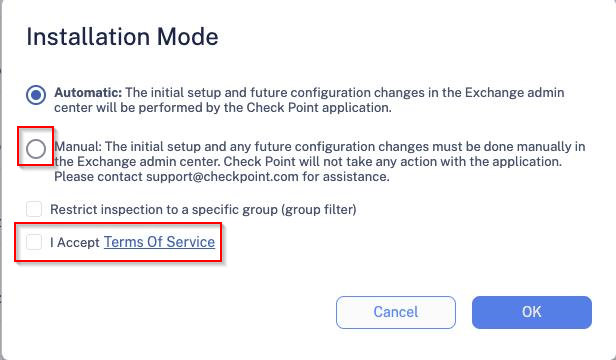
Select the Manual Mode checkbox.
|
||
|
5 |
Select I Accept Terms of Service checkbox and click OK. |
||
|
6 |
Authorize Office 365 event monitoring - click Continue. |
||
|
7 |
Enter your Office 365 admin credentials and click Accept. |
||
|
8 |
Authorize Office 365 security - click Continue and accept the terms.
|
||
|
9 |
Move to step 3: Click Next and then Start Now. |

Step 3 - Check Point Contact
In the Manual mode of integration, you have to add a dedicated Check Point Contact.
This contact is used for the Undeliverable Journal Reports under Journal Rules in Step 4 - Journal Rule.
If you already configured a recipient for undeliverable journal rules, skip this step.
| Step | Instructions |
|---|---|
|
1 |
Log in to your Microsoft 365 admin account. |
|
2 |
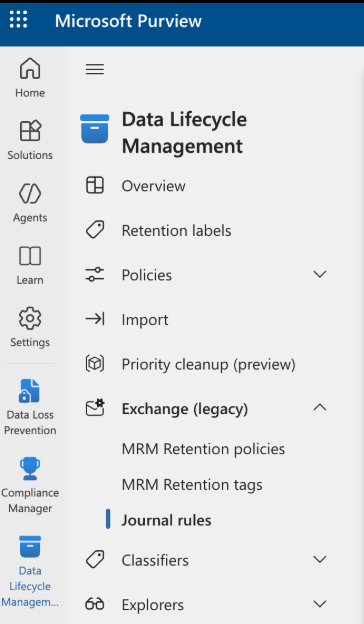
In the Microsoft Purview, from the left navigation pane, go to click Data Lifecycle Management > Exchange (legacy).
|
|
3 |
In the Exchange admin center, go to Recipients > Contacts. |
|
4 |
Click Add a mail contact.
|
|
5 |
In the New Mail Contact window, enter this information:
|
|
6 |
Click Next. |
|
7 |
(Optional) Enter the details about the Company and click Done. |


Step 4 - Journal Rule
The Journal rule is used only for Detect modes (Monitor only or Detect and Protect).
The Journal rule configures Office 365 to send a copy of all scoped emails to the journaling mailbox used by Harmony Email & Collaboration for inspection.
|
|
Notes -
|
| Step | Instructions | ||||
|---|---|---|---|---|---|
|
1 |
In the Microsoft Purview, from the left navigation pane, go to click Data Lifecycle Management > Exchange (legacy).
|
||||
|
2 |
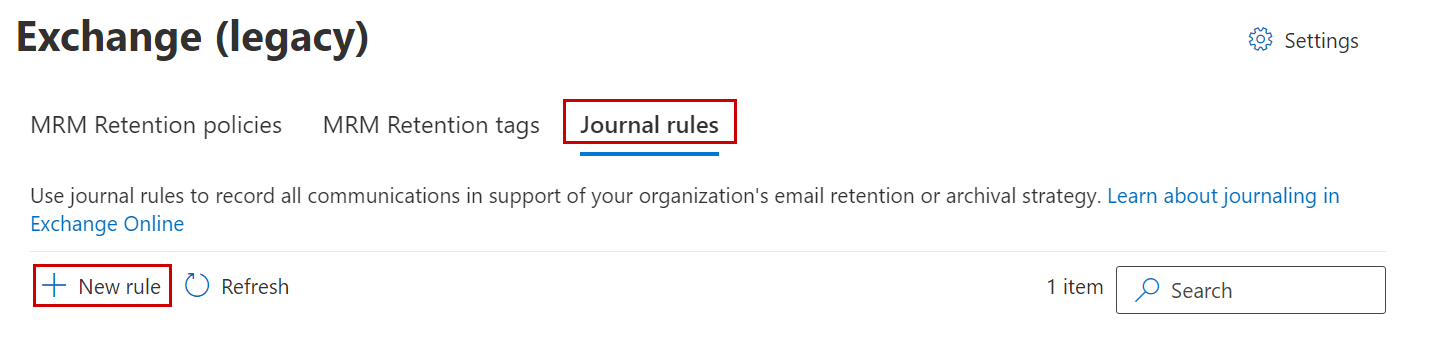
Click the Journal rules tab and click New rule.
|
||||
|
3 |
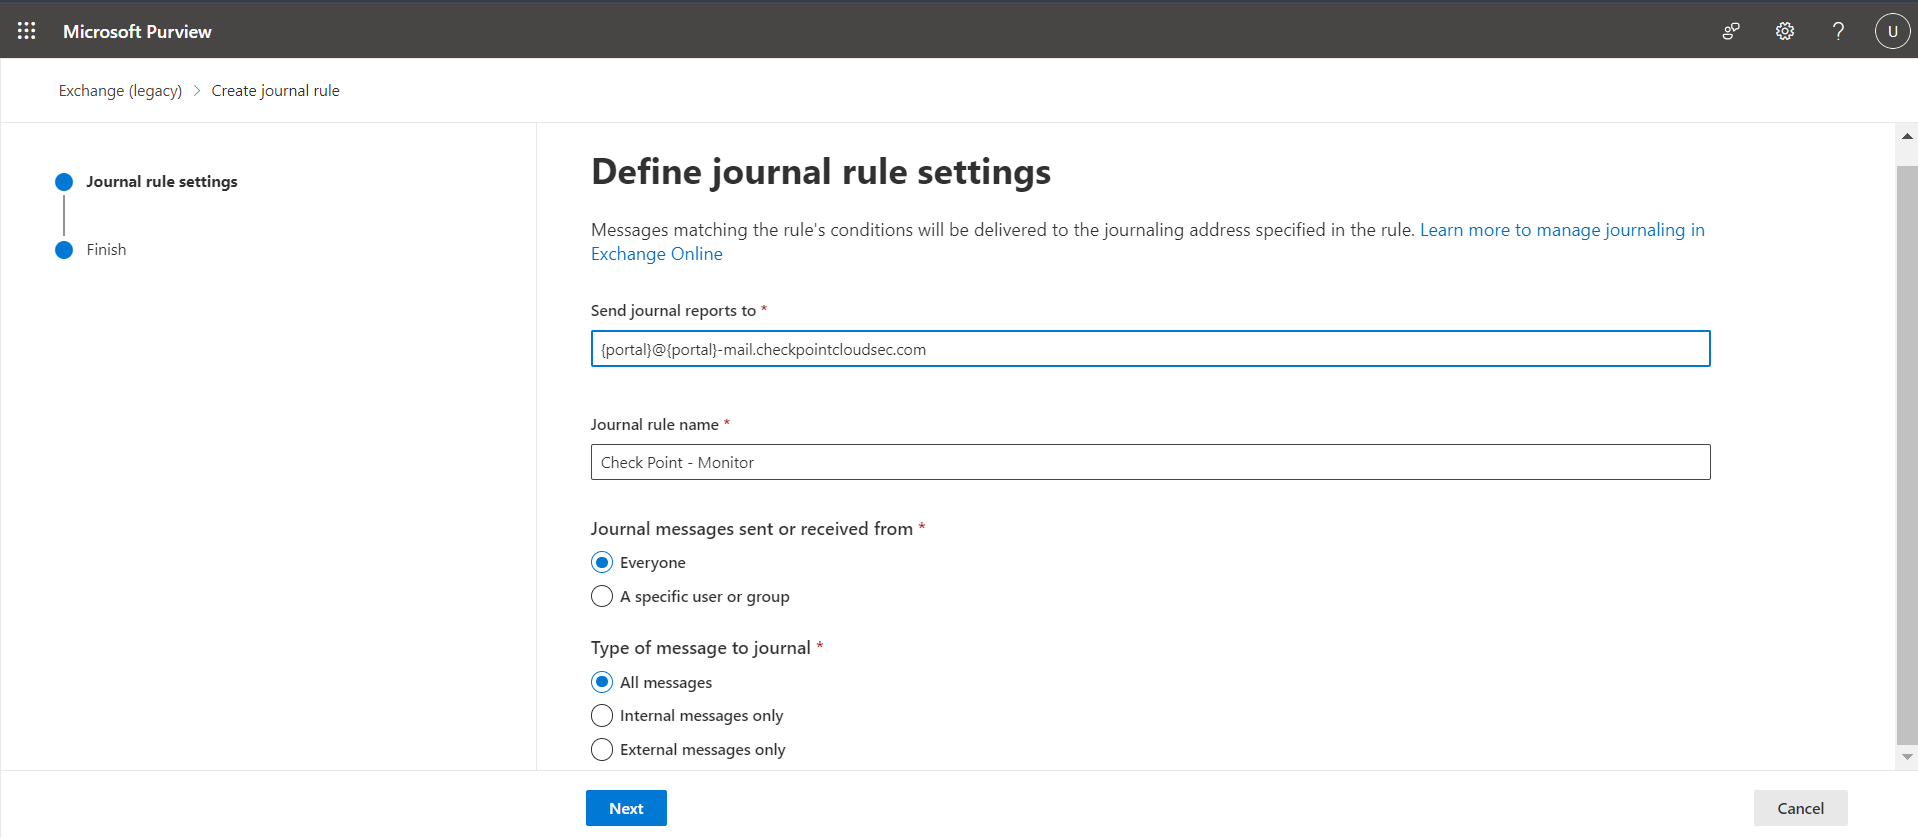
Enter this information in the Define journal rule settings window:
|
||||
|
4 |
Click Next. |
||||
|
5 |
Review the settings and click Submit. |
Step 5 - Connectors
In this step, you define two connectors:
-
Inbound connector - For all modes.
-
Journaling Outbound - For Detect modes.
These connectors send traffic to and receive traffic from the cloud.
|
|
Note - These connectors are used for Detect modes. For information on the configuration for Protect (Inline) mode, see Introduction - Protect (Inline) Protection Mode. |
| Step | Instructions |
|---|---|
|
1 |
In the Exchange admin center, from the left navigation pane, click Mail flow > Connectors. |
|
2 |
To create a new connector, click Add a connector.
|
|
3 |
For From, select Partner organization. |
|
4 |
For To, select Office 365. |
|
5 |
Click Next. |
|
6 |
For Name, enter Check Point Inbound. |
|
7 |
For Description, enter Check Point Inbound Connector. |
|
8 |
For What do you want to do after the connector is saved?, select Turn it on. |
|
9 |
Click Next. |
|
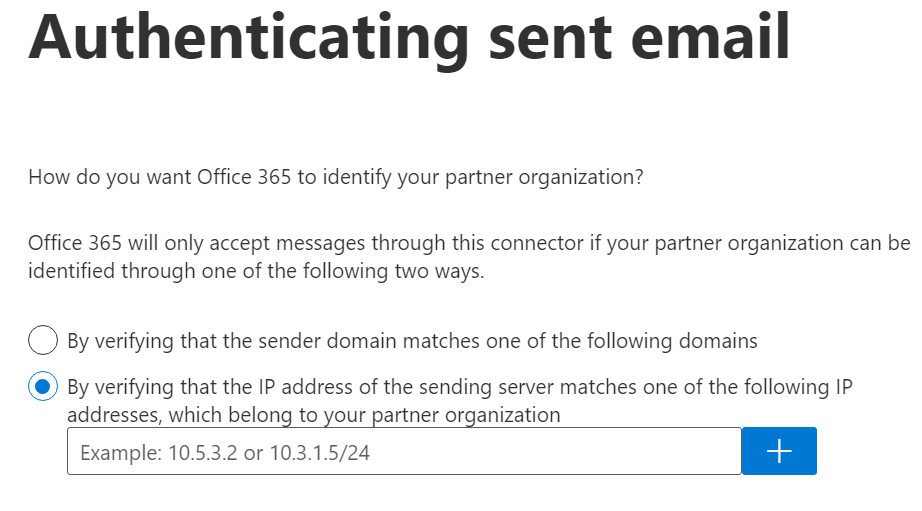
10 |
For How do you want to identify the partner organization, select By verifying that the IP address of the sending server matches one of the following IP addresses, which belong to your organization address.
|
|
11 |
Enter the IP address relevant to your region and click +.
|
|
12 |
Click Next. |
|
13 |
For What security restrictions do you want to apply?, select Reject email messages if they are not sent over TLS. |
|
14 |
Click Next. |
|
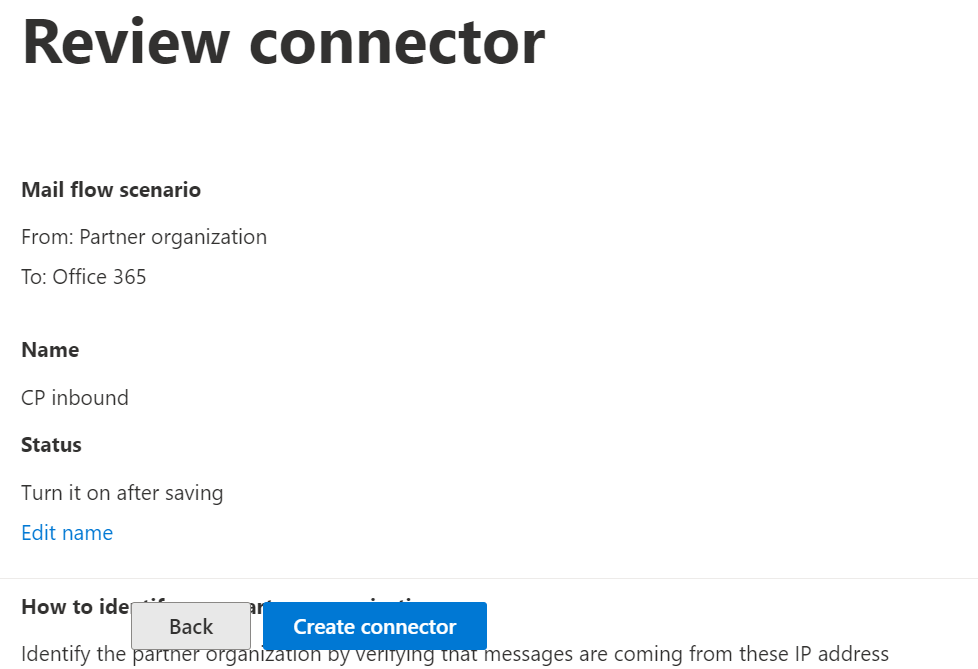
15 |
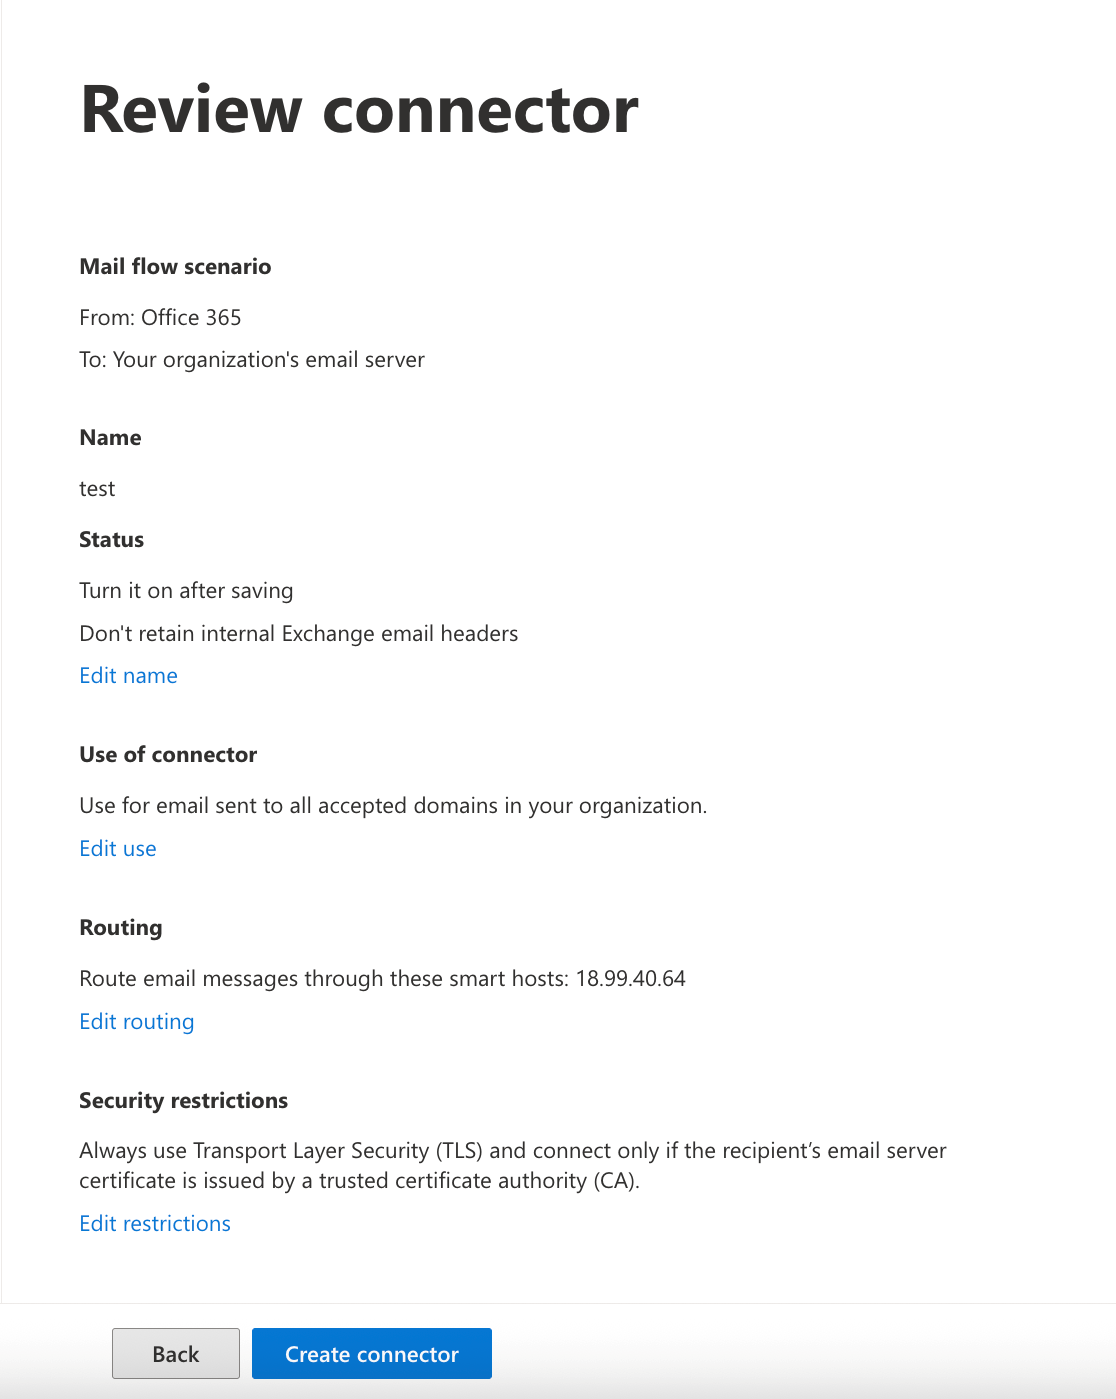
In the Review connector window, verify the settings and click Create connector.
|
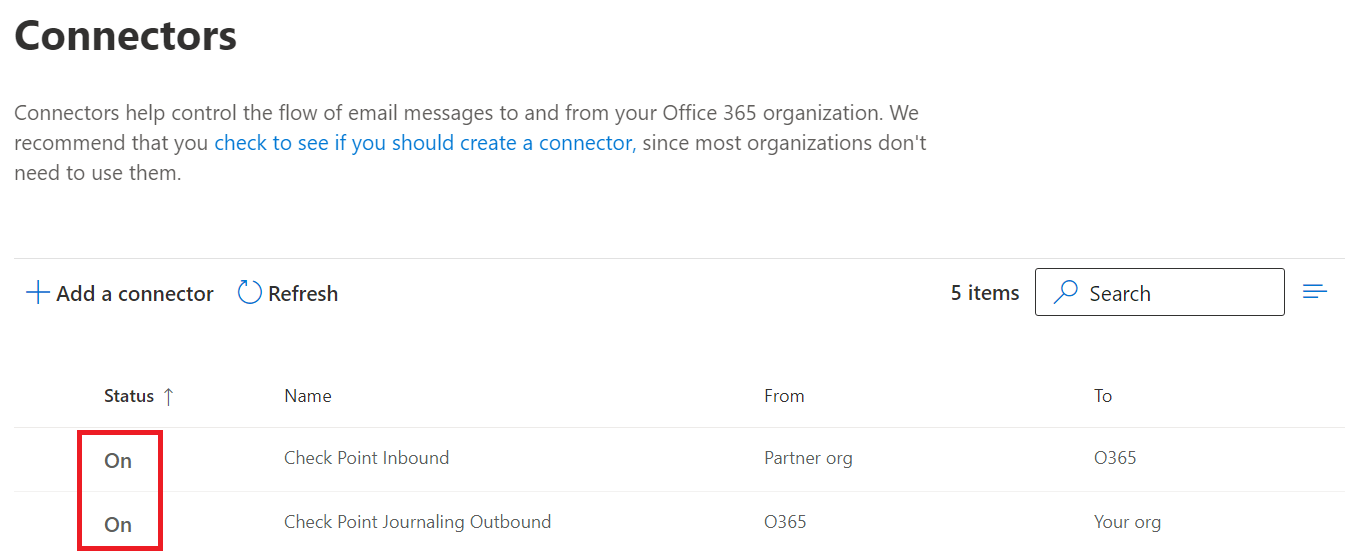
| 23 |
Verify that the status of connectors is On.
|

| Step | Instructions |
|---|---|
|
1 |
In the Exchange admin center, from the left navigation pane, click Mail flow > Connectors. |
|
2 |
To create a new connector, click Add a connector.
|
|
3 |
For From, select Your organization. |
|
4 |
For To, select Office 365. |
|
5 |
Click Next. |
|
6 |
For Name, enter Check Point DLP Inbound. |
|
7 |
For Description, enter Check Point DLP Inbound Connector. |
|
8 |
For What do you want to do after the connector is saved?, select Turn it on. |
|
9 |
Click Next. |
|
10 |
For How do you want to identify your organization, select By verifying that the IP address of the sending server matches one of the following IP addresses, which belong to your organization address.
|
|
11 |
Enter the IP address relevant to your region and click +.
|
|
12 |
Click Next. |
|
13 |
For What security restrictions do you want to apply?, select Reject email messages if they are not sent over TLS. |
|
14 |
Click Next. |
|
15 |
In the Review connector window, verify the settings and click Create connector. |
| 16 |
Verify that the status of connectors is On.
|
| Step | Instructions |
|---|---|
|
1 |
In the Exchange admin center, from the left navigation pane, click Mail flow > Connectors. |
|
2 |
To create a new connector, click Add a connector.
|
|
3 |
For From, select Office 365. |
|
4 |
For To, select Partner organization. |
|
5 |
Click Next. |
|
6 |
For Name, enter:
|
|
7 |
For Description (Optional), enter:
|
|
8 |
For What do you want to do after connector is saved?, select Turn it on. |
|
9 |
Click Next. |
|
10 |
For Specify when do you want to use this connector?, select Only when email messages are sent to these domains. |
|
11 |
Add the new domain: |
|
12 |
Click Next. |
|
13 |
For How do you want to route email messages?, select Route email through these smart hosts. |
|
14 |
Enter the host domain name: |
|
15 |
Click Save and then Next. |
|
16 |
For How should Office 365 connect to your partner organization's email server?, select Always use Transport Layer Security (TLS) to secure the connection. |
|
17 |
For Connect only if the recipient's email server certificate matches this criteria, select Any digital certificate, including self-signed certificates. |
|
18 |
Click Next. |
|
19 |
Check your settings before validation and click Next. |
|
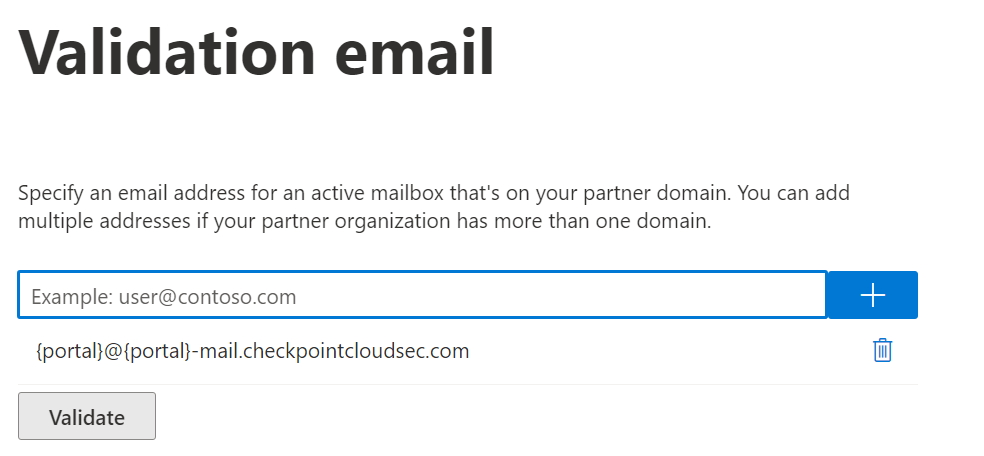
20 |
Click the + icon and Enter this email address:
|
|
21 |
Click Validate. |
|
22 |
In the Review connector window, verify the settings and click Create connector.
|
| 23 |
Verify that the status of connectors is On.
|
Step 6 - Connection Filter (All Modes)
Update the Connection Filter to Allow-list emails from Check Point.
This goes hand-in-hand with the Check Point Inbound Connector created in Step 5 - Connectors .
| Step | Instructions |
|---|---|
|
1 |
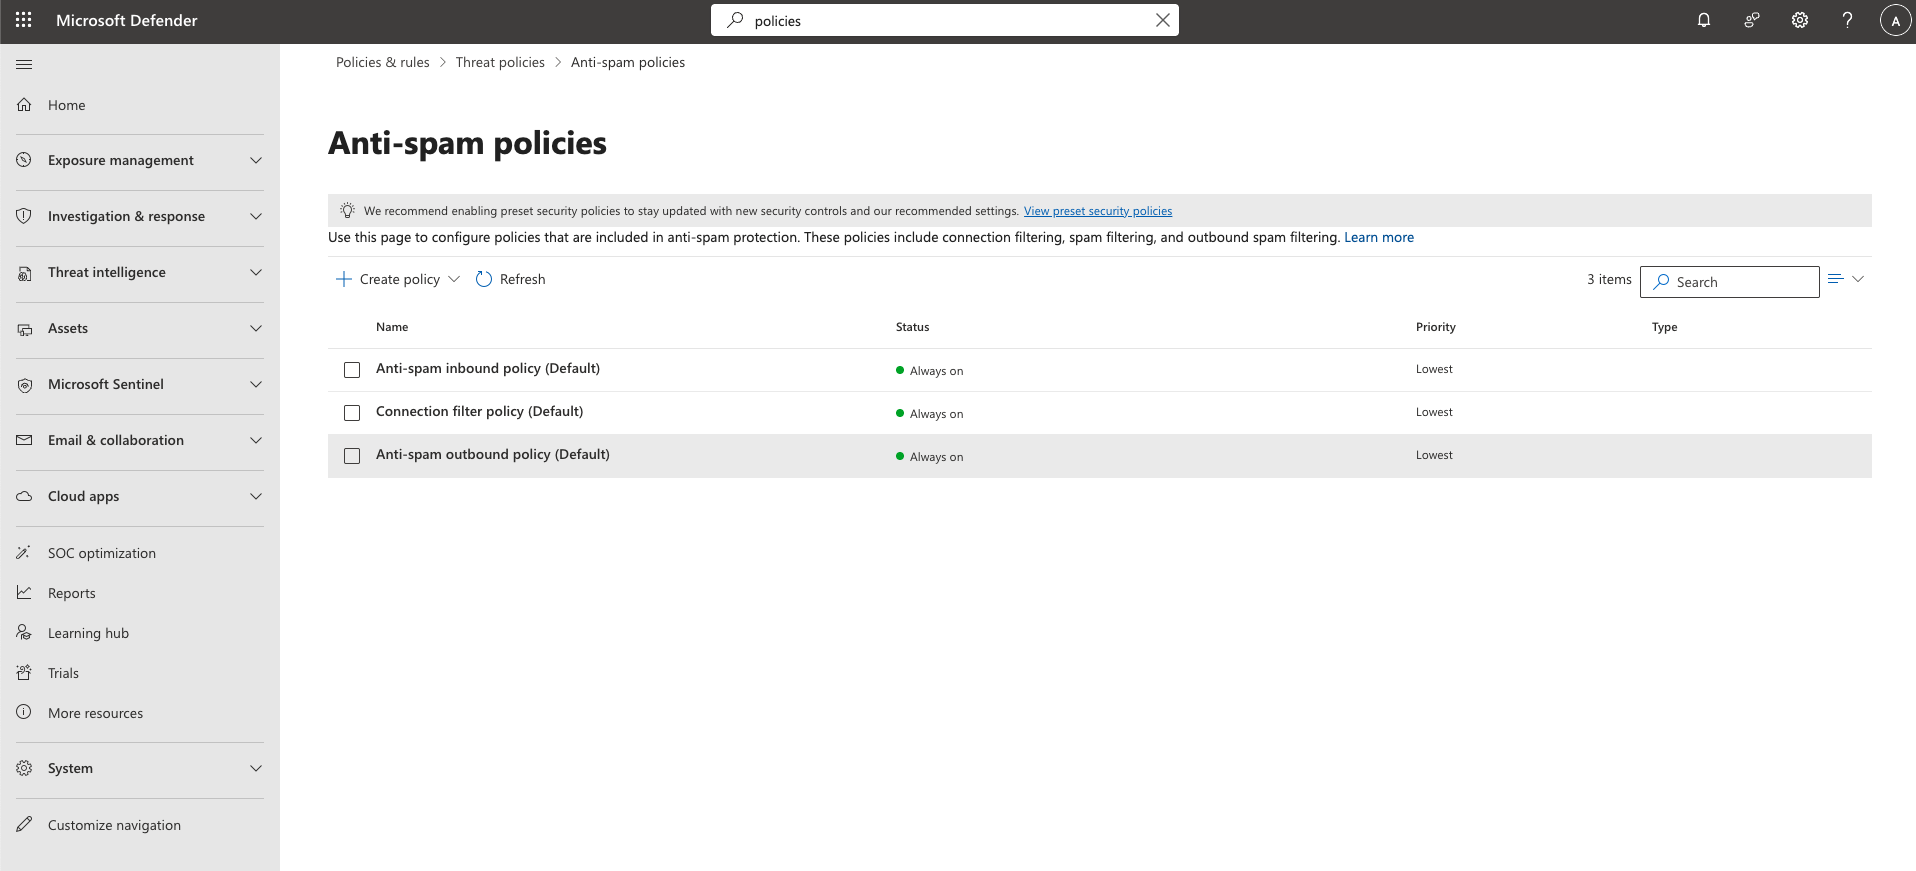
In the Microsoft Defender, go to Policies & rules > Threat policies > Anti-spam policies. |
|
2 |
Edit Connection filter policy (Default) policy.
|
|
3 |
Under Connection filtering > IP Allow list, click the + icon. |
|
4 |
Under Add allowed IP address:
|
Step 7 - Protect (Inline) Protection Mode Policy Configuration on Harmony Email & Collaboration
Introduction - Protect (Inline) Protection Mode
In Protect (Inline) protection mode, the system inspects all emails in scope before delivery to the users.
In manual mode, you must change the policy to Protect (Inline) before moving to Office 365 configurations.
To configure Protect (Inline)protection mode, follow Steps 7-9 below.
|
|
Note - To return to detect modes, disable the transport rules in Step 9 - Transport Rules (Protect (Inline) Mode). |
| Step | Instructions |
|---|---|
|
1 |
Log into the Harmony Email & Collaboration Administrator Portal. |
|
2 |
Go to Policy > click Create a New Rule or open a existing rule for Office 365. |
|
3 |
Select Protect (Inline) protection mode. |
|
4 |
In the Scope section, select the users and/or group of users for whom the policy is applicable:
|
|
5 |
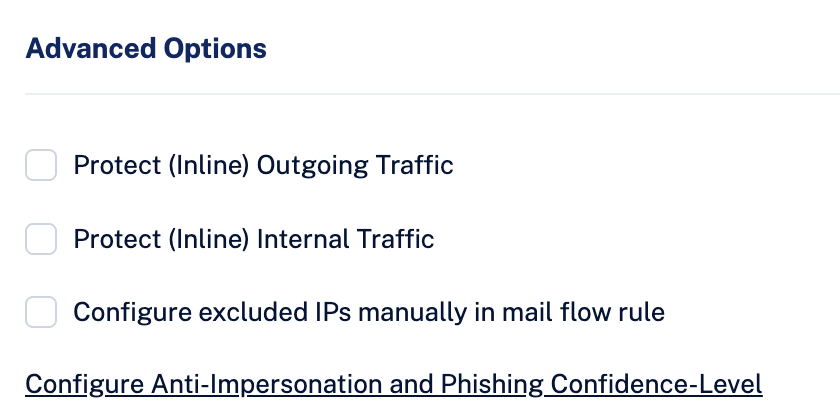
Under Advanced Configuration select Configure excluded IPs manually in mail flow rule checkbox.
|
|
6 |
Click Save and apply. |
Step 8 - Connectors (Protect (Inline) Mode)
In this step, you define the outbound connector for Protect (Inline) mode.
| Step | Instructions |
|---|---|
|
1 |
In the Exchange admin center, from the left navigation pane, click Mail flow > Connectors. |
|
2 |
To create a new connector, click Add a connector.
|
|
3 |
For From, enter:
|
|
4 |
For To, enter the your organization. |
|
5 |
Click Next. |
|
6 |
For Name, enter:
|
|
7 |
For Description (Optional), enter:
|
|
8 |
For What do you want to do after connector is saved?, select Turn it on and click Next.
To enable Inline protection for Microsoft 365 Mail, you must select the Retain internal Exchange email headers checkbox in the Check Point DLP Outbound Connector. |
|
9 |
For Specify when do you want to use this connector?, select Only when I have a transport rule to set up that redirects messages to this connector and then click Next. |
|
10 |
For How do you want to route email messages?, select Route email through these smart hosts. |
|
11 |
Add a smart host: |
|
12 |
Click Next. |
|
13 |
For How should Office 365 connect to your organization's email server?, select Always use Transport Layer Security (TLS) to secure the connection. |
|
14 |
For Connect only if the recipient's email server certificate matches this criteria, select Any digital certificate, including self-signed certificates and click Next. |
|
15 |
Confirm your settings before validation and click Next. |
|
16 |
Enter this email address: |
|
17 |
Click Validate.
|
|
18 |
In the Review connector window, verify the settings and click Create connector. |
|
19 |
Verify that the Status of the connector is On.
|
| Step | Instructions |
|---|---|
|
1 |
In the Exchange admin center, from the left navigation pane, click Mail flow > Connectors. |
|
2 |
To create a new connector, click Add a connector.
|
|
3 |
For From, enter:
|
|
4 |
For To, enter the partner organization. |
|
5 |
Click Next. |
|
6 |
For Name, enter:
|
|
7 |
For Description (Optional), enter:
|
|
8 |
For What do you want to do after connector is saved?, select Turn it on and click Next.
To enable Inline protection for Microsoft 365 Mail, you must select the Retain internal Exchange email headers checkbox in the Check Point DLP Outbound Connector. |
|
9 |
For Specify when do you want to use this connector?, select Only when I have a transport rule to set up that redirects messages to this connector and then click Next. |
|
10 |
For How do you want to route email messages?, select Route email through these smart hosts. |
|
11 |
Add a smart host: |
|
12 |
Click Next. |
|
13 |
For How should Office 365 connect to your partner organization's email server?, select Always use Transport Layer Security (TLS) to secure the connection. |
|
14 |
For Connect only if the recipient's email server certificate matches this criteria, select Any digital certificate, including self-signed certificates and click Next. |
|
15 |
Confirm your settings before validation and click Next. |
|
16 |
Enter this email address: |
|
17 |
Click Validate.
|
|
18 |
In the Review connector window, verify the settings and click Create connector.
|
|
19 |
Verify that the Status of the connector is On.
|
Step 9 - Transport Rules (Protect (Inline) Mode)
The purpose of the transport rule is to implement the inline mode for the users that need to be inline. Every time you change the scope of the inline policy (add or remove users/groups) you need to edit the scope of the transport rule accordingly.
|
|
Note - If any mail flow rules already exist, the Check Point rules must be prioritized. |
These are the Check Point rules:
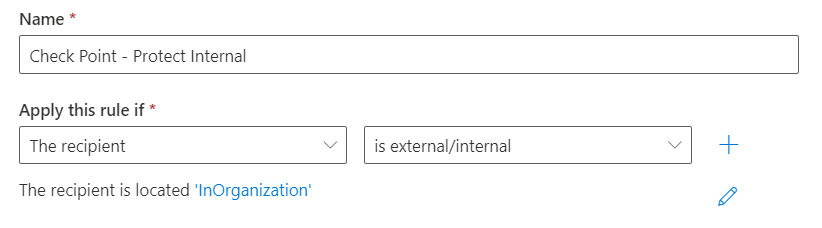
Check Point - Protect Internal
-
In the Exchange admin center, Click Mail flow > Rules.
-
To add a rule, click Add a rule and select Create a new rule.


| Step | Instructions | ||
|---|---|---|---|
|
1 |
For Name, enter Check Point - Protect Internal. |
||
|
2 |
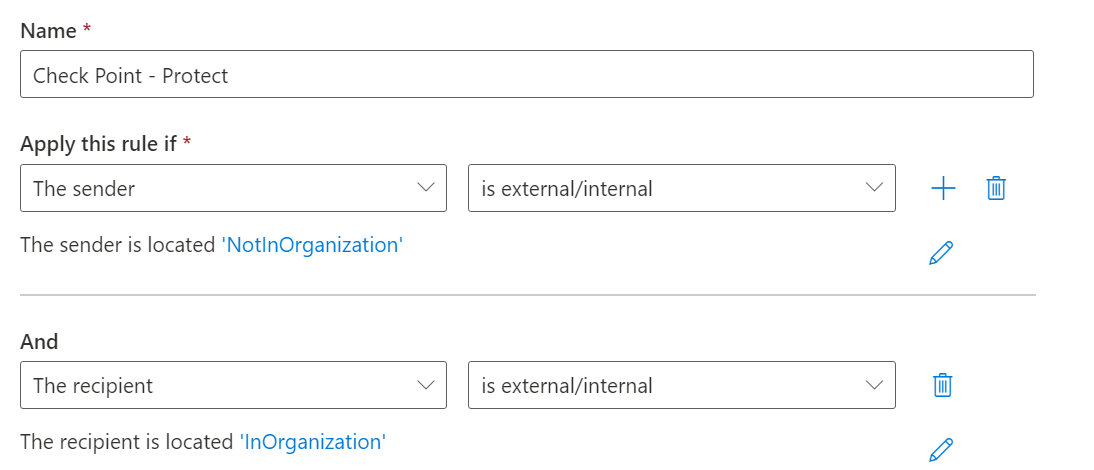
For Apply this rule if..., add this condition: The sender is located outside the organization.
|
||
|
3 |
For Do the following..., add these two actions:
|
||
|
4 |
For Except if..., add these two exceptions:
|
||
|
5 |
Click Next. |
||
|
6 |
In the Rule mode, select Enforce. |
||
|
7 |
From the Severity drop-down list, select the severity level. |
||
|
8 |
Select the Activate this rule on check box and select the required date and time. |
||
|
9 |
Select the Deactivate this rule on check box and select the required date and time. |
||
|
10 |
Select the Stop processing more rules checkbox. |
||
|
11 |
In the Match sender address in message field, select Header. |
||
|
12 |
Click Next. |
||
|
13 |
In the Review and finish window, verify the settings and click Finish. |


Check Point - Protect
-
In the Exchange admin center, Click Mail flow > Rules.
-
To add a rule, click Add a rule and select Create a new rule.
| Step | Instructions | ||
|---|---|---|---|
|
1 |
For Name, enter Check Point - Protect. |
||
|
2 |
For Apply this rule if..., add two conditions:
|
||
|
3 |
For Do the following..., add these two actions:
|
||
|
4 |
For Except if..., add these two exceptions:
|
||
|
5 |
Click Next. |
||
|
6 |
In the Rule mode, select Enforce. |
||
|
7 |
From the Severity drop-down list, select the severity level. |
||
|
8 |
Select the Activate this rule on check box and select the required date and time. |
||
|
9 |
Select the Deactivate this rule on check box and select the required date and time. |
||
|
10 |
Select the Stop processing more rules checkbox. |
||
|
11 |
In the Match sender address in message field, select Header. |
||
|
12 |
Click Next. |
||
|
13 |
In the Review and finish window, verify the settings and click Finish. |


Check Point - Allow-List
| Step | Instructions |
|---|---|
|
1 |
In the Name field, enter |
|
2 |
In the Apply this rule if... field, sender's IP address:
|
|
3 |
For the Do the following... field, select set the spam confidence level (SCL) to... > Bypass spam filtering.
|
|
4 |
For the Except if... field, select A message header matches these text patterns.
|
|
5 |
Click Next. |
|
6 |
In the Rule mode, select Enforce. |
|
7 |
From the Severity drop-down list, select the severity level. |
|
8 |
Select the Activate this rule on check box and select the required date and time. |
|
9 |
Select the Deactivate this rule on check box and select the required date and time. |
|
10 |
Select the Stop processing more rules checkbox. |
|
11 |
In the Match sender address in message field, select Header. |
|
12 |
Click Next. |
|
13 |
In the Review and finish window, verify the settings and click Finish. |


Check Point - Junk Filter
| Step | Instructions |
|---|---|
|
1 |
In the Name field, enter |
|
2 |
For the Apply this rule if... field, add these two conditions:
|
|
3 |
For the Do the following... field, do these:
|
|
4 |
Click Next. |
|
5 |
In the Rule mode, select Enforce. |
|
6 |
From the Severity drop-down list, select the severity level. |
|
7 |
Select the Activate this rule on check box and select the required date and time. |
|
8 |
Select the Deactivate this rule on check box and select the required date and time. |
|
9 |
Select the Stop processing more rules checkbox. |
|
10 |
In the Match sender address in message field, select Header. |
|
11 |
Click Next. |
|
12 |
In the Review and finish window, verify the settings and click Finish. |


Transport Rules
Office 365 Transport rules automate actions on emails-in-traffic based on custom policies. In most enterprise environments, every transport rule falls under either Delivery Rule or Modification Rule.
- Quarantine emails from "abc.com"
- Allow-List emails coming from IP 111.111.111.111
- Mark emails with Nickname = "John" as Spam (SCL)
- Send emails to Connector XYZ
- Forward emails sent to X to Y
- Add "[EXTERNAL]" to the subject if sender is Outside Organization
- Add disclaimer to the email body footer
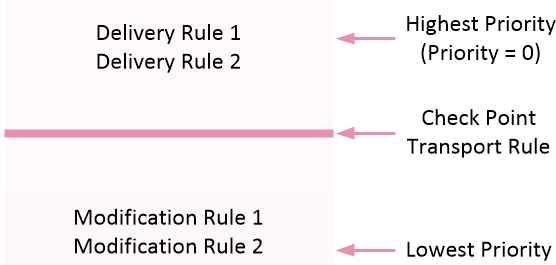
The Check Point Protect policy for Office 365 Exchange automatically creates a transport rule with the name of "Check Point - Protect" with default priority of 0 (highest priority).
Unless you have a reason to keep your rules in a specific order, keep the Delivery Rules on top of the Modification Rules. Place the Check Point Protect Rule between the Delivery Rules and the Modification Rules.
Contact Check Point Support if one of these is true:
-
There is a 3rd party integration that receives the mail-flow.
-
The rules only function is a specific order.
Step 10 - Sending User Reported Phishing Emails to an Internal Mailbox
To handle phishing reports effectively, Harmony Email & Collaboration requires that reports sent through the Microsoft Report Phishing / Report Message add-in are also sent to an internal mailbox. This mailbox can be an existing dedicated mailbox or a new shared mailbox that does not require a Microsoft license.
To send user reported phishing emails to an internal mailbox:
-
Log in to the Microsoft Defender portal.
-
Click Settings > Email & Collaboration > User reported settings.
-
Scroll down to the Reported message destinations section and do these:

-
In the Send reported messages to: field, select Microsoft and my reporting mailbox.
-
In the Add an exchange online mailbox to send reported messages to: field, enter the dedicated mailbox email address.
-
-
Click Save.

Reverting Manual Onboarding / Switching to Automatic Onboarding
To switch the onboarding from Manual mode to Automatic mode or to disconnect Harmony Email & Collaboration from your Office 365 account, follow these steps:
-
Navigate to Security Settings > SaaS Applications.
- Click Stop for all the Office 365 SaaS applications.
-
Follow all the steps in Appendix A: Check Point Manual Integration with Office 365, and remove every rule and object you created.
-
Contact Check Point Support so that Check Point support finalizes the process in the backend.
After the confirmation from Check Point Support, the reverting process is complete.
-
To start the onboarding in Automatic mode, follow the procedure in Activating Office 365 Mail.
Unified Quarantine for Manual Mode of Onboarding
Some organizations prefer Manual mode of onboarding for these reasons:
-
The permissions required by the Check Point Cloud Security Platform - Emails V2 enterprise application for Automatic mode are too high for the organization.
-
The organization prefers that Check Point do not automatically change mail flow rules, connectors, transport rules, and so on in their Microsoft Azure cloud platform.
However, to get visibility on emails quarantined by Microsoft (Unified Quarantine) and act on them, Check Point requires permissions that are requested only by the Check Point Cloud Security Platform - Emails V2 application in the Automatic mode of onboarding.
For customers using Harmony Email & Collaboration in Manual mode who agree to grant the necessary permissions (see Required Roles and Permissions) to the Check Point Cloud Security Platform - Emails V2 application, but prefer not to have Check Point manage mail flow rules, connectors, transport rules, and other configurations in their Microsoft Azure, can still use Unified Quarantine.
|
|
Note - Emails quarantined by Microsoft due to a blocked sender (blocked by the end user) are not synced with the Infinity Portal. |
To do that:
-
Contact Check Point Support with the request.
-
After approval from the support representative, re-authorize the Office 365 Mail application with Microsoft administrator credentials.
-
Click Security Settings > SaaS Applications.
-
Click Configure for Office 365 Mail.
-
Click Re-Authorize Check Point Office 365 Email App.
-
Follow the onscreen instructions and authorize the Microsoft 365 application.
You can see that Harmony Email & Collaboration is using a different application requiring more permissions.
-
Unified Quarantine is enabled and the application will not make any changes to your Microsoft 365 configuration.