


|
|
|
In This Section: |
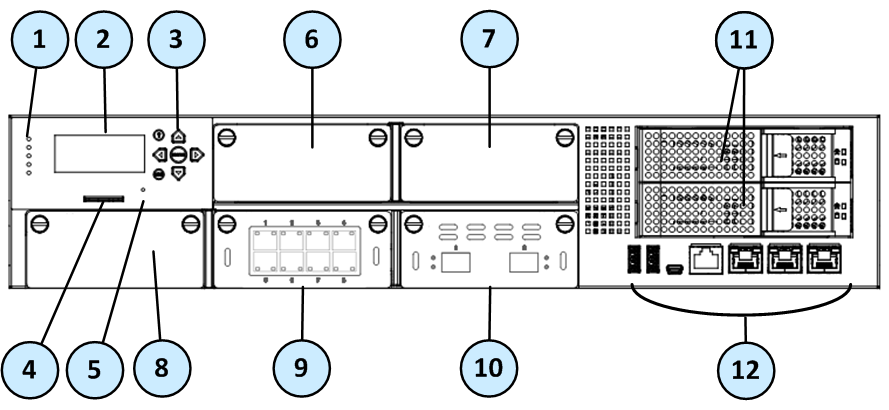
The line drawing shows the front panel elements in the 23900 appliance. Differences in other appliances are described in the table.
Item |
Component |
Description |
|---|---|---|
1 |
System LEDs |
System power, storage device activity, power supply status, alert, and location. |
2 |
LCD screen |
Allows system monitoring and configuration. |
3 |
Keypad |
Use the buttons to control the LCD screen. |
4 |
Service tag |
A slide out card that identifies the appliance and shows its serial number and MAC address. |
5 |
Reset |
Insert a pin for 5 to 8 seconds to perform a hardware reset. |
6 |
Expansion line card |
Expansion slot (in 23500, 23800, and 23900 appliances only). This slot is assigned eth4-Ox in the OS. |
7 |
Expansion line card |
Expansion slot (in 23500 23800, and 23900 appliances only). This slot is assigned eth5-Ox in the OS. |
8 |
Expansion line card |
Expansion slot. |
9 |
Expansion line card |
8 port 1 GbE RJ45 |
10 |
Expansion line card |
2 port 1/10GbE SFP+ |
11 |
2 storage devices |
When monitoring the storage devices with the |
12 |
Appliance ports |
Use these ports to connect to the appliance. |
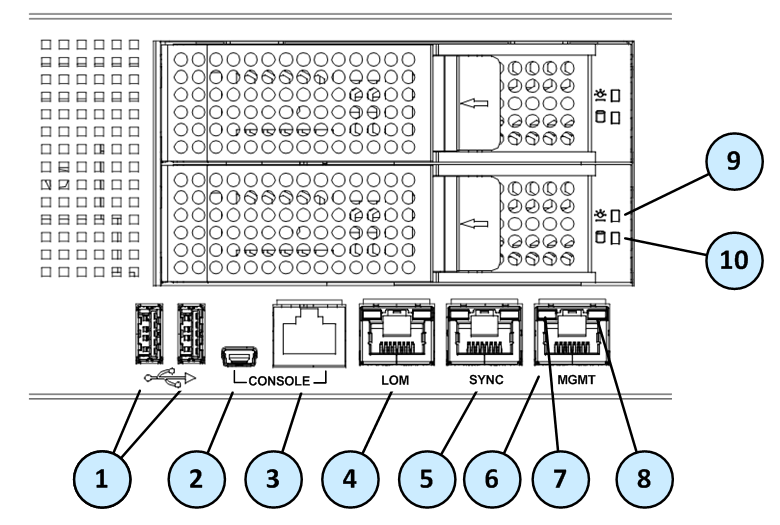
Item |
Component |
Description |
|---|---|---|
1 |
USB ports |
Two USB ports. |
2 |
Mini USB console port |
For a serial connection to the appliance. See Connecting to the 15000 / 23000 Appliances CLI. |
3 |
RJ45 Console port |
For a serial connection to the appliance. See Connecting to the 15000 / 23000 Appliances CLI. |
4 |
LOM port |
LOM (Lights Out Management) port to connect to the LOM card. |
5 |
Synchronization port |
Synchronize with cluster members or a High Availability peer. |
6 |
Management port |
For an Ethernet connection to a remote management computer. |
7 |
Port activity LED |
|
8 |
Link LED |
|
9 |
Storage device power LED |
|
10 |
Storage device activity LED |
|
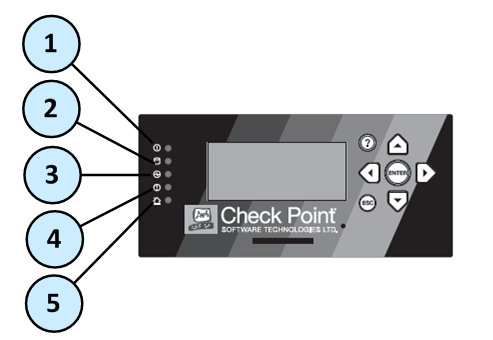
Item |
Icon |
Component |
Description |
|
|---|---|---|---|---|
1 |
|
System power |
|
|
2 |
|
Storage device activity |
|
|
3 |
|
Power supply status |
|
|
4 |
|
Alert |
|
|
5 |
|
Location |
|
|
The appliance has an LCD panel that you can use to do these basic management operations:
For more information, see the Gaia Administration Guide for your version.
Menu Options
Menu |
Sub-menu |
Purpose |
|---|---|---|
Network |
|
|
|
Set Mgmt IP |
Set the management interface IP address. |
|
Set Netmask |
Set the management interface Netmask. |
|
Set Default GW |
Set the management interface default gateway. |
System |
|
|
|
Reboot |
Reboot the appliance. |
LCD Panel Buttons
To |
Press |
|---|---|
Enter the main menu |
Any button |
Navigate the menu |
|
Change a number |
|
Select a menu option |
|
Go back to previous menu |
|
When Entering an IP Address
To |
Press |
|---|---|
Move to the next digit |
|
Move back to the previous digit |
|
Approve the change |
|
Cancel the IP change |
|
Change current digit |
|
Below is the 15000 and 23000 Appliances rear panel.
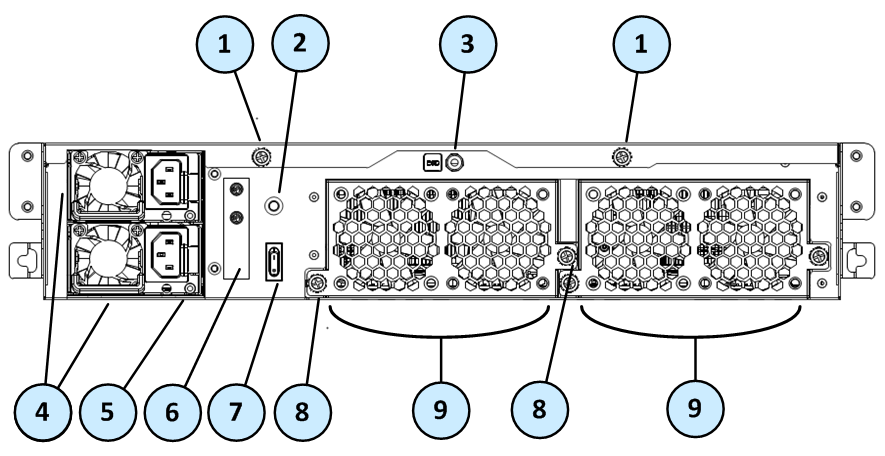
Item |
Component |
Description |
|---|---|---|
1 |
Cover screws |
Loosen screws to remove the cover of the appliance. |
2 |
Alarm Off button for power supply units |
If a power supply cable is not connected to the outlet, an alarm sounds continuously. Press this button to turn off the alarm. Note that this button is functional 1-2 minutes after powering up the appliance. |
3 |
ESD grounding plug |
When servicing the appliance, connect an ESD strap to this plug. |
4 |
Power supply units |
Dual redundant power supplies that you can hot swap. Each power supply unit connects to an electric outlet. |
5 |
LED indicator for each power supply unit |
|
6 |
Grounding lugs |
Used to connect grounding. |
7 |
Main power switch |
|
8 |
Thumb screws for cooling fan unit |
Loosen screws to remove cooling fan unit from the appliance. |
9 |
Cooling fan units |
Numbered from right to left: |
The Check Point Lights Out Management (LOM) card lets you use a dedicated management channel to remotely control Check Point appliances. Lights Out Management can also work when the appliance is turned off or not responding. However, the appliance must be connected to a power source.
For more about using Lights Out Management, see the Lights Out Management Administration Guide.
To ensure resilience in the event of a BIOS failure, 15000 and 23000 Appliances are equipped with dual redundant BIOS images.
If an appliance encounters a BIOS failure, it will boot up from a recovery, read-only BIOS image that enables full functionality of the appliance.
These notifications are shown in the event of a BIOS failure:


To recover from a BIOS failure, see sk108517 or contact Check Point support. The appliance is fully functional until the BIOS recovery is completed.
The 15000 / 23000 appliance has parts that you can easily replace to minimize downtime. There are also components that you can install to upgrade the appliance. These are the parts and components that can be used with the appliance:
For more information about installing these parts and components, see the appliance home page.
Unless directed to do so by Check Point technical support, you are prohibited by warranty and support agreements from replacing any parts.


