

In This Section: |
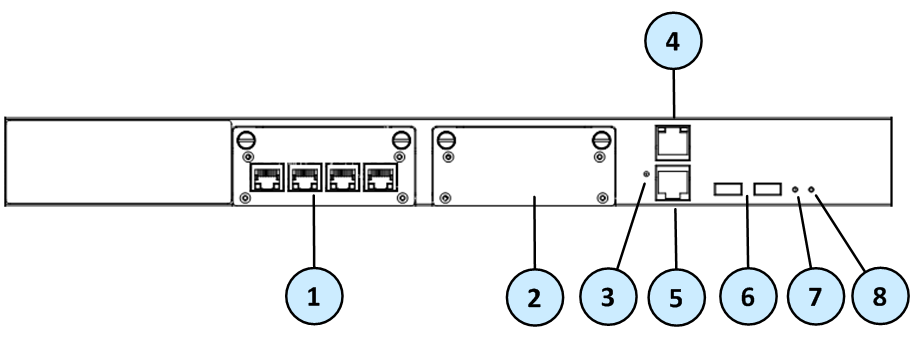
This section describes the features and components located on the appliance front panel.

Item |
Component |
Description |
|---|---|---|
1 |
Line card |
Four 10/100/1000Base-T RJ-45 ports. See Front Panel Port LEDs. Use these ports to connect:
The appliance comes equipped with this line card. Only this card is supported.
|
2 |
Dummy panel |
Reserved for future use. Installing line cards is not supported. |
3 |
Reset button |
Insert a pin to perform a hardware reset on the appliance. |
4 |
Management configuration port |
For an connection to a computer that does the initial configuration of this appliance. The interface name is |
5 |
Console port |
An RJ45 port. For a serial connection to the appliance using a terminal emulation program such as PuTTY. |
6 |
USB ports |
Two USB 2.0 ports. |
7 |
System power |
Green when power is on. |
8 |
Hard disk activity |
Blinking red when there is read/write activity. |

Item |
Component |
Description |
|---|---|---|
1 |
System LEDs |
|
2 |
Reset button |
Insert a pin to perform a hardware reset on the appliance. |
3 |
USB ports |
Two USB 2.0 ports. |
4 |
Management configuration port |
For an Ethernet connection to a computer that does the initial configuration of this appliance. The interface name is |
5 |
Console port |
An RJ45 port. For a serial connection to the appliance using a terminal emulation program such as PuTTY. |
6 |
Line card |
Eight 10/100/1000Base-T RJ-45 ports. See Front Panel Port LEDs. Use these ports to connect:
The appliance comes equipped with this line card. Only this card is supported.
|
7 |
Dummy panel |
Reserved for future use. Installing line cards is not supported. |
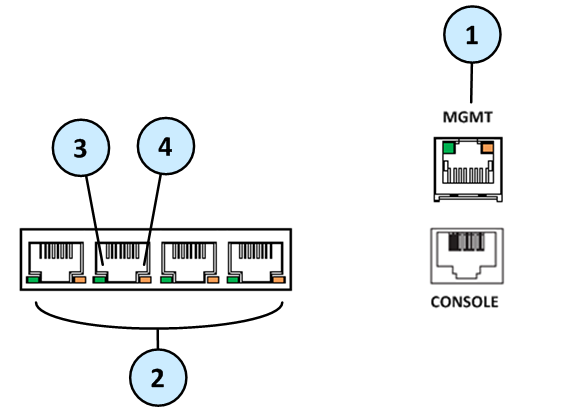
TE100X Appliance

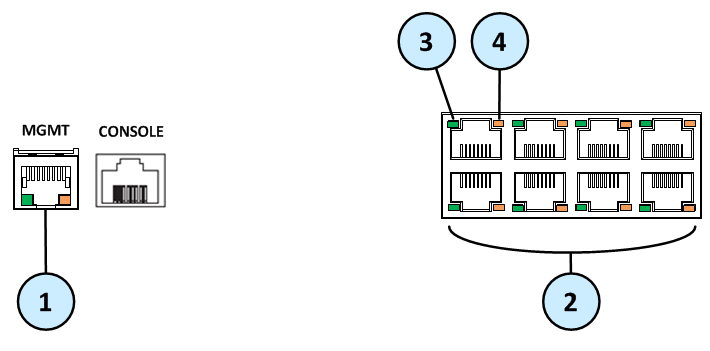
TE250X Appliance

Item |
Component |
Description |
|---|---|---|
1 |
Management port |
For an Ethernet connection to a computer that does the initial configuration of this appliance. The interface name is |
2 |
Ethernet Ports |
Network interfaces. The interface names from left to right are:
|
3 |
Port activity LED |
|
4 |
Link speed LED |
|
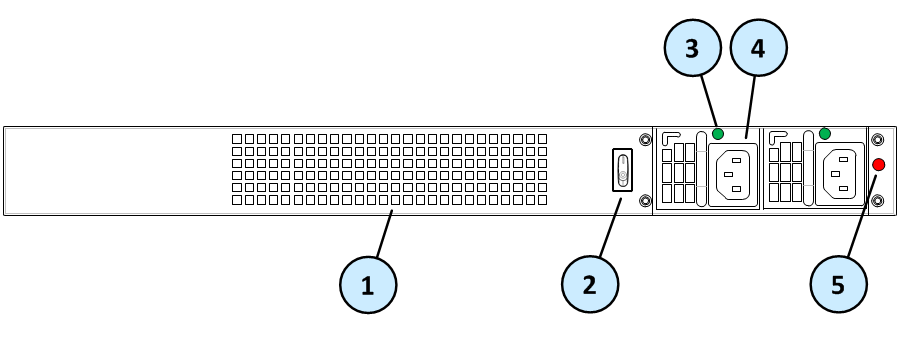
This section describes components located on the rear panel of the appliance.
|
Important - Only use the appliance when the Security Acceleration Module or the placeholder tray is in the upper slot to make sure the appliance is cooled correctly. |

Item |
Component |
Description |
|---|---|---|
1 |
Main power switch |
|
2 |
AC power supply and fan |
Connect to an electric outlet. |
3 |
Fixed cooling fans |
They are numbered from left to right: |

Item |
Component |
Description |
|---|---|---|
1 |
Fixed cooling fans |
They are numbered from left to right: |
2 |
Main power switch |
|
3 |
LED indicator for power supply unit |
|
4 |
AC power supply units |
Connect to an electric outlet. The first AC PSU module is included and the second is optional for redundancy (hot swap). |
5 |
Alarm off button for power supply units |
If a power supply fails or is not connected to the outlet, an alarm sounds continuously. Press this button to turn off the alarm. |