Configuring Smart-1 Appliances
Starting the Appliance
Connect the appliance to a power source and turn on the appliance. When the appliance is ready, you can run the First Time Configuration Wizard to configure it.
To start the appliance:
- Connect the appliance's management interface to a PC with the included Ethernet cable.
- Connect both power cables to the power supply units in the rear panel.
- If the power did not come up, press the Power button to power it up.
- The appliance turns on.
When the appliance is ready, you can run the First Time Configuration Wizard to configure it.
Available Software Images
The Smart-1 525/Smart-1 5050/Smart-1 5150 appliance comes with the R80.10 software image.
To follow the installation progress and see when the appliance is ready, connect to the appliance with a serial console cable.
For more about software images, see the Smart-1 525, Smart-1 5050 and Smart-1 5150 home page.
Initial Configuration
Configure the appliance with the Gaia First Time Configuration Wizard. See the Quick Start Guide provided with your appliance:
Advanced Configuration
You can configure advanced options on Gaia OS from the Gaia Portal or the Gaia Clish.
Connecting to the Smart-1 Appliances CLI
To connect to the command line interface of the Smart-1 Appliances, use one of these:
- Use the included serial console cable (DB9-to-DB9), or the DB9-to-RJ-45 adapter, and a terminal emulation software, such as PuTTY (from Windows) or Minicom (from Unix/Linux).
- Use an SSH connection to the management interface (if SSHD is configured).
To connect to the appliance CLI using the serial console cable DB9-to-DB9 and a terminal emulation software:
- Connect one end of the serial console cable DB9-to-DB9 directly to the Serial console port on the appliance.
- Use a screwdriver to attach the cable screws to the Serial console port.
- Connect the other end of the serial console cable to your computer (console server).
- On your computer, open a terminal emulation software.
- Configure the serial connection parameters: 9600bps, 8 bits, no parity, 1 stop bit (8N1), Flow Control - None.
- Establish the serial connection to the appliance.
To connect to the appliance CLI using the the DB9-to-RJ-45 adapter and a terminal emulation software:
Your appliance may be shipped with one of two types of the DB9-to-RJ-45 adapters:
Type of the
DB9-to-RJ-45 adapter
|
Description
|
A DB9-to-RJ-45 adapter
without plastic protrusions
on the DB9 end
|
The adapter connects directly to the Serial console port on the Smart-1 Appliances.
|
A DB9-to-RJ-45 adapter
with plastic protrusions
on the DB9 end
(these protrusions are part of the adapter's plastic body - they protrude above and below the DB9 connector)
|
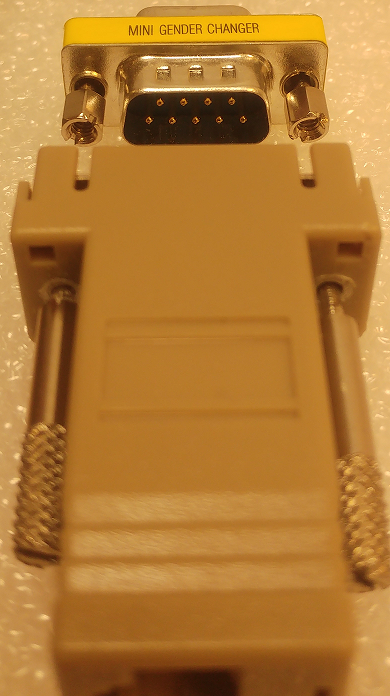
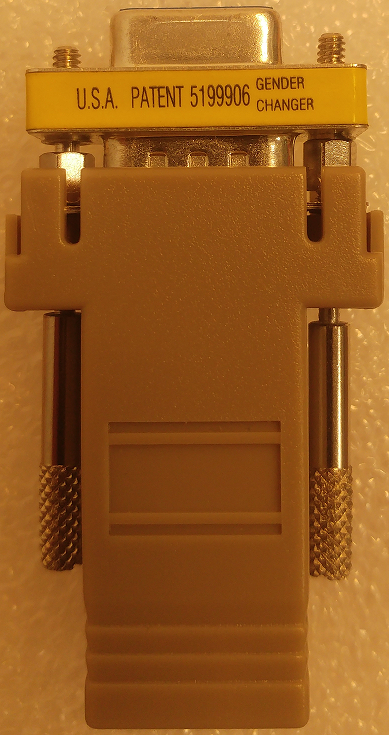
The adapter connects to the Serial console port on the Smart-1 Appliances through the DB9 gender changer.
- Your appliance may be shipped with the DB9 gender changer already connected.
- If the DB9 gender changer is not already connected to the appliance, it is provided in a parts bag with this DB9-to-RJ-45 adapter type.
|
If your appliance is shipped with the DB9-to-RJ-45 adapter without plastic protrusions on the DB9 end:
- Connect the DB9 connector of the DB9-to-RJ-45 adapter directly to the Serial console port on the appliance.
- Use a screwdriver to attach the DB9-to-RJ-45 adapter screws to the Serial console port.
- Connect the RJ45 end of the serial console cable to the RJ45 port on the DB9-to-RJ-45 adapter.
- Connect the other end of the serial console cable to your computer (console server).
- On your computer, open a terminal emulation software.
- Configure the serial connection parameters: 9600bps, 8 bits, no parity, 1 stop bit (8N1), Flow Control - None.
- Establish the serial connection to the appliance.
If your appliance is shipped with the DB9-to-RJ-45 adapter that has plastic protrusions on the DB9 end:
- Connect the DB9 gender changer to the Serial console port on the appliance.
- Use a screwdriver to attach the DB9 gender changer screws to the appliance.
- Connect the DB9-to-RJ-45 adapter to the DB9 gender changer.
- Use a screwdriver to attach the DB9-to-RJ-45 adapter screws to the DB9 gender changer.

- Connect the RJ45 end of the serial console cable to RJ45 port on the DB9-to-RJ-45 adapter.
- Connect the other end of the serial console cable to your computer (console server).
- On your computer, open a terminal emulation software.
- Configure the serial connection parameters: 9600bps, 8 bits, no parity, 1 stop bit (8N1), Flow Control - None.
- Establish the serial connection to the appliance.
To connect to the appliance CLI using an SSH connection to the management interface (if SSHD is configured):
- If you connect to your appliance through a Firewall, make sure to define the applicable security rules that allow such SSH connection from your computer to your appliance.
- On your computer, open an SSH client software (for example, PuTTY).
- Start a connection to the IP address that you assigned to the interface on your appliance.
- Log in with the applicable credentials:
State
|
Username
|
Password
|
Before completing the
First Time
Configuration Wizard
|
admin
|
admin
|
After completing the
First Time
Configuration Wizard
|
Your configured password
|
Your configured password
|
Configuring SmartEvent
To learn how to connect the SmartEvent components to a Security Management Server and to a Multi-Domain Management Server, see the Logging and Monitoring Administration Guide for your version.
For R80.10, see the R80.10 Logging and Monitoring Administration Guide.


