Security Zones
With Security Zones you can create a strong Access Control Policy that controls the traffic between parts of the network.
A Security Zone object represents a part of the network (for example, the internal network or the external network). You assign a network interface of a Security Gateway![]() Dedicated Check Point server that runs Check Point software to inspect traffic and enforce Security Policies for connected network resources. to a Security Zone. You can then use the Security Zone objects in the Source and Destination columns of the Rule Base
Dedicated Check Point server that runs Check Point software to inspect traffic and enforce Security Policies for connected network resources. to a Security Zone. You can then use the Security Zone objects in the Source and Destination columns of the Rule Base![]() All rules configured in a given Security Policy. Synonym: Rulebase..
All rules configured in a given Security Policy. Synonym: Rulebase..
Use Security Zones to:
-
Simplify the Policy. Apply the same rule
 Set of traffic parameters and other conditions in a Rule Base (Security Policy) that cause specified actions to be taken for a communication session. to many Security Gateways.
 -
Add networks to Security Gateways interfaces without changing the Rule Base.
For example, in the diagram, we have three Security Zones for a typical network: ExternalZone (1), DMZZone (2) and InternalZone (3).
-
Security Gateway (4) has three interfaces. One interface is assigned to ExternalZone (1), one interface is assigned to DMZZone (2), and one interface is assigned to InternalZone (3).
-
Security Gateway (5) has two interfaces. One interface is assigned to ExternalZone (1) and one interface is assigned to InternalZone (3).
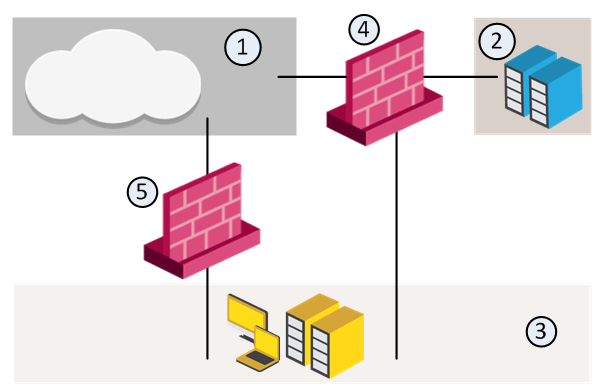
A Security Gateway interface can belong to only one Security Zone. Interfaces to different networks can be in the same Security Zone.
Workflow
-
Configure Security Zone objects.
Or, use the predefined Security Zones (see Predefined Security Zones ).
-
Assign Security Gateway interfaces to Security Zones (see Creating and Assigning Security Zones).
-
Use the Security Zone objects in the Source and Destination of a rule.
For example:
-
Install the Access Control Policy (see Installing the Access Control Policy).
Processing Flow for Rule Base Execution when using Security Zones and NAT Rules
-
Matching NAT Rules
The system performs NAT Rule Base matching as the first step. It identifies and records the outbound IP address, which is used both for translation and routing. This step ensures the system can map traffic to the appropriate Security Zones.
-
Retrieving the Outgoing Interface
After identifying the outbound IP address, the kernel queries the routing API to determine the corresponding network interface. The system then assigns this interface to the appropriate outbound Security Zone. This assignment ensures that Rule Base execution aligns with the NAT configurations and accurately routes traffic.
-
Executing the Rule Base
Using the configured outbound interface and Security Zone, the system applies Security Policies
Collection of rules that control network traffic and enforce organization guidelines for data protection and access to resources with packet inspection. to manage traffic. This ensures that all traffic adheres to predefined rules, supporting efficient and accurate network operations.
Example: Resolving Conflicts with Third-Party Tools
Third-party Rule Base tools, such as Algosec, may encounter conflicts when analyzing Check Point policies. These conflicts arise because the Rule Base does not explicitly define NAT-translated IPs. To resolve this, the system processes the NAT Rule Base before executing the main Rule Base. By combining NAT data with routing information, it configures the correct outgoing interface zone. This integration allows third-party tools to interpret the policy correctly and enforce traffic rules without errors.
Creating and Assigning Security Zones
Before you can use Security Zones in the Rule Base, you must assign Security Gateway interfaces to Security Zones.
To create a Security Zone
-
In the Objects bar (F11), click New > More > Network Object > Security Zone.
The Security Zone window opens.
-
Enter a name for the Security Zone.
-
Enter an optional comment or tag.
-
Click OK.
To assign an interface to a Security Zone
-
In the Gateways & Servers view, right-click a Security Gateway object and select Edit.
The Gateway Properties window opens.
-
In the Network Management pane, right-click an interface and select Edit.
The Interface window opens. The Topology area of the General pane shows the Security Zone to which the interface is already bound. By default, the Security Zone is calculated according to where the interface Leads To.
-
Click Modify.
The Topology Settings window opens.
-
In the Security Zone area, click User Defined and select Specify Security Zone.
-
From the drop-down box, select a Security Zone.
Or click New to create a new one.
-
Click OK.
Predefined Security Zones
These are the predefined Security Zones, and their intended purposes:
-
WirelessZone - Networks that can be accessed by users and applications with a wireless connection.
-
ExternalZone - Networks that are not secure, such as the Internet and other external networks.
-
DMZZone - A DMZ (demilitarized zone) is sometimes referred to as a perimeter network. It contains company servers that can be accessed from external sources.
A DMZ lets external users and applications access specific internal servers, but prevents the external users accessing secure company networks.
Add rules to the Security Gateway Rule Base that allow traffic to the company DMZ. For example, a rule that allows HTTP and HTTPs traffic to your web server in the DMZ.
-
InternalZone - Company networks with sensitive data that must be protected and used only by authenticated users.
Limitations
-
NAT policy supports Security Zones only for R81 Security Gateways and higher.
-
The Threat Prevention Policy supports Security Zones only for R81 Security Gateways and higher. Threat Prevention logs do not display Security Zone fields.
-
If the clean-up rule contains Security Zones, it might prevent the creation of Drop templates for that rule.