


|
|
|
In This Section: |
Large enterprises often have branches in different cities or countries. With each branch managed by a different Domain, the enterprise can use a central management system to centrally manage all the various Domains. When connectivity is established, the connections must be secure and have high levels of privacy, authentication, and integrity.
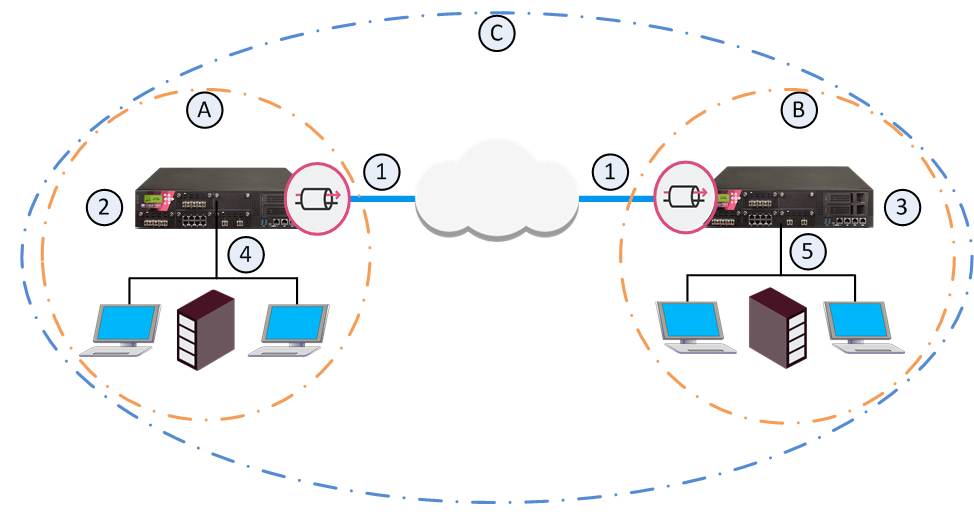
A Global VPN Community connects the enterprise's Security Gateways through VPN and lets the enterprise manage them under one network. You define the Global VPN Community in the Global Domain. The Multi-Domain Server utilizes its knowledge about the different Domain Management Server environments to create a VPN community which can manage them.
Item |
Description |
|---|---|
A |
Domain A on Multi-Domain Server |
B |
Domain B on Multi-Domain Server |
C |
Global VPN Community |
1 |
VPN tunnel |
2 |
Security Gateway configured in Domain A |
3 |
Security Gateway configured in Domain B |
4 |
VPN Domain of Security Gateway 2 |
5 |
VPN Domain of Security Gateway 3 |
To learn more about VPN communities, see the R80.30 Site to Site VPN Administration Guide.
When you establish a Global VPN Community, it replaces part of the configuration of Externally Managed Security Gateways and automates the exchange of certificates for each Domain Management Server.
These trusted entities create VPN trust in a Multi-Domain Management deployment:
The ICA of the Domain Management Server issues certificates used by Domain Security Gateways to create SIC trust. Each Security Gateway supports certificates issued by the CAs of the other Domains.
For more information on VPN with Externally Managed Gateways, see the R80.30 Site to Site VPN Administration Guide.
To create a Global VPN Community:
You define the Domain Security Gateways in the Domain SmartConsole.
To define a VPN Domain on a Security Gateway:
In the Security Gateway editor:
For information on configuration of a VPN Domain, see the R80.30 Site to Site VPN Administration Guide.
Multi-Domain Server holds these IP address ranges used by the Security Gateways. During the assignment of the Global configuration, the Multi-Domain Server transfers this information to all the Domains with participating Security Gateways in the Global VPN Community.
Repeat this step for all Security Gateways that are to participate in the Global VPN Community:
In the Multi-Domain Server SmartConsole > Gateways & Servers view, right-click a Security Gateway and select Enable Global Use.
A global Security Gateway object and a VPN Domain object are created for the Security Gateway in the Global Domain. Different Domains can coincidentally contain Security Gateways with the same name. Because each global Security Gateway object must have its own unique Global Name, the Global Names Template automatically assigns a unique name for each global Security Gateway. The default global name format is: <>_of_<Domain Name>.
For example:
Note - When the local Domain that manages the gateway to be used globally has the active server on the standby Multi-Domain Server, you cannot use the gateway globally.
Enabling clusters for global use
You can enable a cluster for global use in the same way that you enable a Security Gateway. A global cluster object and a VPN Domain object will be created for the cluster in the Global Domain.
After you enabled VPN on the Security Gateways, and enabled the Security Gateways for global use, you can create the Global VPN Community.
To create a Global VPN Community:
To learn more about VPN communities, see the R80.30 Site to Site VPN Administration Guide.
The configuration of Security Gateways into a Global VPN Community does not automatically let the Security Gateways access each other. For the Security Gateways to communicate with each other you must define an Access Control Security Policy.
You can define the Access Control Security Policy in the Global Domain or in the Local Domains or both.
To define a Global Security Policy, see Global Policy Management. To learn more about the Access Control Security Policy Rule Base, see the R80.30 Security Management Administration Guide.
After you create the Global VPN Community, and in some case, also the Global Policy, you must assign the Global configuration to the Local Domains. After assignment, install policy on the Local Domains.
To assign the global configuration to the Local Domains:
Note - All Security Gateways which participate in the Global VPN Community must use a Simplified VPN Policy.
For each Domain with Security Gateways in the Global VPN Community, a global CA Server object is created in the Global Domain. During the assignment process, the Multi-Domain Server automatically exports relevant Domain ICA information (such as the CA certificate) to all the Domain Management Servers with Security Gateways that participate in the community. This way, all the Security Gateways in the community can trust the others' ICAs.
After the assignment, the Global VPN Community object shows in each Domain with Security Gateways in the community. If you assign a Global Policy to a Domain that has no Security Gateways in the community, this Domain does not show the community object and the community Security Gateway objects.
If you make changes to the global configuration, reassign the configuration to the Domains.
To reassign the Global configuration to the Local Domains:
Note - This operation assigns the Policy to all selected Domains, and then installs the Policy on all Domain Security Gateways, in one step. It does not let you select specific Security Gateways on which to install the Policy. The selected Policy is installed on all Security Gateways in the selected Domains. Assigning the Policy to many Domains and all their Security Gateways can take some time. Use this option with caution.

