


|
|
|
In This Section: |
High Availability is redundancy and database backup for management servers. Synchronized servers have the same policies, rules, user definitions, network objects, and system configuration settings.
Multi-Domain Management implements High Availability at these levels:
One Domain Management Server is Active and the others are Standby. Each Multi-Domain Server can have both Active and Standby Domain Servers. You can configure the Active Domain Management Server on different Multi-Domain Servers for effective load sharing.
All High Availability deployments include one Primary Multi-Domain Server and one or more Secondary servers. Synchronization occurs automatically when administrators publish sessions with changes to Policies, objects or configuration settings.
Primary and Secondary Multi-Domain Servers
The order in which you install Multi-Domain Servers is significant. You must define the first physical server as a Primary Multi-Domain Server in the First Time Wizard. You must define all other Multi-Domain Servers as Secondary in the First Time Wizard.
Active and Standby Domain Management Servers
You can only use the Active Domain Management Server to manage Domain Security Gateways, networks, Security Policies objects and system configuration. Standby Domain Management Servers synchronize fully for redundancy. You can connect to a Standby Domain Management Server in the Read Only mode to look at current object configurations and Rule Base.
In the standard configuration, there is only one Active Domain Management Server for each Domain. All others are Standby Domain Management Servers. If the Active Domain Management Server fails, you must manually change a Standby Domain Management Server to Active.
Important notes about backing up and restoring in Management High Availability environment:
For more information:
migrate export and migrate import commands, see the R80.30 CLI Reference Guide.mds_backup and mds_restore commands, see the R80.30 Multi-Domain Management Administration Guide.This example shows a Multi-Site, High Availability deployment with two Multi-Domain Servers and one Multi-Domain Log Server. A real-life deployment will have many more assets.
Each Multi-Domain Server has two Domains configured for Load Sharing, where a different Domain Management Server is Active at each location. Administrators can connect to all Multi-Domain Servers. For best performance, connect to the Multi-Domain Server nearest to your geographical location.
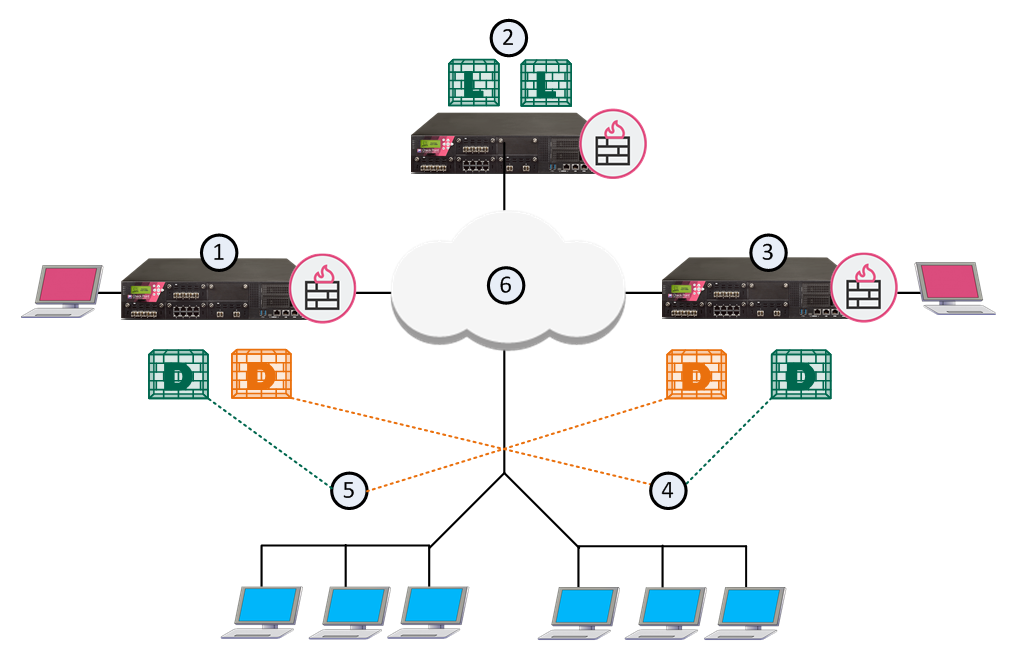
Item |
Description |
|---|---|
1 |
London Multi-Domain Server with an Active Domain Management Server for London and a Standby Domain Management Server for Tokyo |
2 |
Multi-Domain Log Server with Domain Log Servers for London and Tokyo |
3 |
Tokyo Multi-Domain Server with an Active Domain Management Server for Tokyo and a Standby Domain Management Server for London |
4 |
Tokyo network |
5 |
London network |
6 |
Internet |
|
Active Domain Management Server |
|
Standby Domain Management Server |
|
Domain Log Server |
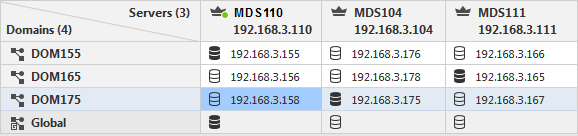
This illustration shows the configuration grid in the SmartConsole Multi Domain view for the example deployment:
The system automatically creates the Global Domain when you install Multi-Domain Management.
This section shows you how to create a new secondary Multi-Domain Server.
Important: Before you start this procedure, make sure to define the physical server as the correct server type (Secondary Multi-Domain Server, or Multi-Domain Log Server) during installation. An incorrect definition can cause deployment failure.
To create a new, secondary Multi-Domain Server:
Follow the procedures in the R80.30 Installation and Upgrade Guide. Make sure to define this server as a secondary Multi-Domain Server in the First Time Wizard. Connect to the Primary Multi-Domain Server with SmartConsole and go the Multi-Domain > Domains view.
To get the IP address automatically, the name must be in the DNS.
The new Multi-Domain Server automatically synchronizes with all existing Multi-Domain Servers and Multi-Domain Log Servers. The synchronization operation can take some time to complete, during which a notification indicator shows in the task information area.
This section includes procedures for configuring the Multi-Domain Management environment for secondary Multi-Domain Servers and a Multi-Domain Log Server. When you install Multi-Domain Management for the first time, select Primary Multi-Domain Server in the First Time Wizard. For High Availability and Load Sharing, select Secondary Multi-Domain Server in the First Time Wizard.
Each Domain has one Active and one or more Standby Domain Management Servers. For example, if a deployment has three Multi-Domain Servers, each Domain can have one Active and two Standby Domain Management Servers. This lets the Domains load be shared between several physical Multi-Domain Servers.
Example of Domain Management Server High Availability with Load Sharing:
By default, the Primary Domain Management Server is Active. All other Domain Management Servers for that Domain are Standbys. You can change a Standby Domain Management Server to Active as necessary.
All Domain management operations, such as working with Security Policies, users, networks and other objects, occur on the Active Domain Management Server. Standby Domain Management Servers automatically synchronize with the Active Domain Management Server. Security Gateways can get a Security Policy and a Certificate Revocation List (CRL) from either the Active or Standby Domain Management Servers.
When you first create a Domain, you also define the Primary Domain Management Server. Use this procedure to create Secondary Domain Management Servers for existing Domains.
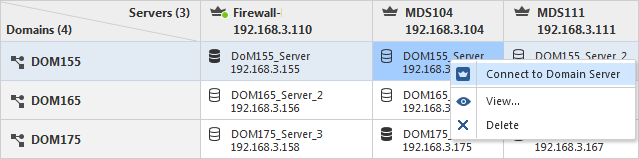
To create a secondary Domain Management Server:
Domain Management Server synchronization starts automatically and can take some time to complete.
|
Note - You cannot change settings for an existing Domain Management Server. You must first delete the Domain Management Server and then create a new one. |
To delete a secondary Domain Management Server configuration, right-click the applicable cell and select Delete.
In a multi-domain environment, the Multi-Domain Servers work in active-active mode. All Multi-Domain Servers are active and synchronize each other.
The Domains managed by the Multi-Domain Server work in active-standby mode, where the Active Domain Server synchronizes all the standby Domain Servers.
The system automatically synchronizes periodically and when an administrator publishes changes to the configuration.
During synchronization, the system performs these steps without user intervention:
On periodic synchronization:
On manual synchronization:
The data that is transferred during synchronization includes:
Initial synchronization occurs automatically when you create a secondary Multi-Domain Server, Multi-Domain Log Server, or Domain Management Server. The system generates a task to copy all databases and system information from the connected server to the new server.
Multi-Domain Server and Multi-Domain Log Server synchronization tasks show in the Task Information area, in the Multi-Domain Server SmartConsole. Domain synchronization tasks show in the Domain SmartConsole.
Multi-Domain Servers synchronize with all other peers and Multi-Domain Log Servers. Periodic synchronization occurs automatically, and when an administrator publishes a session. Private (non-published) sessions do not synchronize.
Periodic synchronizations are incremental. Only database changes synchronize with peers. Active Domain Management Servers synchronize to the standby Domain Management Servers.
Manual synchronization is a full synchronization that overwrites all data on the peers. It disconnects all connected clients and overrides active sessions and running tasks.
When changes made in a session are published on the Active server (made public), the changes are synchronized to the Standby server. Unpublished, private sessions are not synchronized.
Best practice - Use this option with caution, and only in cases of synchronization error. We recommend that you publish changes before initiating full sync.
For Domain Management Servers, you can only run a manual synchronization from the active Domain Management Server to the standby peers.
You can manually synchronize the connected Multi-Domain Server with a peer Multi-Domain Server.
To manually synchronize Multi-Domain Servers:
Synchronization starts immediately and the status shows in the window. The synchronization operation can take many minutes to complete.
Warning: Use manual synchronization with caution. This can overwrite all data on the peer Multi-Domain Server if they do not synchronize correctly.
You can manually synchronization a Standby Domain Management Server with the Active Domain Management Server on a different Multi-Domain Server.
To manually synchronize Domain Management Servers for a Domain:
Synchronization starts immediately and the status shows in the window. The synchronization operation can take many minutes to complete.
When you create a new secondary Multi-Domain Server, the Internal Certificate Authority (ICA) on the Primary Multi-Domain Server generates a certificate when you establish SIC trust. The ICA can generate a certificate for a new administrator, if required by the authentication method. In a High Availability deployment with more than one Multi-Domain Server, the system synchronizes the ICA databases as necessary.
If the current Active Domain Management Server is responsive, use this procedure to set a different Domain Management Server to Active.
To change an Active Domain Management Server:
The Standby Domain Management Server changes to Active. The Standby Domain Management Servers automatically synchronize, and a confirmation message shows in the High Availability Status window. The synchronization operation can take many minutes to complete.
To manually set the Active Domain Management Server to Standby
The Active Domain Management Server changes to Standby. Continue the procedure to set a different Domain Management Server to Active. Until you do this, Domain SmartConsole clients open in the Read Only mode and you cannot work with Domain objects or Policies.
Note - SmartConsole clients connected to the Active Domain Management Server will be disconnected during the procedure for changing the Active Domain Management Server.
To see Multi-Domain Server and Multi-Domain Log Server High Availability status:
The High Availability Status window shows all Multi-Domain Servers and Multi-Domain Log Servers in your environment, together with their synchronization status.
Icon |
Status |
|---|---|
|
Multi-Domain Server (that you are connected to) - Synchronization OK |
|
Multi-Domain Server Synchronization OK |
|
Multi-Domain Log Server Synchronization OK |
|
Multi-Domain Server - Not synchronized - No connection with peer |
To see Domain Management Server High Availability status:
By default, SmartConsole connects to the Active Domain Management Server.
The High Availability Status window shows the status of all Domain Management Servers for the selected Domain. You can manually synchronize the peer servers with the Domain Management Server to which you are connected. You can also connect with SmartConsole to a peer Domain Management Server in the Read Only mode.
Icon |
Status |
|---|---|
|
Active Domain Management Server - Synchronization OK |
|
Standby Domain Management Server - Synchronization OK |
|
Domain Log Server - Synchronization OK |
|
Domain Management Server not synchronized - No connection with peer |
|
Domain Management Server synchronization in process or has a problem |
Note - Domain servers' status is reflected also in the Domains view in the SmartConsole connected to the Multi-Domain Server. For more information on synchronization status, see the R80.30 Security Management Administration Guide.
In many cases, you can recover a failed Primary Multi-Domain Server in a High Availability deployment. To do this, promote an existing Secondary Multi-Domain Server to become the Primary. Promote a Secondary Domain Management Server to become Primary Domain Management Server. You can then install and configure a new secondary Multi-Domain Server.
Important: Use Domain Management Server promotion only to recover a failed Multi-Domain Server.
To connect to a secondary Multi-Domain Server:
A SmartConsole instance opens for the Global Domain.
This procedure is necessary because there are no automatic steps to promote a Secondary Multi-Domain Server when the Primary Multi-Domain Server fails.
To promote a Secondary Multi-Domain Server to Primary:
cpprod_util FwSetPrimary 1cpprod_util CPPROD_SetValue PROVIDER-1 Primary 4 1 1cpprod_util CPPROD_SetValue SIC ICAState 4 3 1ckp_regedit -d //SOFTWARE//CheckPoint//SIC OTPckp_regedit -d //SOFTWARE//CheckPoint//SIC ICAip
These commands update the required parameters in the registry on the secondary Multi-Domain Server.
Note - If the environment includes more than one secondary Multi-Domain Server and at least one Multi-Domain Log Server, you must run SIC reset in mdsconfig on these servers.
Follow these instructions for each Domain on the failed Primary Domain Management Server.
|
Important - To use this procedure, there must be at least one Active Domain Management Server on a different Multi-Domain Server. |
To restore the Domain Management Servers:
> mdsenv <domain_server_name>> promote_util
These steps set the Multi-Domain Server context to the specified Domain Management Server.
To make Domain Management Server Active when there is no corresponding peer and the High Availability Status window is not available, run these commands:
# mdsenv <domain_name># mgmt_cli make-server-active force true --domain <domain_name> --user <user_name> --password <password>
These commands set the Domain Management Server to the Active state. Do this for all Domain Management Servers that do not have a High Availability peer.
To restore your High Availability deployment, run these commands:
mdsstopmdsstart
To delete a secondary Multi-Domain Server:
mdsstop Note - This procedure deletes all standby and non-primary Domain Management Servers on the Secondary Multi-Domain Server. You cannot delete the Primary or Active Domain Management Server.
|
Important - You can only re-establish SIC trust on a Secondary Multi-Domain Server or Multi-Domain Log Servers. There is no option to establish SIC trust on the Primary Multi-Domain Server. |
It is occasionally necessary to re-establish trust between a Primary and secondary Multi-Domain Server or Multi-Domain Log Server. This can occur for many reasons, including:
To re-establish SIC trust:
mdsconfigy to confirm.If successful, the Certificate State field shows Trust established.


