


|
|
|
In This Section: |
The UserCheck client is installed on endpoint computers to communicate with the gateway and show UserCheck interaction notifications to users.
It works with the Data Loss Prevention and Content Awareness Software Blades.
Notifications of incidents can be sent by email (for SMTP traffic) or shown in a popup from the UserCheck client in the system tray (for SMTP, HTTP and FTP).
UserCheck client adds the option to send notifications for applications that are not in a web browser, such as Skype, iTunes, or browser add-ons (such as radio toolbars). The UserCheck client can also work together with the UserCheck portal to show notifications on the computer itself when:
Users select an option in the notification message to respond in real-time.
For Data Loss Prevention (DLP), administrators with full permissions or the View/Release/Discard DLP messages permission can also send or discard incidents from the SmartConsole Logs & Monitor > Logs view.
Workflow for installing and configuring UserCheck clients:
See UserCheck Client Requirements in the R80.30 Release Notes.
Enable UserCheck and the UserCheck client on the gateway in the Properties window of the gateway object in SmartConsole. This is necessary to let clients communicate with the gateway.
To enable UserCheck and the UserCheck client on the gateway:
The gateway window opens and shows the General Properties page.
This enables UserCheck notifications from the gateway.
This enables UserCheck notifications from the client.
To get the MSI file:
|
Important - Before you can download the client msi file, the UserCheck portal must be up. The portal is up only after a Policy installation. |
After configuring the clients to connect to the gateway, install the clients on the user machines. You can use any method of MSI or EXE mass deployment and installation that you choose. For example, you can send users an email with a link to install the client. When a user clicks the link, the MSI file automatically installs the client on the computer.
Alternatively, users can download the installation package from the regular DLP UserCheck notifications.
To install the client for all user accounts on a Windows computer, see sk96107.
The installation is silent and generally, no reboot is required.
When the client is first installed, the tray icon indicates that it is not connected. When the client connects to the gateway, the tray icon shows that the client is active.
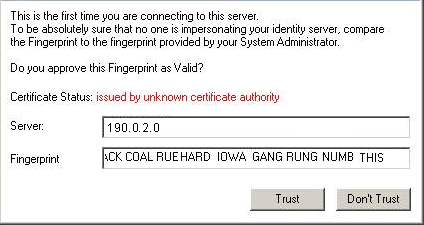
The first time that the client connects to the gateway, it asks for verification from the user and approval of the fingerprint.
Best Practices:
If UserCheck for DLP is enabled on the gateway, users are required to enter their username and password after the client installs.
Example of message to users about the UserCheck client installation (for DLP):
Dear Users,
Our company has implemented a Data Loss Prevention automation to protect our confidential data from unintentional leakage. Soon you will be asked to verify the connection between a small client that we will install on your computer and the computer that will send you notifications.
This client will pop up notifications if you try to send a message that contains protected data. It might let you to send the data anyway, if you are sure that it does not violate our data-security guidelines.
When the client is installed, you will see a window that asks if you trust the DLP server. Check that the server is SERVER NAME and then click Trust.
In the next window, enter your username and password, and then click OK.
|
Note - If the UserCheck client is not connected to the gateway, the behavior is as if the client was never installed. Email notifications are sent for SMTP incidents and the Portal is used for HTTP incidents. |
You can see and edit Check Point users from Users and Administrators in the navigation tree.
To enable Check Point password authentication:
SmartConsole Configuration
UserCheck Client Configuration
Ask your users to configure their UserCheck client:
If users require assistance to troubleshoot issues with the UserCheck client, you can ask them to send you the logs.
To configure the client to generate logs:
The Settings window opens.
To send UserCheck logs from the client:
The Status window opens.
The default email client opens, with an archive of the collected logs attached.
These are the default UserCheck messages in the Access Tools > UserCheck page of the Access Control Policy:
Name |
Action Type |
Description |
|---|---|---|
Access Approval |
Inform |
|
Access Notification |
Inform |
Shows when the action for the rule is inform. It informs users what the company policy is for that site. |
Blocked Message - Access Control |
Block |
Shows when the action for the rule is Block, when a request is blocked. |
Cancel Page - Access Control |
Cancel |
Shows after a user gets an Inform or Ask message and clicks Cancel. |
Company Policy |
Ask |
Shows when the action for the rule is ask. It informs users what the company policy is for that site and they must click OK to continue to the site. |
If the default UserCheck messages do not fit your needs, you can create a UserCheck Interaction object.
For example, you can create a message with Content Awareness fields.
You can show these UserCheck message previews:
Ask and Inform pages include a Cancel button that users can click to cancel the request.
For Threat Prevention and Application and URL Filtering , you can show these UserCheck message previews:
For DLP, you can also show these UserCheck message previews:
After you set the UserCheck interaction object language, you can translate the Portal OK and Cancel buttons to the applicable language. For more information, see sk83700.
Some of the UserCheck predefined notifications are translated to more than one language. For example, Access Notification is translated to English, French, Spanish, and Japanese.
To support more languages:

