


|
|
|
In This Section: |
The Capsule Docs Software Blade, managed by an on-premises Security Management Server, lets organizations protect and share documents safely within the organization and with business partners, and manage the organizational Capsule Docs policy, monitoring, and deployment through SmartEndpoint.
Check Point Capsule Docs provides these benefits:
Control the parties that can access the data
Protect data stored on untrusted servers and shared via untrusted channels
See full audit trail for data access
Access protected documents easily from your platform of choice
Full Integration with Organizational Active Directory
You must configure all prerequisites before you can work with Capsule Docs.
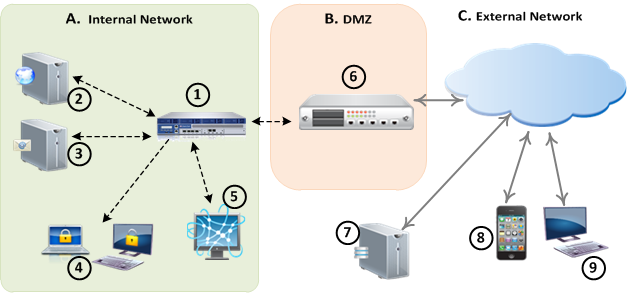
This picture gives an overview of the different components required for a Capsule Docs deployment as part of an Endpoint Security environment:
ID |
Description |
|
ID |
Description |
|---|---|---|---|---|
A |
Internal Network |
|
B |
DMZ |
1 |
Management Server |
|
6 |
Reverse Proxy |
2 |
Active Directory Server |
|
C |
External Network |
3 |
SMTP Server |
|
7 |
Public-facing DNS Server |
4 |
Internal users |
|
8 |
Mobile users |
5 |
Management Console |
|
9 |
External users |
Notes:
If these conditions do not exist, a DNS Server is still required but does not need to be accessible from external networks.
To share protected documents externally, you must have an SMTP server and configure a Reverse Proxy.
Workflow for Capsule Docs Configuration
Before you configure Capsule Docs policy in SmartEndpoint:
To configure the Active Directory server as the primary DNS server in Gaia:
To configure the Active Directory server as the primary DNS server in Windows:
The Connection Properties window opens.
See Active Directory Scanner for instructions to configure the Directory Scanner.
The Reverse Proxy makes sure that requests from mobile devices and Capsule Docs clients that do not have internal network access reach the Endpoint Security Server.
If you use a Security Gateway as the Capsule Docs Reverse Proxy, do the procedures in this section. Alternatively, you can configure a third party server, for example an Apache Server, as a Reverse Proxy Server. See sk102973 to use a third party server as a Reverse Proxy Server.
To prepare the Security Gateway for the Capsule Docs Reverse Proxy you must:
Note- Make sure the name of the Endpoint Security Management Server resolves correctly in DNS.
If you do not make this change, the Gaia portal will not be accessible.
To enable the Mobile Access Software Blade on the Security Gateway:
The Mobile Access Configuration wizard opens.
The Mobile Access Policy is created, but has no rules in it.
During policy installation, a warning shows: The Mobile Access Policy does not contain any rules. You can ignore this.
To configure the Capsule Docs proxy on the Security Gateway:
ReverseProxyCLI add application capsule_docs <public_server_name> <capsule_docs_server>
Where:
<public_server_name> is the Capsule Docs Server public name, configured in SmartEndpoint. This hostname should be resolved to the Reverse Proxy Gateway, for example: capsuledocs.externalsite.comMake sure that the output of Please wait.. Calculating your internal Host (host) IP addresses is the IP address of the internal server and that no warnings are shown.
ReverseProxyCLI apply configMake sure the command output is :Finished applying configuration successfully.
If warnings are shown you must resolve the problems before you continue.
You can also enable Single Sign-on for Capsule Workspace with Capsule Docs users.
To enable Single Sign-on for Capsule Workspace Capsule Docs users:
The list of all Web Applications shows.
The Web Application window opens.
If it does not show in the drop-down menu, click Manage > New, select Host or DNS Name, and configure the new Endpoint Security Management Server.
The new directories are:
Note - on gateway objects, Path Translation is supported by default.
|
Note - To grant access to an application for the Capsule Workspace users, you must add a Single Sign-on access rule to the Capsule Workspace policy. |
To send protected documents to external users, you must configure your email server. Two types of email servers are supported:
To configure the email server:
Troubleshooting issues with email settings
If the email server does not send alerts and email server authentication is not necessary do these steps:
Configure these parameters :
For managed clients to seamlessly authenticate to Capsule Docs with users' AD credentials, enable Single Sign-on with Active Directory authentication.
The default setting is Do not allow Single Sign-on with Active Directory.
To enable Single Sign-on with Active Directory:
When users create a new document in a supported application, the protection settings of their default Capsule Docs community are applied to the document. Users can change the settings through the Capsule Docs menu.
In some MS Office versions, the menu shows in the upper-right corner of documents. In others it shows in the Home tab.
Based on the Capsule Docs policy that you configure, users can:
Note - the Favorites lists can be used across the supported applications, to share the documents with different sets of users.
To learn more, see the Capsule Docs User Guide for your client release.
For each Action in a rule, select an option, which defines the Action behavior. You can select a predefined Action option or select New to define a custom Action option.
Right-click an Action and select Edit or Edit Shared Action to change the Action behavior.
Changes to policy rules are enforced only after you install the policy.
Actions with the ![]() icon apply to all of the organization.
icon apply to all of the organization.
The Organization Settings define the name of the organization and the name of the Public or External Server. This is the domain name that leads to the reverse proxy server or gateway.
Note - The Public Server Name should be configured one time and not changed.
Define the Capsule Docs classifications in use and the permissions associated with them.
Also define the permissions of document Authors. By default the permissions are set to be based on the classifications assigned to individual documents or higher. However, you can change them as necessary. A document can have multiple authors. Classification based means that the setting for the Author is the same as what is defined for the Classification.
To create a new classification:
To delete a classification:
To change the order of the classifications that end-users see in the Capsule Docs menu:
For each Classification, define its properties and permissions in the table. For more details about the options see sk105076.
Column |
Description |
|---|---|
Icon |
Select the icon that users see in protected documents. |
Classification Name |
Give the classification a descriptive name. |
Applied On |
|
Encrypted |
|
Edit |
Can users edit the document: Yes or No. |
Modify Users |
Can users add or remove users and groups: Yes or No. |
Change Classification |
Can users change the classification of a document: Yes or No. |
Unprotect |
Can users make a document unprotected: Ask, Yes, or No. If Ask is selected, users must give a reason if they choose to unprotect a document. |
Mobile Access |
Can the document be accessed through Capsule Docs on mobile devices: Yes or No. |
Can users print the document: Yes or No. |
|
Screen Capture |
Can users take screenshots of the document: Ask, Yes, or No. If Ask is selected, users must give a reason that they require screenshots. |
Copy Paste |
Can users copy from the document and paste in their device: Yes or No. |
Markings |
Double-click to change the selection. Select a header, footer, or watermark with the Classification Name to include in the document. Different markings are supported for different document types. |
Email Domains for sharing documents Defines permissions for new user registration, based on email domains. Each domain can be defined as either Internal or External. There are two default domains that cannot be edited or deleted:
You can add more Internal or External Non AD Scanned Domains, and set the permissions to add New Users from them:
Define the default encryption behavior for new documents:
You can also manually select or clear these options in the Properties of the Action:
Define the default protection settings that are assigned to newly protected documents. Users with the required permissions can edit these settings from the document.
The settings are:
The classifications and permissions shown are those configured in the Classifications and Permissions Action. You cannot edit them from this Action.
To add and remove user groups that show in newly protected documents:
All groups that show in the Protection Setting window are assigned to the document.
To configure which users or groups have Author permissions:
If the default classification does not have encryption:
All users can access it and the users and groups selected here only apply if the classification is changed to one with encryption.
Set permissions for the ability to add new users to a document if they are not yet invited or registered. By default, all users in the internal domains have permission to the documents and do not require invitations.
The options are:
If you select Allow inviting users from any domains, you can also limit the users who can be invited to those from specified domains.
To limit the users who can be invited to a document:
Configure Client access to protected documents.
Set the period of downtime, after which if the client does not get updated, the access to protected documents becomes blocked. You can also configure how often the client checks for updates.
This Action defines permissions for Single Sign-on with Active Directory. The default is Do not allow Single Sign-on with Active Directory.
You can add external users who can access Capsule Docs protected documents in these ways:
The first time that an external user from a new domain is added to the system, a new folder is created for the domain in the Users and Computers tree under External Users.
External users are in one of these states, shown in the User Details:
An administrator can give an external user or domain internal permissions.
To give an external user the same permissions as an internal user:
Right-click on a user or domain from the Users and Computers tree and select Grant internal permission (for document use).
External users who have internal permissions are shown in the Capsule Docs internal users Virtual Group.
To revoke an external user:
Right-click on a user or domain from the Users and Computers tree and select Revoke user. The user is moved to the Revoked Users folder. You cannot delete external users.
Traffic Logs
You can configure the Reverse Proxy to send traffic logs, which then can be reviewed in SmartLog, under Mobile Access logs.
To configure the Reverse Proxy to send traffic logs:
Identify Reverse Proxy logs by these criteria:
The Access section of the log can show:
To allow a blocked URL:
ReverseProxyCLI show applicationscapsule_docs app in the Paths column, find the path that is unauthorized in the log.ReverseProxyCLI show applications in the Internal Server Name column. Your Endpoint Security Management Server is configured as a DNS name. Make sure that this hostname can be resolved from the gateway. To do this run nslookup on the host to see that the gateway can resolve it.
Capsule Docs Recovery
The Capsule Docs Recovery Tool generates a master key that can open all documents in a situation of disaster recovery.
A new master key is valid for one year. Therefore we recommend that you generate a new master key every year. A notification shows in the SmartEndpoint Overview page when the master key is close to its expiration date. A new master key can open all documents that were created before its creation and up to one year afterwards.
To get the Capsule Docs Recovery Tool:

