

In This Section: |
Route Injection Mechanism (RIM) enables a Security Gateway to use dynamic routing protocols to propagate the encryption domain of a VPN peer Security Gateway to the internal network and then initiate back connections. When a VPN tunnel is created, RIM updates the local routing table of the Security Gateway to include the encryption domain of the VPN peer.
Note - Route Injection is not currently supported for IPv6.
RIM can only be enabled when permanent tunnels are configured for the community. Permanent tunnels are kept alive by tunnel test packets. When a Security Gateway fails to reply, the tunnel will be considered 'down.' As a result, RIM will delete the route to the failed link from the local routing table, which triggers neighboring dynamic routing enabled devices to update their routing information accordingly. This will result in a redirection of all traffic destined to travel across the VPN tunnel, to a pre-defined alternative path.
There are two possible methods to configure RIM:
Route injection can be integrated with MEP functionality (which route return packets back through the same MEP Security Gateway). For more information on MEP, see Multiple Entry Point VPNs.
Automatic RIM can be enabled in the Gaia Portal. Although you can use a custom script, no custom-written scripts are required.
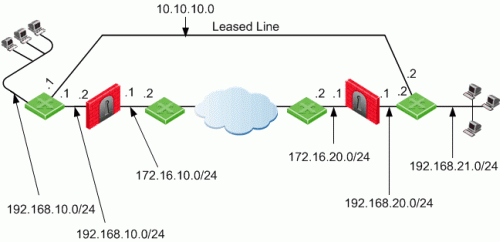
In this scenario:

The routing tables for the Security Gateways and routers read as follows. Entries in bold represent routes injected into the Security Gateways local routing tables by RIM:
For Security Gateway 1:
Destination |
Netmask |
Security Gateway |
Metric |
|---|---|---|---|
0.0.0.0 |
0.0.0.0 |
172.16.10.2 |
1 |
192.168.21.0 |
255.255.255.0 |
172.16.10.2 |
1 |
192.168.11.0 |
255.255.255.0 |
192.168.10.1 |
1 |
Security Gateway 2:
Destination |
Netmask |
Security Gateway |
Metric |
|---|---|---|---|
0.0.0.0 |
0.0.0.0 |
172.16.20.2 |
1 |
192.168.11.0 |
255.255.255.0 |
172.16.20.2 |
1 |
192.168.21.0 |
255.255.255.0 |
192.168.20.1 |
1 |
R1 (behind Security Gateway 1):
Destination |
Netmask |
Security Gateway |
Metric |
|---|---|---|---|
0.0.0.0 |
0.0.0.0 |
192.168.10.2 |
1 |
192.168.21.0 |
255.255.255.0 |
192.168.10.2 |
1 |
192.168.21.0 |
255.255.255.0 |
10.10.10.2 |
2 |
R4 (behind Security Gateway 2):
Destination |
Netmask |
Security Gateway |
Metric |
|---|---|---|---|
0.0.0.0 |
0.0.0.0 |
192.168.20.2 |
1 |
192.168.11.0 |
255.255.255.0 |
192.168.20.2 |
1 |
192.168.11.0 |
255.255.255.0 |
10.10.10.1 |
2 |
Custom scripts can be run on any Security Gateway in the community. These scripts are executed whenever a tunnel changes its state, i.e. goes "up" or "down." Such an event, for example, can be the trigger that initiates a dial-up connection.
A script template custom_rim (with a .sh or .bat extension depending on the operating system) is provided in the $FWDIR/Scripts directory.
Sample customized script:
#!/bin/sh
# This script is invoked each time a tunnel is configured with the RIM option # and the tunnel changed state. # # You may add your custom commands to be invoked here.
# Parameters read from command line. RIM_PEER_Security Gateway=$1 RIM_NEW_STATE=$2 RIM_HA_STATE=$3 RIM_FIRST_TIME=$4 RIM_PEER_ENC_NET=$5
case "${RIM_NEW_STATE}" in up) # Place your action for tunnels that came up ;; down) # Place your action for tunnel that went down ;; esac
|
Where:
RIM_PEER_Security GatewayRIM_NEW_STATERIM_HA_STATERIM_FIRST_TIMERIM_PEER_ENC_NETYou can inject the IP addresses of the peer Security Gateway into the routing tables, in addition to the networks behind the Security Gateway.
For example, after a VPN tunnel is created, RIM injects into the local routing tables of both Security Gateways, the encryption domain of the peer Security Gateway. However, when RIM enabled Security Gateways communicate with a Security Gateway that has Hide NAT enabled, the peer's interfaces need to be injected as well.
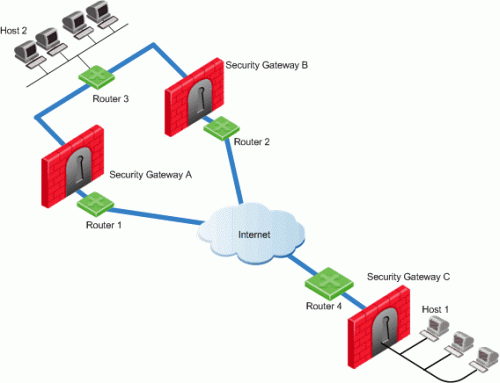
In this scenario:

This solution for routing the packets back properly is two-fold:
The following Permanent Tunnel modes are then made available:
Note - When choosing tunnels, keep in mind that RIM can only be enabled on tunnels that have been configured to be permanent. You must select On all tunnels in the community, if MEP is enabled on the community.
The Star Community Settings window opens.
In the Community section:
In the Tracking section:
Log, Popup Alert, Mail Alert, SNMP Trap Alert, User Defined Alert
$FWDIR/scripts/custom_rim.shThe following Permanent Tunnel modes are then made available:
Note - When choosing tunnels, keep in mind that RIM can only be enabled on tunnels that have been configured to be permanent. You must select On all tunnels in the community, if MEP is enabled on the community.
The Meshed Community Settings window opens.
In the Community section:
In the Tracking section:
Log, Popup Alert, Mail Alert, SNMP Trap Alert, User Defined Alert
$FWDIR/scripts/custom_rim.shTo enable the RIM_inject_peer_interfaces flag:
In Gaia, the Route Injection Mechanism adds routes directly to the kernel. For the routes to remain in the Kernel, you must configure this option.
To set kernel routes using the CLI:
To set kernel routes using the Gaia Portal:
Gaia Gateways in a Star VPN Community
For RIM to work, the Gaia gateways in a star VPN community must publish the routes of the satellite networks to the router.
For Gaia gateways to publish routes, run these CLI commands on all gateways at the center of the community.
For more information, see the R80.20 Gaia Advanced Routing Administration Guide.
set routemap <Routemap Name> id <ID Number>For example:
set routemap RIM id 5
set routemap <Routemap Name> id <ID Number> match protocol kernelFor example:
set routemap RIM id 5 match protocol kernel
Set ospf export-routemap <Routemap Name> preference 1 onFor example:
set ospf export-routemap RIM preference 1 on
set routemap <Routemap Name> id <ID Number> allowFor example:
set routemap RIM id 5 allow
set routemap <Routemap Name> id <ID Number> onFor example:
set routemap RIM2 id 10 on
set routemap <Routemap Name> id <ID Number> match nexthop <IP of OSPF Interface of the other RIM GW> onFor example:
set routemap RIM2 id 10 match nexthop <10.16.50.3> on
set routemap <Routemap Name> id <ID Number> restrictFor example:
set routemap RIM2 id 10 restrict
set ospf import-routemap <Routemap Name> preference 1 onFor example:
set ospf import-routemap RIM2 preference 1 on
save config