


In This Section: |
Multiple Entry Point (MEP) is a feature that provides a High Availability and Load Sharing solution for VPN connections. A Security Gateway on which the VPN module is installed provides a single point of entry to the internal network. It is the Security Gateway that makes the internal network "available" to remote machines. If a Security Gateway should become unavailable, the internal network too, is no longer available. A MEP environment has two or more Security Gateways both protecting and enabling access to the same VPN domain, providing peer Security Gateways with uninterrupted access.
Both MEP and Clustering are ways of achieving High Availability and Load Sharing. However:
MEP is implemented via a proprietary Probing Protocol (PP) that sends special UDP RDP packets to port 259 to discover whether an IP is reachable. This protocol is proprietary to Check Point and does not conform to RDP as specified in RFC 908/1151.
Note - These UDP RDP packets are not encrypted, and only test the availability of a peer.
The peer continuously probes or polls all MEP Security Gateways in order to discover which of the Security Gateways are "up", and chooses a Security Gateway according to the configured selection mechanism. Since RDP packets are constantly being sent, the status of all Security Gateways is known and updated when changes occur. As a result, all Security Gateways that are "up" are known.
There are two available methods to implement MEP:
MEP Method |
Description |
|---|---|
Explicit MEP |
Only Star communities with more than one central Security Gateway can enable explicit MEP. This MEP method provides multiple entry points to the network behind the Security Gateways. When available, Explicit MEP is the recommended method. |
Implicit MEP |
This MEP method is supported in all scenarios, where fully or partially overlapping encryption domains exist, or where Primary-Backup Security Gateways are configured. |
In a Site To Site Star VPN community, explicit MEP is configured in the VPN community object. When MEP is enabled, the satellites consider the "unified" VPN domain of all the Security Gateways as the VPN domain for each Security Gateway. This unified VPN domain is considered the VPN domain of each Security Gateway:
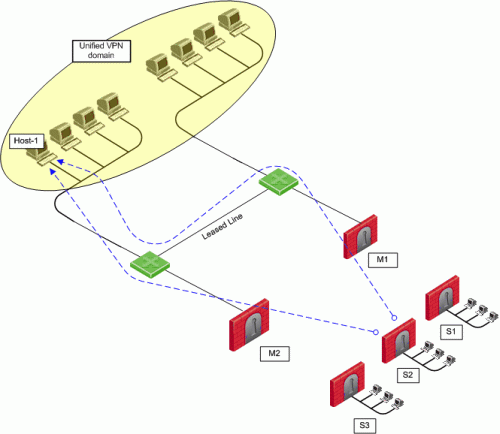
In the figure, a Star VPN community has two central Security Gateways, M1 and M2 (for which MEP has been enabled) and three satellite Security Gateways - S1, S2, and S3. When S2 opens a connection with Host-1 (which is behind M1 and M2), the session will be initiated through either M1 or M2. Priority amongst the MEP Security Gateways is determined by the MEP entry point selection mechanism.
If M2 is the selected entry point and becomes unavailable, the connection to Host-1 fails over to M1. Returning packets will be rerouted with RIM or IP Pool NAT. For more information about returning packets, see Routing Return Packets.
There are four methods used to choose which of the Security Gateways will be used as the entry point for any given connection:
Method |
Description |
|---|---|
Select the closest Security Gateway to source |
First to respond |
Select the closest Security Gateway to destination |
By VPN domain |
Random selection |
For Load distribution |
Manually set priority list |
MEP rules |
If you select either By VPN domain , or Manually set priority list, then Advanced options provide additional granularity.
MEP Selection Method |
Description |
|---|---|
First to Respond |
The first Security Gateway to reply to the peer Security Gateway is chosen. An organization would choose this option if, for example, the organization has two Security Gateways in a MEP configuration - one in London, the other in New York. It makes sense for VPN peers located in England to try the London Security Gateway first and the NY Security Gateway second. Being geographically closer to the peers in England, the London Security Gateway will be the first to respond, and becomes the entry point to the internal network. See: First to Respond. |
VPN Domain |
If the destination IP address belongs to a particular VPN domain, the Security Gateway of that domain becomes the chosen entry point. This Security Gateway becomes the Primary Security Gateway, while other Security Gateways in the MEP configuration become its Backup Security Gateways. See: By VPN Domain. |
Random Selection |
The remote peer randomly selects a Security Gateway, with which to open a VPN connection. For each source/destination IP address pair, a new Security Gateway is randomly selected. An organization might have a number of Security Gateways with equal performance abilities. In this case, it makes sense to enable load distribution to use these Security Gateways in a random and equal way. See: Random Selection. |
Manually set priority list |
Priorities of Security Gateways can be set manually for the entire VPN community, or for individual satellite Security Gateways. |
When there is no primary Security Gateway, all Security Gateways share "equal priority".
When all Security Gateways share equal priority:
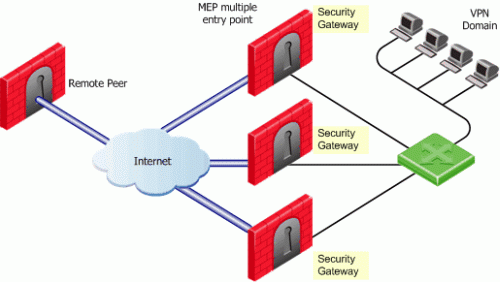
The idea behind first to respond is proximity. The Security Gateway, which is "closer" to the remote peer, responds first.
Before you enable MEP, each IP address belongs to a specific VPN domain. With By VPN Domain, the Security Gateway of that domain becomes the chosen entry point.
In the example figure below, the VPN Star community has two central MEP Security Gateways (M1 and M2, each of which have their own VPN domains), and remote satellite S1.
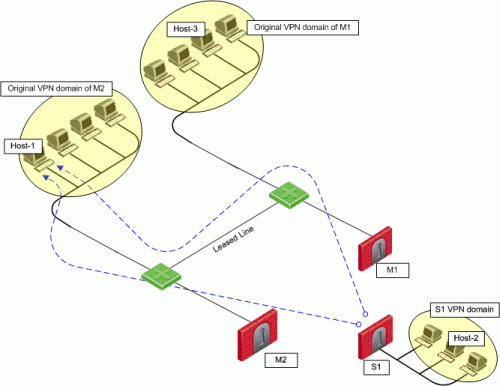
Host-2 (in the VPN domain of satellite S1 initiates a connection with Host-1. The connection can be directed through either M1 or M2. However, Host-1 is within M2's original VPN domain. For this reason, M2 is considered the Security Gateway "closest" to the destination IP address. M2 is therefore considered the primary Security Gateway and M1 the backup Security Gateway for Host-1. If there were additional Security Gateways in the center, these Security Gateways would also be considered as backup Security Gateways for M2.
If the VPN domains have fully or partially overlapping encryption domains, then more than one Security Gateway will be chosen as the "closest" entry point to the network. As a result, more than one Security Gateway will be considered as "primary." When there are more than one primary or backup Security Gateways available, the Security Gateway is selected with an additional selection mechanism. This advanced selection mechanism can be either (See Advanced Settings):
For return packets you can use RIM on the center Security Gateways. If RIM is also enabled, set a metric with a lower priority value for the leased line than the VPN tunnel. The satellite S1 might simultaneously have more than one VPN tunnel open with the MEP Security Gateways, for example M2 as the chosen entry point for Host-1 and M1 as the chosen entry point for Host-3. While both M1 and M2 will publish routes to Host-1 and Host-3, the lower priority metric will ensure the leased line is used only when one of the Security Gateways goes down.
With this method, a different Security Gateway is randomly selected as an entry point for incoming traffic. Evenly distributing the incoming traffic through all the available Security Gateways can help prevent one Security Gateway from becoming overwhelmed with too much incoming traffic.
The Security Gateways are probed with RDP packets, as in all other MEP configurations, to create a list of responding Security Gateways. A Security Gateway is randomly chosen from the list of responding Security Gateways. If a Security Gateway stops responding, another Security Gateway is (randomly) chosen.
A new Security Gateway is randomly selected for every source/destination IP addresses pair. While the source and destination IP addresses remain the same, the connection continues through the chosen Security Gateway.
In such a configuration, RIM is not supported. IP Pool NAT must be enabled to ensure return packets are correctly routed through the chosen Security Gateway.
The Security Gateway that will be chosen (from the central Security Gateways in the Star VPN community) as the entry point to the core network can be controlled by manually setting a priority per source Security Gateway.
Each priority constitutes a MEP Rule.
In the figure below, three MEP members (M1, M2, M3) provide entry points to the network for three satellite Security Gateways (S1, S2, S3). Satellite S1 can be configured to try the Security Gateways in the following order: M1, M2, M3, giving the highest priority to M1, and the lowest priority to M3. Satellite S2 can be configured to try the Security Gateways in the following order: M2, M3 (but not to try M1).
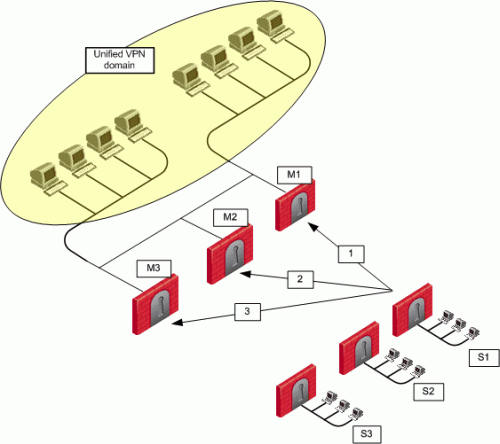
Each of these priorities constitutes a MEP rule in the MEP manual priority list window:
Item |
Description |
|---|---|
1 |
Default MEP Rule |
2 |
First MEP Rule |
3 |
Second MEP Rule |
The MEP manual priority list window is divided into the default rule, and rules which provide exceptions to the default rule. The default MEP rule takes effect when:
The Exception priority rules section contains three priority levels: primary, secondary, and tertiary. While there are only three priority levels,
In the second MEP rule below:
Central Security Gateways M3 and M1 have equal priority. The same rule is being applied to satellites S2 and S3.
When more than one Security Gateway is assigned the same priority level, which Security Gateway will be chosen is resolved according to the Advanced settings. See Advanced Settings.
In some instances, more than one Security Gateway is available in the center with no obvious priority between them. For example - as shown in the second example of the second MEP rule, above - more than one Security Gateway is assigned "second" priority. In this scenario, Advanced options are used to decide which Security Gateway is chosen: First to Respond, or Random Selection. (Choose Random Selection to enable load balancing between the Security Gateways.)
When "manually set priority list" is the MEP selection mechanism, RIM is supported. RIM can be configured with "manually set priority list" because the "random selection" mechanism available on the Advanced button is different from the random selection mechanism used for MEP.
For the "random selection" mechanism employed for MEP, a different Security Gateway is selected for each source/destination IP addresses pair. For the random selection mechanism available from the Advanced button, a single MEP entry point is randomly selected and then used for all connections, and does not change according to source/destination pair. Load distribution is therefore achieved since every satellite Security Gateway is randomly assigned a Security Gateway as its entry point. This makes it possible to enable RIM at the same time.
If the Tracking option is enabled for MEP, this information is logged by each satellite Security Gateway:
For example, in the scenario shown in the Manually Set Priority List section, satellite S1 opens a connection to the VPN domain that includes Security Gateways M1, M2, and M3. M1 is the resolved peer. If tracking is enabled, the log reads:
|
There are three methods to implement implicit MEP:
Method |
Description |
|---|---|
First to Respond |
The first Security Gateway to reply to the peer Security Gateway is chosen. An organization would choose this option if, for example, the organization has two Security Gateways in a MEP configuration - one in London, the other in New York. It makes sense for VPN peers located in England to try the London Security Gateway first and the NY Security Gateway second. Being geographically closer to the peers in England, the London Security Gateway will be the first to respond, and becomes the entry point to the internal network. See: First to Respond. |
Primary-Backup |
One or multiple backup Security Gateways provide "high availability" for a primary Security Gateway. The remote peer is configured to work with the primary Security Gateway, but switches to the backup Security Gateway if the primary goes down. An organization might decide to use this configuration if it has two Security Gateways in a MEP environment, one of which is stronger than the other. It makes sense to configure the stronger Security Gateway as the primary. Or perhaps both Security Gateways are the same in terms of strength of performance, but one has a cheaper or faster connection to the Internet. In this case, the Security Gateway with the better Internet connection should be configured as the primary. |
Load Distribution |
The remote peer randomly selects a Security Gateway, with which to open a VPN connection. For each source/destination IP address pair, a new Security Gateway is randomly selected. An organization might have a number of Security Gateways with equal performance abilities. In this case, it makes sense to enable load distribution to use these Security Gateways in a random and equal way. See: Random Selection. |
Implicit MEP is supported, if the Security Gateways with overlapping encryption domains are in the same community. If they are located in different communities, only one of the Security Gateways will be used for this encryption domain.
When there is no primary Security Gateway, all Security Gateways share "equal priority".
When all Security Gateways share "equal priority":
The idea behind first to respond is "proximity". The Security Gateway which is "closer" to the remote VPN peer responds first.
In a star VPN community, RDP packets are sent to the Security Gateways and the first to respond is used for routing only when:
This setting is found on the Community Properties > VPN Advanced > VPN Routing page.
In this example scenario:
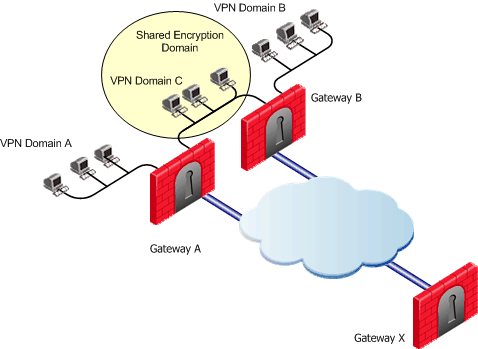
Backup Security Gateways provide redundancy for primary Security Gateways.
The first Security Gateway is configured as the "primary," and the second Security Gateway as the "backup." If the primary Security Gateway fails, for whatever reason, the remote VPN peer detects that the link has gone down and works through the backup Security Gateway. The backup Security Gateway inherits the complete VPN domain of the primary Security Gateway. Failover within an existing connection is not supported; the current connection is lost.
When the primary Security Gateway is restored, new connections go through the primary Security Gateway, while connections that already exist will continue to work through the backup Security Gateway.
Important - When you use the Primary-Backup Security Gateways method, the encryption domains should not overlap.
To prevent any one Security Gateway from being flooded with connections, the connections can be evenly shared amongst all the Security Gateways to distribute the load. When all Security Gateways share equal priority (no primary) and are MEP to the same VPN domain, it is possible to enable load distribution between the Security Gateways. The Security Gateways are probed with RDP packets, as in all other MEP configurations, to create a list of responding Security Gateways. A Security Gateway is randomly chosen from the list of responding Security Gateways. If a Security Gateways stops responding, a new Security Gateway is (randomly) chosen.
A new Security Gateway is randomly selected for every source/destination IP addresses pair. While the source and destination IP addresses remain the same, the connection continues through the chosen Security Gateway.
To make sure return packets are routed correctly, the MEP Security Gateway can make use of either of these:
IP Pool NAT is a type of NAT, in which source IP addresses from remote VPN domains are mapped to an IP address drawing from a pool of registered IP addresses. In order to maintain symmetric sessions with MEP Security Gateways, the MEP Security Gateway performs NAT with a range of IP addresses dedicated to that specific Security Gateway and should be routed within the internal network to the originating Security Gateway. When the returning packets reach the Security Gateway, the Security Gateway restores the original source IP address and forwards the packets to the source.
Route Injection Mechanism (RIM) enables a Security Gateway to use a dynamic routing protocol to propagate the encryption domain of a VPN peer Security Gateway to the internal network. When a VPN tunnel is created, RIM updates the local routing table of the Security Gateway to include the encryption domain of the VPN peer.
When a tunnel to a MEP Security Gateway goes down, the Security Gateway removes the applicable "return route" from its own local routing table. This change is then distributed backwards to the routers behind the Security Gateway.
RIM is based both on the ability of the Security Gateway to update its local routing table, and the presence of the a dynamic routing protocol to distribute the change to the network behind the Security Gateway. There is little sense in enabling RIM on the Security Gateway if a dynamic routing protocol is not available to distribute changes.
When MEP is enabled, RIM can be enabled only if permanent tunnels are enabled for the whole community. In a MEP configuration RIM is available when you use the First to Respond, Manual set priority list, and VPN Domain mechanisms. In the first two options, satellite Security Gateways "see" the center Security Gateways as unified as if one tunnel is connecting them. As a result, only the chosen MEP Security Gateway will inject the routes. In VPN Domain MEP, it could be that all MEP Security Gateways will inject the routes, which requires configuring the routers behind the MEP Security Gateways to return packets to the correct Security Gateway.
RIM is not available when Random Selection is the selected entry point mechanism.
For more information, see Route Injection Mechanism.
To configure MEP, decide on:
Explicit MEP is only available in Site-to-Site Star VPN communities where multiple central Security Gateways are defined.
To configure MEP:
Notes:
When more than one Security Gateway leads to the same (overlapping) VPN domain, they are in a MEP configuration. The first Security Gateway to respond is chosen. To configure first to respond, define that part of the network that is shared by all the Security Gateways into a single group and assign that group as the VPN domain.
Before you start, make sure that Load Distribution for MEPs configurations is disabled:
To configure First to Respond MEP:
Configure the VPN Domain that includes the Primary Security Gateway and another VPN Domain that includes only the Backup Security Gateways.
Configure each Security Gateway as either the Primary Security Gateway, or a Backup Security Gateway.
Procedure:
Step |
Description |
|---|---|
1 |
Enable the Backup Gateway options in Global properties:
|
2 |
Configure a Network Group object:
|
3 |
Configure the Primary Security Gateway object:
This Security Gateway is now the Primary Security Gateway for this VPN domain. |
4 |
Define the VPN for the Backup Security Gateways. Backup Security Gateways do not always have a VPN Domain of their own. They simply back up the Primary Security Gateway. |
|
If the Backup Security Gateway does not have a VPN Domain of its own, the VPN Domain should include only the Backup Security Gateway itself:
|
|
If the Backup Security Gateway has a VPN Domain of its own:
Important - There must be no overlap between the VPN Domain of the Primary Security Gateway and the VPN Domain of the Backup Security Gateways - no IP address can belong to both VPN Domains. |
To configure implicit MEP for random gateway selection in SmartConsole:
Step |
Description |
|---|---|
1 |
Enable load distribution for MEP configurations:
|
|
Configure a Network Group object:
|
2 |
Define the same VPN Domain for all the Security Gateways:
|
3 |
Install the Access Control Policy on all the Security Gateways. |
To configure IP Pool NAT for Site to Site VPN in SmartConsole:
Step |
Description |
|---|---|
1 |
Enable IP Pool NAT in the Global Properties:
|
2 |
For each Security Gateway, configure an object that represents the IP Pool NAT addresses for that Security Gateway:
|
3 |
In each Security Gateway, configure IP Pool NAT settings:
|
4 |
Install the Access Control Policy on all Security Gateways. |
5 |
Edit the routing table for each internal router, so that packets with an IP address assigned from the IP Pool NAT are routed to the applicable Security Gateway. |