


|
|
|
In This Section: |
You can change settings for Identity Agent parameters to control Identity Agent behavior. You can change some of the settings in SmartConsole and others using the Identity Agent Configuration tool.
To change Identity Agents parameters in SmartConsole:
The Global Properties window opens.
This is a sample list of parameters that you can change:
Parameter |
Description |
|---|---|
|
Whether users can right click the Identity Agent client (umbrella icon on their desktops) and change settings. |
|
You can add a default email address, to which to send client troubleshooting information. |
|
Whether users can right click the Identity Agent client (umbrella icon on their desktops) and close the agent. |
|
Whether to disable the packet tagging feature that prevents IP Spoofing. |
|
Whether to hide the client (the umbrella icon does not show on users' desktops). |
The Identity Awareness Single Sign-On (SSO) solution for Identity Agents gives the ability to authenticate users transparently that are logged in to the domain. This means that a user authenticates to the domain one time and has access to all authorized network resources without additional authentication.
Using Identity Agents gives you:
You get SSO in Windows domains with the Kerberos authentication protocol. Kerberos is the default authentication protocol used in Windows 2000 and above.
The Kerberos protocol is based on the idea of tickets, encrypted data packets issued by a trusted authority, which in this case, is the Active Directory (AD). When a user logs in, the user authenticates to a domain controller that provides an initial ticket granting ticket (TGT). This ticket vouches for the user’s identity. When the user needs to authenticate against the Identity Awareness Gateway, the Identity Agent presents this ticket to the domain controller and requests a service ticket (SR) for a specific resource (Security Gateway that Identity Agents connect to). The Identity Agent then presents this service ticket to the Security Gateway that grants access.
This is the workflow for SSO (Single Sign On):
The user name is encrypted with the shared secret between the Security Gateway and the AD server.
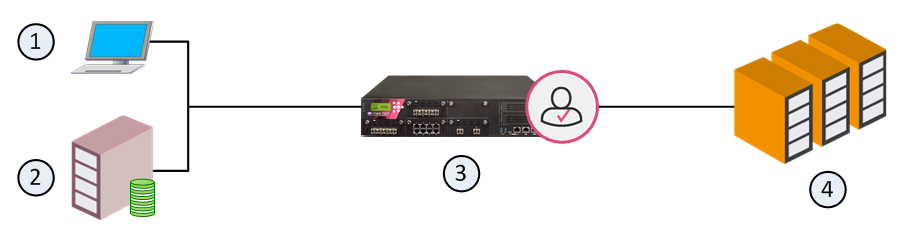
Item |
Description |
|---|---|
1 |
Computer for the user |
2 |
Active Directory Domain Controller server |
3 |
Identity Awareness Gateway |
4 |
Data Center servers |
SSO configuration includes two steps:
To use Kerberos with AD, make a Kerberos principal name with the Check Point Security Gateway service. Map this new account to the domain name.
Use the setspn.exe utility. Make sure you have the correct version.
Important - If you used the setspn utility before, with the same principal name, but with a different account, you must delete the different account, or remove the association to the principal name.
To remove the association, run:setspn -D ckp_pdp/<domain_full_dns_name> <old_account name>
If you do not do this, authentication will fail.
To configure AD for Kerberos:
setspn -A ckp_pdp/<domain_full_dns_name> <username>To see users associated with the principle name, run: setspn -Q ckp_pdp*/*
When done, configure an Account Unit in the SmartConsole, to use this account.

