

In This Section: |
This section explains how to configure advanced Threat Prevention settings that are in the Engine Settings window, including: inspection engines, the Check Point Online Web Service (ThreatCloud repository), internal email whitelist, file type support for Threat Extraction and Threat Emulation and more.
To get to the Engine Settings window, go to Manage & Settings > Blades > Threat Prevention > Advanced Settings.
The Threat Prevention Engine Settings window opens.
Select the behavior of the ThreatSpect engine if it is overloaded or fails during inspection. For example, if the Anti-Bot inspection is terminated in the middle because of an internal failure. By default, in such a situation all traffic is allowed.
The Check Point Online Web Service is used by the ThreatSpect engine for updated resource categorization. The responses the Security Gateway gets are cached locally to optimize performance.
Gateway traffic generates a large amount of activity. To make sure that the amount of logs is manageable, by default, logs are consolidated by session. A session is a period that starts when a user first accesses an application or a site. During a session, the gateway records one log for each application or site that a user accesses. All activity that the user does within the session is included in the log. For connections that are allowed or blocked in the Anti-Bot, Threat Emulation, and Anti-Virus Rule Base, the default session is 10 hours (600 minutes).
To adjust the length of a session:
The Suspicious Mail engine scans outgoing emails. You can create a list of email addresses or domains whose internal emails are not inspected by Anti-Bot.
To add an email address or domain whose internal emails are not scanned by Anti-Bot:
In this window, you can also edit or remove the entries in the list.
You can select the file types that are sent for emulation for all the Threat Prevention profiles. Each profile defines an Inspect or Bypass action for the file types.
To select Threat Emulation file types that are supported in Threat Prevention profiles:
The Threat Prevention Engine Settings window opens.
The File Types Support window opens.
The Emulation supported on column shows the emulation environments that support the file type.
Advanced Threat Extraction engine settings let you configure file type support and mail signatures for the Threat Extraction.
To configure file type support:
The Threat Extraction Supported File Types window opens.
To configure mail signatures:
The Threat Extraction Mail Signatures window opens.
Use this window to configure text for:
The first signature is always attached to an email that had threats extracted.
The second signature is added to the first if the email recipient has access to the original file.
You can insert predefined field codes into the signature text, such as:
The link opens the UserCheck Portal. The portal shows a list of attachments the recipient can download.
Use this ID to send the file to the recipient. You can also find the ID in the logs.
On the gateway, run the command: scrub send_orig_email.
SNORT is a popular, open source, Network Intrusion Detection System (NIDS). For more information about SNORT see snort.org.
Check Point supports the use of SNORT rules as both the GUI and the SmartDomain Manager API’s options.
When you import a SNORT rule, it becomes a part of the IPS database.
You can perform these actions on a Check Point Management Server:
Make sure you have the SNORT rule file. It holds SNORT rules and usually has the extension: .rules.
In a Multi-Domain Security Management environment, import SNORT rules to the Security Management Server. Then assign Global policy to the Domain Management Servers. This downloads the new SNORT protections to the Domain Management Servers.
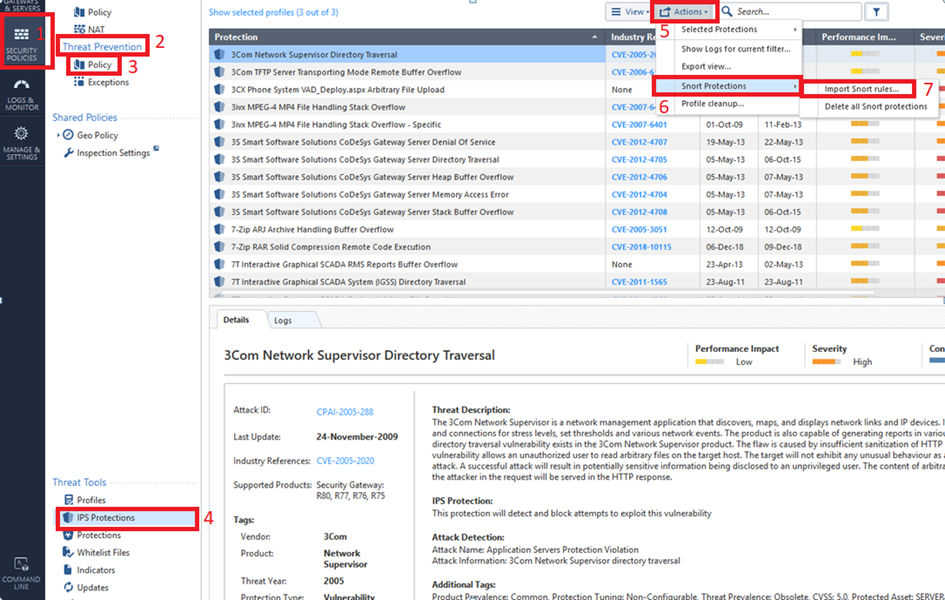
To import SNORT Protection rules to the Security Management Server:
The tool converts the rules to Check Point syntax and updates the protections database.
Important - SmartConsole shows the converted SNORT rules as IPS protections whose names start with Snort imported.

To override the profile settings for a specific SNORT protection, see Action on SNORT Protection Rules.
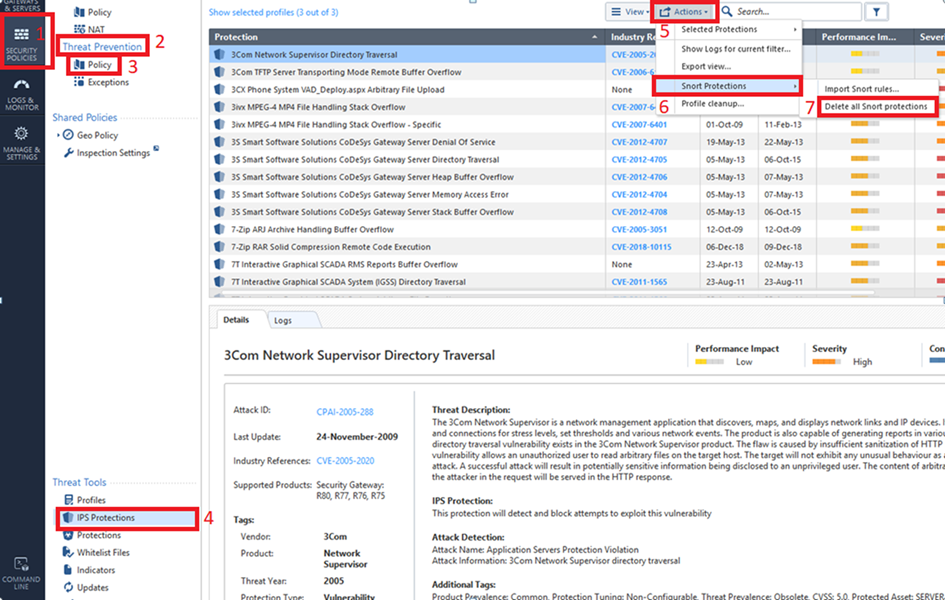
To delete SNORT protection rules from the Security Management Server:

Make sure you have the SNORT rule file. It holds SNORT rules and usually has the extension: .rules.
In a Multi-Domain Security Management environment, import SNORT rules to the Multi-Domain Server. Then assign Global policy to the Domain Management Servers. This downloads the new SNORT protections to the Domain Management Servers.
To import SNORT rules to the Multi-Domain Server:

The tool converts the rules to Check Point syntax and updates the protections database.
Important - SmartConsole shows the converted SNORT rules as IPS protections whose names start with Snort imported.
To override the profile settings for a specific SNORT protection, see Action on SNORT Protection Rules.