


|
|
|
In This Section: |
SmartConsole offers a number of tools that address policy management tasks, both at the definition stage and for maintenance.
At the definition stage:
At the maintenance level:
A policy package is a collection of different types of policies. After installation, the Security Gateway enforces all the policies in the package. A policy package can have one or more of these policy types:
The installation process:
If there are verification errors, the policy is not installed. If there are verification warnings (for example, if anti-spoofing is not enabled for a Security Gateway with multiple interfaces), the policy package is installed with a warning.
You can create different policy packages for different types of sites in an organization.
Example:
An organization has four sites, each with its own requirements. Each site has a different set of Software Blades installed on the Security Gateways:
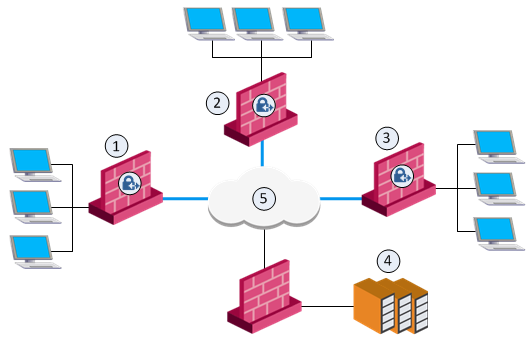
Item |
Security Gateway |
Installed Software Blades |
|---|---|---|
1 |
Sales California |
Firewall, VPN |
2 |
Sales Alaska |
Firewall, VPN, IPS, DLP |
3 |
Executive management |
Firewall, VPN, QoS, and Mobile Access |
4 |
Server farm |
Firewall |
5 |
Internet |
|
To manage these different types of sites efficiently, you need to create three different Policy Packages. Each Package includes a combination of policy types that correspond to the Software Blades installed on the site's gateway. For example:
Install the Access Control policy package on all Security Gateways.
Install this policy package on the executive management Gateway.
Install this policy package on the executive management Gateway.
The Manage policies and layers window opens.
The New Policy window opens.
To see the QoS, and Desktop Security policy types, enable them on one or more Gateways:
Go to gateway editor > General Properties > Network Security tab:
To install Policy Packages correctly and eliminate errors, each Policy Package is associated with a set of appropriate installation targets.
The new policy shows on the Security Policies page.
The Manage policies and layers window opens.
The Install Policy window opens showing the installation targets (Security Gateways).
Note - If you select For Gateway clusters install on all the members, if fails do not install at all, the Security Management Server makes sure that it can install the policy on all cluster members before it begins the installation. If the policy cannot be installed on one of the members, policy installation fails for all of them.
When you make changes to user definitions through SmartConsole, they are saved to the user database on the Security Management Server. User authentication methods and encryption keys are also saved in this database. The user database does not contain information about users defined externally to the Security Gateway (such as users in external User Directory groups), but it does contain information about the external groups themselves (for example, on which Account Unit the external group is defined). Changes to external groups take effect only after the policy is installed, or the user database is downloaded from the Security Management Server.
You must choose to install the policy or the user database, based on the changes you made:
The user database is installed on:
You can also install the user database on Security Gateways and on a remote server, such as a Log Server, from the command line interface on the Security Management Server.
To install user database from the command line interface:
On the Security Management Server, run: fwm dbload <host name>
Note - Check Point hosts that do not have active Management Software Blades do not get the user database installed on them.
You can uninstall a policy package through a command line interface on the gateway.
To uninstall a policy package:
fw unloadlocal.Warning -
fw unloadlocal command prevents all traffic from passing through the Security Gateway, because it disables the IP Forwarding in the Linux kernel.fw unloadlocal command removes all policies from the Security Gateway. This means that the Security Gateway accepts all incoming connections destined to all active interfaces without any filtering or protection enabled.
