Basic Configuration
VoIP in SmartDashboard
VoIP in SmartDashboard is configured in two places:
Basic Configuration Workflow
This section describes the workflow for a basic SIP configuration.
We assume:
- You have installed a Security Gateway and Security Management Server.
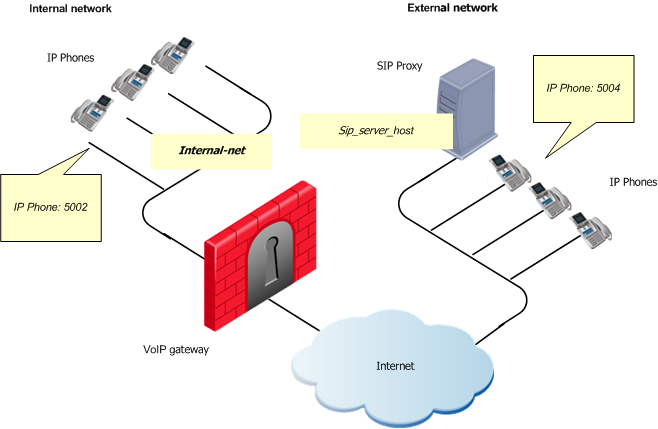
- The VoIP phones in the external networks are:
- Not behind a NAT device or
- Behind a NAT device that is VoIP-aware
To configure VoIP:
- Log in to SmartDashboard.
- Define the Security Gateway.
- Define the VoIP server.
- Define the VoIP endpoints.
- Define a VoIP security rule.
- Install the Security Policy.
- Test the configuration.
Defining the SIP Server
To define a SIP server (also known as a SIP Proxy or a Registrar) use the regular Host object in:
For example, name the host: sip_server_host.
Defining the SIP Endpoints
Define the internal VoIP phones (endpoints) by:
- Defining networks or host objects or
- A group of hosts and network objects
For example, a group of internal networks might be named: internal_net.
Defining the Security Rule
Configure a simple security rule that allows traffic between endpoints on the internal network and the SIP server in the external network.
- Click the tab.
- Add this rule and install the policy:
Source
|
Destination
|
Service
|
Action
|
internal-net
sip_server_host
|
sip_server_host
internal-net
|
sip
sip_dynamic_ports
sip-tcp
|
Accept
|
Testing the Configuration
Test the configuration by making phone calls from an:
- Internal phone to an internal phone.
- Internal phone to an external phone.
- External phone to an internal phone.
After making each call, see the resulting logs in SmartView Tracker.
To see the VoIP logs:
- From the SmartDashboard menu, select .
SmartView Tracker opens.
- Under the queries, select the filter.
- Examine the resulting logs.
Typical Call Session VoIP log
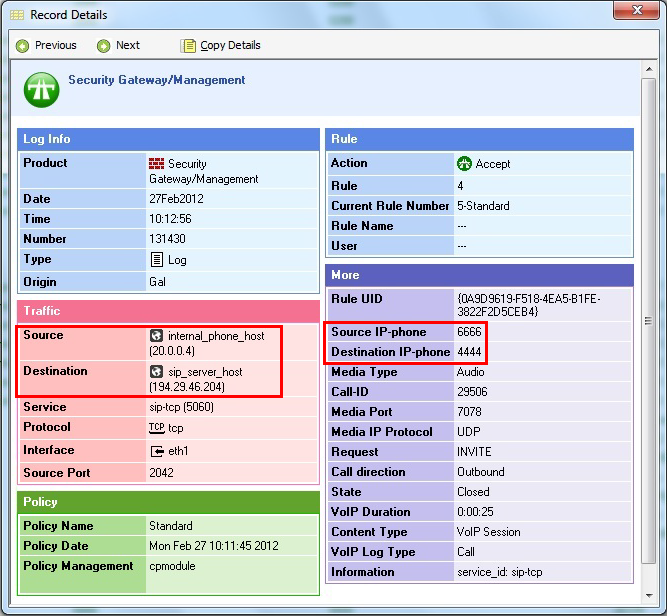
The Figure shows a typical Call Session VoIP log for a successful call from an internal phone to an external one.
|

