


|
|
|
In This Section: |
Domain Based VPN controls how VPN traffic is routed between Security Gateways and remote access clients within a community. To route traffic to a host behind a Security Gateway, you must first define an encryption domain for that Security Gateway. Configuration for VPN routing is done with SmartDashboard or by editing the VPN routing configuration files on the Security Gateways.
In this figure, one of the host machines behind Security Gateway A tries to connect to a host computer behind Security Gateway B. For technical or policy reasons, Security Gateway A cannot establish a VPN tunnel with Security Gateway B. With VPN Routing, Security Gateways A and B can establish VPN tunnels through Security Gateway C.

Item |
|
|---|---|
A |
Security Gateway A |
B |
Security Gateway B |
C |
Security Gateway C |
VPN routing connections are subject to the same access control rules as any other connection. If VPN routing is correctly configured but a Security Policy rule exists that does not allow the connection, the connection is dropped. For example: a Security Gateway has a rule which forbids all FTP traffic from inside the internal network to anywhere outside. When a peer Security Gateway opens an FTP connection with this Security Gateway, the connection is dropped.
For VPN routing to succeed, a single rule in the Security Policy Rule Base must cover traffic in both directions, inbound and outbound, and on the central Security Gateway. To configure this rule, see Configuring the 'Accept VPN Traffic Rule.
Common VPN routing scenarios can be configured through a VPN star community, but not all VPN routing configuration is handled through SmartDashboard. VPN routing between Security Gateways (star or mesh) can be also be configured by editing the configuration file $FWDIR/conf/vpn_route.conf.
VPN routing cannot be configured between Security Gateways that do not belong to a VPN community.
For simple hubs and spokes (or if there is only one Hub), the easiest way is to configure a VPN star community in SmartDashboard:
On the Star Community properties window, Central Security Gateways page, select the Security Gateway that functions as the "Hub".
The two DAIP Security Gateways can securely route communication through the Security Gateway with the static IP address.
To configure the VPN routing for SmartLSM Security Gateways:
$FWDIR/conf/vpn_route.confFor more granular control over VPN routing, edit the vpn_route.conf file in the conf directory of the Security Management Server.
The configuration file, vpn_route.conf, is a text file that contains the name of network objects. The format is: Destination, Next hop, Install on Security Gateway (with tabbed spaces separating the elements).
Consider a simple VPN routing scenario consisting of Hub and two Spokes. All machines are controlled from the same Security Management Server, and all the Security Gateways are members of the same VPN community. Only Telnet and FTP services are to be encrypted between the Spokes and routed through the Hub:
Although this could be done easily by configuring a VPN star community, the same goal can be achieved by editing vpn_route.conf:
Destination |
Next hop router interface |
Install on |
|---|---|---|
Spoke_B_VPN_Dom |
Hub_C |
Spoke_A |
Spoke_A_VPN_Dom |
Hub_C |
Spoke_B |
In this instance, Spoke_B_VPN_Dom is the name of the network object group that contains spoke B's VPN domain. Hub C is the name of the Security Gateway enabled for VPN routing. Spoke_A_VPN_Dom is the name of the network object that represents Spoke A's encryption domain. For an example of how the file appears:

In SmartDashboard:
A rule will appear in the Rule Base that will accept VPN traffic between the selected Security Gateways.
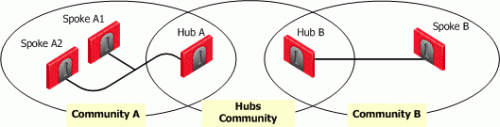
Consider two Hubs, A and B. Hub A has two spokes, spoke_A1, and spoke_A2. Hub B has a single spoke, spoke_B. In addition, Hub A is managed from Security Management Server A, while Hub B is managed via Security Management Server B:
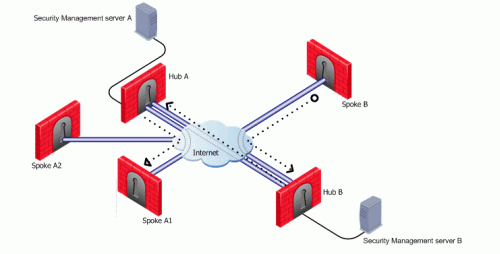
For the two VPN star communities, based around Hubs A and B:
A_community is the VPN community of A plus the spokes belonging to A. B_community is the VPN community. Hubs_community is the VPN community of Hub_A and Hub_B.
The vpn_route.conf file on Security Management Server 1 looks like this:
Destination |
Next hop router interface |
Install on |
|---|---|---|
Spoke_B_VPN_Dom |
Hub_A |
A_Spokes |
Spoke_A1_VPN_Dom |
Hub_A |
Spoke_A2 |
Spoke_A2_VPN_Dom |
Hub_A |
Spoke _A1 |
Spoke_B_VPN_Dom |
Hub_B |
Hub_A |
Spokes A1 and A2 are combined into the network group object "A_spokes". The appropriate rule in the Security Policy Rule Base looks like this:
Source |
Destination |
VPN |
Service |
Action |
|---|---|---|---|---|
Any |
Any |
A_Community B_Community Hubs_Community |
Any |
Accept |
The vpn_route.conf file on Security Management Server 2 looks like this:
Destination |
Next hop router interface |
Install On |
|---|---|---|
Spoke_A1_VPN_Dom |
Hub_B |
Spoke_B |
Spoke_A2_VPN_Dom |
Hub_B |
Spoke_B |
Spoke_A1_VPN_Dom |
Hub_A |
Hub_B |
Spoke_A2_VPN_Dom |
Hub_A |
Hub_B |
The appropriate rule in the Security Policy Rule Base looks like this:
Source |
Destination |
VPN |
Service |
Action |
|---|---|---|---|---|
Any |
Any |
B_Community A_Community Hubs_Community |
Any |
Accept |
For both vpn_route.conf files:
If branch office Security Gateways are managed by SmartProvisioning as SmartLSM Security Gateways, enable VPN routing for a hub and spoke configuration by editing the vpn_route.conf file on the Security Management Server.
To configure VPN For a single SmartLSM Profile with multiple gateways:
vpn_route.confDestination |
Router |
Install on |
Robo_Domain |
Center_gws |
Robo_profile |
If access to the SmartLSM Security Gateway through the VPN tunnel is required, the Security Gateway's external IP address should be included in the ROBO_domain.
Multiple router Security Gateways are now supported on condition that:
You can configure a VPN star community between two SmartLSM Profiles. The procedures below show a SmartLSM Profile Gateway and Cluster. You can also configure the community with two SmartLSM Profile Clusters or two SmartLSM Profile Gateway. All included SmartLSM Profile Gateways and Clusters must have the IPsec VPN blade enabled.
The procedure requires configuration in:
In SmartDashboard create network objects that represent the VPN community members and their networks. You must create a star community with To center and to other satellites through center as the selected option for VPN Routing (Star Community Properties > Advanced Settings > VPN Routing).
To configure a VPN star community between two SmartLSM Profiles in SmartDashboard:
When you configure the topology, make sure that the interface name exactly matches the name of the physical interface.
Note - Security Gateway 80 gateways cannot be the Center Gateway.
Edit the routing table of the Domain Management Server or Security Management Server to enable two SmartLSM Profile Gateways or Clusters to communicate with each other through the Center Gateway. Do this in the vpn_route.conf
To edit the vpn_route.conf file:
Open the vpn_route.conf
/var/opt/CPmds-<version>/customers/<Domain Management Server_name>/CPSG80CMP-<version>/conf/vpn_route.conf/opt/CPmds-<version>/customers/<Domain Management Server_name>/CPsuite-<version>/fw1/conf/vpn_route.conf/opt/CPSG80CMP-<version>/conf/vpn_route.conf/opt/CPsuite-<version>/fw1/conf/vpn_route.confIf two SmartLSM Gateways on different LSM Gateway profiles will communicate with each other through the Center gateway, edit the file:
# destination |
router |
[install on] |
<Simple Group Name of internal network of SmartLSM Gateway> |
<Center Gateway> |
<Name of second LSM Profile> |
<Simple Group Name of internal network of second SmartLSM Gateway> |
<Center Gateway> |
<Name of LSM Profile> |
If more than one SmartLSM Gateway in the same LSM Profile will communicate with each other through the Center gateway, edit the file:
# destination |
router |
[install on] |
<Simple Group Name of internal network of SmartLSM Gateway> |
<Center Gateway> |
<Name of LSM Profile> |
Install policy on the SmartLSM Profiles and on the Center Gateway.
Complete the configuration in the SmartProvisioning and the CLI of the Center Gateway.
To complete the VPN configuration:
|
Note - If topology information, including date and time, changes after you generate the certificate, you must generate a new certificate in the VPN tab and update the gateway (Actions > Update Gateway). |
LSMenabler onAll traffic between the satellites and Center Gateway is encrypted.

