

In This Section: |
The use of VPN Tunnel Interfaces (VTI) introduces a new method of configuring VPNs called Route Based VPN. This method is based on the notion that setting up a VTI between peer Security Gateways is much like connecting them directly.
A VTI is an operating system level virtual interface that can be used as a Security Gateway to the encryption domain of the peer Security Gateway. Each VTI is associated with a single tunnel to a Security Gateway. The tunnel itself with all its properties is defined, as before, by a VPN Community linking the two Security Gateways. The peer Security Gateway should also be configured with a corresponding VTI. The native IP routing mechanism on each Security Gateway can then direct traffic into the tunnel just as it would for any other type of interface.
All traffic destined to the encryption domain of a peer Security Gateway, will be routed through the "associated" VTI. This infrastructure allows dynamic routing protocols to use VTIs. A dynamic routing protocol daemon running on the Security Gateway can exchange routing information with a neighboring routing daemon running on the other end of an IPsec tunnel, which appears to be a single hop away.
Route Based VPN is supported on SecurePlatform and Gaia platforms only and can only be implemented between two Security Gateways within the same community.
Route Based VPN is not supported with IKEv2.
A VPN Tunnel Interface is a virtual interface on a Security Gateway that is related to a VPN tunnel and connects to a remote peer. You create a VTI on each Security Gateway that connects to the VTI on a remote peer. Traffic routed from the local Security Gateway via the VTI is transferred encrypted to the associated peer Security Gateway.

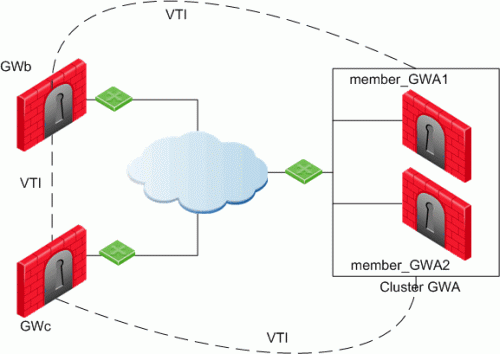
In this scenario:
A virtual interface behaves like a point-to-point interface directly connected to the remote peer. Traffic between network hosts is routed into the VPN tunnel using the IP routing mechanism of the Operating System. Security Gateway objects are still required, as well as VPN communities (and access control policies) to define which tunnels are available. However, VPN encryption domains for each peer Security Gateway are no longer necessary. The decision whether or not to encrypt depends on whether the traffic is routed through a virtual interface. The routing changes dynamically if a dynamic routing protocol (OSPF/BGP) is available on the network.
|
Note - For NGX (R60) and above, the dynamic routing suite has been incorporated into SecurePlatform Pro. The administrator runs a daemon on the Security Gateway to publish the changed routes to the network. |
When a connection that originates on GWb is routed through a VTI to GWc (or servers behind GWc) and is accepted by the implied rules, the connection leaves GWb in the clear with the local IP address of the VTI as the source IP address. If this IP address is not routable, return packets will be lost.
The solution for this issue is:
Having excluded those IP addresses from route-based VPN, it is still possible to have other connections encrypted to those addresses (i.e. when not passing on implied rules) by using domain based VPN definitions.
The VTI can be configured in two ways:
You configure a local and remote IP address for each numbered VPN Tunnel Interface (VTI). For each Security Gateway, you configure a local IP address, a remote address, and the local IP address source for outbound connections to the tunnel. The remote IP address must be the local IP address on the remote peer Security Gateway. More than one VTI can use the same IP Address, but they cannot use an existing physical interface IP address.
Numbered interfaces are supported for SecurePlatform and Gaia operating systems.
|
Note - Route Based VPN is not supported with IKEv2. |
For unnumbered VTIs, you define a proxy interface for each Security Gateway. Each Security Gateway uses the proxy interface IP address as the source for outbound traffic. Unnumbered interfaces let you assign and manage one IP address for each interface. Proxy interfaces can be physical or loopback interfaces.
Unnumbered interfaces are supported for Gaia and IPSO (3.4 and higher) platforms.
VTIs allow the ability to use Dynamic Routing Protocols to exchange routing information between Security Gateways. The Dynamic Routing Protocols supported are:
|
SecurePlatform Pro |
Gaia |
IPSO |
|---|---|---|---|
BGP4 |
Yes |
Yes |
Yes |
OSPFv2 |
Yes |
Yes |
Yes |
RIPv1 |
Yes |
No |
No |
RIPv2 |
Yes |
No |
No |
Route Based VPN can only be implemented between two Security Gateways within the same community. It is supported on these operating systems:
If you configure a Security Gateway for Domain Based VPN and Route Based VPN, Domain Based VPN takes precedence by default. To force Route Based VPN to take priority, you must create a dummy (empty) group and assign it to the VPN domain.
To force Route-Based VPN to take priority:
Using the new VPN Command Line Interface (VPN Shell), the administrator creates a VPN Tunnel Interface on the enforcement module for each peer Security Gateway, and "associates" the interface with a peer Security Gateway. The VPN Tunnel Interface may be numbered or unnumbered. For more information on the VPN Shell, see VPN Shell.
Every numbered VTI is assigned a local IP Address and a remote IP Address. Prior to configuration, a range of IP Addresses must be configured to assign to the VTIs.

A VTI connects:
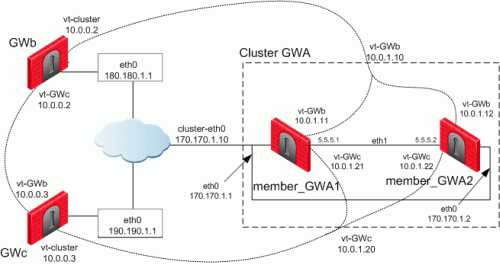
The devices in this scenario are:
ClusterXL:
VPN Modules:
IP Configurations:
When configuring numbered VTIs in a clustered environment, a number of issues need to be considered:
The following sample configurations use the same Security Gateway names and IP addresses used referred to in: Numbered VTIs
Configuring member_GWA1
|
Configuring member_GWA2
|
When configuring a VTI in a clustered environment and an interface name is not specified, a name is provided. The default name for a VTI is "vt-[peer Security Gateway name]". For example, if the peer Security Gateway's name is Server_2, the default name of the VTI is 'vt-Server_2'. For peer Security Gateways that have names that are longer than 12 characters, the default interface name is the last five characters plus a 7 byte hash of the peer name calculated to the give the interface a unique name.
After configuring the VTIs on the cluster members, it is required to configure in the SmartConsole the VIP of these VTIs.
In SmartDashboard:
The VTIs are shown in the topology.
Note that the Edit Topology window lists the members of a VTI on the same line if the following criteria match:
Configuring GWb
|
Configuring GWc
--------- Access the VPN shell Command Line Interface [GWc]# vpn shell ? - This help .. - Go up one level quit - Quit [interface ] - Manipulate tunnel interfaces [show ] - Show internal data [tunnels ] - Manipulate tunnel data --------- Add vt-GWa VPN shell:[/] > /interface/add/numbered 10.0.0.3 10.0.1.20 GWa Interface 'vt-GWa' was added successfully to the system --------- Add vt-GWb VPN shell:[/] > /interface/add/numbered 10.0.0.3 10.0.0.2 GWb Interface 'vt-GWb' was added successfully to the system ---------- Verify configuration VPN shell:[/] > /show/interface/detailed all vt-GWa Type:numbered MTU:1500 inet addr:10.0.0.3 P-t-P:10.0.1.20 Mask:255.255.255.255 Peer:GWa Peer ID:170.170.1.10 Status:attached
vt-GWb Type:numbered MTU:1500 inet addr:10.0.0.3 P-t-P:10.0.0.2 Mask:255.255.255.255 Peer:GWb Peer ID:180.180.1.1 Status:attached
VPN shell:[/] > /quit [GWc]# ifconfig vt-GWa vt-GWa Link encap:IPIP Tunnel HWaddr inet addr:10.0.0.3 P-t-P:10.0.1.20 Mask:255.255.255.255 UP POINTOPOINT RUNNING NOARP MULTICAST MTU:1500 Metric:1 RX packets:0 errors:0 dropped:0 overruns:0 frame:0 TX packets:1 errors:0 dropped:0 overruns:0 carrier:0 collisions:0 txqueuelen:0 RX bytes:0 (0.0 b) TX bytes:36 (36.0 b)
[GWc]# ifconfig vt-GWb vt-GWb Link encap:IPIP Tunnel HWaddr inet addr:10.0.0.3 P-t-P:10.0.0.2 Mask:255.255.255.255 UP POINTOPOINT RUNNING NOARP MULTICAST MTU:1500 Metric:1 RX packets:0 errors:0 dropped:0 overruns:0 frame:0 TX packets:1 errors:0 dropped:0 overruns:0 carrier:0 collisions:0 txqueuelen:0 RX bytes:0 (0.0 b) TX bytes:36 (36.0 b) |
Using the example:

The following tables illustrate how the OSPF dynamic routing protocol is enabled on VTIs both for single members and for cluster members using SecurePlatform. Note that the network commands for single members and cluster members are not the same.
For more information on advanced routing commands and syntaxes, see the Check Point Advanced Routing Suite - Command Line Interface book.
To learn about enabling dynamic routing protocols on VTIs in Gaia environments, see VPN Tunnel Interfaces in the R77 Gaia Administration Guide.
When peering with a Cisco GRE enabled device, a point to point GRE tunnel is required. Use the following command to configure the tunnel interface definition:
ip ospf network point-to-point
--------- Launch the Dynamic Routing Module [member_GWa1]# expert Enter expert password:
You are in expert mode now.
[Expert@member_GWa1]# cligated localhost>enable localhost#configure terminal --------- Enable OSPF and provide an OSPF router ID localhost(config)#router ospf 1 localhost(config-router-ospf)#router-id 170.170.1.10 --------- Define interfaces/IP's on which OSPF runs (Use the cluster IP as defined in topology) and the area ID for the interface/IP localhost(config-router-ospf)#network 10.0.1.10 0.0.0.0 area 0.0.0.0 localhost(config-router-ospf)#network 10.0.1.20 0.0.0.0 area 0.0.0.0 --------- Redistribute kernel routes (this is only here as an example, please see the dynamic routing book for more specific commands concerning redistribution of routes) localhost(config-router-ospf)#redistribute kernel localhost(config-router-ospf)#exit localhost(config)#exit -------- Write configuration to disk localhost#write memory IU0 999 Configuration written to '/etc/gated.ami' localhost#quit |
Dynamic Routing on member_GWA2
--------- Launch the Dynamic Routing Module [member_GWa2]# expert Enter expert password:
You are in expert mode now.
[Expert@member_GWa2]# cligated localhost>enable localhost#configure terminal --------- Enable OSPF and provide an OSPF router ID localhost(config)#router ospf 1 localhost(config-router-ospf)#router-id 170.170.1.10 --------- Define interfaces/IP's on which OSPF runs (Use the cluster IP as defined in topology) and the area ID for the interface/IP localhost(config-router-ospf)#network 10.0.1.10 0.0.0.0 area 0.0.0.0 localhost(config-router-ospf)#network 10.0.1.20 0.0.0.0 area 0.0.0.0 --------- Redistribute kernel routes (this is only here as an example, please see the dynamic routing book for more specific commands concerning redistribution of routes) localhost(config-router-ospf)#redistribute kernel localhost(config-router-ospf)#exit localhost(config)#exit -------- Write configuration to disk localhost#write memory IU0 999 Configuration written to '/etc/gated.ami' localhost#quit |
Dynamic Routing on GWb
--------- Launch the Dynamic Routing Module [GWb]# expert Enter expert password:
You are in expert mode now.
[Expert@GWb]# cligated localhost>enable localhost#configure terminal --------- Enable OSPF and provide an OSPF router ID localhost(config)#router ospf 1 localhost(config-router-ospf)#router-id 180.180.1.1 --------- Define interfaces/IP's on which OSPF runs (Use the cluster IP as defined in topology) and the area ID for the interface/IP localhost(config-router-ospf)#network 10.0.1.10 0.0.0.0 area 0.0.0.0 localhost(config-router-ospf)#network 10.0.0.3 0.0.0.0 area 0.0.0.0 --------- Redistribute kernel routes (this is only here as an example, please see the dynamic routing book for more specific commands concerning redistribution of routes) localhost(config-router-ospf)#redistribute kernel localhost(config-router-ospf)#exit localhost(config)#exit -------- Write configuration to disk localhost#write memory IU0 999 Configuration written to '/etc/gated.ami' localhost#quit |
Dynamic Routing on GWC
--------- Launch the Dynamic Routing Module [GWc]# expert Enter expert password:
You are in expert mode now.
[Expert@GWc]# cligated localhost>enable localhost#configure terminal --------- Enable OSPF and provide an OSPF router ID localhost(config)#router ospf 1 localhost(config-router-ospf)#router-id 190.190.1.1 --------- Define interfaces/IP's on which OSPF runs (Use the cluster IP as defined in topology) and the area ID for the interface/IP localhost(config-router-ospf)#network 10.0.1.20 0.0.0.0 area 0.0.0.0 localhost(config-router-ospf)#network 10.0.0.2 0.0.0.0 area 0.0.0.0 --------- Redistribute kernel routes (this is only here as an example, please see the dynamic routing book for more specific commands concerning redistribution of routes) localhost(config-router-ospf)#redistribute kernel localhost(config-router-ospf)#exit localhost(config)#exit -------- Write configuration to disk localhost#write memory IU0 999 Configuration written to '/etc/gated.ami' localhost#quit |
To learn how to configure VTIs in Gaia environments, see VPN Tunnel Interfaces in the R77 Gaia Administration Guide.
|
Note - For VTIs between Gaia gateways and SPLAT, IPSO, or Cisco GRE gateways, you must manually configure hello/dead packet intervals at 10/40 on the Gaia gateway or at 30/120 on the peer gateway. OSPF will not get into Full state otherwise. |
In SmartDashboard:
Objects selected in the Don't check packets from: drop-down menu are disregarded by the Anti-Spoofing enforcement mechanism.
When a VTI connects an IPSO machine and a SecurePlatform machine, a loopback interface must be configured and defined in the Topology tab of the Security Gateway.
In IPSO Network Voyager:
The Physical Interface loop0 page refreshes and displays the newly configured loopback interface.
Working with unnumbered interfaces eliminates the need to assign two IP addresses per interface (the local IP, and the remote IP Address), and the need to synchronize this information among the peers.
If the VPN Tunnel Interface is unnumbered, local and remote IP addresses are not configured. This interface is associated with a proxy interface from which the virtual interface inherits an IP address. Traffic initiated by the Security Gateway and routed through the virtual interface will have the physical interface's IP Address as the source IP.
Unnumbered interfaces are supported for Gaia and IPSO (3.4 and higher) platforms.
|
Note - IPSO platform supports unnumbered VTIs in a VRRP HA configuration, active-passive mode only. |
To configure unnumbered VTIs for IPSO:
The new interface shows on the VPN Tunnel Configuration page.
To configure unnumbered VTIs for Gaia:
vpnt prefix to the Tunnel IDMulticast is used to transmit a single message to a select group of recipients. IP Multicasting applications send one copy of each datagram (IP packet) and address it to a group of computers that want to receive it. This technique addresses datagrams to a group of receivers (at the multicast address) rather than to a single receiver (at a unicast address). The network is responsible for forwarding the datagrams to only those networks that need to receive them. PIM is required for this feature and it is only available on SecurePlatform Pro and IPSO.
For more information on Multicasting, see "Multicast Access Control" in the R77 Security Gateway Technical Administration Guide.
Multicast traffic can be encrypted and forwarded across VPN tunnels that were configured using VPN tunnel interfaces (virtual interfaces associated with the same physical interface). All participant Security Gateways, both on the sending and receiving ends, must have a virtual interface for each VPN tunnel and a multicast routing protocol must be enabled on all participant Security Gateways.
For more information on virtual interfaces, see Configuring a Virtual Interface Using the VPN Shell.
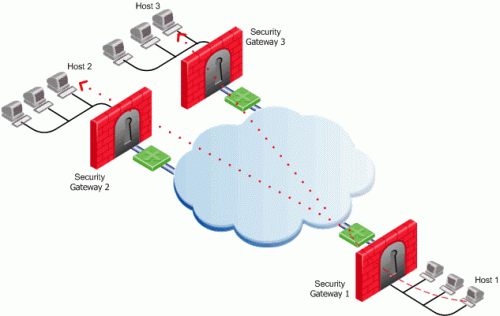
In the figure:

To enable multicast service on a Security Gateway functioning as a rendezvous point, add a rule to the security policy of that Security Gateway to allow only the specific multicast service to be accepted unencrypted, and to accept all other services only through the community. Corresponding access rules enabling multicast protocols and services should be created on all participating Security Gateways. For example:
Source |
Destination |
VPN |
Service |
Action |
Track |
|---|---|---|---|---|---|
Multicast_ |
Multicast_ |
Any Traffic |
igmp pim |
accept |
log |
Sample_Host |
Multicast_Group_ |
Sample_ |
Multicast_ |
accept |
log |