Managing and Approving Sessions
This section presents the procedures for reviewing and approving repairs to sessions. If Role Segregation is disabled the approval procedures are not necessary, however the review and audit options are fully functional.
All options for session management and session review are contained in the window.
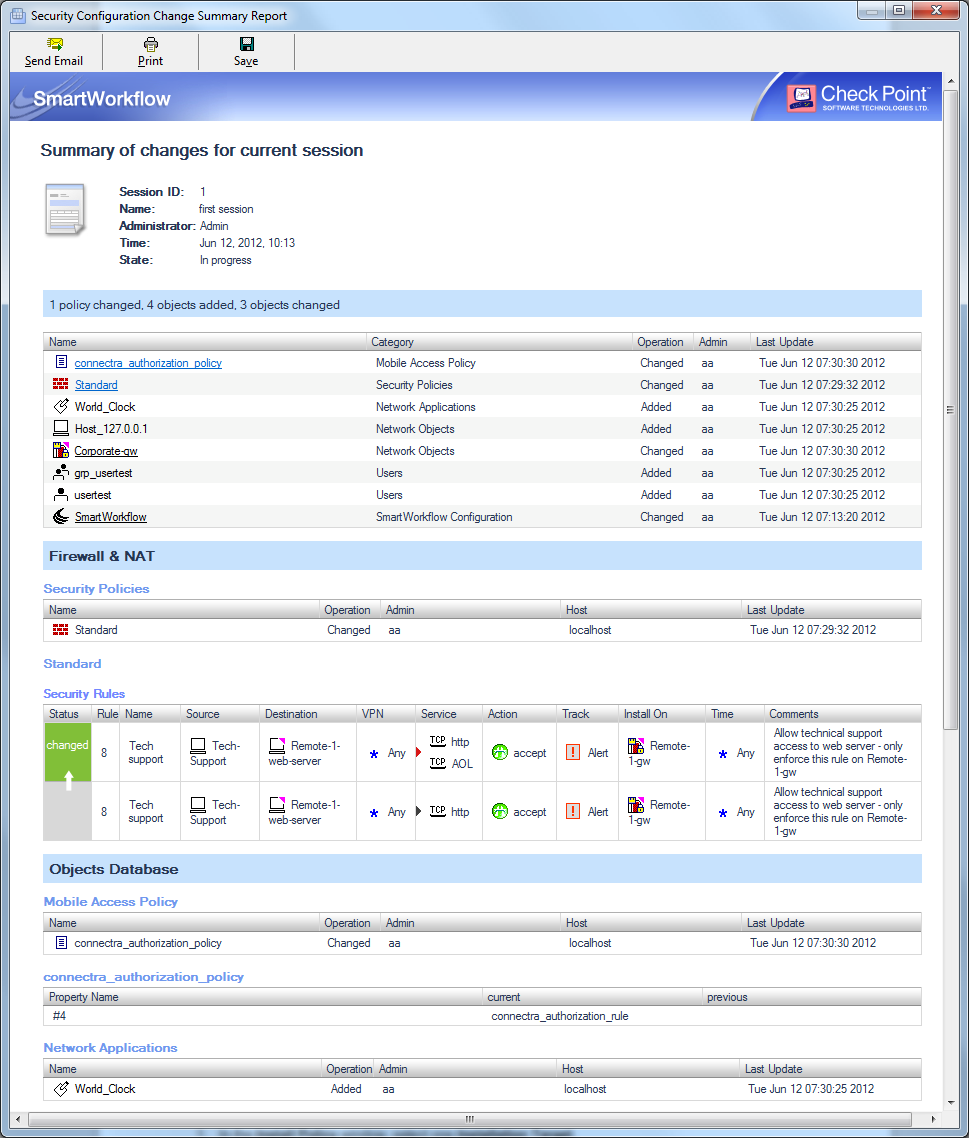
Security Configuration Change Summary Report
The Security Configuration Change Summary Report presents a comprehensive picture of all changes that were made during the selected session. You can print, save or send an email containing the report. In addition, you can approve or request repairs to the selected session directly from the report window.
The Security Configuration Change Summary Report is divided into several sections, according to the types of changes made. The initial section presents a summary of each changed item with a link to the details. The details include the type of change, who performed the change and when.
To display the Security Configuration Change Summary Report:
Click in the window.
Viewing a Submitted Session
To view a submitted session, click the button in the window. You will be viewing the session in Read-only mode.
Comparing Policies
Before you install the security policy, compare the changes with the installed policy. You can compare policies from the Install Policy window or the Database Revision Control window.
Compare Policies compares the current state, which includes all pending sessions regardless of their status, with the state immediately following the last Policy installation.
To compare policies from Install Policy:
- In the window, select one .
- Click .
A comparative report opens. Compare the current session policy with all the targets you want to review.
To compare policies from Database Revision Control:
- In the window:
- To compare the current state with an earlier revision, select one revision.
- To compare two database Revisions with each other, hold down the key and select two revisions.
- Click > .
Comparing Submitted Sessions
You can compare two submitted sessions appearing in the SmartWorkflow Session Management window. You cannot, however, compare a session that has not yet been submitted (in the "in progress" state).
To compare two sessions:
- In the window, select two sessions to compare.
- Click . A comparative report is shown.
Approving Sessions
All sessions must be approved before they can be installed on a management server. Typically, managers approve sessions created by administrators. In a Multi-Domain Security Management environment, Multi-Domain Security Management superusers and Domain Superusers can approve sessions. You can also configure SmartWorkflow to automatically approve submitted sessions without approval.
Managers must approve sessions in the order that they were submitted. For example, if session 1 and session 2 are both awaiting approval, session 1 must be approved before you can approve session 2. This restriction also applies to sessions that have been repaired.
To approve a session:
- In the window, click .
- If you choose to add comments, enter text in the field.
- If you choose to send a notification by email:
- Select .
- Enter the email address in the designated field.
- If you wish to attach the summary report to the email, select .
- Click . The session status changes to Approved.
If you selected the email notification option, an email message opens in your email client containing any notes you entered and, optionally, an attachment containing the change summary report.
Requesting Repairs to Sessions
Managers can request modifications (repairs) be made to a submitted session before approval. Essentially, this means that the manager disapproves the session and returns it to the submitting administrator for action.
To request that a repair be made to a session:
- In the window, click .
- Enter a describing the repairs to be made to the field.
- If you choose to send a notification by email:
- Select .
- Enter the email address in the designated field.
- If you wish to attach the summary report to the email, select .
- Click .
- Click .
The session status changes from "Awaiting Approval" to "Waiting for Repair". If you selected the email notification option, an email message opens in your email client displaying the note you inserted and, optionally, an attachment containing the change summary report.
Repairing Sessions
When a session is returned for repair, the submitting administrator makes the requested repairs in SmartDashboard and then resubmits the session for approval.
The repair process actually creates a new session, with its own ID, to record the actual change. The original session status is updated to Repaired and a note is inserted stating "Repaired by session <session ID>".
For example, if the submitting administrator receives a request to repair session 2, named "Adding new network objects", he makes the requested repairs. These repairs create a new session 5 named "Repairing Session 2". The original session (ID 2) is updated to the Repaired status and the Notes column in the Session Management window indicates that it was "Repaired by Session 5".
To repair a session:
- In the window, click .
- Add a notedescribing the repairs made in the field.
- If you choose to send a notification by email:
- Select the .
- Enter the email address in the designated field.
- If you want to attach the summary report to the email, select .
- Click .
- Click .
The original session status is updated to Repaired and the "Repair" session status is updated to In Process. If you selected the email notification option, an email message opens in your email client displaying the note you inserted and optionally, an attachment containing the change summary report.
- Later on, submit the repaired session for approval as usual.
If you selected the email notification option, an email message opens in your email application displaying the note you inserted and optionally, an attachment containing the change summary report.
Installing the Security Policy
After all sessions have been approved, you can install the security policy in SmartDashboard.
To install the security policy:
- In the Sessions Management window, select .
You enter SmartDashboard and most options are read/write blocked except for Install Policy and SmartWorkflow session management.
- Click .
When you install a policy, you are presented with the option to retain session information for those sessions included in the policy install. By default, session information is deleted from the database once the policy is installed. Actions performed in deleted sessions are always available for audit using SmartView Tracker. Refer to Auditing Changes with SmartView Tracker.
|

