Configuring SmartWorkflow
Before you can use SmartWorkflow, you set it up. You assign administrators and managers, decide on deployment mode, enable it as a Software Blade, and configure its properties for your environment.
Assigning Permissions
In a full change management scenario with Role Segregation, only managers are authorized to:
- approve sessions
- enable or disable SmartWorkflow
- configure SmartWorkflow properties
In Multi-Domain Security Management, only Multi-Domain Security Management and Domain Superusers have these permissions.
Define users and assign their permissions before you enable SmartWorkflow. This is necessary to prevent SmartWorkflow from enforcing Role Segregation before you assign manager permissions.
Defining Permissions for Security Management Server
When you configure permissions, make sure to give Manager permissions to people who should actually have auditing authority. It is best if Managers are not Administrators.
To configure permission profiles in a Security Management Server environment:
- In SmartDashboard, select .
- Select an existing profile or click to create a new profile.
- Enter a name for the permission profile.
- Select the as required for your environment.
- Select for managers and administrators.
- For Managers only, select .
Defining Permissions for Multi-Domain Security Management
To configure manager permissions for Multi-Domain Security Management:
- In the SmartDomain Manager, click on the.
- In the pane, double-click an existing user or right-click the icon and choose .
- In the window, select or for managers.
- Define other user properties as required.
Enabling the SmartWorkflow Blade
You must enable SmartWorkflow in SmartDashboard for each Security Management server or Domain Management Server before you can begin to work with it. After SmartWorkflow is enabled, SmartWorkflow is available when you re-open SmartDashboard.
After you enable SmartWorkflow, you have a 45-day trial license.
To enable SmartWorkflow:
- In SmartDashboard, double-click an active Security Management server or Domain Management Server object and select . The Security Management server can be primary or secondary but it must have an IP address identical to the server you are connected to.
- In the section, select the tab and then select .
The opens. - Select a mode of working with SmartWorkflow.
- - Lets you track changes to the policy without sessions. You can install the policy without an approval process.
- - Lets you track changes to the policy with sessions. This enforces policy installation only with approval by a manager. Without approval, the policy cannot be installed.
- Save the configuration.
To disable SmartWorkflow:
- In SmartDashboard, double-click a Security Management server or Domain Management Server object and select .
- In the section, select the tab and clear .
- Save the configuration.
Configuring SmartWorkflow Properties
Configure SmartWorkflow properties in SmartDashboard. In a Multi-Domain Security Management environment, do these configuration steps for each Domain Management Server.
To configure SmartWorkflow properties:
- In SmartDashboard, click .
- In the window, open .
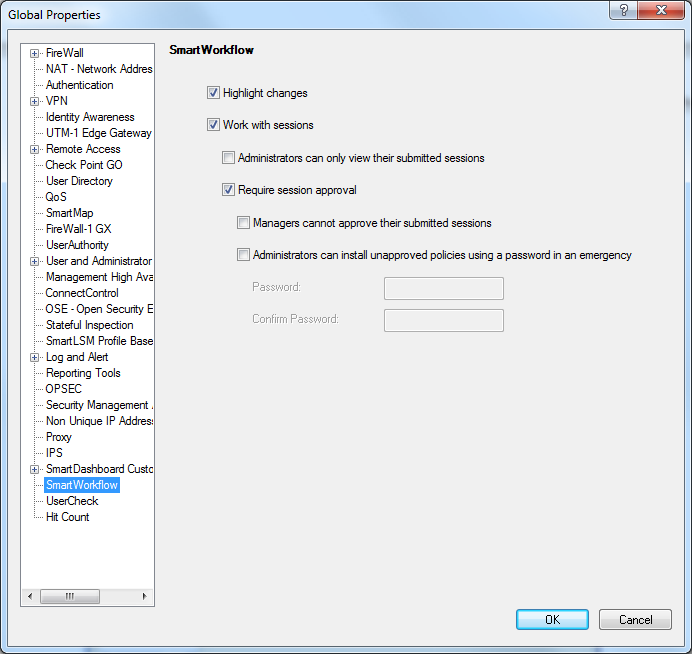
- To disable highlighting changes made in sessions, clear .
- To work without sessions, clear .
- To work without role segregation, clear .
- Select to let administrators view only their own sessions. Managers can view all sessions.
- If you enable role segregation:
- To make sure managers cannot approve their own sessions, select .
- To let administrators install policy if the manager is not available and it must be done, select . Enter the emergency password.
The session remains unapproved after the policy installation. Enter and confirm the emergency password in the designated fields.
|
|

