


|
|
|
In This Section: |
To make the most of Check Point products and all their capabilities and features, become familiar with some basic concepts and components. This is an overview of usage, terms, and tasks to help you manage your Check Point Security Gateways.
Basic deployments:
Assume an environment with gateways on different sites. Each Security Gateway connects to the Internet on one side, and to a LAN on the other.
You can create a Virtual Private Network (VPN) between the two Security Gateways, to secure all communication between them.
The Security Management server is installed in the LAN, and is protected by a Security Gateway. The Security Management server manages the Security Gateways and lets remote users connect securely to the corporate network. SmartDashboard can be installed on the Security Management server or another computer.
There can be other OPSEC-partner modules (for example, an Anti-Virus Server) to complete the network security with the Security Management server and its Security Gateways.
Software Blades are independent and flexible security modules that enable you to select the functions you want to build a custom Check Point Security Gateways. Software Blades can be purchased independently or as pre-defined bundles.
The following Security Management Software Blades are available:
Security Management Software Blades |
Description |
|---|---|
Network Policy Management |
Gives you control over configuring and managing even the most complex security deployments. Based on the Check Point unified security architecture, the Network Policy Management Software Blade provides comprehensive security policy management using SmartDashboard - a single, unified console for all security features and functionality. |
Endpoint Policy Management |
Lets you centrally manage the security products you use on your organization's end-user devices. You control computing devices and the sensitive information they contain. |
Logging & Status |
Gives comprehensive information on security activity in logs and a complete visual picture of changes to gateways, tunnels, remote users, and security activities. |
Identity Awareness |
Lets you add user and computer identity data to Check Point log entries and configure which Active Directory domains to retrieve logs from. |
Monitoring |
Shows a complete picture of network and security performance, for fast response to changes in traffic patterns or security events |
Management Portal |
Extends browser-based management access to outside groups, such as technical support staff or auditors, and maintain centralized control of policy enforcement. Management Portal users can view security policies and status of Check Point products and administrator activity, edit, create and modify internal users, and manage firewall logs. |
Workflow |
Advanced management tool that lets you track and control changes to the network security configuration. |
User Directory |
Lets Check Point Security Gateways use LDAP-based user information stores, eliminating the risks associated with manually maintaining and synchronizing redundant data stores. With the Check Point User Directory Software Blade, Check Point Security Gateways become full LDAP clients which communicate with LDAP servers to obtain identification and security information about network users. |
Provisioning |
Gives centralized provisioning of Check Point security devices. Using profiles, you can easily deploy a security policy or configuration settings to multiple, geographically distributed devices. It also gives centralized backup management and a repository of device configurations, to quickly deploy configurations to new devices. |
SmartReporter |
Centralizes reporting on network, security, and user activity and consolidates the data into concise predefined and custom-built reports. Easy report generation and automatic distribution save time and money. |
SmartEvent |
Gives centralized, real-time security event correlation and management for Check Point security gateways and third-party devices. This minimizes the time spent analyzing data, and isolates and prioritizes the real security threats. |
SmartEvent Intro |
Gives a complete event management system for situational visibility, easy to use forensic tools, and reporting for IPS, DLP, Application Control and URL Filtering, Anti-Bot and Anti-Virus. |
Compliance |
The Check Point Compliance Blade helps you optimize your security settings and meet regulatory requirements. |
To verify which and how many Software Blades are currently installed on the Security Management Server, look at the SmartDashboard representation of the Security management server. In the General Properties page of the Security management server, the Management tab of the Software Blades section shows all enabled management Software Blades.
In a High Availability environment the Software Blade must be enabled on each High Availability Management.
The login process, in which administrators connect to the Security Management server, is common to all SmartConsole applications (SmartDashboard, SmartUpdate, and so on). This process is bidirectional. The administrator and the Security Management server authenticate each other and create a secure channel of communication between them using Secure Internal Communication (SIC). When SIC is established, the Security Management server launches the selected SmartConsole.
Administrators can authenticate themselves in different ways, depending on the tool used to create the accounts.
Administrators defined in Check Point Configuration Tool authenticate themselves with a Username and Password. This is asymmetric SIC. Only the Security Management server uses a certificate to authenticate.
|
Important - Administrators cannot use multi-challenge SecurID authentication for the SmartConsole clients, including SmartDashboard. To work around this limitation, configure your RSA server to work in the single transaction mode. |
Administrators defined in SmartDashboard can authenticate with a username and password, or with a Certificate. If using a certificate, the administrator browses to the certificate and unlocks it with its password. This is symmetric SIC. The Security Management server and the administrator authenticate each other using certificates.
After giving authentication data, the administrator enters the name or IP address of the target Security Management server and clicks OK. If the administrator is successfully authenticated by the Security Management server:
The administrator authenticates the Security Management server using the Security Management server's Fingerprint. This Fingerprint, shown in the Fingerprint tab of the Check Point Configuration Tool, is obtained by the administrator before attempting to connect to the Security Management server.
The first time the administrator connects to the Security Management server, the Security Management server displays a Fingerprint verification window. The administrator, who has the original Fingerprint on hand, compares it to the displayed Fingerprint. If the two are identical, the administrator approves the Fingerprint as valid. This action saves the Fingerprint (along with the Security Management server's IP address) to the SmartConsole machine's registry, where it remains available to automatically authenticate the Security Management server in the future.
If the Fingerprints are not identical, the administrator quits the Fingerprint verification window and returns to the initial login window. In this case, the administrator should verify the resolvable name or IP address of the Security Management server.
Many administrators can use SmartDashboard to connect to a Security Management server simultaneously. But only one administrator can have Read/Write access to change object definitions, security rules or Security Management server settings at one time. All other administrators connected at the same time have Read Only access.
If you connect to a Security Management server while another administrator is connected in the Read/Write mode, a message is shown with these options:
|
Important - Be careful when disconnecting another administrator. Unsaved changes made by the disconnected administrator are lost. Also, it is possible that some policies changed by the disconnected administrator were not installed on Security Gateways. |
You can change the access mode after you open SmartDashboard.
To change the access mode:
SmartDashboard is your primary tool to manage network and security resources.
The SmartDashboard shows a tab for the Software Blades you have in your Check Point deployment.
![]()
Each tab opens a different workspace and has different default panes and options in the menus.
You can use the SmartDashboard toolbar to do these actions:
Icon |
Description |
|---|---|
|
Open the SmartDashboard menu. When instructed to select menu options, click this button to show the menu. For example, if you are instructed to select Manage > Users and Administrators, click this button to open the Manage menu and then select the Users and Administrators option. |
|
Save current policy and all system objects. |
|
Open a policy package, which is a collection of Policies saved together with the same name. |
|
Refresh policy from the Security Management. |
|
Open the Database Revision Control window. |
|
Change global properties. |
|
Verify Rule Base consistency. |
|
Install the policy on Security Gateways or VSX Gateways. |
|
Open SmartConsole. |
You create objects to represent actual hosts and devices, intangible components (such as HTTP and TELNET services) and resources (for example, URI and FTP). Make an object for each component in your organization. Then you can use the objects in the rules of the Security Policy. Objects are stored in the Objects database on the Security Management server.
Objects in SmartDashboard are divided into several categories, which you can see in the tabs of the Objects Tree.
Icon |
Object Type |
Examples |
|---|---|---|
|
Network Objects |
Check Point Gateways, networks |
|
Services |
TCP, Ctirix |
|
Resources |
URI, FTP |
|
Servers and OPSEC Applications |
Trusted CAs |
|
Users and Administrators |
Access Roles, User Groups |
|
VPN Communities |
Site to Site, Remote Access |
When you create your objects, consider the needs of your organization:
One of the first things to do to protect your environment, is to define the objects in SmartDashboard. You can create objects in the Objects Tree, different panes, menus, or toolbars.
To add a new object:
For example, to make an object that represents a network: in the Network Objects tab, right-click Networks and select New Network.
To see or change the properties of an object, right-click and select Edit, or double-click the object.
To delete an object, right-click and select Delete.
There are different ways to create objects and configure them to use in actual management tasks. This is an example of how to create and configure a Check Point Security Gateway object, starting in your Objects Tree.
To define a new Security Gateway object:
The Check Point gateway properties window shows the default pages.
If you can establish SIC trust now, it will make the rest of the process easier, but you can do this later.
If you are unsure of the platform data, you can leave this until after trust is established. If you do, you will see a message when you click OK:The specified OS on this Security Gateway is 'Unknown'.
Click Yes to accept the configurations you have now and to fill in the rest later.
If you are unsure of the installed Software Blades, you can leave them unselected now and edit the object later. If you do not choose a Software Blade, you will see a message when you click OK. Click Yes to accept the configurations you have now and to fill in the rest later.
The Check Point network object is in the Objects Tree, but without Trust, it is just a holder.
The Security Management server manages Check Point components of your environment through SIC (Secure Internal Communication). There must be authentication between the components and the servers, which establishes Trust. See Secure Internal Communication (SIC).
When a network object has Trust with the server, you can manage the object through the SmartDashboard.
To establish trust:
With Trust established, you can manage the actual component from its network object.
When there is Trust between a Security Gateway and the Security Management server, it easier to configure the network object of the Security Gateway.
To configure a trusted Security Gateway:
Some Software Blades have first time setup wizards. You can do these wizards now or later.
The left pane of the properties window shows the properties that are related to the selected Software Blades. Continue with the default properties.
If you selected the Firewall Software Blade, you can click Get to have the Security Management server get them for you.
The network topology represents the internal network (both the LAN and the DMZ) protected by the gateway. The gateway must be aware of the layout of the network topology to:
Each component in the network topology is distinguished on the network by its IP address and net mask. The combination of objects and their respective IP information make up the topology. For example:
In this example, there is one simple internal network. In more complicated scenarios, the LAN is composed of many networks.
The internal network is composed of:
In this example, the system administrator defines the topology of the Security Gateway accordingly.
In SmartDashboard:
In each category of objects, you can change the view.
For Network Objects the default view is by category of network object. This is recommended for small to medium deployments and for when you are getting started. When you have groups of objects, you can see the objects in their groups. This is recommended for larger deployments, but is relevant only after you have groups of objects.
To create a group: In classic view, select Network Objects from the Objects Tree list. Right-click Groups > Groups and select a group type.
To change the Network Objects view: From the SmartDashboard menu, select View > Arrange Network Tree > Arrange by groups or Switch to classic view.
In all object trees, you can view by default categories or sort by property. To sort a tree: Right-click the root, select Sort and then select Name, Type, or Color.
When you create a group, you can set conventions. When an object is created that fits the group conventions, you get a prompt to add the object automatically to the group.
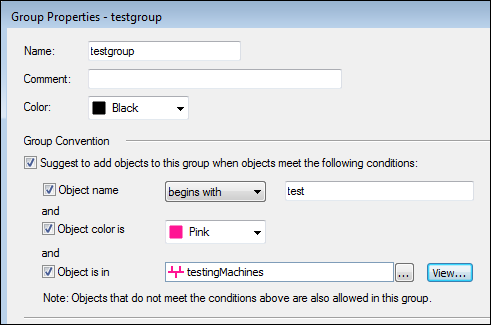
To define group conventions:
If you change the properties of an object so it does not match the conditions of its group, you see this message:
Your object no longer fits the group name. Do you wish to remove it from the group?
If you can remove an object from a group, the object itself is not changed or removed from the system. If you remove an object from its last group, you can find it in the Others group.
The Rule Base is the policy definitions of what is allowed and what is blocked by the firewall. Rules use objects. For example, networks objects are used in the Source and Destination of rules. Time and Group objects are used in the Time of rules.
The Objects List shows data for a selected object category. For example, when a Logical Server Network Object is selected in the Objects Tree, the Objects List displays a list of Logical Servers, with certain details displayed.
The Identity Awareness pane shows as a tab in the bottom pane of the main window.
Traditionally, firewalls use IP addresses to monitor traffic and are unaware of the user and computer identities behind those IP addresses. Identity Awareness removes this notion of anonymity since it maps users and computer identities. This lets you enforce access and audit data based on identity.
Identity Awareness is an easy to deploy and scalable solution. It is applicable for both Active Directory and non-Active Directory based networks as well as for employees and guest users. It is currently available on the Firewall blade and Application Control blade and will operate with other blades in the future.
Identity Awareness lets you easily configure network access and auditing based on network location and:
When Identity Awareness identifies a source or destination, it shows the IP address of the user or computer with a name. For example, this lets you create firewall rules with any of these properties. You can define a firewall rule for specific users when they send traffic from specific computers or a firewall rule for a specific user regardless of which computer they send traffic from.
In SmartDashboard, you use Access Role objects to define users, computers and network locations as one object.
Identity Awareness gets identities from these acquisition sources:
The SmartWorkflow pane shows as a tab in the bottom pane of the main window.
SmartWorkflow Blade is a security policy change management solution that tracks proposed changes to the Check Point network security environment, and ensures appropriate management review and approval prior to implementation.
Managing network operations while accurately and efficiently implementing security policies is a complex process. Security and system administrators find it increasingly difficult to ensure that all security gateways, network components and other system settings are properly configured and conform to organization security policies.
As enterprises evolve and incorporate technological innovations, network and security environments have become increasingly complex and difficult to manage. Typically, teams of engineers and administrators are required to manage configuration settings, such as:
An effective enterprise security policy change management solution is also essential to ensure compliance with increasingly stringent corporate governance standards and regulatory reporting requirements.
A graphical display of objects in the system is displayed in SmartMap view. This view is a visual representation of the network topology. Existing objects representing physical components such as gateways or Hosts are displayed in SmartMap, but logical objects such as dynamic objects cannot be displayed.
Secure Internal Communication (SIC) lets Check Point platforms and products authenticate with each other. The SIC procedure creates a trusted status between gateways, management servers and other Check Point components. SIC is required to install polices on gateways and to send logs between gateways and management servers.
These security measures make sure of the safety of SIC:
The ICA is created during the Security Management server installation process. The ICA is responsible for issuing certificates for authentication. For example, ICA issues certificates such as SIC certificates for authentication purposes to administrators and VPN certificates to users and gateways.
Communication Initialization establishes a trust between the Security Management server and the Check Point gateways. This trust lets Check Point components communicate securely. Trust can only be established when the gateways and the server have SIC certificates.
|
Note - For SIC to succeed, the clocks of the gateways and servers must be synchronized. |
The Internal Certificate Authority (ICA) is created when the Security Management server is installed. The ICA issues and delivers a certificate to the Security Management server.
To initialize SIC:
This one-time activation password must exist on both sides.
The ICA signs and issues a certificate to the gateway. Trust state is Initialized but not trusted. The certificate is issued for the gateway, but not yet delivered.
SSL negotiation takes place. The two communicating peers are authenticated with their Activation Key.
The certificate is downloaded securely and stored on the gateway.
After successful Initialization, the gateway can communicate with any Check Point node that possesses a SIC certificate, signed by the same ICA. The Activation Key is deleted. The SIC process no longer requires the Activation Key, only the SIC certificates.
The SIC status reflects the state of the Gateway after it has received the certificate issued by the ICA. This status conveys whether or not the Security Management server is able to communicate securely with the gateway. The most typical status is Communicating. Any other status indicates that the SIC communication is problematic. For example, if the SIC status is Unknown then there is no connection between the Gateway and the Security Management server. If the SIC status is Not Communicating, the Security Management server is able to contact the gateway, but SIC communication cannot be established. In this case an error message will appear, which may contain specific instructions how to remedy the situation.
Resetting the Trust State revokes the gateway's SIC certificate. This must be done if the security of the gateway has been breached, or if for any other reason the gateway functionality must be stopped. When the gateway is reset, the Certificate Revocation List (CRL) is updated to include the name of the revoked certificate. The CRL is signed by the ICA and issued to all the gateways in this system the next time a SIC connection is made. If there is a discrepancy between the CRL of two communicating components, the newest CRL is always used. The gateways refer to the latest CRL and deny a connection from an impostor posing as a gateway and using a SIC certificate that has already been revoked.
|
Important - The Reset operation must be performed on the gateway's object, using SmartDashboard, as well as physically on the gateway using the Check Point Configuration Tool. |
To reset the Trust State in SmartDashboard:
If SIC failed to initialize, and you do not have a Rule Base yet (and so cannot install a policy), you can reset Trust on the gateways.
To reset Trust on Check Point Security Gateways:
If SIC fails to Initialize:
/etc/hosts file on the Security Gateway.If the IP address of the Security Management server undergoes static NAT by its local Security Gateway, add the public IP address of the Security Management server to the /etc/hosts file on the remote Security Gateway, to resolve to its hostname.
fw unloadlocal This removes the security policy so that all traffic is allowed through.
If Remote Access users cannot reach resources and Mobile Access is enabled:

