Installing and Uninstalling
You can deploy Security Gateway Virtual Edition on your ESX hosts from an OVF template or from an ISO.
If you choose to install from an OVF template, the operating system for the VM is installed and configured for typical deployment. This option is faster.
If you choose to create a new Virtual Machine, you install the Security Gateway from the Check Point ISO. You install the operating system and then run the First Time Configuration Wizard.
Installing Security Gateway Virtual Edition Virtual Machine
To install a new Security Gateway Virtual Edition VM from an OVF template:
- Import the OVF template and start the Deploy OVF Template wizard.
- Configure the Security Gateway Virtual Edition VM in the ESX inventory.
- Map the Security Gateway Virtual Edition VM interfaces to your network.
- Run the First Time Configuration Wizard.
Getting the Template
To get the Security Gateway Virtual Edition OVF Template:
- Download
Check_Point_Security_Gateway_R77_VE.tgz - Extract the template OVF file to a temporary folder.
Deploying the Security Gateway Virtual Edition VM
To deploy the VM and save it in the inventory:
- In the VMware vSphere client, select an ESX host.
- Select File > Deploy OVF Template. The Deploy OVF Template wizard opens.
- In the Source window, select Deploy from file.
- Enter or select the .ovf file and then click Next.
- In the OVF Template Details window, click Next.
The next windows that you see depend on the template properties.
- Name and Location window - select an inventory location for the VM.
- Disk Format window - select Thick provisioned format.
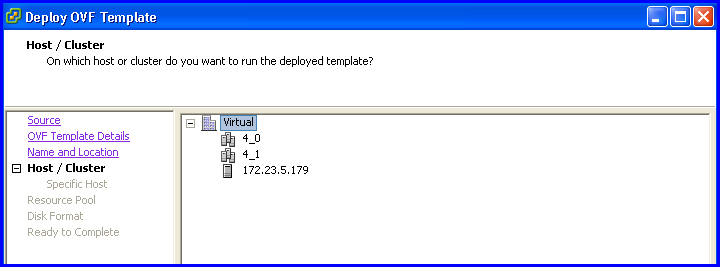
- Host/Cluster window - select a host. This window only opens if there are multiple hosts or clusters.
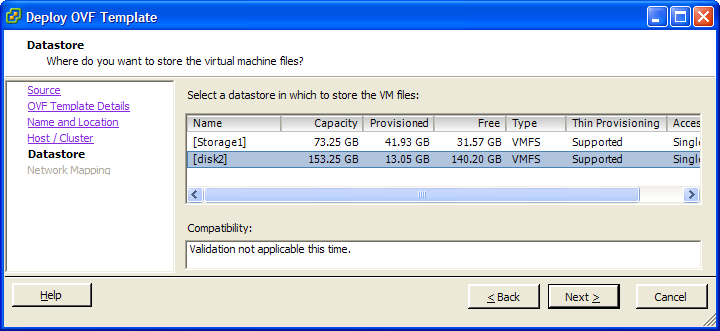
- If the Datastore window opens, select a datastore. This window opens only if there is more than one datastore related to the host or cluster.
Configuring the Virtual Machine Settings
Before you configure the Security Gateway Virtual Edition, make sure the VM has the minimum requirements.
To configure the VM:
- Right-click the VM.
- Select Edit Settings.
The Virtual Machine Properties window opens.
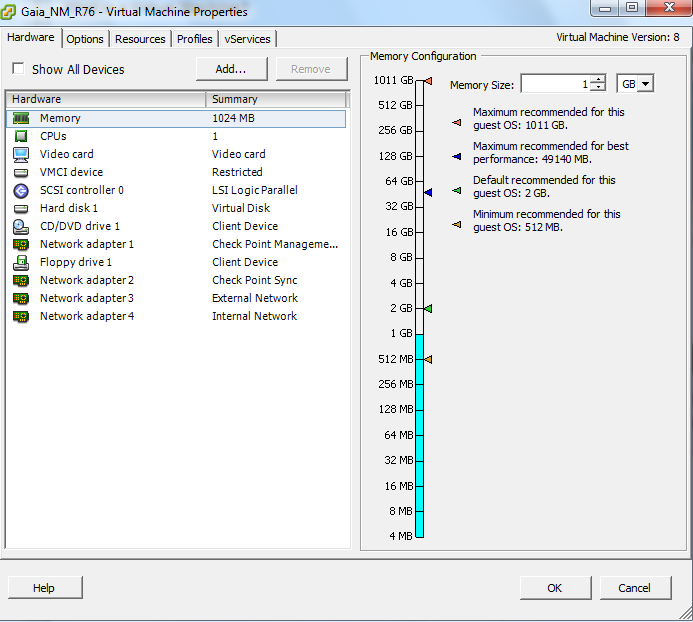
- Configure memory:
- Minimum to run Security Gateway Virtual Edition in - 1024 MB. Add more to increase connection capacity.
- Minimum to run Security Gateway Virtual Edition in - 6 GB.
- Configure Network Adapters.
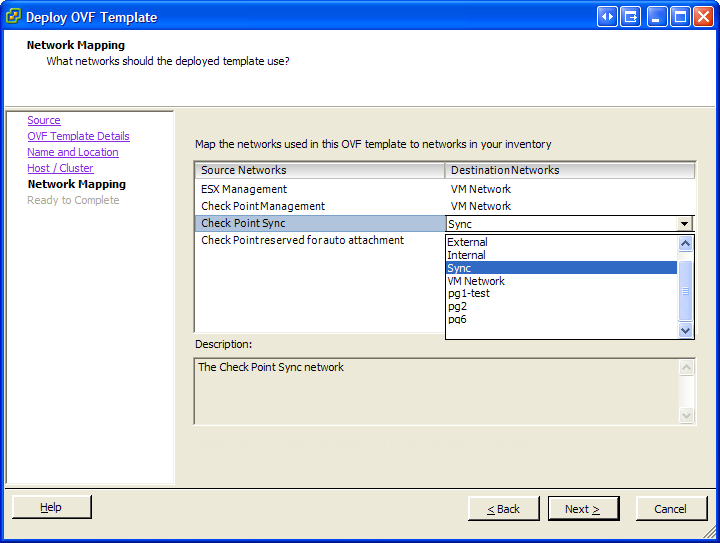
Configuring Network Adapters - Mapping Interfaces
To complete import of the OVF template, map the interfaces. Security Gateway Virtual Edition is already configured with four network adapters. You can add and delete vNICs.
In the window, configure the default network adapters and destination networks. These are the network adapters that are configured for Security Gateway Virtual Edition by the template.
To complete OVF import:
- For each source network, select a destination network from the list.
(The destination network names are examples and will be different for your deployment.)
- Click .
- Click .
It can take some time to add the Security Gateway Virtual Edition VM to the inventory.
- Continue with the First Time Configuration Wizard.
Configuring Storage
When you deploy a Security Gateway Virtual Edition R77 on Gaia from OVF, it gets this configuration:
- Swap: 2 GB
- Root: 7 GB
- Logs: 3 GB
- Backup and upgrade: 8 GB
To add more storage, increase the disk size.
Installing Security Gateway Virtual Edition from ISO
Before you begin, download the ISO file with the R77 image for the Gaia operating system to your vSphere Client computer.
To create a new R77 VM:
- In the VMware vSphere client, click > > .
The wizard opens.
- Select .
- Enter a name, inventory location, host, destination storage, and version for the VM.
- In , select .
- In , select or .
The mode you select here must match the mode that you select during Gaia installation.
- In the window, select the number of virtual CPUs for the virtual machine.
- In the window, set the memory size of the VM:
- Minimum to run Security Gateway Virtual Edition in - 1024 MB. Add more to increase connection capacity.
- Minimum to run Security Gateway Virtual Edition in - 6 GB.
- In the window, select the number of NICs to connect to the VM.
- Map the interfaces to the networks available to the ESX host.
- Use adapter for the NICs.
- Leave selected.
- In the window, select .
- In the window, select .
- In the window:
- - 21 GB is required minimum
- - select
- - select
- In the window, do not change the default settings ( = , = ).
- In the window, select .
- Click .
The window opens.
To configure the new VM with required settings:
- Open the Tab and select .
- Increase to at least .
More reserved resources increases the performance of the Security Gateway VM.
- Click .
- Power on the Virtual Machine.
- Attach the ISO file with the downloaded R77 image to the VM CD/DVD drive.
- With the Virtual Machine selected, click .
- Click .
- Browse to the location of the ISO file and click .
- Right-click the VM and select > .
- With the Virtual Machine selected, open the tab.
- Log in to the virtual machine console.
The operating system installation begins automatically. See the R77 Installation and Upgrade Guide.
- Continue with the First Time Configuration Wizard.
First Time Configuration Wizard
The First Time Configuration Wizard is part of the management console, on a WebUI. Open the management console from a VM or a remote host (virtual or physical) .
- If the management console is a VM, it must be connected to the Check Point management port group.
- If the management console is a remote host, you will configure the network of the Security Gateway Virtual Edition to reach the host.
First, turn on the Security Gateway Virtual Edition VM.
To open the First Time Configuration Wizard from a different VM:
- Open the VM console.
- Open a browser to the default address of the Security Gateway Virtual Edition (
https://192.168.1.1The First Time Configuration Wizard starts.
To open the First Time Configuration Wizard from a remote host:
- Open the console of the Security Gateway Virtual Edition VM.
- Log in with the admin credentials (default is admin/admin).
- In clish, run:
set interface eth0 ipv4-address x.x.x.x subnet-mask x.x.x.x - If the remote host is not on the same subnet as the Security Gateway Virtual Edition, define a default gateway:
set static-route default nexthop gateway address x.x.x.x on - On the remote host, open a browser to the IP address of the Security Gateway Virtual Edition (
https://The First Time Configuration Wizard starts.
To configure the Security Gateway Virtual Edition with the First Time Configuration Wizard:
- In the first step of the First Time Configuration Wizard, configure a new password.
- Configure the host name, domain name, and DNS server.
- Configure the date and time.
- Review the network details of the management interface and correct, if necessary.
- Select Check Point products to install.
- Select deployment:
- Standalone: Select and . In the next steps, configure the user name and password of the administrator, and the GUI clients.
- Distributed: Select and not . In the next steps, configure the Security Gateway Virtual Edition IP address for static or dynamic, and configure the SIC activation key.
- Configure the username of an administrator.
- Click .
A message shows to restart the Security Gateway.
- Click to restart the Security Gateway Virtual Edition now.
Completing the Installation
You must have a SmartDashboard installed on a Windows computer, and defined as a GUI client.
To install the R77 SmartDashboard:
- Browse to:
https:// - At , click .
After the SmartDashboard is installed, use the GUI client to install the 15-day trial license, or to add a permanent license. Open SmartDashboard and install a policy on the Security Gateway Virtual Edition.
Uninstallation
To uninstall Security Gateway Virtual Edition:
- In the vSphere client, turn off the Security Gateway Virtual Edition VM.
- Delete the Security Gateway Virtual Edition from your inventory.
- Delete Security Gateways, cluster objects, and other network objects in SmartDashboard that were used with Security Gateway Virtual Edition.
|
|
