Print Download PDF Send Feedback

Previous

Next

Installing Multi-Domain Security Management

In This Section:

Basic Architecture

Setting Up Multi-Domain Security Management Networking

Installing Multi-Domain Server

Installing Gateways

Installing Multi-Domain Security Management GUI Clients

Post-Installation Configuration

Multi-Domain Security Management is a centralized management solution for large-scale, distributed environments with many different network Domains. This best-of-breed solution is ideal for enterprises with many subsidiaries, branches, partners and networks. Multi-Domain Security Management is also an ideal solution for managed service providers (MSPs), cloud computing providers, and data centers.

Centralized management gives administrators the flexibility to manage polices for many diverse entities. Security policies should be applicable to the requirements of different departments, business units, branches and partners, balanced with enterprise-wide requirements.

Basic Architecture

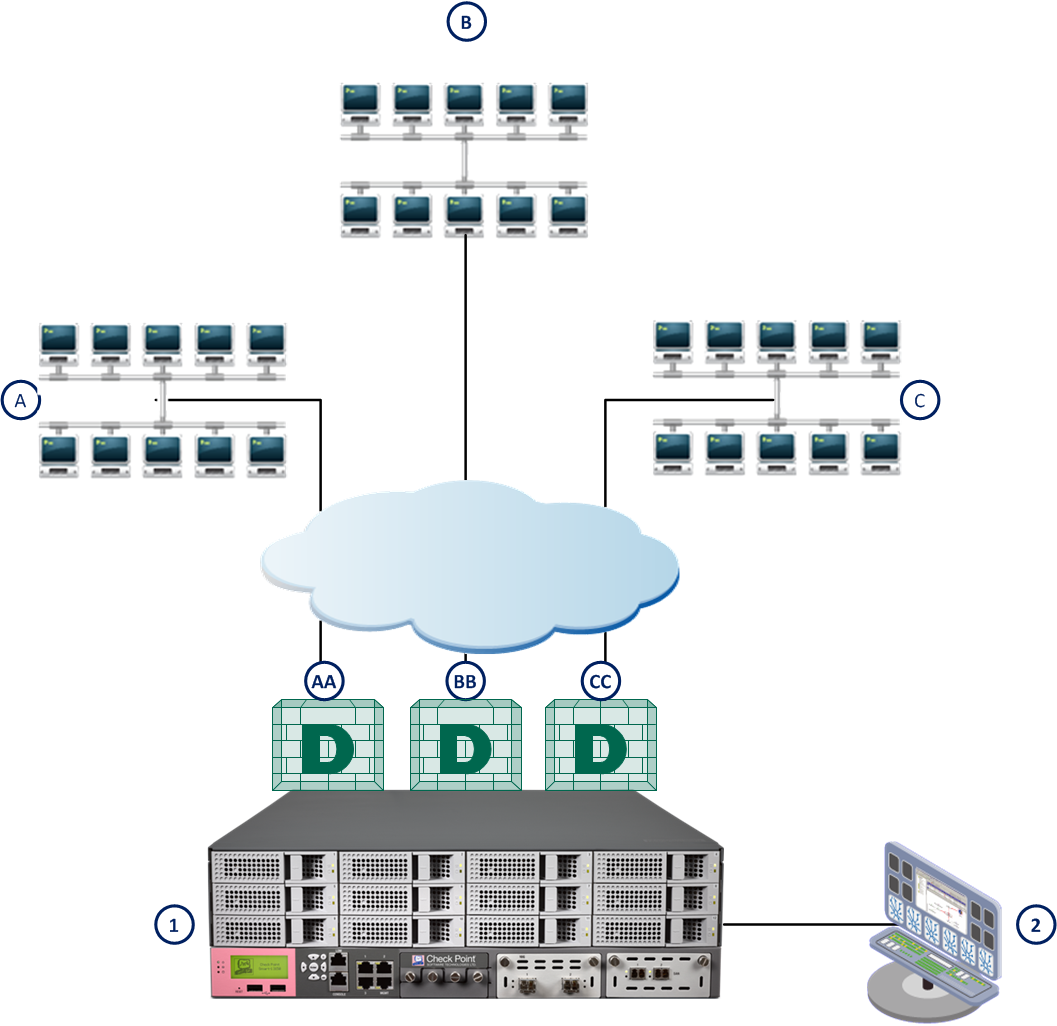
Multi-Domain Security Management uses a tiered architecture to manage Domain network deployments.

The Multi-Domain Servers and SmartDomain Manager are typically located at central Network Operation Centers (NOCs). Security Gateways are typically located together with protected network resources, often in another city or country.

BasicCMA

Item

Description

A

USA Development Domain

B

Headquarters Domain

C

UK Development Domain

1

Security Gateway

2

Network Operation Center

3

Multi-Domain Server

4A

USA Development Domain Server

4B

Headquarters Domain Server

4C

UK Development Domain Server

Setting Up Multi-Domain Security Management Networking

The Multi-Domain Server and Domain Security Gateway computers should be ready to connect to the network. The Multi-Domain Server must have at least one interface with a routable IP address. It also must be able to query a DNS server and resolve other network components.

Make sure that you configure routing to allow IP communication between:

Installing Multi-Domain Server

Installing Multi-Domain Server on Smart-1 Appliances

Install a Multi-Domain Server on supported Smart-1 models.

To install Multi-Domain Server on an appliance:

  1. Install the Gaia operating system on the appliance using Upgrades(CPUSE). Alternatively, follow the procedure for UTM-1 and 2012 Models.
  2. While the appliance restarts, open the terminal emulation program.
  3. When prompted, press any key to enter the boot menu.
  4. Select Reset to factory defaults - Multi-Domain Server and press Enter.
  5. Type yes and press Enter.

    Multi-Domain Server is installed on the appliance and then the appliance resets.

To start the First Time Configuration Wizard:

  1. Connect a standard network cable to the appliance management interface and to your management network.

    The management interface is marked MGMT.

  2. Open Internet Explorer to the default management IP address, https://192.168.1.1:4434
  3. Log in to the system using the default login name/password: admin/admin.

    Note - You can use the Portal menu to configure the appliance settings. Navigate to https://<appliance_ip_address>:4434.

  4. Set the username and password for the administrator account.
  5. Click Save and Login.

    The First Time Configuration Wizard opens.

To configure Multi-Domain Server on appliances:

  1. This step applies to R77.10 and higher. For other Gaia releases, configure these options in the Gaia Portal, in the Image Management page and the (Upgrades (CPUSE)) page.

    In the Deployment Options page, select Continue with Gaia configuration. Other options are:

    Clean install

    • Install a version from the Check Point Cloud.
    • Install from a USB device.

    Recovery

    • Automatic version recovery from the Check Point Cloud.
    • Import an existing snapshot.

    Click Next.

  2. In the Authentication Details page, change the default administrator password.

    Click Next.

  3. In the Management Connection page, set an IPv4 and an IPv6 address for the management interface, or set one IP address (IPv4 or IPv6).

    You can change the Management IP address. Gaia automatically creates a secondary interface to keep connectivity when the management interface is not available. After you complete the First Time Configuration Wizard, you can remove this interface in the Interface Management > Network Interfaces page.

  4. Optional: In the Connection to User Center page, configure an external interface to connect to the Check Point User Center. Use this connection to download a license and activate it. Alternatively, use the trial license. To connect to the User Center, you must also configure DNS and (if applicable) a Proxy Server, in the Device Information page of the Wizard.
  5. In the Device Information page, set the Host Name for the appliance.

    Optional:

    • Set the domain name, and IPv4 or IPv6 addresses for the DNS servers.
    • To connect to the User Center, set the IP Address and Port for a Proxy Server. Do this if you want to activate the appliance by downloading a license from the User Center.

    Click Next.

  6. In the Date and Time Settings page, set the date and time manually, or enter the hostname, IPv4 address or IPv6 address of the NTP server.

    Click Next.

  7. This step does not apply to R77.20 and higher or Smart-1 205/210/225/3050/3150:
    In the Appliance Type page, select Smart-1 appliance.

    Click Next.

  8. In the Products page, select Multi-Domain Server and Primary.

    For R77.10 and higher: Automatically download Blade Contracts and other important data. Check Point highly recommends that you select Automatic Downloads.

  9. In the Security Management Administrator page, define the name and password of a Superuser administrator that can connect to the Multi-Domain Server using SmartConsole clients.

    Click Next.

  10. In the Multi-Domain Server GUI Clients page, define IP addresses from which SmartConsole clients can log in to the Multi-Domain Server.
    • If you select This machine or Network, define an IPv4 or an IPv6 address.
    • You can also select a range of IPv4 addresses.

    Click Next.

  11. In the Appliance Activation page, get a license automatically from the User Center and activate it, or use the 15 day trial license.

    Click Next.

  12. In the Summary page, review your choices

    Optional: Improve product experience by Sending Data to Check Point.

    Click Finish.

  13. To start the configuration, click Yes.

    A progress bar tracks the configuration of each task.

  14. Click OK.

    The Multi-Domain Server is installed on the appliance.

  15. If necessary, download SmartConsole from the Gaia Portal.
    1. Open a connection from a browser to the Portal: https://<management_ip_address>
    1. In the Overview page, click Download Now!

To configure a secondary Multi-Domain Server on appliances:

Use the same procedure as for the primary Multi-Domain Server with these changes:

To configure a Multi-Domain Server log server on appliances:

Do steps 1 - 10 with these changes:

Define the Secure Internal Communication (SIC) Activation Key that is used by the gateway object in SmartDashboard and then click Next.

This key is necessary to configure the appliances in SmartDashboard.

Open Servers

Install Multi-Domain Server on a dedicated open server.

Use this procedure to install these Multi-Domain Server types:

SecurePlatform

Configure the Multi-Domain Server when you install the operating system on the open server. This procedure starts after you configure the date and time in the installation.

To install a Primary Multi-Domain Server on SecurePlatform:

  1. Use the Multi-Domain Security Management removable media or ISO file to install and configure SecurePlatform.
  2. In the Multi-Domain Security Management welcome screen, enter yes.
  3. Select Multi-Domain Server.
  4. Enter yes when prompted to install a Primary Multi-Domain Server.

    You must install the Primary Multi-Domain Server first.

    You can install a secondary Multi-Domain Server or a Multi-Domain Log Server later.

  5. When prompted, enter yes to confirm installation of a Primary Multi-Domain Server.

    You cannot change this installation setting later.

  6. At the Are you sure prompt, enter yes to continue.
  7. When prompted, press the space bar to scroll through the license agreement and then press y.
  8. If there is more than one interface on the Multi-Domain Server, enter the interface that connects Domain Servers to their managed networks and gateways. This is typically the management interface.

    You can only have one interface for this purpose.

  9. In Configuring Licenses, enter n to continue using the 15 day trial license.

    We recommend that you get and attach your licenses when configuring Multi-Domain Security Management with the SmartDomain Manager.

  10. In Configuring Groups, press Enter and then press y to assign the root user group by default. You can define groups later.
  11. Press Enter to start the Certificate Authority.
  12. Press y to save the certificate fingerprint to a file.
  13. Define least one Multi-Domain Security Management administrator.

    You must define the first administrator as a Multi-Domain Security Management Superuser. You can add this administrator to a group.

    You can define more administrators, but we recommend that you use the SmartDomain Manager to do this later.

  14. Enter n when prompted to add this administrator to an administrators group. You can do this later.
  15. Define at least one GUI client (SmartDomain Manager) to manage this Multi-Domain Server.
  16. When prompted, press Enter.
  17. Restart the Multi-Domain Server.

To install a secondary Multi-Domain Server:

Do the steps in the above procedure with this exception:

To install a Multi-Domain Server log server:

Do the steps in the above procedure with this exception:

Linux

Install the Multi-Domain Server after you install Linux on the open server.

To install a Primary Multi-Domain Server on Linux:

  1. Download the ISO file for Multi-Domain Server on Linux from the R77 home page.
  2. Burn the ISO file onto a DVD.
  3. Insert DVD into the drive.
  4. At the root prompt, create a mount point and mount the DVD. Run:

    mkdir /mnt/cdrom
    mount -ro loop /dev/cdrom /mnt/cdrom

  5. Go to the mount directory, and look at the files. Run:
    cd /mnt/cdrom/
    ls -l
  6. Run:
    ./UnixInstallScript
  7. In the Multi-Domain Security Management welcome screen, enter yes.
  8. Select Multi-Domain Server.
  9. Enter yes when prompted to install a Primary Multi-Domain Server.

    You must install the Primary Multi-Domain Server first.

    You can install a secondary Multi-Domain Server or a Multi-Domain Log Server later.

  10. When prompted, enter yes to confirm installation of a Primary Multi-Domain Server.

    You cannot change this installation setting later.

  11. At the Are you sure prompt, enter yes to continue.

    The Multi-Domain Security Management infrastructure packages are installed.

  12. When prompted, press the space bar to scroll through the license agreement and then press y.
  13. Configuring Leading VIP Interfaces: If there is more than one interface on the Multi-Domain Server, enter the interface that connects Domain Servers to their managed networks and gateways. This is typically the management interface.

    You can only have one interface for this purpose.

  14. Configuring Licenses: Enter n to continue using the 15 day trial license.

    We recommend that you get and attach your licenses when configuring Multi-Domain Security Management with the SmartDomain Manager.

  15. Configuring Groups: Press Enter and then press y to assign the root user group by default. You can define groups later.
  16. Configuring Certificate Authority: Press Enter to start the Certificate Authority.
  17. Configuring Certificate Fingerprint: Press y to save the fingerprint to a file.
  18. Configuring Administrators: Define least one Multi-Domain Security Management administrator.

    You must define the first administrator as a Multi-Domain Security Management Superuser. You can add this administrator to a group.

    You can define more administrators, but we recommend that you use the SmartDomain Manager to do this later.

  19. Enter n when prompted to add this administrator to an administrators group. You can do this later.
  20. Configuring GUI clients: Define at least one GUI client (SmartDomain Manager) to manage this Multi-Domain Server.
  21. Restart the Multi-Domain Server.

To install a secondary Multi-Domain Server:

Do the steps in the above procedure with this exception:

To install a Multi-Domain Server log server:

Do the steps in the above procedure with this exception:

Installing Gateways

Install the Network Operation Center (NOC) and Security Gateways of the domain using the R77 removable media.

Installing Multi-Domain Security Management GUI Clients

The SmartDomain Manager is automatically installed together with Check Point SmartConsole. If you have not yet installed SmartConsole, do so now.

To install the SmartConsole clients on Windows platforms:

  1. Insert the R77 distribution media or download the SmartConsole application from the Support Center.
  2. If you are using the installation media, go to the Linux\linux\windows folder.
  3. Run the SmartConsole executable.
  4. Continue with the instructions on the screen.

Post-Installation Configuration

Use the SmartDomain Manager to configure and manage the Multi-Domain Security Management deployment. Make sure to install SmartDomain Manager on a trusted GUI Client. You must be an administrator with appropriate privileges (Superuser, Global Manager, or Domain Manager) to run the SmartDomain Manager.

To start the SmartDomain Manager:

  1. Click Start > All Programs > Check Point SmartConsole R77 > SmartDomain Manager.
  2. Enter your credentials:
    • To use a password, enter the Multi-Domain Server host name or IP address. Then enter your administrator user name and password.
    • To use a certificate, enter the Multi-Domain Server host name or IP address. Then click Certificate and select the certificate.
    • To start without credentials, select Demo mode.
    • Optional: Enter a description of this session.
  3. Click Login.

    SmartDomain Manager connects to the Multi-Domain Server. When SmartDomain Manager opens, it shows the network objects and options that you have permission to work with.

  4. If necessary, confirm the connection using the fingerprint generated during installation.

    You see this only the first time that you log in from a client computer.

Demo Mode

You can open the SmartDomain Manager in Demo mode. This mode does not require authentication or a connection to the Multi-Domain Server. Use the Demo mode to experiment with different objects, views, modes and features before you create a production system. The Demo mode includes several pre-configured sample Domains, Domain Servers, Security Gateways and policies.

Operations performed in Demo mode are stored in a local database. You can continue a Demo session from the point at which you left off in a previous session.

Adding Licenses using the SmartDomain Manager

You can add a license to a Multi-Domain Server or Multi-Domain Log Server using the SmartDomain Manager.

  1. In the SmartDomain Manager, open the General View > Multi-Domain Server Contents page.
  2. Double-click a Multi-Domain Server or Multi-Domain Log Server. The Multi-Domain Server Configuration window opens.
  3. Open the License tab.
  4. Install licenses using Fetch or Add:

    Fetch License File

    1. Click Fetch From File.
    2. In the Open window, browse to and double-click the desired license file.

      Add License Information Manually

    3. Click Add.
    4. In the email message that you received from Check Point, select the entire license string (starting with cplic putlic... and ending with the last SKU/Feature) and copy it to the clipboard.
    5. In the Add License window, click Paste License to paste the license details you have saved on the clipboard into the Add License window.
    6. Click Calculate to display your Validation Code. Compare this value with the validation code that you received in your email. If validation fails, contact the Check Point licensing center, providing them with both the validation code contained in the email and the one displayed in this window.

Uninstalling Multi-Domain Security Management

To uninstall a Multi-Domain Server:

  1. Back up the databases.
  2. Reformat the hard disk.

To uninstall the SmartDomain Manager and SmartConsole applications, use Add/Remove Programs.

Where To From Here?

Check Point documentation provides additional information and is available on the R77 home page on the Check Point Support Center. It is also available on the Check Point DVD.