|
|
|
Use the VSX Gateway Conversion wizard in SmartDashboard to convert Gaia Security Gateways to VSX Gateways. You can convert one Security Gateway or all the members of a cluster to VSX. The settings of the Security Gateways are applied to the VSX Gateway (VS0). You can also use SmartDashboard to convert a VSX Gateway to a Security Gateway.
We recommend that you go to sk79260, before you use the Conversion wizard. You can only convert Security Gateways or clusters that use the Gaia operating system.
|
Note - The Security Gateway loses connectivity during the conversion process. |
SmartDashboard converts a Security Gateway or cluster to VSX. You can only complete the Conversion Wizard if the features and settings of the Security Gateway or cluster are compatible with VSX.
When the Conversion Process window is shown, you cannot cancel or close the Conversion Wizard.
To convert a Security Gateway:
The compatibility check makes sure that the Security Gateway or cluster is compatible with VSX.
The Converting window shows as the management database is updated.
|
Note - You cannot use SmartDashboard while the Converting window shows. |
The VSX Gateway Conversion Wizard cannot convert a Security Gateway or cluster that uses Software Blades or other features that VSX does not support. The wizard automatically checks for common compatibility problems with the Security Gateway. We recommend that you go to sk79260, to see a full list of limitations and compatibility problems.
If the Security Gateway is not compatible, the Compatibility Check window tells you the solution for each compatibility problem. Close the wizard, disable the unsupported features, and run the VSX Gateway Conversion Wizard again.
Complete the Security Gateway to VSX Gateway Conversion Wizard. When you complete the wizard, the management database is updated with the new VSX Gateway object.
To complete the Conversion Wizard:
Click Finish. The Converting window is shown as the management database is updated.
|
Note - You cannot use SmartDashboard while the Converting window is shown. |
SmartDashboard converts a VSX Gateway or cluster to a Security Gateway. You must remove all the Virtual Systems and other Virtual Devices from the VSX object before you can convert the VSX Gateway.
You cannot convert a VSX Gateway that uses a shared interface configuration to a Security Gateway.
To convert a VSX Gateway to a Security Gateway:
From the Network Objects tree, right-click each Virtual Device object and select Delete.
A confirmation window opens.
The VSX Gateway is converted to a Security Gateway.
|
Note - You cannot use SmartDashboard while the Converting window is shown. |
In This Section |
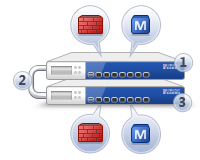
Standalone Full HA - Security Management Server and Security Gateway are each installed on one appliance, and two appliances work in High Availability mode. One is active, and one is standby.
|
Item |
Description |
1 |
Primary appliance |
|
2 |
Direct appliance to appliance connection |
|
3 |
Backup appliance |
|
|
Security Gateway component |
|
|
Security Management Server component |
After you install the Gaia or SecurePlatform operating system, configure Standalone Full HA. First, configure each of the two standalone appliances with its First Time Configuration Wizard. Then configure the High Availability options in SmartDashboard.
Note - SmartEvent Server and SmartReporter are not supported in Management High Availability Availability and ClusterXL Full High Availability environments. In these environments, install SmartEvent Server and SmartReporter on dedicated machines.
For more, see sk25164
Some appliances have a dedicated SYNC interface that is used to synchronize with the other appliance. If there is no SYNC interface on the appliance, use the ETH1 interface.
|
Note - The internal interface (INT) on a UTM-1 appliance is used as the management interface. |
To start the First Time Configuration Wizard:
The management interface is marked MGMT.
https://192.168.1.1:4434 Note - You can use the Portal menu to configure the appliance settings. Navigate to https://<appliance_ip_address>:4434.
The First Time Configuration Wizard opens.
To configure Full High Availability:
Click Next.
Click Next.
The Summary window shows the settings for the appliance.
SecurePlatform R77 is installed on the primary appliance.
This key is necessary to configure the appliances in SmartDashboard.
After you set up the appliances for Standalone Full High Availability, configure this deployment in SmartDashboard. You must configure both cluster members before you open the cluster configuration wizard in SmartDashboard.
The LAN1 interface serves as the SYNC interface between cluster members. If not configured, SYNC interfaces are automatically set to 10.231.149.1 and 10.231.149.2. If these addresses are already in use, their values can be manually adjusted. If you manually adjust the default IP SYNC addresses, verify that both reside on the same subnet.
|
Note - All interfaces in the cluster must have unique IP addresses. If the same IP address is used twice, policy installation will fail. A Load on gateway failed error message is displayed. |
The cluster has a unique IP address, visible to the internal network. The unique Virtual IP address makes the cluster visible to the external network, and populates the network routing tables. Each member interface also has a unique IP address, for internal communication between the cluster members. These IP addresses are not in the routing tables.
To configure Standalone Full High Availability:
The Security Cluster wizard opens.
Click Next.
Click Next.
Click Next.
You can remove one of the two members of a cluster without deleting the cluster object. A cluster object can have only a primary member, as a placeholder, while you do maintenance on an appliance. You must remove the cluster member in the Portal and in the CLI.
To remove a cluster member:
Services running on the appliance are restarted.
cp_conf fullha disableThis command changes back the primary cluster member to a standalone configuration.
The former cluster object is now a locally managed gateway and Security Management Server.
You can add a standalone appliance to a cluster, after the High Availability cluster is defined. You can change which member is primary.
To add an existing appliance to a cluster:
The first-time cluster configuration wizard opens.
Troubleshooting network objects:
In SmartConsole, the network object of the standalone appliance is converted to a cluster object. If the standalone appliance was in the Install On column of a rule, or in the Gateways list of an IPSec VPN community, the cluster object is updated automatically. For all other uses, you must manually change the standalone object to the cluster object. These changes can affect policies.
To see objects and rules that use the object to change:
If the Where Used line is a:
Note - The icon in SmartConsole changes to show new status of the appliance as a primary cluster member. The Name and UID of the object in the database stay the same.
In High Availability, log files are not synchronized between the two cluster members. For this reason, we recommend that you configure the logs of the cluster.
To forward cluster logs to an external log server:
Or:
Configure SmartEvent and SmartReporter with standard reports, to use only one of the cluster members as a source for log file correlation and consolidation.
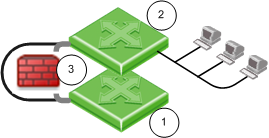
If you install a new Security Gateway in a network and cannot change the IP routing scheme, use bridge mode. A Security Gateway in bridge mode is invisible to Layer-3 traffic. When authorized traffic arrives, the Security Gateway passes it to the next interface through bridging. This creates a Layer-2 relationship between two or more interfaces. Traffic that enters one interface exits the other interface. Bridging lets the Security Gateway inspect and forward traffic, without the original IP routing.
Before
|
After
|
||
Item |
Description |
||
1 |
Switch 1 |
||
2 |
Switch 2 |
||
3 before |
Connection between switches, one IP address. |
||
3 after |
Security Gateway Firewall bridging Layer-2 traffic over the one IP address, with a subnet on each side using the same address. |
||
Before configuring the bridge, install the Security Gateway.
To manage the gateway in bridge mode, it must have a separate, routed IP address. You must configure the bridged interfaces.
You can configure bridge mode in the SecurePlatform Portal or the CLI.
To configure a bridge interface in the SecurePlatform Portal:
To configure a bridge interface in the Command Line:
sysconfigNIf anti-spoofing is required for the bridged interfaces, define different IP address ranges behind each bridged interface. Do not use the same network for the two interfaces, as this can cause a loss of connectivity.
To see the bridge status:
The brctl show command displays the status of the bridge configuration. For example:
[Expert@GW-1]# brctl show
bridge name bridge id STP enabled interfaces br0 8000.000423b93e56 no eth0 eth1 |
The interfaces are the two bridged interfaces. The MAC address of the bridge is inherited from one of the physical interfaces.
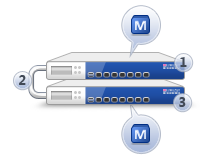
Management HA - A Primary and Secondary Security Management Server are configured. The databases of the Security Management Servers are synchronized, either manually or on a schedule, so they can back up one another. The administrator makes one Security Management Server Active and the other(s) Standby. If the Active Security Management Server is down, the administrator can make the Standby server Active.
|
Item |
Description |
1 |
Primary Security Management Server |
|
2 |
Direct or indirect Security Management Server to Security Management Server connection |
|
3 |
Secondary Security Management Server |
|
|
Security Management Server component |
You can configure Management High Availability between:
Prerequisites for Management High Availability
Workflow for Installing and Configuring Management High Availability:
cpconfig.cpconfig.For instructions on installing and configuring the primary and secondary Security Management Server see the applicable section:
To learn how to synchronize the databases of the Security Management Servers and make one Active and the other(s) Standby, see the R77 Security Management Administration Guide.