


|
|
|
In This Section: |
Check Point DLP provides the MultiSpect set of features. These features provide the flexibility you need to monitor and ensure accuracy of your DLP deployment. For example, if you find incidents that called for actions but should have passed without delay, you can change the Data Types and/or the rules to ensure that this does not occur again. In this way you fine-tune DLP over a relatively short amount of time to create a trustworthy implementation.
You can also include User Decisions to fine-tune Data Types and rules. How useful this information is depends on how well you communicate with users. Make sure they know that their input can influence the DLP - if they want a type of data to be sent without delay, and can explain why, you will use their logged decisions to change the rules.
MultiSpect includes:
In this stage, you may decide to set some rules to Prevent. When DLP captures a Prevent incident, the data transmission is stopped completely; the user has no option to continue the send. (It is recommended that such rules include notification to data owner and to user.)
To have full Data Loss Prevention, you might think that data transmissions with protected data should all prevented from leaving the organization. However, putting all your rules to Prevent from the start will surely cause so many disruptions in mission-critical work of your organization, that the protection will become worse than meaningless. The best practice is to set rules to Prevent only after users have become familiar with the Organization Guidelines and audits of your logs have shown that automated prevention of user initiated actions is necessary - and then, only for specific Data Types, users, or other parameters.
|
Note - This is one reason why you might want to create a user group for new employees, so that they can learn from the UserCheck stage before having their transmissions automatically prevented. Another user group you will probably find useful is one for terminating employees. |
It is recommended that for rules set to Prevent that also have a High or Critical severity, you also set Email in the Track parameter. This will ensure that the data owners are notified by email as soon as such an incident is prevented.
To set a rule to Prevent:
One of the ways DLP authenticates users is by querying the Active Directory servers configured in SmartDashboard. If a legitimate user has multiple accounts on different AD servers, each account associated with a different password, the user may fail to authenticate. DLP validates the user according to the credentials supplied by the first AD server to respond. To help prevent this error, and decrease the load created by constantly querying all AD servers, you can define which AD servers DLP queries when:
To define AD servers Using GuiDBedit:
DLPSenderRealm.ldap_au container.The Add/Edit Element window opens.
On a network that contains ten AD servers, perhaps only two of them must be queried. Edit the list to include only the required AD servers.
|
Note - These AD servers must first be defined in SmartDashboard. |
The Check Point database tool, GuiDBedit, has a number of properties that set default authentication values. These properties can be used in troubleshooting DLP related authentication issues. These objects are found under: GuiDBedit > Tables > Other > authentication_objects:
Object |
Description |
|---|---|
|
Controls authentication for the DLP portal and the UserCheck agent. This object contains:
Use |
|
This object controls how DLP identifies users by querying the email address attribute in the Active Directory. Use this object to troubleshoot problems involving email look up in the Active directory. The
By default, it searches for the user with the specified email address. To refine the query, you can add other AD attributes to the query or change existing ones. WARNING: Changing this default query might affect DLP rules that enforce a policy according to users or user groups defined by access roles. Known users may become Unknown and the data they send allowed to leave the organization. |
|
This object controls how DLP identifies users by querying the email address attribute in the database of internal users defined in SmartDashboard. |
The optimal method for defining new data type representations is to use the Data Type Wizard.
First, review the predefined Data Types: you might not need to add more. If the data assets that you want to protect from leakage are not represented in the Data Types page, open the Data Type Wizard.
To add a new data type:
The Data Type Wizard opens.
You can create a list of keywords that will be matched against data transmissions. Transmissions that contain this list of words in their data are matched. You define whether it should match it on an ALL or ANY basis.
To create a data type representation of specified keywords:
The next step is the Specify Keywords window.
For example, if you want to ensure that no one can send an email that contains any of the names of congressmen in a committee, their names would be the keywords and you would set the Threshold to At least 1. (Note that the higher the threshold, the more precise the results will be.)
If you wanted to allow emails mentioning the congressmen, but decided that all of their names in one email would be suspicious, then set Threshold to All words must appear.
Confidential and sensitive documents are often based on templates. A template defines the headers, footers, seals, and formatting of related documents. This is what makes all court orders, for example, look the same.
You can create a Data Type that protects documents based on a specific template. You then add the Data Type to a rule and connections that contain such a document are matched by the policy.
|
Important - When a template including images is attached to a DLP Template Data Type, the image file format is important. The file format used in the template must match the file format in the user document. If the file formats are different, the rule will not trigger a DLP response.
For example, if the template contains a JPG image and the user document contains the image in GIF format, there is no DLP response. |

To create a Data Type representation of documents based on a template:
This file does not have to be known as a template in the application: the template for the Data Type may be a *.doc file and does not have to be a *.dot file. Choose any file that is a basic example of documents that might be sent.
It is recommended that you first set this slider quite low; the higher it is, the less the rule will catch. After completing the wizard, send a test email with such a document, and check the SmartView Tracker logs to see if the document was caught. Slowly increase the Similarity level until the rule is catching the documents you want. This will be different for each template.
To configure additional properties for the Data Type, select Configure additional Data Type properties clicking Finish.
Property |
Description |
|---|---|
Match empty templates |
|
Consider template's images |
|
Alternative to slider testing:
If you want to catch documents that match on different levels with different actions, you may try this procedure:
Create a data type that protects files based on file type, file name, and file size. Transmissions that contain a file that matches the parameters are matched.
To create a data type representation of files:
|
Note - A file must match all the parameters that you define here, for it to be matched to the rule. Thus, the more parameters you can set here with assurance, the more accurate the results will be. |
You can create a regular expression that will be matched against content in data transmissions. Transmissions that contain strings that match the pattern in their data are matched.
|
Note - Use the Check Point supported regular expression syntax. |
To create a data type representation of a pattern:
For example, if you want to ensure that no one can send an email that contains a complete price-list of five products, you would set the pattern to "^[0-9]+(\.[0-9]{2})?$" and you would set the Number of occurrences to 5.
You can create a complex data type representation. A compound data type includes multiple Data Types, which are matched either on AND (a number of Data Types are matched), or NOT (necessary Data Types are not present), or both.
For example, you can look for files or emails that contain patient records. You could create a data type that combines documents that match a patient record template, with a dictionary data type that contains a group of patient names who have not signed release forms. Now you have a single data type that will match emails or FTP that contain patient records of patients who have not signed a release form.
To create a compound data type representation:
If a transmission is sent that matches all the Data Types of the first section and none of the Data Types in the second section, the data of the transmission is matched to the compound Data Types.
Many Data Types identify data by classifying it according to keywords or file attributes such as document type, name, or size. Classifications and attributes are used to describe the data. The fingerprint Data Type does not rely on a description of the data. The fingerprint Data Type identifies the data according to a unique signature known as a fingerprint. A fingerprint accurately identifies confidential files or parts of confidential files.
Fingerprint Data Type can accurately identify files that the organization considers confidential. This Data Type will accurately match files or parts of it.
Generating the unique signature
Repository Scanning
Files in the repository are constantly changing. New files are added, existing files modified or deleted. To keep file signatures up to date, the repository must be scanned on a regular basis. By default, the repository is automatically scanned every day. If a file is added or modified after a scan, the file's signature will not be updated until the next scheduled scan occurs.
Supported file shares for repositories:
|
Note - Scans of a repository that has already been scanned takes less time. Unchanged files in a repository are skipped. |
Filtering for Efficiency
A large repository might also contain many files that are not confidential and do not need to be scanned. The scan can be made more efficient by:
Select only those folders that are known to contain confidential files. You may need help from the related department heads to do this. For example not all the folders in the Finance department may contain confidential information. These folders do not have to be included in the scan.
If you add Credit Card Numbers as the Data Type in the filter, all the files in the repository that contain credit card numbers are scanned and fingerprinted. If Spreadsheet file is selected as the Data Type in the filter, only spreadsheet files in the repository will be scanned and fingerprinted.
Granularity
Complete files do not have to go outside of an organization for data to be lost. Confidential data can be lost if sections from files in the repository are copied into other files, copied to email or posted to the web. A file in the repository may be saved locally and then modified in a way that it no longer matches the unique fingerprint signature. To identify such incidents, a partial match between files scanned by the DLP gateway and files in the repository can be configured. A partial match can be:
The number of text segments in the sent file is divided by the number of text segments in the repository file, and the result expressed as a percentage. A match occurs if this percentage is higher than the percentage configured on the General Properties page of the Data Type.
A match occurs when the number of identical text segments in a scanned file and a file in the repository is higher than the number configured on the General Properties page of the Data Type.
Scan Times
Large repositories might cause a scan to run all day. To prevent this, you might want to limit the scan to a specified range of hours. If a scan does not complete before the time range expires, the scan will recommence where it stopped when the next scheduled scan occurs.
Logging
Repository scans generate logs that can be viewed in SmartLog or SmartView Tracker. In SmartView Tracker, the Fingerprint Scans query shows all logs generated by a scan.
Logs are generated when:
In the log:
|
Note - Running logs are generated every two hours. For a scan that lasts less than two hours, you will only see the start and finish logs. |
Log Details
Scan ID |
A unique scan identification to distinguish between logs |
Next Scheduled Scan Date |
Time the scan started |
Duration |
How long the scan lasted |
Scan Status |
The status can be Running, Paused, Canceled, or Success |
Number of errors |
Number of errors encountered. |
Repository root path |
The upper level repository |
Current directory |
Current directory being scanned |
Directories |
The total number of directories in the repository selected in data locations. |
Repository size (MB) |
The size of the repository |
Repository Files |
The number of files in the repository |
Directories scanned |
The number of directories scanned so far |
Scanned size (MB) |
The number MBs scanned so far |
Scanned files |
The number of files scanned so far |
Unreachable directories |
Number of sub directories in the repositories that could not be opened during the scan. |
Fingerprinted files |
The number of files with a fingerprint signature |
Filtered files |
The number of files that were not scanned because they did not meet the criteria set on the Repository Scan Filter page. For example file size, modification date, or Data Type. |
Scan speed (KBs) |
The speed of the scan |
Progress |
Percentage of the repository so far scanned |
Remaining time |
Estimated time to scan completion |
To create a fingerprint Data Type:
This is the name that will show on the Data Loss Prevention > Repositories page.
By default, The DLP Blades object shows. This object represents all gateways that have the DLP blade enabled. Only gateways selected here scan the repository and enforce the fingerprint data type.
This tests that DLP gateways defined in the gateways list (step 4a) can access the repository using the (optional) assigned authentication credentials.
This option matches similarity between the document in the repository and the document being examined by the DLP gateway. You can specify an exact match with a document in the repository, or a partial match based on:
Select Configure additional Data Type Properties after clicking Finish if you want to configure more properties.
The New data type wizard closes. The data type shows in the list of data types and also on the Repositories page.
To configure more fingerprint properties:
In the Data Types window or Repositories window, double-click fingerprint object to open it for editing. These properties can be configured:
Change the data entered in the Data Type wizard.
Add users or user groups that own the data. Data owners can be notified when the fingerprint data type is matched by a rule in the DLP policy.
Add CPcode scripts to apply more match criteria after the fingerprint data type is matched by a rule.
Configure when the document repository is scanned to update the fingerprint data type. The default time object (Every-Day) has no time restrictions configured. This means that a scan runs without time restrictions after the fingerprint data type is added to a policy rule. If gateway resources and network bandwidth are an issue, limit the scan to off-peak hours.
This page offers more scanning criteria:
This property lets you scan documents in the repository according to more data types, for example credit card numbers. If you add credit card numbers as the data type, all the files in the repository that contain credit card numbers are fingerprinted. If "spreadsheet files" are selected as the data type, only spreadsheet files in the repository are fingerprinted.
Only files of the specified maximum and minimum size are included in the fingerprint.
Only files that match the specified modification dates are included in the fingerprint.
|
Note - After a change to the filters (adding or removing a data type, selecting a different file size or modification date) the DLP gateway regards all files in the repository as new. In a large repository, this will result in a long scan. The fingerprint will only be enforced after this scan has ended. |
Use the Data Locations tree to include or not include repository sub-folders. If you want the fingerprint data type to prevent only one document type from leaving the organization, put that document in a folder that contains no other document. Select only that folder as the data location.
Using the Fingerprint Data Type
To use the fingerprint Data Type, you must:
After the fingerprint Data Type is included in a policy, a scheduled scan occurs. After the scan successfully finishes, the fingerprint Data Type is enforced.
If you want to manually start a scan of the repository:
NFS Repository scanning in NATed Environments
NATing, for example in a clustered environment where each member's connections are translated to the Virtual IP address of the cluster, prevents repository scanning when the repository is located on an NFS server. To enable repository scanning you must disable Hide NAT on all NFS services. The members of a cluster must be configured to send NFS related traffic using the member's IP address in the Source field of the packet, and not the Virtual IP of the cluster.
To disable Hide NAT on NFS services:
$FWDIR/lib/table.def for editing.no_hide_services_ports. These are the services and ports not included in Hide NAT.
no_hide_services_ports = { <111, 17>, <111, 6>, <4046, 17>, <4046, 6> }
If a list of services and ports already exists, add these numbers to the end of the list.
Note:
table.def globally to all gateways. The Data Type Wizard has four advanced Data Types:
If you begin by creating a Data Type for keyword or pattern, and realize that it is not ALL or ANY, but that one word is a sign of protected data in itself, and other word would be a suspicious sign only if it appeared numerous times, you can define this complex data representation as a Weighted Keyword rather than a simple keyword or pattern.
Transmissions that contain this list of words, in the weight-sum that you define, in their data are handled according to the action of the rules that use this Data Type.
To create a Data Type representation of weighted keywords:
(If you click the Add button instead of its sub-menu, the item will be a keyword, not a pattern.)
The Edit Word window opens, for both types of item.
If you pre-planned the keywords that should flag data as protected, you do not need to enter them one by one in a keyword data representation. Instead, you can upload the list as a dictionary. You decide how many of the items in the list have to be matched to have the data match the rule.
|
Note - Dictionary files should be one word or phrase per line. If the file contains non-English words, it is recommended that it be a Word document (*.doc). Dictionaries that are simple text files must be in UTF-8 format. |
To create a Data Type representation of dictionary:
It is recommended that you first set this to the highest reasonable value, and then lower it after auditing the SmartView Tracker logs.
For example, if the dictionary is a list of employee names, you should not set the threshold to 1, which would catch every email that has a signature. You could set an Employee Name Dictionary Data Type to a threshold of half the number of users and its rule to Detect. If no data is caught by the rule after about a week, lower the threshold and check again. When the rule begins to detect this information being sent out, set it to Ask User, so that users have to explain why they are sending this information outside before it will be sent. With this information on hand, you can create a usable, reasonable and accurate enforcement of corporate policy.
CPcode is a scripting language, similar to C or Perl, specifically for Intrusion Prevention Systems. If you are familiar with this language, you can create your own complex rules. Use CPcode data types to create dynamic definitions of data to protect, or to create data type representations with custom parameters.
For example, you can create a CPcode that checks for a date that is before a public release, allowing you to create rules that stop price list releases before that date, but pass them afterwards. Other common uses of CPcode include relations between rule parameters, such as recipients (match rule to email if sent to too many domains) and protocols (match rule to HTTP if it looks like a web mail).
|
Note - See the R77 CPcode DLP Reference Guide. |
To create a Data Type representation of CPcode:
Example of CPcode function:
|
func rule_1 {
foreach $recipient inside global:DESTS {
foreach $comp inside CPMPETITORS_DOMAIN {
if( casesuffix( $recipient , $comp ) ) {
set_message_to_user(cat("The mail is sent to " ,
$recipient , "which is a competitor's mail address.")); set_track(TRACK_LOG); return quarantine(); } } } } |
In DLP, a message can be sent using the SMTP, HTTP, or FTP protocols.
Message attributes refer to 3 properties of the message:
To create the message attribute Data Type:
The Specify Message Attributes window opens.
The size attribute can have a:
Minimum value |
Maximum value |
Meaning |
|---|---|---|
Yes |
Yes |
Messages that fall within the specified range match the message attribute. |
Yes |
No |
A message whose size is greater than the minimum value specified here matches the attribute. |
No |
Yes |
A message whose size is smaller than the maximum value specified here matches the attribute. |
Define the number of attachments a message can have.
Minimum value |
Maximum value |
Meaning |
|---|---|---|
Yes |
Yes |
A Message whose number of attachments falls within the specified range matches the message attribute. |
Yes |
No |
A message with more than the minimum number of attachments specified here matches the attribute. |
No |
Yes |
A message with less attachments that those shown by the maximum value specified here matches the attribute. |
Scan for a significant amount of text. If an email has a large binary file attached such as a graphic, and the email contains the words "your picture" the email might match the Size attribute but contain no text worth scanning. You will want the email to match a DLP rule only if the email contains enough text that could conceivably result in data loss.
Minimum value |
Maximum value |
Meaning |
|---|---|---|
Yes |
Yes |
Messages whose word count falls within the specified range matches the message attribute. |
Yes |
No |
A message whose word count is greater than the minimum value specified here matches the attribute. |
No |
Yes |
A message whose word count is lower than the maximum value specified here matches the attribute. |
If you want to add more parameters to the Data Type, select the Configure additional Data Type properties after clicking finish and then click Finish.
|
Note - For a message to match the Data Type attribute, it must match the criteria for size and the number of attachments and the number of words. If the message fails to match one of the criteria, it will fail to match the attribute. |
A number of Data Types, such as credit card numbers, have an option called Enhance accuracy through statistical analysis on their General Properties page.
Credit cards like Visa and Mastercard have sixteen digit numbers arranged in four groups of four. While scanning for this Data Type, all sixteen digit numbers in the data that match the Luhn algorithm will be identified as credit card numbers. The sixteen digits might not represent a credit card number. The sixteen digits might represent spare part numbers, an ordering or sales code.
The Enhance accuracy option applies statistical analysis to increase the accuracy of identifying specified Data Types, for example credit card numbers.
To enhance accuracy through statistical analysis:
|
Note - Enabling statistical analysis does not impact gateway performance. |
The data types are the building blocks of the Data Loss Prevention rule base, and the basis of the DLP policy that you install on DLP gateways - the basis of DLP functionality. Each data type defines a data asset that you want to protect.
Data Owners should be aware of the types of data that are under their responsibility and be able to tell you what type of data must be able to move outside of the organization and what data must be protected.
For example, a team leader of a programming team should know that lines of code should not be allowed to move outside the organization, and require that it be protected. A hospital administrator should have an example of a court order releasing patient records to authorized domains.
In the Data Loss Prevention Data Types window, data types are sorted according to category. An important category is the compliance category. The Data Types window lets you create data types that enforce compliance in accordance with regulatory standards.
The compliance category contains built-in data types that represent accepted standards and regulatory requirements. For example, according to Payment Card Industry (PCI) compliance standards, credit card numbers of customers must not be sent to outside sources in clear text.
The Data Loss Prevention Overview window > DLP Featured Data types toolbox lists the data types for:
Clicking the Compliance button shows the data types in this category and how many are activated.
In the Featured Data Types area of the toolbox, two actions are available:
Action |
Use |
|---|---|
View rule |
Click View rule to see how the compliance data type is used in the DLP policy. |
Add to policy |
Click Add to policy to add the compliance data type to the DLP policy. |
Clicking Compliance on the tool bar in the Data Types window filters out those data types which do not belong to the Compliance category. Check Point regularly adds to the number of built-in data types, but if none of the types is applicable to your needs - you can create a new data type and add it to the compliance category.
Built-in data types exist for:
To add a new data type to the compliance category
The Data Type Wizard opens.
|
Note - You cannot change the category of a built-in data type, only add new data types to one of the pre-existing categories. |
After you define Data Types with the Data Type Wizard, you can fine-tune them if necessary.
Each Data Type in the General Properties window shows only its applicable fields. You only see the options that apply to the currently selected data type.
Section |
Description |
|---|---|
General Properties |
|
Custom CPcode |
|
Compound |
|
Dictionary |
Note - If the items in the dictionary are in a language other than English, use a Word document as the dictionary file. Any text file must be in UTF-8 format. |
Documents Based on a Corporate Template |
|
File |
File - Select the conditions that should be checked on files in data transmissions (including zipped email attachments, as well as other transmissions). A transmitted file must match all selected conditions for the File data type to be matched.
|
Group Members |
|
Keywords or Phrases |
|
Pattern |
|
Similarity |
|
Threshold (dictionary) |
|
Threshold (occurrences) |
|
Threshold (keywords) |
This data will be matched only if it contains:
|
Threshold (recipients) |
This data will be matched only if the email contains:
|
Threshold (External BCC) |
This data will be matched only if the email contains at least:
|
Weighted Keywords or Phrases |
|
To edit a Data Type:
You can create a Data Type representation that is a group of existing Data Types.
For example, you could create a group of Data Types that protect your organization from leaking personal contact information, to comply with privacy laws. The Data Type group would include various built-in Data Types for personal names of different countries, last names, personal email addresses, and so on. Using the Data Type group, you can create and maintain rules more efficiently.
Data Type groups are matched on OR. If data matches any of the Data Types in the group, the Data Type group is matched.
To create a Data Type group:
The Group Data Type window opens.
If relevant, add Data Owners to the group.
You can add CPcode script files for more advanced match criteria to improve accuracy after a keyword, pattern, weighted keyword, or words from a dictionary are matched. If the CPcode script file has a corresponding value file (for constants values) or csv file, add it here.
|
Note - You can add more than one CPcode script. All of the scripts must match the keywords or phrases to be recognized as matching the data type. |
To add advanced matching Data Type CPcode script:
The Data Type window opens.
For all Data Type representations, you can add CPcode scripts that run after a data type is matched.
When you use CPcode scripts here as match criteria, you get a more advanced level of improved accuracy on matched data types. When you set more than one CPcode script, Data Types with specified CPcode scripts are matched on AND. If data matches all of the CPcode scripts, the Data Type is matched. If the CPcode script file has a corresponding value file (for a constant value) or csv file, add it here.
For example, you can add a CPcode script that matches Data Types that occur during work hours (09:00 - 17:00) on work days.
To add a post match Data Type CPcode script:
The Data Type window opens.
Before installing a policy that contains new Data Types, you can test them in a lab environment.
Recommendation for testing procedure:
|
Important - If you change the action of the rule to Ask User, to test the notifications, you must change the subject of the email if you send it a second time. If Learning mode is active, DLP recognizes email threads. If a user answers an Ask User notification with Send, DLP will not ask again about any email in the same thread. |
For example, for a Document by Template Data Type, try to send a document that is somewhat similar to the template but contains no sensitive data.
If the acceptable transmission is not passed, adjust the Data Type parameters to increase accuracy.
You can export to a file the Data Types that you have created or that are built-in. This allows you to share Data Types between DLP Gateways, when each is managed by a different Security Management Server.
You might want to export Data Types as a recovery measure: recover a Data Type that you or another DLP administrator deleted.
To export a Data Type:
You can share Data Types with another Security Management Server or recover a Data Type that was deleted but previously exported. You can also obtain new Data Types from your value-added reseller or from Check Point and use this procedure to add the new Data Types to your local system.
|
Note - You can only export and then import Data Types on Security Management Servers that are the same version. For example, you can export and import Data Types on different R77 Security Management Servers. You cannot export Data Types from an R75 Security Management Server and then import them to an R77 Security Management Server. |
To import Data Types:
Repositories are network locations used for document storage. DLP has two kinds of repository
Fingerprint Repository
The fingerprint repository is used to store files from which the fingerprint Data Type is derived. A fingerprint repository is automatically created when you create the fingerprint Data Type. Files that exactly or partially match documents in the fingerprint repository are identified before they go outside of the organization.
Whitelist Repository
The Whitelist repository is a store of documents that are allowed to go outside of the organization. The Whitelist repository can be used to improve the accuracy of the DLP policy.
|
Note - For a file not to be included in the DLP match, it must exactly match a file in the whitelist repository. |
The Data Type wizard opens with Fingerprint selected as the Data Type.
By default, The DLP Blades object shows. This object represents all gateways that have the DLP blade enabled. Only gateways selected here scan the repository and enforce the fingerprint data type.
This tests that DLP gateways defined in the gateways list (step 4a) can access the repository using the (optional) assigned authentication credentials.
This option matches similarity between the document in the repository and the document being examined by the DLP gateway. You can specify an exact match with a document in the repository, or a partial match based on:
Select Configure additional Data Type Properties after clicking Finish if you want to configure more properties.
The New data type wizard closes. The data type shows in the list of data types and also on the Repositories page.
To configure more fingerprint properties:
In the Data Types window or Repositories window, double-click fingerprint object to open it for editing. These properties can be configured:
Change the data entered in the Data Type wizard.
Add users or user groups that own the data. Data owners can be notified when the fingerprint data type is matched by a rule in the DLP policy.
Add CPcode scripts to apply more match criteria after the fingerprint data type is matched by a rule.
Configure when the document repository is scanned to update the fingerprint data type. The default time object (Every-Day) has no time restrictions configured. This means that a scan runs without time restrictions after the fingerprint data type is added to a policy rule. If gateway resources and network bandwidth are an issue, limit the scan to off-peak hours.
This page offers more scanning criteria:
This property lets you scan documents in the repository according to more data types, for example credit card numbers. If you add credit card numbers as the data type, all the files in the repository that contain credit card numbers are fingerprinted. If "spreadsheet files" are selected as the data type, only spreadsheet files in the repository are fingerprinted.
Only files of the specified maximum and minimum size are included in the fingerprint.
Only files that match the specified modification dates are included in the fingerprint.
|
Note - After a change to the filters (adding or removing a data type, selecting a different file size or modification date) the DLP gateway regards all files in the repository as new. In a large repository, this will result in a long scan. The fingerprint will only be enforced after this scan has ended. |
Use the Data Locations tree to include or not include repository sub-folders. If you want the fingerprint data type to prevent only one document type from leaving the organization, put that document in a folder that contains no other document. Select only that folder as the data location.
The Whitelist Repository window opens.
Enter a name and informative comments for the repository type.
By default, The DLP Blades object shows. This object represents all gateways that have the DLP blade enabled. Only gateways selected here scan the repository.
This tests that DLP gateways defined in the gateways list (step 2a) can access the repository using the (optional) assigned authentication credentials.
A text segment from a file in the whitelist repository might match a text segment from a file in the fingerprint repository. Such segments can be safely ignored during the fingerprint Data Type match.
The Whitelist shows in the list of repositories.
To manually start a scan of the whitelist repository, click Start in the Scan now area on the summary pane.
There are two ways to create a list of files that will never be matched by the DLP rulebase:
Files in the list are uploaded to the Security Management Server and not matched against DLP rules. This option is recommended if you only have a small number of files.
Files in this repository are not included in the match.
To add files to the Whitelist:
The file is uploaded to a folder on the Security Management Server.
|
Note - For a file not to be included in the DLP match, it must exactly match a file in the whitelist. |
In DLP administration you may need to define email addresses or domains that are outside of your network security management.
For example:
You can create Email Address objects. Each object holds a list of addresses or domains, or both, where the list can contain one or more items. After you create an Email Address object, you can add it to:
For example, the administrator of a hospital makes an exception to a rule that prevents patient records from being sent outside the organization. The exception says to allow patient records to be sent to the email address of the social worker.
|
Note - All the addresses in the object are a unit. You cannot choose to use some email addresses of an object and not others. |
Notes about Domains:
example.comexample.com, email addresses such as jsmith@uk.example.com are also considered as part of My Organization.To define email addresses and domains for use in rules:
The Email Addresses window opens.
Watermarking lets you monitor outgoing Microsoft Office documents. Visible watermarks or hidden encrypted text are added to Word, Excel, or PowerPoint files created in Office 2007 (or higher). Visible watermarks work as a deterrent by making it clear that the document contains confidential data. Invisible watermarks make forensic tracking possible: users and computers that handled the document can be traced to source.
Watermarking works by introducing custom XML files that contain the watermarking data. Only documents in these Office Open XML formats can be watermarked:
|
Important - Older formats supported in Office 2007 and above for backward compatibility (such as doc, ppt, and xls, cannot be watermarked). Changing the file extension from doc to docx will not make the document eligible for watermarking. |
To watermark documents:
In SmartDashboard, on the DLP tab:
DLP has 3 built-in profiles:
|
Note - You can also modify a built-in profile. |
To create a new watermark profile:
New watermarks can be created from the Action column of a DLP rule, or from Additional Settings > Watermarks.
The Watermark Profiles window opens.
The Advanced Settings window opens.
|
Note -
|
The actual placement of watermarks depends on:
Watermark option |
Section Break |
In Word 2007 |
In Word 2010 |
|---|---|---|---|
All pages
|
Yes |
All pages get watermark |
All pages get watermark |
No |
All pages get watermark |
All pages get watermark |
|
First page only
|
Yes |
All pages get watermark |
First page only gets watermark |
No |
All pages get watermark |
First page only gets watermark |
|
Even pages only
|
Yes |
All pages get watermark |
All pages get watermark |
No |
Only even pages get watermark |
Only even pages get watermark |
|
Odd pages only
|
Yes |
All pages get watermark |
All pages get watermark |
No |
Only odd pages get watermark |
Only odd pages get watermark |
On the General Page
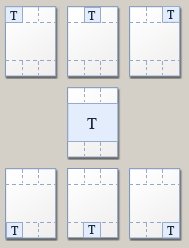
The Select text location on page window opens. There are seven possible locations for visible watermark text.
To put a shadow behind Watermark text in Word and PowerPoint:
(i) On the gateway, run: cpstop.
(ii) On the gateway, open for editing: $DLPDIR/config/dlp.conf.
(iii) Search for the attribute: watermark_add_shadow_text(0).
(iv) Change the value of the attribute from 0 to 1.
(v) Set percentages for watermark transparency and size, for docx and pptx files.
(vi) Save and close.
(vii) Run: cpstart.
Note: Before the changes to dlp.conf take effect, you must run cpstop and cpstart.
(The Incident UID in SmartView Tracker, which contains the IP address of the computer which sent the file)
![]()
|
Note - Watermark rotation is only available for:
|
On the Hidden Text page:
If Microsoft Office 2007 (or higher) is installed on the same computer as SmartDashboard, a preview of the watermark shows on a sample file in the preview pane.
|
Note - The preview pane is not available if you create or edit a watermark from the DLP policy rule base. To see a preview, create a watermark from Additional settings > Advanced > Watermarks > New. |
|
Note - Hidden encrypted text is not removed, only added to by each DLP gateway. Hidden text can later be used for forensic tracking. |
|
Important - If the Data Type scanned for by the DLP gateway occurs in the body of the email and not the document, the document will not be watermarked. For example if you are scanning for credit card numbers. If the credit card number shows in the body of an email with a document attached, the document will not be watermarked. The Data Type has to occur in the document. |
In SmartDashboard > Data Loss Prevention tab > Additional Settings > Watermarks, Watermarks are previewed in the right-hand pane on sample documents.
Preview works by downloading sample Office files from the Security Management Server and applying the watermark to them. The sample preview files are named:
To open a document or preview it, you must install Microsoft Office 2007 (or higher) on the computer that has SmartDashboard installed.
Watermarks can also be previewed on User-Added Files.
To view watermarks on user-added files:
The Select File window opens.
The Select File window is now divided into User Added Files and Sample Files.
|
Note - When you preview a user-added file, the file is uploaded to the Security Management Server. The file will stay on the server until you remove it by selecting the file in the Select File window and clicking the red X in the top right-hand corner. |
For Office documents that have been watermarked by a DLP gateway, view the watermarks in this way:
Office document |
Go to: |
|---|---|
Word |
View > Print Layout or Full Screen Reading |
Excel |
View > Page layout > Print Layout |
PowerPoint |
PowerPoint has a number of built-in layers. The DLP watermark sits above the slide layout layer but below the slide content layer. This means that the watermark always shows below the content of a slide. |
When scanned by the DLP gateway, an email with a document attached might match one or more DLP rules. If the rules have different and conflicting watermark profiles, then the conflict must be resolved for visible watermarks and resolved for hidden text.
Resolving Hidden Text Conflicts
If different watermark profiles specify invisible text, the text is taken from the profile attached to the DLP rule that has the highest precedence. Rule precedence is derived from the ACTION and SEVERITY priorities in the DLP Rule Base.
Action |
Priority |
|---|---|
Ask User |
1 |
Inform User |
2 |
Detect |
3 |
Hidden text is taken from the watermark profile belonging to the rule that has the highest ACTION priority. If the two rules have the Ask User setting, the same priority, then SEVERITY is considered:
Severity |
Priority |
|---|---|
Critical |
1 |
High |
2 |
Medium |
3 |
Low |
4 |
For example, if an email with a document attached matches these two rules:
Data |
Action |
Severity |
Watermark Profile |
|---|---|---|---|
Rule 1 |
Ask User |
Low |
W1 |
Rule 2 |
Detect |
Critical |
W2 |
The ACTION setting for Rule 1 has a greater priority than the ACTION setting defined for Rule 2. Rule 1 takes precedence. The hidden text configured for the W1 profile applies even though Rule 2 has a greater SEVERITY. If the rule is changed to:
Data |
Action |
Severity |
Watermark Profile |
|---|---|---|---|
Rule 1 |
Inform User |
Low |
W1 |
Rule 2 |
Inform User |
Medium |
W2 |
The rules have the same ACTION priority, so SEVERITY is considered. In this case Medium has a higher priority than Low. Hidden text from the W2 profile is added to the document. Rule 2 has precedence.
If the rules have the same priority for ACTION and SEVERITY, for example:
Data |
Action |
Severity |
Watermark Profile |
|---|---|---|---|
Rule 1 |
Inform User |
Low |
W1 |
Rule 2 |
Inform User |
Low |
W2 |
Rule precedence is decided according to an internal calculation based on the name of the rule in the data column.
Resolving Visible Watermark Conflicts
An outgoing document may match one or more rules in the DLP policy. If each rule specifies different watermarking profiles, then a conflict will arise. For example if different profiles specify dissimilar text in the center, the conflict must be resolved by merging the different watermark profiles according to rule precedence. Rule precedence is decided based on ACTION and SEVERITY priorities.
After rule precedence is decided, a merged watermark profile is built according to this criteria:
The procedure repeats until all watermarks are added to the merged profile. For example, if you have three DLP rules, each with a custom Watermark Profile, and an email matches all three of these rules:
DLP Data Rule |
Precedence |
Watermark Profile Name |
In graphic |
|---|---|---|---|
Rule_A |
1 |
W1 |
1 |
Rule_B |
2 |
W2 |
2 |
Rule_C |
3 |
W3 |
3 |
The merged profile (4) is built by taking elements from all the profiles.
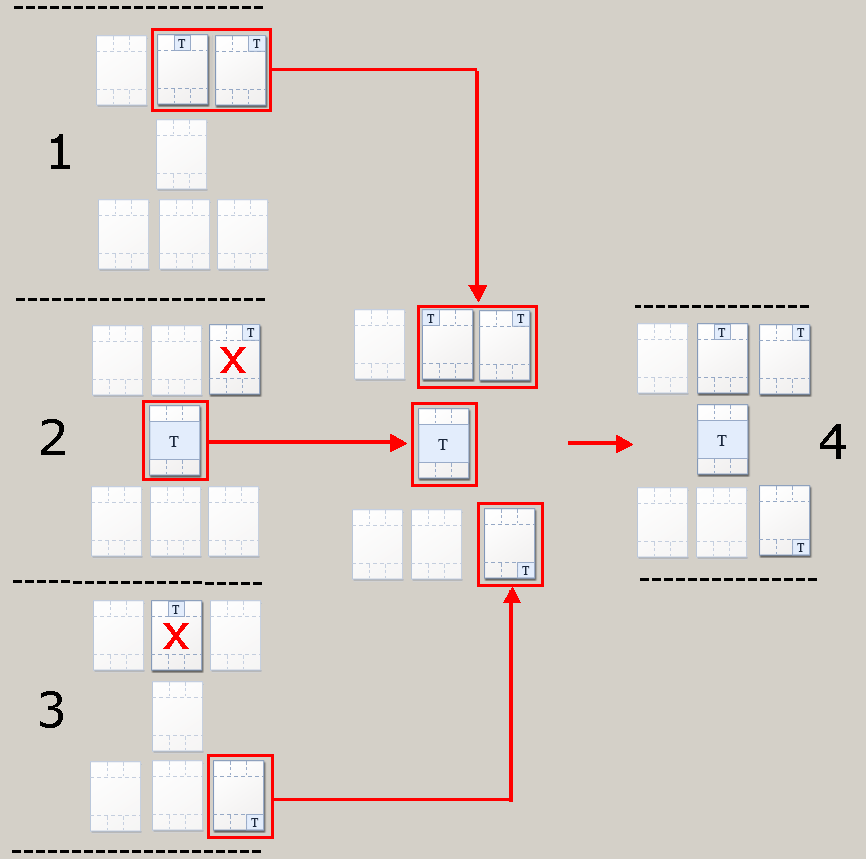
(The watermark in the top right corner will not overwrite the watermarked placed there by W1, which has higher precedence.)
(The watermark for the top center location is already taken by W1, which has greater precedence.)
Naming the Merged Profile
If the merged profile takes elements from existing profiles (hidden text or visible watermarks) then the name of those profiles are integrated into the name of the merged profile. In the above example, the name of the merged profile will be W1;W2;W3, with a semi-colon separating the individual profile names. This is the name that shows in the DLP Watermark Profile column in SmartView Tracker.
Watermarking can be turned off in a number of ways:
enable_watermarking_feature propertyIn the DLP rule base, the warning Watermarks are not applied on the DLP policy shows at the bottom of the policy table.
Clicking Apply opens the Advanced Settings Window where you can once more add watermarks in the DLP rules.
For forensic tracking, hidden text can be decrypted and read using the DLP watermark viewing tool.
To view hidden text on a watermarked document:
dlp_watermark_viewerEnter the name of one file or the path to a directory that contains a number of files.
|
Note - Only the hidden text is shown by the tool, not the document's content. |
Keys used for decrypting hidden text are stored on the Security Management Server and downloaded to the Security Gateway. DLP gateways managed by the same Security Management Server share the same keys and a common (random) ID. The random ID identifies the Security Management Server that installed the DLP policy on the gateway. The viewing tool will only show text added by gateways managed by the same Security Management Server. For example, for a document that has passed through three DLP gateways, each managed by a different Security Management Server, you must copy the file to each gateway and run the tool on each. The tool will only show the hidden text added by that gateway, and not the text added by gateways managed by other Security Management Servers.
|
Important - If you reinstall a Security Gateway, the keys and random ID are downloaded again from the server. The new gateway can be used to decrypt hidden text added by the old one. But if you reinstall the Security Management Server the random ID is lost. The random ID added to the document by the gateway will not match the ID of the new Security Management Server. The DLP viewer will not show the document's hidden text. |
In the rule base, you can change the default Source (My Organization) and the default Destination (Outside My Org) to any network object, user, or group that is defined in SmartDashboard, and you can fine tune user definitions specifically for DLP.
|
Note - SMTP only matches users, groups, and email addresses. HTTP and FTP only match Network objects. If needed, you can add a network and a user group to a rule. |
From version R75.20 and higher, you can also use these objects as the Destination of the rule:
|
Note - These objects are not enforced in rules installed on gateway versions before R75.20. In such cases, policy installation might fail with warnings and errors. To avoid such errors, make sure to specify gateway versions that are R75.20 and higher in the Install On column. |
To create a domain object:
You can set the Source of a rule to be any defined user, group, host, network, or VPN. You can then set the Destination to be Outside. The rule will inspect data transmissions from the source to any destination outside of the source. This will create DLP rules specific to one group of users.
|
Note the different between Outside Source (external to a source that is a subset of My Organization) and Outside of My Org (external to My Organization). To enable use of Outside Source, the DLP gateway must be functioning in front of the servers that handle the data transmission protocols. For example, to use Outside on SMTP transmissions, the DLP gateway must inspect the emails before the Mail Server does. |
Alternatively, the Destination of the rule could be another user, group, host, etc. This would create DLP rules to inspect and control the data transmissions between two groups of users.
Examples:
Data |
Source |
Destination |
Action |
|---|---|---|---|
Salary Reports |
Finance |
Outside Source |
Prevent |
Data |
Source |
Destination |
Action |
|---|---|---|---|
Customer Names |
My Organization |
Temps |
Prevent |
The Legal Department sends confidential legal documents to your legal firm. They need to be able to send to that firm, but never to leak to anyone else, either inside the organization or outside.
HR needs to send legal contracts to all employees, but not to leak to anyone outside the organization.
All other departments should have no reason to send legal documents based on your corporate template to anyone, with the exception of sending back the contracts to HR.
The first rule would be:
The second rule would be:
The third rule would be:
|
Note - In this rule, you would have to exclude the two groups if you want to ensure that the previous rules are applied. If you chose My Organization as the source of the third rule, it would apply to the users in Legal and HR and thus negate the other rules. |
To ensure that data transmissions to the DMZ are checked by Data Loss Prevention, define the DMZ as being outside of My Organization.
For example, the PCI DSS Requirement 1.4.1 requires that a DMZ be included in the environment to prevent direct Internet traffic to and from secured internal data access points.
To ensure traffic from My Organization to the DMZ is checked for Data Loss Prevention:
You may choose to define the strictest environment possible. Using these settings ensures that data transmissions are always checked for Data Loss Prevention, even if the transmission is from and within your secured environment. For example:
|
Important - You must ensure that legitimate transmissions are not blocked and that Data Owners are not overwhelmed with numerous email notifications. If you do use the settings explained here, set the actions of rules to Detect until you are sure that you have included all legitimate destinations in this strict definition of what is the internal My Organization. |
To define a strict My Organization:
Data transmissions among the internal objects and users will be passed unchecked if the Source of the rule is My Organization. Everything else will go through Data Loss Prevention.
Each rule in the Data Loss Prevention policy has a definition for the protocols of the data transmission. The default setting for Protocols is Any: DLP will scan transmissions over all enabled protocols.
You can control which protocols are supported by DLP in general, or by each gateway, or for each rule.
To define supported protocols for DLP:
For example, if performance becomes an issue, you could clear the HTTP checkbox here, without making any other change in the policy. HTTP posts and web mail would go through without Data Loss Prevention inspection.
To define supported protocols for individual DLP Gateways:
The properties window of the gateway opens.
To define supported protocols for a rule:
If this column is not visible, right-click a column header. In the list of possible columns that appears, select Protocols.
Traffic that matches the other parameters of the rule, but is sent over another protocol, is not inspected.
When you choose a specific source or destination for a DLP rule, you can optimize the rule for the selected protocol.
By default, rules use all supported protocols, or the default protocols selected for the gateway (in the Check Point gateway window).
If you specify that a rule should use only mail sending protocols, such as SMTP, the source and destination can be users (including user groups and LDAP Account Units) or email addresses (including specific email or domains).
If you specify that a rule should use only HTTP or FTP or both, the rule will ignore any source or destination that is not recognized by IP address.
If the rule uses all supported protocols, HTTP and FTP will recognize only source and destinations that can be defined by IP address. SMTP will recognize and enforce the rule for sources and destinations based on users and emails.
To scan transmissions on HTTP running on any port other the standard HTTP ports (80, 8080), you must define the non-standard ports to be included in the HTTP protocol.
To add ports to HTTP:
The Services window opens.
The TCP Service Properties window opens.
The Advanced TCP Service Properties window opens.

