


|
|
|
In This Section: |
The first stage of DLP deployment uses the Data Loss Prevention policy provided Out of the Box.
When you open the SmartDashboard to the Data Loss Prevention tab, these views are available.
Page |
Function |
|---|---|
Overview |
Quick access to urgent tasks, commonly used features, and overview statistics. |
Policy |
Manage the rule base for Data Loss Prevention policy. |
Whitelist Policy |
Manage files that will never be matched by the DLP rulebase. |
Data Types |
Define representations of data assets to protect. |
Repositories |
Manage the fingerprint and whitelist repositories. The fingerprint repository contains documents that are not allowed to leave the organization. The whitelist repository contains documents that can leave the organization. |
My Organization |
Define the internal environment: networks, users, email addresses, and VPN communities. |
Gateways |
Enable the Data Loss Prevention Software Blade on Check Point Security Gateways. You can define DLP gateways and Exchange Agents. An Exchange Agent lets you scan internal emails between Microsoft Exchange clients once you install the Exchange Security Agent on the Exchange Server. The table shows status, uptime, inspected items, version, CPU usage and comments for the gateways and Exchange Agents. You can see a graphical representation of this information in SmartView Monitor. |
UserCheck |
Manage UserCheck objects that are used in a Rule Base to:
|
Additional Settings: |
|
Protocols |
Enable the protocols to be checked on individual DLP Gateways. |
Mail Relay |
Configure the mail server for DLP to send notification emails. |
Email Addresses or Domains |
Manage email address lists and domains for use in DLP rules and Data Types. |
Watermarks |
Configure the tracking option that adds visible watermarks or invisible encrypted text to Microsoft Office documents (Word, Excel, or PowerPoint files from Office 2007 and higher) that are sent as email attachments (outgoing and internal emails). |
Advanced |
|
HTTPS Inspection |
Configure inspection of HTTPS/SSL traffic from enterprise networks to external destinations. |
The My Organization page shows what DLP recognizes as data movement in the internal network (where data leakage is not an issue) and what is external (where data transmission must be monitored).
By default, My Organization includes all hosts and networks that are behind the internal interfaces of the DLP gateway. My Organization also includes specific users, user groups, and all users in the LDAP groups defined in the Security Management Server.
|
Note - The SmartDashboard must be in the Active Directory domain to take advantage of the LDAP User List features. |
My Organization Definitions: |
You define the DLP internal domains and specific email addresses that are included in My Organization. You can add domains to include your remote offices and branch offices as part of the definition of what is My Organization.
|
Important - If your organization uses cloud servers, you should not add them. The technology governing cloud servers makes them inherently insecure, taking the control of your data away from your administration and giving it to a third party. It is recommended to detect all sensitive data sent to and from cloud servers, rather than to trust a service provider to make sure that other clients do not have access to your data. |
Add email addresses to include those that are safe for general data sharing. You should not add the private email addresses of any employees or managers. Taking home confidential data is a bad practice that you should discourage and eventually prevent.
Notes about Domains:
example.comexample.com jsmith@uk.example.com
|
Important - Do not remove the default domain definition. You must have a domain in the My Organization definition, or an LDAP server defined. If you do not have the domain defined (either by Email Address Domain or LDAP Account Unit) for My Organization, DLP will not scan emails. |
To add domains and email addresses to My Organization:
Most organizations use an external LDAP server (for example, Active Directory) to manage users and user groups.
You can define an internal user account to use as a source or destination in the Rule Base when:
You can add accounts for individual users from the Data Loss Prevention tab in SmartDashboard.
To define user accounts as internal users:
The User Properties window opens.
The most important field is the email address. This lets DLP recognize the user for email scans.
The user is added to the other Software Blades managed by SmartDashboard.
DLP may require different user groups than those in the LDAP server. For example, you may want a group for new employees, whose rules are set to Ask User rather than Prevent, to give them time to become familiar with the organization guidelines. You may also want a group for temporary employees or terminating employees, to give them stricter rules.
To define user groups:
The Group Properties window opens.
If the default option for the Users area is selected (Users, user groups and LDAP groups defined in the Security Management Server), you can define exclusions to this definition of My Organization.
For example, you can exclude the CEO. This lets the CEO send any data without having it scanned.
To exclude users from My Organization:
The User groups and Users window opens.
By default, My Organization includes networks, network groups, and hosts that are defined as being behind the internal interface of the DLP gateway.
If you choose to define My Organization by naming specific networks or hosts, any internal networks or hosts that you did not name will not be considered internal by DLP.
|
Note - The networks and hosts must already be defined in the Objects Tree of SmartDashboard. |
To define specific networks and hosts:
In large sites it is often more efficient to define exclusions to the internal interfaces than to define the internal environment piece by piece.
If the default option in My Organization is selected (Anything behind the internal interfaces of my gateways), you can define exclusions to internal Networks.
Any network, network group, or host that you define as an exclusion will be recognized by Data Loss Prevention as Outside My Org. To scan data sent from these networks, you must change the default Source of rules from My Org to the network object.
To exclude networks from My Organization:
The Networks and Hosts window opens.
If your Check Point deployment includes Virtual Private Networks, allow dynamic VPN traffic to be included in your My Organization definition.
A DLP gateway is aware of the VPN communities in which it participates. A dedicated DLP gateway for example, is aware of the VPN communities in which its protecting Security Gateway participates. Even if other VPNs are configured in your SmartDashboard, only those that are relevant to the DLP gateway are included in the DLP My Organization.
Remote Access communities in VPN of My Organization are supported only in Office Mode.
To configure Office Mode for support of Remote Access communities:
To include VPN traffic in My Organization:
VPNs provide an encrypted tunnel between sites. If you have multiple VPNs in your deployment, you might want to exclude some from the My Organization definition.
For example, if you have a VPN with a third party, such as a business partner, you can configure a VPN community that joins the organizations together. All traffic between the two organizations would be seen as internal by the VPN gateway of each office. However, if you want DLP to prevent confidential data being passed to the business partner, you could exclude the VPN from My Organization and thus control the type of data that is passed.
Before you make this decision, you should know which VPNs defined in your SmartDashboard are relevant to the DLP gateway.
DLP can see only the VPNs in which its protecting VPN gateway participates. All defined gateways are listed in the VPN Communities window in which you define exclusions; but only the relevant VPNs can be manually excluded. The others are always excluded and cannot be included.
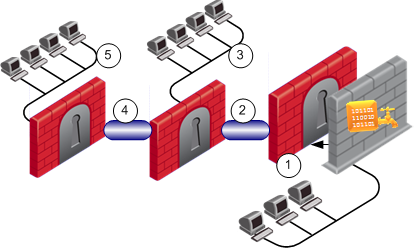
The organization behind the DLP gateway is protected by a VPN gateway (1). This gateway participates in a VPN community (2). Therefore, DLP sees the remote hosts in the VPN (3) as part of My Organization.
The protecting VPN gateway does not participate in the VPN community between the other sites (3 and 5), and is not aware of the VPN between them (4). Therefore, DLP considers the hosts in site 5 as external to My Organization.
To discover VPNs known to DLP:
For an integrated DLP deployment, this is the DLP gateway itself. The protecting VPN gateway includes the IP address of the DLP gateway in its encryption domain.
The DLP gateway is aware of the VPN communities that are listed in the IPSec VPN page of the protecting VPN gateway.
To exclude VPNs from My Organization:
The VPN Communities window opens.
Ignore the VPNs that are not relevant to the protecting VPN gateway; they are excluded by default.
The DLP policy defines which data is to be protected from transmission, including: email body, email recipients, email attachments (even if zipped), FTP upload, web post, web mail, and so on. The policy determines the action that DLP takes if a transmission is captured.
Manage the rules of the policy in the Data Loss Prevention > Policy page.
A Data Loss Prevention rule is made up of:
The rule base of the DLP gateway should look familiar if you have experience with the Check Point Firewall rule base, but there are differences.
When Identity Awareness is enabled, you can create access role objects and use them in the DLP policy. When Identity Awareness is enabled, in DLP:
Email Notifications for FTP and HTTP DLP violations
In addition to email notifications on SMTP DLP violations, you can configure notifications to be sent when the violation occurs using the FTP or HTTP protocols. To send these notifications, you must:
When you select Web or FTP in the Email Notifications area, the Web and FTP options are also selected in the Learn User Actions area. This lets DLP learn how the user decides to handle a DLP incident and apply the same decision for subsequent messages.
Access Roles in the Source or Destination of a Rule
Access role objects can be used in the Source or Destination column of a DLP rule. The presence of access roles makes DLP user aware. The access role object identifies users, computers, and network locations as one object. You can select specified users, user groups, or user branches as the object.
Redirection to an Authentication Captive Portal
Captive Portal redirection only applies to the HTTP and HTTPS protocols. Redirection occurs when the sender is unknown (the IP address does not map to any user in the AD) and the Action of the DLP rule is Identity Captive Portal and one of these conditions is also met:
Redirecting to the Captive Portal lets DLP:
Once known, these users can be matched against access roles in the policy.
|
Note - Captive Portal redirection occurs:
|
To Redirect HTTP traffic to the Captive Portal:
The Action column shows Identity Captive Portal.
Identifying Users Behind a Proxy
If your organization uses an HTTP proxy server behind the gateway, the identities of users behind the proxy will remain hidden unless you configure:
You can also configure the DLP gateway to strip the X-Forward-For header in outgoing traffic. Without the header, internal IP addresses are not be shown in requests to the internet.
To use X-Forwarded-For HTTP header:
Example DLP rule with Identity Awareness
These three rules show how Identity Awareness works with DLP:
Rule 1
Data |
Source |
Destination |
Protocol |
Action |
|---|---|---|---|---|
PCI – Credit Card Numbers |
Finance_Dept (Access Role) |
Outside My Org |
Any |
Prevent |
In this rule:
Rule 2
Data |
Source |
Destination |
Protocol |
Action |
|---|---|---|---|---|
PCI – Credit Card Numbers |
My Organization |
Outside My Org |
Any |
Prevent Identity Captive Portal |
In this rule:
|
Note - Enabling Identity Captive Portal on this rule means that HTTP or HTTPS connections passing from inside to outside of the organization must be identified with a user. |
Rule 3
Data |
Source |
Destination |
Protocol |
Action |
|---|---|---|---|---|
PCI – Credit Card Numbers |
Finance_Dept (Access Role) |
Outside My Org |
Any |
Prevent Identity Captive Portal |
In this rule:
The DLP rule order does not matter. In this rule base, each transmission is checked against each rule.
Because the rule order does not matter, you can change the display of the DLP policy for your convenience.
If data matches a rule, and the rule has exceptions, the exceptions to a rule are checked. If the data matches any exception, DLP allows the transmission.
For example, consider a rule that captures emails containing more than fifteen employee names in the body of a message. If a user in the HR department sends a list of twenty employees to an outside address (such as their contractor), the email will be allowed without incident logging or any Data Loss Prevention action taken - because the same rule has an exception that allows users in the HR group to send lists of employee names outside your organization.
If the data matches multiple rules, one with an exception and one without exceptions, the rule without exceptions is used.
If the data matches multiple rules, the most restrictive rule is applied.
For example, if a user sends an email with an attached unencrypted PDF, the email can match two rules. One rule is Detect: detect emails to an external destination that contain PDF files. A second rule is Ask User: delay emails with PDF files that are unencrypted, until the user specifies that it is good to send. An administrator with full permissions or the View/Release/Discard DLP messages permission can also send/discard this mail from SmartView Tracker. This rule will also inform the Marketing and Technical Communications manager that the PDF was released from the company to an external destination.
In this case:
For each DLP rule that you create for a Data Type, you also define what action is to be taken if the rule matches a transmission.
Action |
Description |
|---|---|
Detect |
The transmission is passed. The event is logged in SmartView Tracker and is available for your review and analysis in SmartReporter and SmartEvent. The data and the email itself, or the properties of the transmission if not email, are saved in storage for future reference. You can choose to notify Data Owners of the event. This is true for all the following actions as well. |
Inform User |
The transmission is passed, but the incident is logged and the user is notified. |
Ask User |
The transmission is held until the user verifies that it should be sent. A notification, usually with a remediation link to the Self Incident Handling portal, is sent to the user. The user decides whether the transmission should be completed or not. The decision itself is logged in SmartView Tracker under the User Response category. Administrators with full permissions or with the View/Release/Discard DLP messages permission can also decide whether the transmission should be completed or not from SmartView Tracker. This can be useful in the event that a user is not available to make sure if it should be sent. |
Prevent |
The data transmission is blocked. Note: Check Point does not recommend using the Prevent action as a first choice. The action may prove disruptive. To improve the accuracy of rule matches, set rules to Prevent only when you have tested them with the less strict actions over a reasonable amount of time. |
Watermark |
Tracks outgoing Microsoft Office documents (Word, Excel, or PowerPoint files from Office 2007 and higher) by adding visible watermarks or invisible encrypted text.
|
|
Note - If data matches multiple rules, the rule of the most restrictive action is applied. The order from most restrictive to least is: Prevent, Ask User, Inform User, Detect. |
The Detect action is set to rules by default because it is the least disruptive of the action options. When Data Loss Prevention discovers a transmission containing protected data, an incident is logged in SmartView Tracker and other logging actions (if any) are taken.
You might want to leave all your rules in Detect at first. Then you can review the logs and decide which rules are needed according to your organization's actions. This could save you and your users a lot of time and make your explanations of what they need to know and what to do much more specific to their needs.
A primary consideration for creating Data Loss Prevention rules is how to audit incidents.
In the rule base of the Data Loss Prevention policy, the Track column offers these options:
Option |
Meaning |
|---|---|
Sends an email to a configured recipient |
|
Log |
Records the incident in SmartView Tracker or SmartEvent. (All the other tracking options also log an incident.) |
Alert |
Opens a pop-up window in the SmartView Monitor. |
SNMP Trap |
Sends an SNMP alert to the SNMP GUI. This uses the fwd process, to run the |
User Defined (alert) |
Sends one of three possible customized alerts. The alerts are defined by the scripts specified in Policy > Global Properties > Log and Alert > Alert Commands. The alert process on the Log server runs the scripts. |
Store Incident |
Determines how the data should be stored and deleted (if at all). The options are:
|
Store Incident
Store Incident tracking options determine how data that matches a DLP rule is stored (or not stored). These options are available:
Store Option |
Meaning |
||||||||||
|---|---|---|---|---|---|---|---|---|---|---|---|
Yes |
Note: For FTP and HTTP, only those elements of the message that violate DLP rules are stored. |
||||||||||
Only as Text |
Note: For FTP and HTTP, only those elements of the message that violate DLP rules are shown in the HTML page presented by SmartView Tracker or SmartEvent. |
||||||||||
Don't Store |
When the rule is matched, the incident is logged and the data deleted so that it cannot be viewed in SmartView Tracker or SmartEvent. Note: The deletion of the data can be prevented by other store options. If a scanned message matches a number of store incident options, the option with highest priority has precedence:
|
||||||||||
Delete |
Logs the incident and immediately deletes the data. Select this example for sensitive data such as credit card numbers. Note: If the email that contains the sensitive data also has an attachment that must be watermarked, the email is not deleted. The email is saved but cannot be viewed using SmartView Tracker or SmartEvent. |
Resolving Store Incident Conflicts
If a scanned message matches a number of different DLP rules, and each rule has a different store option, the option with highest priority has precedence. For example, if an email matches these rules:
Rule |
Store Incident Option |
Priority |
|---|---|---|
Rule_1 |
Only as text |
3 |
Rule_2 |
Yes |
2 |
Rule_3 |
Don't store |
4 |
The store incident option related to Rule_2 has the highest priority. The data will be stored even though the email matched a rule (Rule_3) configured to delete the data.
Changing the Priority
The Only as Text store option can be configured to have a higher priority than Yes. To change the priority:
$DLPDIR/config/dlp.confEach message protocol has its own section. For example:
) :ftp ( :enabled (1) :maximum_words_to_log (14) :maximum_chars_to_words_in_log (490) :cleanup_session_files (1) :save_incident_quota_percentage (85) :allow_append_cmd (0) :view_incident_dispute_option (yes)
|
view_incident_dispute_optionThe default value is Yes.
YesTextdlp.confThe Time column in the DLP Rule table holds a time object or group of time objects. The time object is the same time object as used in the Firewall Rule Base.
|
Notes -
|
To create a time object:
A window opens showing a list of existing time objects. You can select an existing time or create a new one.
|
Note - Existing time object can be reused. |
The days when the time object enforces the DLP rule. The time object can be enforcing the DLP rule each day, specified days of the week, a specified month or all months.
If you have more than one time object, you can merge them into a group. When a condition in one of the time objects in the group is met, the DLP rule is enforced.
To create a time group object:
The Time Group window opens.
The DLP blade supports the extraction and scanning of these compressed archive types:
For any rule in the policy, you can choose that it be deployed on specific Enforcing Gateways.
To deploy a rule on specific Enforcing DLP Gateways:
Defined DLP Gateways appear in a menu.
Check Point Data Loss Prevention supports various data transmission protocols.
It is recommended that you enable protocols as needed in your deployment. Start with only SMTP. Observe the logs on detected emails and user responses for handling them. Later, add FTP to the policy. For emails and large uploads, users do not expect instant responses. They can handle incidents in the Portal or UserCheck client for emails and uploads without disturbing their work, especially if your users know what to expect and how to handle the incidents.
HTTP, which includes posts to web sites, comments on media sites, blogging, and web mail, is another matter. Users do expect that when they press Enter, their words are sent and received instantly. If an employee uses HTTP for mission-critical work, having to decide whether a sentence is OK to send or not every instance is going to be extremely disruptive. Therefore, it is recommended that you enable HTTP only after you have run analysis on usage and incidents.
You can also enable inspection for Exchange Agent emails and the HTTPS protocol.
To select protocol deployment for all gateways:
|
Important - If you clear all of the protocol checkboxes, Data Loss Prevention will have no effect. |
To select protocol deployment per gateway:
The properties window of the gateway opens.
In the process of Data Loss Prevention, analysis of incidents is essential.
Before you begin, make sure that the severity of rules in the policy is accurate.
While auditing rules with SmartView Tracker and SmartEvent, use the Follow Up flag. If you find an incident or a set of incidents that you want to fine-tune, or for which you doubt whether the action is best, you can set the Data Type or the rule to Follow Up.
The Overview page of Data Loss Prevention in SmartDashboard provides a quick link to Data Types and rules that are marked for Follow Up.
The DLP gateway issues logs for various events.
To open SmartView Tracker:
The Data Loss Prevention logs are categorized for filtering.
To see more information:
The Record Details window opens.
The DLP Record Details window opens, displaying more information about the incident in an easy-to-read format, with links back to the Data Loss Prevention tab in SmartDashboard or to specific information on the Data Type.
From the log of a specific incident you can open the actual data that caused the incident. You should not have to review most of the incidents manually, but the original transmission (for example, the email or its attachment) is kept for you if there is a question from the sender or the data owners.
Because personal emails and web posts may be captured and stored for viewing, you must let the users know that this may happen. Failure to do so may cause your organization issues with local privacy laws.
|
Note - To view DLP incidents in the SmartView Tracker or SmartEvent SmartConsole application on a Windows 7 computer, Microsoft Office 2010 is required. DLP incidents may not show if the incidents (which are in EML file format) are associated with any other application. |
SmartView Tracker actions for DLP incidents include:
DLP Action |
Description |
|---|---|
Ask User |
DLP incident captured and put in Quarantine, user asked to decide what to do. |
Do not Send |
User decided to drop transmission that was captured by DLP. An administrator with full permissions or with the View/Release/Discard DLP messages permission can also drop these transmissions. Email notification is sent to the user. |
Send |
User decided to continue transmission after DLP capture. An administrator with full permissions or with the View/Release/Discard DLP messages permission can also decide to continue transmission. Email notification is sent to the user. |
Quarantine Expired |
DLP captured data transmission cannot be sent because the user did not make a decision in time. Expired incidents may still be viewed, until they are deleted (routine cleanup process). |
Prevent |
DLP transmission was blocked. |
Allow |
DLP transmission was allowed; usually by exception to rule. |
Inform User |
DLP transmission was detected and allowed, and user notified. |
Deleted Due To Quota |
DLP incidents are deleted from gateway for disk space. |
DLP incidents can show some or all of these columns and are available to all administrators.
DLP Columns |
Description |
|---|---|
Incident UID |
Unique ID of the incident. |
DLP Action Reason |
Reason for the action. Possible values: Rule Base, Internal Error, Prior User Decision |
Related Incident |
Internal incident ID related to the current log. |
DLP Transport |
Protocol of the traffic of the incident: HTTP, FTP, Email. |
Using the Incident UID as a key between multiple logs:
Each DLP incident has a unique ID included in the log and sent to the user as part of an email notification. User responses (Send, Do not Send) are assigned the same Incident UID that was assigned to the initial DLP incident log.
If a user/administrator sends an email with a DLP violation and then decides to discard it, two logs are generated. The first log is a DLP incident log with Ask User action and is assigned an Incident UID. On the user action, the second log is generated with the same UID, with the Do not Send action.
Each matched Data Type generates its own log. The gateway makes sure that all the Data Type logs of one incident show the same unique Incident UID and rule action (Prevent, Ask, Inform, or Detect). This happens also if Data Types were matched on different rules. The same action shown for an incident is the most restrictive.
For example, in a case that a transmission matches two Data Types. Each Data Type is used in a different rule. The action of one rule is Prevent. The action in the second rule is Detect. The two logs that are generated will show Prevent as the action. The action implemented will be Prevent. The log of the Detect rule will show Rule Base (Action set by different rule) in the DLP Action Reason column.
These columns are restricted to administrators with permissions.
Restricted Filters |
Description |
|---|---|
UserCheck |
|
User Response |
Comment entered by the user in the text box shown in the UserCheck notification. |
UserCheck Message to User |
The message shown to the user. |
Interaction Name |
The interaction name as shown in SmartDashboard. |
Fingerprint |
|
Matched File |
The file name and path in the scanned fingerprint repository that matches the inspected message. |
Matched File Percentage |
How much is this file similar to Matched File. In "exact match" this will always be 100%. |
Matched File Text Segments |
In a partial match, the number of file parts/segments that are matched between the Matched File and the inspected file (parts/segment may overlap). |
DLP Type |
|
DLP Rule Name |
Name of the DLP rule on which the incident was matched. |
Message to User |
Message sent, as configured by administrator, for the rule on which the incident was matched. |
DLP Words List |
If the Data Type on which the incident was matched included a word list (keywords, dictionary, and so on), the list of matched words. |
DLP Relevant Data Types |
If matched Data Type is a group Data Type. This field specifies which Data Types from that group were matched. |
User Information |
|
DLP Recipients |
For SMTP traffic, list of recipients of captured email. |
Mail Subject |
For SMTP traffic, the subject of captured email. |
Scanned Data Fragment |
Captured data itself: email and attachment of SMTP, file of FTP, or HTTP traffic. |
More |
|
UserCheck |
A Boolean field that shows if the log is produced by UserCheck or by another DLP. |
Data Type Name |
Name of the matched Data Type. |
Data Type UID |
Internal ID of the Data Type on which the incident was matched. |
DLP Categories |
Category of Data Type on which the incident was matched. |
DLP Template Score |
A measurement, expressed as a percentage, that shows how closely a document matches the template file. 0% - The document and template are very different. 100% - The document and template are a close match. |
SmartEvent provides advanced analysis tools with filtering, charts, reporting, statistics, and more, of all events that pass through enabled Security Gateways. SmartEvent combines all DLP logs of the same incident (all matching rules and Data Types and user action if applicable) to a single event.
You can filter out the specific Data Loss Prevention information for efficient monitoring and relevant reporting on DLP incidents.
To open SmartEvent:

