Traditional Mode VPNs
Introduction to Traditional Mode VPNs
The Simplified Mode lets you maintain and create simpler, less error prone and more secure VPNs. It also makes it easier to understand the VPN topology of an organization, and to understand who is allowed to communicate with whom. In addition, new VPN features such as VPN routing are supported only with a Simplified Mode Security Policy.
However, organizations that have large VPN deployments with complex networks may prefer to maintain existing VPN definitions and continue to work within Traditional Mode until they are able to migrate their policies to Simplified Mode.
For guidelines on how to convert Traditional Mode VPNs to Simplified Mode, see Converting a Traditional Policy to a Community Based Policy.
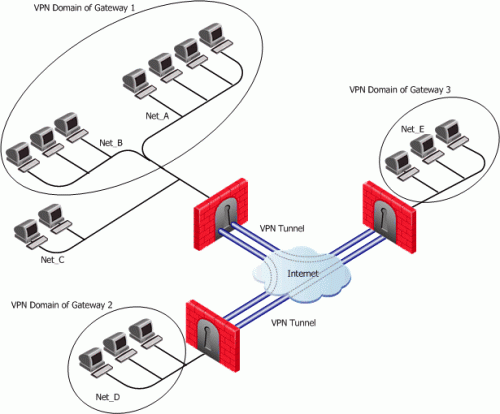
VPN Domains and Encryption Rules
The figure depicts a VPN between Security Gateways, and the VPN Domain of each Security Gateway. Net_A and Net_B are the VPN Domain of Security Gateway 1, Net_D is the VPN Domain of Security Gateway 2, and Net_E is the VPN Domain of Security Gateway 3.
The Table below shows how the VPN is implemented in a rule. in Traditional VPN Mode. A single rule with the Encrypt rule action, deals with both access control and encryption.
Example Encrypt rule in a Traditional Rule Base
|
|
|
|
|
|
|
Source
|
Destination
|
Service
|
Action
|
Track
|
Install On
|
Net_A
Net_E
|
Net_A
Net_E
|
My_Services
|
Encrypt
|
Log
|
Security Gateway 1
Gateway 3
|
|
A connection that matches an Encrypt rule is encrypted (or decrypted) and forwarded by the Security Gateways enforcing the policy. Sometimes, a connection may match the encrypt rule, but will not be encrypted. Consider the following rule:
Encrypt rule where encryption does not take place
|
|
|
|
|
|
|
Source
|
Destination
|
Service
|
Action
|
Track
|
Install On
|
X
|
Y
|
My_Services
|
Encrypt
|
Log
|
Policy targets
|
|
If the source or the destination are behind the Security Gateway, but are not in the VPN Domain of the Security Gateway, the connection is dropped.
For example, if Source X is in Net_C and Destination Y is in Net_D, Security Gateway 1 drops the connection because the Action says Encrypt but the connection cannot be encrypted because the source is not in the VPN Domain of Security Gateway 1.
If the source and destination are inside the VPN Domain of the same Security Gateway. In this case, the connection is accepted in the clear.
For example, if Source X is in Net_A and Destination Y is in Net_B, the connection originates at X and reaches the Security Gateway, which forwards the response back to Y. The connection is not encrypted because there is no peer Security Gateway for Y that could decrypt the connection. A SmartView Tracker log is issued "Both endpoints are in the Encryption Domain".
Defining VPN Properties
It is possible to use different encryption methods between the same Security Gateways. Different connections between two Security Gateways can be encrypted using different methods. This is because different IKE phase 2 properties can be defined per Encrypt rule.
IKE Phase 1 properties are defined per Security Gateway.
Internally and Externally Managed Security Gateways
The Security Gateways at each end of a VPN tunnel can be managed by the same Security Management server or by different Security Management servers. A Security Gateway that is managed by the Security Management server is called an internal Security Gateway. If it is managed by a different Security Management server it is called an external Security Gateway.
If the peer Security Gateway is external, you must obtain certain details about that Security Gateway from the peer administrator, and configure them in SmartDashboard.
Considerations for VPN Creation
There are many ways of setting up a VPN. Before starting, a number of issues need to be considered, such as choosing the:
- Authentication method
- Certificate authority
Choosing the Authentication Method
Before Security Gateways can create a VPN tunnel, they need to authenticate to each other. This authentication is performed either by means of certificates or with a pre-shared secret. Certificates are considered to be a stronger form of authentication.
Choosing the Certificate Authority
If the Security Gateways use certificates, the certificates can be issued either by the Internal Certificate Authority (ICA) on the Security Management server, or by a third party OPSEC certified CA.
The Internal CA makes it very easy to use PKI for Check Point applications such as site-to-site and remote access VPNs. However, an administrator may prefer to continue using a CA that is already used within the organization, for generalized applications such as secure email, and disk encryption.
If the Security Gateways are both internally managed and use certificates for authentication, the easiest strategy is for both Security Gateways to present a certificate signed by the Internal CA.
Configuring Traditional Mode VPNs
Editing a Traditional Mode Policy
An existing Traditional Mode policy will open in Traditional Mode. To start a new Traditional Mode policy, proceed as follows.
In the Global Properties window, VPN page, select either Traditional mode to all new Security Policies or Traditional or Simplified per new Security Policy, and save the policy.
Assuming you selected Traditional or Simplified per new Security Policy:
- From the File menu, select New. The New Policy Package window opens.
- Give the new policy package a name.
- Select Security and Address Translation.
- In the VPN configuration method area, select Traditional mode and click OK.
In the Security Policy Rule Base, notice that one of the available Actions is Encrypt.
Configuring VPN Between Internal Gateways using ICA Certificates
Defining the Security Gateways
- For each Security Gateway that is to be part of the VPN define a Check Point Security Gateway object. In the Network Objects tree, right click and select New > Check Point > Security Gateway....
- In the General Properties page of the Check Point Security Gateway object, select VPN.
- In the Communication window, establish Secure Internal Communication.
- In the Topology page, define the IP address, network mask, and anti-spoofing for every Security Gateway interface
- Still on the Topology page, define the VPN Domain. select either:
- All IP Addresses behind Security Gateway based on Topology information or
- Manually defined. Either select an existing network or group from the drop-down list or create a new group of machines or networks by clicking New...
- In the VPN page, Certificate List area, Add a certificate issued by the ICA.
- Still on the VPN page, click Traditional mode configuration. The Traditional mode IKE properties window opens.
- In the Support authentication methods area, select Public Key Signatures. To specify that the Security Gateway will only use certificates issued by the ICA, click Specify and select the ICA.
- Select IKE Phase 1 encryption and data integrity methods or accept the checked defaults.
Defining the Encrypt Rule
- In the Security Rule Base, define the Encrypt rule(s).
- If you wish to change the IKE Phase 2 properties for this rule, double click the Encrypt action and make the required changes.
VPN Between Internal Gateways Using Third Party CA Certificates
Obtain the CA certificate, and define the Certificate Authority (CA) object. For details, see Enrolling with a Certificate Authority.
Defining the Security Gateways
- Define the Check Point Security Gateway object. In the Network Objects tree, right click and select New > Check Point > Security Gateway....
- In the General Properties page, select either VPN.
- In the Communication window, establish Secure Internal Communication.
- In the Topology page, define the IP address, network mask, and anti-spoofing for every Security Gateway interface.
- Still on the Topology page, define the VPN Domain. select either:
- All IP Addresses behind Security Gateway based on Topology information or
- Manually defined. Either select an existing network or group from the drop-down list, or create a new network or group by clicking New....
- In the VPN page, Certificate List area, Add a certificate issued by the certificate authority defined in step 1. For details, see Enrolling with a Certificate Authority.
- Still on the VPN page, click Traditional mode configuration. The Traditional mode IKE properties window opens.
- In the Support authentication methods area, select Public Key Signatures. To specify that the Security Gateway will only use certificates issued by the CA specified in step 1, click Specify and select the CA.
- Select IKE Phase 1 encryption and data integrity methods or accept the checked defaults.
- Repeat step 2 to step 8 for each Security Gateway taking part in the VPN.
Defining the Encrypt Rule
- In the Security Rule Base, define the Encrypt rule(s).
- If you wish to change the IKE Phase 2 properties for this rule, double click the Encrypt action and make the required changes.
Configuring VPN with Externally Managed Gateways Using Certificates
Obtain Information from the Peer Administrator
Obtain the Security Gateway topology and VPN Domain information about the externally managed Security Gateways from the peer administrator.
You must also agree on authentication, encryption and data integrity methods for the VPN.
You must also obtain the CA certificate of the peer, either from the peer administrator or directly from the peer CA.
Defining the CAs
- Obtain the CA certificate and create the Certificate Authority (CA) object for the internally managed Security Gateways. For details, see Enrolling with a Certificate Authority.
- Define the CA object for the externally managed Security Gateways, and configure it using the peer CA certificate.
Defining the Internally Managed Security Gateways
- Create the Check Point Security Gateway object. In the Network Objects tree, right click and select New > Check Point > Security Gateway....
- In the General Properties page, select either VPN.
- In the Communication window, establish Secure Internal Communication.
- In the Topology page, define the IP address, network mask, and anti-spoofing for every Security Gateway interface.
- Still on the Topology page, define the VPN Domain. select either:
- All IP Addresses behind Security Gateway based on Topology information or
- Manually defined. Either select an existing network or group from the drop-down list, or create a new network or group by clicking New....
- In the VPN page, Certificate List area, Add a certificate issued by the certificate authority defined in step 1. For details, see Enrolling with a Certificate Authority.
- Still on the VPN page, click Traditional mode configuration. The Traditional mode IKE properties window opens.
- In the Support authentication methods area, select Public Key Signatures. To specify that the Security Gateway will only use certificates issued by the CA specified in step 1, click Specify and select the CA.
- Select IKE Phase 1 encryption and data integrity methods or accept the checked defaults.
- Repeat step 3 to step 9 for each internally managed Security Gateway.
Defining the Externally Managed Security Gateways
- Create the externally managed Security Gateway object:
- If it is a Check Point Security Gateway, in the Network Objects tree, right click and select New > Check Point > Externally Managed Security Gateway....
- If it is not a Check Point Security Gateway, select Manage > Network Objects.. .> New...> Interoperable Device....
- For an external Check Point Security Gateway only: In the General Properties page, select VPN.
- Using the topology information supplied by the peer administrator, in the Topology page, manually define the IP address and network mask for every Security Gateway interface.
- Using the VPN Domain information supplied by the peer administrator, define the VPN domain in the VPN Domain section of the Topology page. Either select All IP Addresses behind Security Gateway based on Topology information or manually define a group of machines or a network and set them as the VPN domain.
- On the VPN page, click Traditional mode configuration. The Traditional mode IKE properties window opens.
- Select IKE Phase 1 encryption and integrity methods (in coordination with the peer Security Gateway's administrator) or accept the defaults.
- In the Support authentication methods area, select Public Key signatures.
- On the VPN page, click Matching Criteria.... The Certificate Matching Criteria window opens. The configurations settings in this window force the externally managed Security Gateway to present a certificate from a defined CA, and require that the details on the certificate match those specified here. This is enforced by the internally managed Security Gateways during IKE negotiation.
Defining the Encrypt Rule
- In the Security Rule Base, define the Encrypt rule(s).
- If you wish to change the IKE Phase 2 properties for this rule, double click the Encrypt action and make the required changes.
Configuring a VPN using a Pre-Shared Secret
When using a pre-shared secret to authenticate Security Gateways, you need to enable each Security Gateway in the VPN for pre-shared secrets. Then, on each Security Gateway, define a pre-shared secret for each of the other Security Gateways. However, for each pair of Security Gateways, you only need to define the pre-shared secrets for the pair on one of the Security Gateways.
For example, in a VPN with four Security Gateways, A,B, C and D, there will be six secrets: A-B, A-C, A-D, B-C, B-D and C-D.
- On A define the secrets for B, C and D.
- On B define the secrets for C and D.
- On C define the secret for D.
The following procedure applies to both internal and external Security Gateways. When working with externally managed Security Gateways, the administrator of the peer external Security Gateways must configure his or her Security Gateways appropriately.
Obtain Information from the Peer Administrator
If working with externally managed Security Gateways, obtain from the peer administrator the external Security Gateway topology and VPN Domain information.
You must also agree on the pre-shared secrets, and on authentication, encryption and data integrity methods for the VPN.
Defining the Security Gateways
- Define the Security Gateway object.
- If the Security Gateway is an internal Security Gateway, define a Check Point Security Gateway object. In the Network Objects tree, right click and select New > Check Point > Security Gateway....
- If the Security Gateway is externally managed:
- If it is a Check Point Security Gateway, In the Network Objects tree, right click and select New > Check Point > Externally Managed Security Gateway....
- If it is not a Check Point Security Gateway, select Manage > Network Objects... > New... > Interoperable Device....
- For an internally managed Security Gateway or for a Check Point externally managed Security Gateway, in the General Properties page of the Security Gateway object, select VPN.
- For an internally managed Security Gateway only, in the Communication window, establish Secure Internal Communication.
- In the Topology page, define the IP address, network mask, and anti-spoofing for every Security Gateway interface
- Still on the Topology page, define the VPN Domain. select either:
- All IP Addresses behind Security Gateway based on Topology information or
- Manually defined. Either select an existing network or group from the drop-down list or create a new group of machines or networks by clicking New...
- In the VPN page, click Traditional mode configuration. The Traditional mode IKE properties window opens.
- In the Support authentication methods area, select Pre-shared Secret, click Edit Secrets.... Only peer Security Gateways which support pre-shared secrets appear in the list.
- Type a secret for each peer Security Gateway.
- Select IKE phase 1 encryption and data integrity methods or accept the checked defaults.
- Repeat step 1 to step 6 for each Security Gateway taking part in the VPN.
Defining the Encrypt Rule
- In the Security Rule Base, define the Encrypt rule(s).
- If you wish to change the IKE Phase 2 properties for this rule, double click the Encrypt action and make the required changes.
|
|
