Reports
Reports Tab
Use the tab to see, manage and generate reports that show a summary of events identified by SmartEvent. You can generate report for these supported blades:
- Application and URL Filtering events
- Data Loss Prevention events
- IPS events
- Anti-Bot and Anti-Virus events
- - Tabular list of all events, including events not related to these supported blades
Each supported blade has its own filter criteria and format that for presenting the information.
Each report contains a high-level summary of event patterns followed by detailed analyses and graphs. Each report has its own format and filter criteria.
You can generate reports that show events on a daily, weekly or monthly basis. Some blades can show events summarized by domain.
SmartEvent includes these output options for your generated reports:
- Show on the tab
- Open in a Web browser
- Print
- Save as a PDF file
- Send as an email attachment to specified individuals
Predefined Reports
SmartEvent includes many predefined reports that you can run right out of the box. This release includes predefined reports for daily, weekly, monthly and user-specified time frames (Shown as in the tree).
You can identify predefined reports by the predefined report icon  in the tree. You cannot change the default time frame or filter parameters for predefined reports. in the tree. You cannot change the default time frame or filter parameters for predefined reports.
Custom Reports
You can define custom reports that show the information necessary to identify and handle security threats. Custom reports are based on existing predefined or custom reports.
You can identify custom reports in the tree by the custom report icon  . .
To create a custom report:
- Right-click an existing report in the tree.
- Select from the options menu.
- In the window, enter a name for the new report.
- Continue with the procedures in the Configuring Reports section.
You can also click a report definition and then save, rename or delete it.
Configuring Reports
You can configure predefined and custom reports in accordance with your requirements. Reports are based on queries using these criteria:
- - Defines the default time frame for a report (custom reports only)
- - Defines the filter conditions for a report (custom reports only)
- - Defines when a report will run automatically (all report types)
- - Sends the report by email and defines the default email addresses to use (all report types)
To configure a report:
- Select a report in the tree and click .
- In the window, configure the report criteria using the procedures for the applicable blade or report type. The individual procedures show in the next sections.
- Click .
Defining the Time Frame
You can define a default period of time (time frame) for each report. These defaults are used for reports that run automatically on a predefined schedule. When you manually generate a report, you define the time frame at run time.
There are five predefined time frames that you can use for all reports:
- (default for predefined daily reports)
- (default for predefined weekly and other reports)
- (default for predefined monthly reports)
- Select a start and end date
To define the time frame:
- Select a report in the tree.
- Select from the options menu.
- On the page, do one of these steps:
- Select a predefined time frame from the list.
or
- Define a custom date or range of dates in the field.
Report Filters
You can use filters with reports to identify and summarize applicable events. Each report has one or more optional filters that you can use. You can define you own filters for custom reports but you cannot change filter definitions for predefined reports.
Each filter type has its own configuration window, from which you can select values from a list or manually enter values. See the online help for an explanation of the fields in each window type.
You can also add , where users enter filter criteria each time they run the report.
To define a report filter:
- In the window, go to the pane.
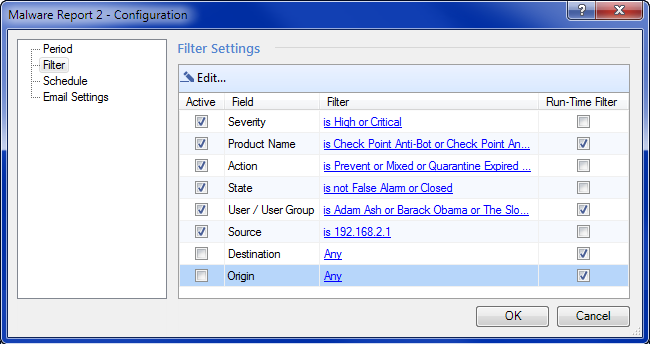
- In the pane, do one or more of these steps to work with the filter settings:
- Select the option to include the selected filter in this report.
Clear to exclude the selected filter.
- Click .
Special Considerations for User Groups
Unlike most objects used in SmartEvent filters, filters use objects that are defined in SmartDashboard. Before you can work with user group objects in filters, you must first define Access Roles for them. You can create SmartEvent reports for user groups that are not in your network, but these must also have defined Access Roles.
See the online help or Creating Access Roles section in the R76 Firewall Administration Guide for more information.
: You must enable Identity Awareness on your management server to use Access Roles.
Automatic Report Scheduling
You can configure a report to run automatically at specified times. A report can have more than one defined schedule.
To configure an automatic report schedule:
- Go to the window.
- Select the option (cleared by default).
You must select this option to run reports automatically.
- Select the report frequency from the list. The available options are:
- - Run one time, at the specified time.
- - Run one time each day, at the specified time.
- - Run one time each week, on the specified week day(s) and time.
- - Run one time each month, on the specified date(s) and time.
- Select or enter a run time for the report.
- Select the date.
This is the date on which the report first runs.
- Optional: Select the option and then select the date on which the report runs for the last time.
By default, this option is cleared.
- Optional: Click to define more schedules for this report.
Configuring Email Settings
You can configure SmartEvent to automatically send reports to specified, default recipients each time the report runs. You define these default recipients on the page in the tree. You can also send a report to different recipients at run-time, instead of the default recipients.
You must configure the and the before you can send email.
To configure email server settings:
- Go to the branch in the tree.
- Enter the SMTP mail server URL in the applicable field.
- Enter the sender email address in the applicable field.
The sender email address shows on all report emails sent by SmartEvent.
- Click to make sure that the defined SMTP connection works correctly.
- Enter the default recipient email addresses in the and fields.
You can enter more than email address in each field, separated by semicolons.
To configure email settings for each defined report:
- Select a report in the tree and click .
- Go to the pane.
- Select the option (cleared by default).
You must select this option to automatically send reports by email.
- Select the option.
- Enter recipient email addresses in the and fields.
You can enter many email addresses in each field, separated by a semicolon.
- Select the :
- MIME HTML archive format
Generating Reports
This section includes the procedure for manually generating reports.
To generate a predefined or custom report:
- Select a report in the tree.
- Click .
- In the window, select or define a report time frame.

|
Note - For your convenience, SmartEvent remembers the last time frame that you used during the current session. This is helpful when you generate several reports using the same time frame.
|
- Click .
After a short time, the report shows in the pane.
After you generate your report, you can use one or more of these output options:
- To print the report, click .
- To see the report in a Web browser, click .
- To save the report as a PDF, click . In the window, enter the file name and path.
- To send an email with the report PDF attached:
- Click .
- In your email client, enter the recipient email addresses.
- Enter a subject.
- Click .
|
