Endpoint Security On Demand
Endpoint Compliance Enforcement
The Check Point Endpoint Security On Demand scanner enforces endpoint compliance by scanning the endpoint to see if it complies with a pre-defined endpoint compliance policy. For example, an endpoint compliance policy would make sure that the endpoint client has updated Anti-Virus and an active firewall. If the endpoint is compliant with the endpoint compliance policy, the user is allowed to access the portal.
By ensuring that endpoints comply with a security policy, Endpoint Security On Demand protects enterprises from threats emanating from unsecured endpoint computers that can result in data loss and excessive bandwidth consumption.
The endpoint compliance policy is made up of rules. A policy can specify, for example, that the endpoint machine must have an approved Anti-Virus application, and that it must be free of spyware. A policy could also specify that a machine must be managed by the organization in order to gain full access to internal data and applications.
On gateways of version R71 and higher, a combination of Endpoint Compliance Policy and Secure Workspace Policy can require the following Policy: Any client connecting to the gateway from a machine that is not managed by the organization or that does not meet a specific enforcement policy, must use Check Point Secure Workspace. This ensures that no unauthorized information is accessed.
Endpoint Compliance Policy Granularity
The administrators can make compliance with a policy a requirement for accessing either the portal or specific applications. This makes it possible to assign varying levels of security clearance to the portal and to Mobile Access applications.
Endpoint Compliance policies can be assigned to Mobile Access gateways. They can also be assigned to Protection Levels, which are in turn associated with Mobile Access applications.
In either case, the scan takes place before logging in to the portal. Only one scan is performed. Compliance to policies is determined according to the results of the scan.
Endpoint Compliance Policy Rule Types
There are different types of Endpoint Compliance policy rules, for different types of security applications. It is possible to have multiple rules of the same type, each with different settings.
Windows Security Rule
Windows security rules perform Windows-specific checks. For example:
- Check for the latest Windows Service Pack on endpoint.
- Check the enabled/disabled state of the built-in Microsoft Windows Automatic Updates system.
- Check for Microsoft Windows Hotfixes and patches on the endpoint.
- Enforce Windows patches by their ID.
Endpoint computers running Windows must pass these checks in order to gain access to the network.
At least one of the Hotfixes in the rule must be active on the endpoint computer in order for the endpoint to be considered compliant and be granted access to the portal.
The rules also specify the action to be taken if an endpoint computer fails to comply with a rule and the error message that is presented to users in the event of non-compliance, such as remediation information.
Anti-Spyware Application Rule
Choose which Anti-Spyware applications endpoint computers (on the Windows platform) must have to gain access to the network.
Ensure that appropriate Anti-Spyware software is running on endpoint computers, and that the software version and virus signature files are up-to-date.
At least one of the Anti-Spyware applications in the rule must be active on the endpoint computer in order for the endpoint to be considered compliant and be granted access to the portal.
For convenience, Anti-Spyware enforcement rules are pre-configured with supported anti-spyware providers. To require a non-supported Anti-Spyware provider, use a custom check rule.
The rules also specify the action to be taken if an endpoint computer fails to comply with a rule and the error message that is presented to users in the event of non-compliance, such as remediation information.
Anti-Virus Application Rule
Choose which Anti-Virus applications the endpoint computer must have in order to gain access to the network.
Ensure that appropriate Anti-Virus software is running on endpoint computers, and that the software version and virus signature files are up-to-date.
At least one of the Anti-Virus applications in the rule must be active on the endpoint computer in order for the endpoint to be considered compliant and be granted access to the portal.
For convenience, Anti-Virus enforcement rules are pre-configured with supported Anti-Virus providers. To require a non-supported anti-virus provider, use a custom check rule.
The rules also specify the action to be taken if an endpoint computer fails to comply with a rule and the error message that is presented to users in the event of non-compliance, such as remediation information.
Firewall Application Rule
Choose which personal firewall applications endpoint computers (on Windows, Linux or Macintosh platforms) must have to gain access to your network.
Ensure that appropriate firewall software is installed, enabled and running on endpoint computers.
At least one of the firewall applications in the rule must be active on the endpoint computer in order for the endpoint to be considered compliant and be granted access to the portal.
For convenience, firewall enforcement rules are pre-configured with supported firewall providers. To require a non-supported firewall provider, use a custom check rule.
The rules also specify the action to be taken if an endpoint computer fails to comply with a rule and the error message that is presented to users in the event of non-compliance, such as remediation information.
Custom Check Rule
Perform custom checks on endpoint computers (on the Windows, Linux or Macintosh platforms) that are not covered by any of the other rule types. For example:
- Custom applications. These applications may include proprietary spyware scanners that supplement the predefined types and/or other special security solutions.
- Specific files.
- Registry keys or processes running on the endpoint computer.
- Non-English or localized names of processes and files.
Custom check rules can be configured to check for specific versions and modification dates.
The rules also specify the action to be taken if an endpoint computer fails to comply with a rule, and the error message that is presented to users in the event of non-compliance, such as remediation information.
OR Group of Rules
An "OR Group of Rules" rule includes a list of previously defined rules. An endpoint satisfies a rule of type "OR Group of Rules" if it satisfies one or more of the rules included in the "OR Group of Rules" rule.
The rules also specify the action to be taken if an endpoint computer fails to comply with a rule and the error message that is presented to users in the event of non-compliance, such as remediation information.
Spyware Scan Rule
Select the action that should take place for each type of spyware present on endpoint computers. You can change the protections for types of spyware threats.
Spyware Type
|
Description
|
Dialer
|
Software that change the user's dial-up connection settings so that instead of connecting to a local Internet Service Provider, the user connects to a different network, usually a toll number or international phone number.
|
Worm
|
Programs that replicate over a network for the purpose of disrupting communications or damaging software or data.
|
Keystroke Logger
|
Programs that record user input activity (keystrokes or mouse activity). Some keystroke loggers transmit the recorded information to third parties.
|
Hacker Tool
|
Tools that facilitate unauthorized access to a computer and/or extraction of data from a computer.
|
Remote Administration Tool
|
Commercially developed software that allows remote system access and control.
|
Trojan
|
Malicious programs that masquerade as harmless applications.
|
Adware
|
Programs that display advertisements or record information about Web use habits and forward it to marketers or advertisers without the user's authorization or knowledge.
|
Other
|
Any unsolicited software that secretly performs undesirable actions on a user's computer and does not fit any of the above descriptions.
|
Screen Logger
|
Software that record what a user's monitor displays.
|
Tracking Cookie
|
Cookies that are used to deliver information about the user's Internet activity to marketers.
|
Browser Plug-in
|
Software that modifies or adds browser functionality. Browser plug-ins change the default search page to a pay-per-search site, change the user's home page, or transmit the browser history to a third party.
|
You define an exception list of spyware software. For example, you can allow that a signature that is recognized as spyware by Mobile Access, but which you see as legitimate.
In the rule, set the action to take if an endpoint computer fails to comply. Set the error message that users see in the event of non-compliance, such as remediation information.
Endpoint Compliance Logs
If the end user machine is not compliant with one or more of the Endpoint Compliance policy rules, Mobile Access generates Endpoint Compliance-specific logs with the category "Endpoint Security on Demand" (Endpoint Security On Demand). The log entries appear in SmartView Tracker, and include the:
- Rule ID and name that causes the authorization failure.
- Policies that this rules belongs to.

|
Note - Mobile Access logs non-compliant rules from all policies, not only the Endpoint Compliance policy that is assigned to the gateway or to an application. This means that there may be entries in SmartView Tracker for rules that do not appear in the report presented to the end user.
|
- A description in the "info" field of the log. Two logging levels are available to the administrator: (For configuration details, see Configuring Endpoint Compliance Logs.)
- Summary: only one log entry per scan is written to SmartView Tracker. The log entry shows endpoints that do not comply with the Endpoint Compliance policy. The date and time of the scan, the source IP, and the Endpoint Compliance scan ID are logged.
- Details: In addition to the Summary mode information, this adds a log entry for each non-compliant rule. For example, in the case of a Spyware Scan rule that screens for tracking cookies, a log entry is generated that contains the following fields:
- Malware name:
unwantedexample. - Malware type:
3rd party cookie. - Description:
symptom type: URL. Symptom value: cookie:bob@unwantedexample.net.
Configuring Endpoint Compliance
The workflow for configuring Endpoint Compliance enforcement is below. Each step is described in detail in the sections that follow:
- Plan the Endpoint Compliance Policy
Decide on security clearance levels for Mobile Access portals and applications. For example, is it OK for users to gain access to all Mobile Access applications as long as they comply with a single policy? If some resources are more sensitive than others, you may wish to draw up a more stringent policy for some applications than for others.
- Use the ICSInfo Tool
Set up a stand-alone test computer with all the endpoint security applications you want to create enforcement rules for, and the run the ICSinfo tool to obtain the information needed to correctly define Endpoint Compliance policy rules.
- Create Endpoint Compliance Policies
Policies are made up of rules. In order to comply with the policy, endpoints must comply with all rules in the policy. Rules can be used in more than one policy. Rules that are not in a policy are not used.
There are different types of rules for different security applications. The Endpoint Compliance policy configuration tool comes with a number of predefined rules which can be edited to match the needs of the organization.
- Configure Endpoint Compliance Settings for Applications and Gateways
Configure which Endpoint Compliance Policies should be assigned to which applications and gateways.
- To make access to the portal conditional on passing an Endpoint Compliance scan, assign a policy to a gateway.
- To make access to applications conditional on passing an Endpoint Compliance scan:
- Assign a policy to a Protection Level.
- Assign Protection Levels to Mobile Access applications.
- Complete the Endpoint Compliance Configuration
Configure tracking options for the endpoint scan results, then save and install the security policy
Planning the Endpoint Compliance Policy
Defining the Endpoint Compliance policy for Mobile Access clients involves some planning, prior to performing the SmartDashboard configuration.
You need to define security clearance levels for the both the Mobile Access portal (that is, the gateway) and for portal applications. There are various approaches, and the best one to use depends on how granular you need to make the policy.
Basic Approach:
The simplest approach is to define a single Endpoint Compliance policy for the gateway and all applications accessed via the gateway. In this approach, all applications accessed via the gateway are protected by the Endpoint Compliance policy of the gateway. Users whose client machines comply with the policy have access to the portal and all applications.
For example:
Resource
|
Endpoint Compliance Policy
|
Gateway A
|
Low Security
|
Web App P
|
Rely on gateway requirements
|
Web App Q
|
Rely on gateway requirements
|
File Share R
|
Rely on gateway requirements
|
Advanced Approach:
A more advanced approach is appropriate if there is one application (or a small number of applications) that has stricter security requirements than other applications. These additional requirements are specified in a separate Endpoint Compliance policy, which is enforced in addition to the gateway policy. To access the Mobile Access portal, all users must fulfill the threshold security requirements of the gateway policy. Users clicking a link in the portal to an application with additional security requirements are only allowed access to the application if they fulfill those additional requirements.
For example:
Resource
|
Endpoint Compliance Policy
|
Gateway A
|
Low Security
|
Web App P
|
Rely on gateway requirements
|
Web App Q
|
High Security
|
File Share R
|
Rely on gateway requirements
|
Very Advanced Approach:
Where most or every application has its own endpoint security requirements, it is possible to define an individual Endpoint Compliance policy for each application. In this scenario, there are no gateway security requirements: All users are able to access the portal. However, when clicking a link to an application, users are only allowed access if they fulfill the requirements for that application. If no requirements are configured for the application, users are allowed to access it.
For example:
Resource
|
Endpoint Compliance policy
|
Gateway A
|
None
|
Web App P
|
Low Security
|
Web App Q
|
High Security
|
File Share R
|
Medium Security
|
Example Rules for Endpoint Compliance Policies
The following table illustrates Endpoint Compliance policies with different rules, for different security requirements.
Rule
|
Description
|
High Security Endpoint Compliance Policy
|
Medium Security Endpoint Compliance Policy
|
Low Security Endpoint Compliance Policy
|
1
|
Default Windows Security rule
|
Yes
|
Yes
|
No
|
2
|
Anti-Virus applications check
|
Yes
|
Yes
|
Yes
|
3
|
Firewall applications check
|
Yes
|
Yes
|
Yes
|
4
|
Spyware Scan rule
|
Yes
|
No
|
No
|
Using the ICSInfo Tool
When defining Endpoint Compliance policy rules, you must use the correct format. This format varies from vendor to vendor. The ICSinfo.exe utility scans your computer, and generates an xml file that gives you the information in the correct format for all supported security programs it finds.
Run ICSinfo before configuring the Endpoint Compliance policy rules.
To use the ICSinfo.exe utility:
- Set up a stand-alone test computer with all the endpoint security applications you want to create enforcement rules for. Be sure to apply the latest updates to your security software.
- Copy the
ICSinfo tool from the Mobile Access gateway to the test computer. The tool is located at $CVPNDIR/htdocs/ICS/components/ICSinfo.exe. - Run
ICSinfo.exe. This utility lists all detected security software, along with the required information in the correct format. The xml format output file ICSinfo.xml can be viewed in a browser. The sections of the file can be collapsed or expanded by clicking the - or +. - Record the information for each security program and use this information to create your Endpoint Compliance policy rules.
Creating Endpoint Compliance Policies
To create Endpoint Compliance policies, you define rules, and then assign the rules to a policy.
There are different types of rules for different security applications. The Endpoint Compliance policy configuration tool comes with a number of predefined rules which can be edited to match the needs of the organization.
To configure Endpoint Compliance policies:
- From the SmartDashboard Mobile Access tab navigation tree, select Endpoint Security On Demand > Endpoint Compliance.
The Endpoint Compliance page appears.
- Click Edit policies.
The Endpoint Compliance policy configuration tool opens at the Policies page.
- Either create a new Endpoint Compliance policy or edit an existing policy.
- Give the policy a Name, and a Description. The description can be long and detailed.
- This step applies only to Endpoint Compliance policies that include Spyware Scan rules (Note that a Spyware Scan rule is different from an Anti-Spyware rule):
If an endpoint machine has a valid Anti-Spyware of Anti-Virus application, you may consider they do not need to undergo an Endpoint Security On Demand Spyware Scan. If that is the case, select Bypass malware scan if endpoint meets Anti-Virus or Anti-Spyware requirements.
|
Note - This option is disabled if there is no Spyware Scan rule in the policy.
|
- Within a Policy, either add previously defined Endpoint Compliance rules, or create new rules or edit previously defined rules. There are different types of rules for different security applications. It is possible to have multiple rules of the same type, each with different settings.
- Define the rules.
|
Note - For explanations of fields in the Endpoint Compliance rules, see the online help.
|
- Click . This takes you back to the Edit Policy or the New Policy page.
- Click . This takes you back to the Policies page.
- Click . This completes the configuration of the Endpoint Compliance Policies, and takes you back to the Endpoint Security On Demand > Endpoint Compliance page.
After the Endpoint Compliance policies are configured, Endpoint Compliance settings can be configured to make use of the polices.
Configuring Endpoint Compliance Settings for Applications and Gateways
The Endpoint Compliance scanner performs a scan on the endpoint computer when the user connects to a Mobile Access portal. Mobile Access enforces the Endpoint Compliance policy, and allows access to the Mobile Access portal applications according to the Endpoint Compliance policy.
To configure Endpoint Compliance:
- On the Mobile Access tab of SmartDashboard, select Endpoint Security On Demand > Endpoint Compliance from the navigation tree. The Endpoint Compliance page appears.
- In the Endpoint Security Settings on Mobile Access Gateways section, select a gateway and click Edit.
The Endpoint Compliance page of the Mobile Access Properties window opens.
- Enable Scan endpoint machine when user connects.
- Choose one of the following approaches:
Basic Approach: Configuring a Common Policy for the Portal and all Applications
To make access to the portal and all applications conditional on passing an Endpoint Compliance scan, assign a policy to the gateway:
- Enable the Threshold policy to access any application via this gateway, the endpoint must comply with the following policy option.
- From the drop-down list, select the Endpoint Compliance policy to be used for all applications accessed via this gateway.
- Click OK.
This takes you back to the Endpoint compliance page. - Maintain all applications with their default Endpoint compliance settings. In the Additional Settings > Protection Level page of the application, ensure This application relies on the security requirements of the gateway is selected.
- Continue with Configuring Endpoint Compliance Logs.
Advanced Approach: Configuring a Threshold Policy for the Portal, Hardened for Specific Applications
To configure the threshold Endpoint Compliance policy for the portal, hardened for specific Mobile Access applications, define a policy for the gateway. Then, for applications that require hardened endpoint security, assign a Protection Level to the application.
- In the Endpoint Compliance page of the gateway, enable the Threshold policy: to access any application via this gateway, the endpoint must comply with the following policy option.
- From the drop-down list, select the default Endpoint Compliance policy to be used for applications accessed via this gateway.
- Click OK.
- In the Mobile Access tab Endpoint Compliance page, select the application that requires hardened endpoint security and click Edit.
The Mobile Access application opens at the Additional Settings > Protection Level page. (Mobile Access applications are defined in the Applications section of the Mobile Access tab.)
- Select the second option (This application has additional...).
- From the drop-down list, select a Protection Level for this application.
To define a new Protection Level, click Manage and define the protection level.
- Click OK.
- Continue with Configuring Endpoint Compliance Logs.
Very Advanced Approach: Configuring Individual Policies for Each Application
It is possible to configure an individual policy for each application. In this scenario, there are no gateway security requirements: All users are able to access the portal. However, when clicking a link to an application, users are only allowed access if they fulfill the requirements for that application. If no requirements are configured for the application, users are allowed to access it.
To configure an individual policy for each application:
- In the Endpoint Compliance page of the gateway, enable the No threshold option.
- Click OK.
- In the Mobile Access tab Endpoint Compliance page, select the application that requires hardened endpoint security.
- Click Edit.
The Mobile Access application opens at the Additional Settings > Protection Level page. (Mobile Access applications are defined in the Applications section of the Mobile Access tab.)
- Select the second option (This application has additional...), and from the drop-down list, select a Protection Level with the required Endpoint compliance policy for this application.
- To define a new Protection Level, click Manage and define the protection level.
|
Note - If This application relies on the security requirements of the gateway is selected for the Mobile Access application, users are allowed to access the application without any Endpoint Compliance requirements.
|
- Repeat steps step 3 to step 5 for all Mobile Access applications that require hardened endpoint security.
- Click OK.
Configuring Advanced Endpoint Compliance Settings
You can edit the Advanced Endpoint Compliance Settings to configure whether or not to allow access to the gateway and applications if the Endpoint Compliance scanner is not supported on the endpoint operating system.
- In the Endpoint Security On Demand > Endpoint Compliance page, click Edit.
The Advanced Endpoint Compliance Settings window opens.
In this window you can decide whether or not to allow access to the gateway and applications if the Endpoint Compliance scanner is not supported on the endpoint operating system.
The Endpoint Compliance scanner supports the following operating systems: Windows, Mac, and Linux.
Configuring Platform-Based Bypass Per OS
If you want to allow some endpoint operating systems to bypass Endpoint Compliance requirements, you must select the Allow access option in the Advanced Endpoint Compliance Settings window.
For details, see the operating system compatibility table in the Mobile Access Release Notes.
To configure different rules on endpoints with different operating systems, see SecureKnowledge solution sk34989.
Platform-Based Bypass Per Protection Level
Configuring Endpoint Compliance Settings per Protection Level lets you set Platform-Based Bypass per application.
By default all Advanced Endpoint Compliance Settings are taken from the SmartDashboard configuration, in the Advanced Endpoint Compliance Settings page.
Enabling Platform Based Bypass per Protection Level
To configure different access permissions for various Protection Levels for Endpoint Compliance scanning, run:
cvpnd_settings set useICSRelaxedModeInProtectionLevel true
|
To return to the default setting, change true to false in the above command.
Configuring the Protection Levels that are Bypassed
In the Mobile Access tab of SmartDashboard, under Additional Settings > Protection Levels, is a list of Protection Levels. From this page you can edit the Authentication and Endpoint Security settings that are required for applications assigned to each Protection Level. You can also create new Protection Levels.
In the Mobile Access application properties, assign a Protection Level to an application. For example, if you want to allow access to an application only if the user is compliant with Endpoint Compliance policy1, but you also need to accommodate the user connecting from an endpoint that does not support Endpoint Compliance scanning (such as an iPhone), then:
- Create or use a Protection Level named ESOD_Relaxed_PL which enforces Endpoint Compliance Policy policy1.
- Assign the Protection Level to the application.
- Configure the Protection Level as “Bypassed”.
To configure different access permissions for various Protection Levels for Endpoint Compliance, from the Mobile Access CLI, in expert mode, run:
cvpnd_settings listAdd ICSRelaxedModeProtectionLevelNames ESOD_Relaxed_PL
|
You can add other Protection Levels as well.
To restore a Protection Level from being "Bypassed", for Endpoint Compliance:
- Run:
cvpnd_settings listRemove ICSRelaxedModeProtectionLevelNames
|
- Follow the on-screen instructions.
To finalize the configuration of granular platform-based bypass for Endpoint Security On Demand:
- Restart the Mobile Access services by running cvpnrestart.
If the Mobile Access gateway is part of a cluster, be sure to make the same change on each cluster member.
- In SmartDashboard, assign the Protection Levels to the applications.
- Install the policy.
Configuring Endpoint Compliance Logs
Mobile Access generates Endpoint Compliance-specific logs. The logs can be viewed using SmartView Tracker, and have the category "Endpoint Security On Demand" (abbreviated in the log entry as "Endpoint Security on Demand"). The Endpoint Security On Demand information can be found on the "info" field of the logs.
For more information, see Endpoint Compliance Logs.
To configure tracking options for the Endpoint Compliance scanner:
- In the Mobile Access tab of SmartDashboard, select Endpoint Security On Demand > Endpoint Compliance from the navigation tree.
In the Endpoint Compliance page, in the Tracking section, enable Log the endpoint scan results to record the results of Endpoint Compliance scans to the log. Select Details or Summary to determine the level of detail to record in the log file.
The Tracking options are as follows:
- Summary: only one log entry per scan is written to SmartView Tracker. The log entry shows endpoints that do not comply with the Endpoint Compliance policy. The date and time of the scan, the source IP, and the Endpoint Compliance scan ID are logged.
- Details: In addition to the Summary mode information, this adds a log entry for each non-compliant rule. For example, in the case of a Spyware Scan rule that screens for tracking cookies, a log entry is generated that contains the following fields:
- Malware name:
unwantedexample. - Malware type:
3rd party cookie. - Description:
symptom type: URL. Symptom value: cookie:bob@unwantedexample.net.
Assign Policies to Gateways and Applications
To assign policies to gateways:
- On the Endpoint Compliance page, add all Mobile Access gateways to the Endpoint Security Settings on Mobile Access Gateways section.
- Edit any gateway whose access will be conditional on passing an Endpoint Compliance scan. Choose the Threshold policy and select Scan the endpoint machine when a user connects.
To assign policies to applications:
- To make access to applications conditional on passing an Endpoint Compliance scan, assign a policy to a Protection Level.
- Assign Protection Levels to Mobile Access applications.
Excluding a Spyware Signature from a Scan
It is possible to exclude a specific spyware from a scan so that its presence on an endpoint computer does not cause the computer to fail the scan. Obtain the name of the spyware signature from a scan report and then modify the Endpoint Compliance policy to exclude that signature.
To exclude a spyware signature from a scan:
- Configure Mobile Access so that endpoint computers must undergo an Endpoint compliance scan before they connect. The Endpoint Compliance policy must include a Spyware Scan rule.
- Set up a stand-alone test computer that has the spyware to be excluded from the scan.
- Run an Endpoint compliance scan on the test computer by connecting from it to Mobile Access.
When Endpoint Security On Demand detects the spyware (irrespective of the action configured in the Spyware Scan rule), the name of the spyware (something like Win32.megaspy.passwordthief) is included in the report.
- Make a note of the name of the spyware.
- Open SmartDashboard.
- In the Mobile Access tab, select Endpoint Security On Demand > Endpoint Compliance.
- Click Edit Policies.
- Select the policy that is applicable to the clients, and click Edit.
- Select the Spyware Scan rule from the list and click Edit.
- In the Software exception list section, click Add.
- Type the Name of the spyware obtained in step 3, and a Description.
- Click OK three times to close the Endpoint Compliance policy editor.
- Install the policy (Policy > Install).
Preventing an Endpoint Compliance Scan Upon Every Login
By default, the end user computer is scanned by the Endpoint Compliance scanner every time the user logs in. This is the default, and most secure configuration.
It is possible to configure Mobile Access so that after logging in, the user is not scanned, even after logging in again, until the end of a timeout period.
For configuration details, see sk34844 (, https://support.checkpoint.com/results/sk/sk34844).
Endpoint Compliance Scanner End-User Workflow
The Endpoint Compliance scanner on endpoint computers is supported on browsers that run ActiveX (for Windows with Internet Explorer), or Java.
When using the Endpoint Compliance scanner with Internet Explorer, the browser must be configured to download and run ActiveX controls and to allow Active Scripting. This section explains how to configure Internet Explorer to ensure that the Endpoint Compliance scanner will install and run properly on the endpoint computer.
To configure Internet Explorer for the Endpoint Compliance scanner:
- Select Tools > Internet Options from the Internet Explorer menu.
- Select the Security tab.
- Select the Web content zone used by the endpoint computer for remote connections from the Security Settings window.
- Click Custom Level.
- Enable the following options in the Security Settings window and then click OK:
- Download signed ActiveX controls
- Run ActiveX controls and plug-ins
- Script ActiveX controls marked as safe for scripting
- Active scripting
- Select the Privacy tab. Select the Medium setting and then click Advanced.
- Enable Override automatic cookie handling and then enable Accept in the 1st party cookies section.
- Click OK.
Endpoint Compliance Scanner End-User Experience
When a user connects to a portal where the Endpoint Compliance is enabled, the end user computer is scanned before the user sees the login screen.
|
Note - The Endpoint Compliance scan starts if Endpoint compliance is configured for a Mobile Access application in a portal, even if portal access does not require compliance with a policy.
|
The Endpoint Compliance Scanner is installed on the endpoint machine, by using ActiveX (for Windows with Internet Explorer), or Java.
To login to the Mobile Access Portal with the Endpoint Compliance scanner enabled:
- Enter the Mobile Access Portal URL in your browser.
- If using the Endpoint Compliance scanner for the first time on a particular endpoint computer, you are prompted to download and install the Check Point Deployment Agent ActiveX or Java control.
Some warnings may appear, regarding the Mobile Access site server certificate, and the downloaded applet.
- During the scan, a progress bar is displayed.
- If the endpoint computer successfully passes the Endpoint compliance scan, the Mobile Access Portal login screen appears.
If the endpoint computer fails to pass the scan, Endpoint Security On Demand displays a result screen showing the potentially harmful software and security rule violations detected during the scan.
- Click on a potentially harmful software item to display a short description of the detected malware, what it does and recommended removal method(s).
- If the Continue Anyway button appears, you can continue and log on to the Mobile Access Portal without removing the malware or correcting the security rule violation.
- If there is no Continue Anyway button, you must remove the detected malware or correct the security rule violation before you can log on to the Mobile Access Portal. When you have corrected the problem, click Scan again to repeat the scan.
- When the Mobile Access Portal login page appears, you can log on normally.
|
Note - The user and administrator see the scan results as log entries in the Traffic Log. Each entry shows the user name, user group, source computer, malware name, malware type, and malware description.
|
Using Endpoint Security On Demand with Unsupported Browsers
Endpoint Security On Demand for Mobile Access requires browsers that support ActiveX or Java.
The following sections describe Endpoint Security On Demand behavior when users attempt to access the Mobile Access Portal using an unsupported browser.
- If the Block access to all applications option on the Endpoint compliance scan Policy page is enabled and either of the following conditions exist, the endpoint computer cannot connect to the Mobile Access Portal.
- In all other cases, users can log on to the Mobile Access Portal without passing an Endpoint compliance scan. In some cases, an incompatibility message appears with a Continue button that allows users to proceed with Mobile Access login. Endpoint Security On Demand generates a log entry in the administrator's traffic log.
- When an application's Protection Level is configured to require an Endpoint Compliance scan, users can still gain access to the Mobile Access Portal, but cannot run that application.
Preventing Portal Access with Unsupported Browsers
The following steps can prevent users using unsupported browsers from gaining access to the Mobile Access Portal and applications without passing an Endpoint Compliance scan:
Completing the Endpoint Compliance Configuration
After completing the Endpoint Compliance configuration, take an overall view of the configuration by looking at the Endpoint Security On Demand > Endpoint Compliance page of the Mobile Access tab.
The Endpoint Compliance page shows:
- Number of Mobile Access gateways configured to scan endpoint machines.
- Security policy required on the gateway.
- Number of Mobile Access applications, with Level of Enforcement (full, partial, or none).
If this is correct for your organization, save and install the policy.
Secure Workspace
Secure Workspace is a security solution that allows remote users to connect to enterprise network resources safely and securely. The Secure Workspace virtual workspace provides a secure environment on endpoint computers that is segregated from the "real" workspace.
No data is allowed to leave this secure environment except through the Mobile Access portal. Also, Secure Workspace users cannot access any applications, files, system tools, or other resources from the virtual workspace unless they are explicitly permitted by the Secure Workspace policy.
Administrators can easily configure Secure Workspace policy to allow or prevent activity according to enterprise requirements.
Secure Workspace creates an encrypted folder called My Secured Documents on the virtual desktop that contains temporary user files. It deletes this folder and all other session data when the session terminates.
After enabling Secure Workspace, administrators can configure a gateway to either require all users to connect to the Mobile Access portal via Secure Workspace, or to give users the option of connecting via Secure Workspace or from their endpoint computers.
Enabling Secure Workspace
To enable Secure Workspace for an Mobile Access gateway:
- On the SmartDashboard Mobile Access tab, select Endpoint Security On Demand > Secure Workspace.
- To configure the Secure Workspace policy, click Edit policy.
For details, see Configuring the Secure Workspace Policy.
- Select the Mobile Access gateway and click Edit.
The Secure Workspace page of the Mobile Access gateway opens.
- To enable Secure Workspace on the gateway, select This gateway supports access to applications from within the Secure Workspace.
- Select any of the following options to choose the behavior of Secure Workspace when a user logs in to the Mobile Access portal:
- Allow user to choose whether to use Check Point Secure Workspace
- Users must use Check Point Secure Workspace
- User must use Check Point Secure Workspace only if the following Endpoint Compliance policy is not satisfied - This option allows you to set a rule that if a certain Endpoint Compliance policy is not satisfied by the client connecting to the gateway, the client must use Secure Workspace. If the Endpoint Compliance policy is satisfied, using Secure Workspace is optional. This option is available on Security Gateways of version R71 or higher.
- Select the Endpoint Compliance Policy that should be enforced on the gateway. If the criteria of the selected policy are not satisfied, the client connecting must use Secure Workspace.
- Install the policy.
Configuring Advanced Secure Workspace Settings
In the Endpoint Security On Demand > Secure Workspace page, in the Advanced Secure Workspace Settings section, click Edit. The Advanced Secure Workspace Settings window opens.
In this window you can decide whether or not to allow access to the gateway and applications if Secure Workspace is not supported on the endpoint operating system.
To configure advanced operating system-specific settings, see sk34989.
Configuring Platform-Based Bypass Per OS in Secure Workspace
If you want to allow some endpoint operating systems to bypass Secure Workspace requirements, you must select the Allow access option in the Advanced Secure Workspace Settings window.
To configure different rules on endpoints with different operating systems, see sk34989.
Platform-Based Bypass Per Protection Level in Secure Workspace
Configuring Secure Workspace Settings per Protection Level allows you to configure “Platform-Based Bypass” per application.
By default all Advanced Secure Workspace Settings are taken from the SmartDashboard configuration, in the Advanced Secure Workspace Settings page.
Enabling Platform Based Bypass per Protection Level
To configure different access permissions for various Protection Levels for Secure Workspace, from the CLI run:
cvpnd_settings set useISWRelaxedModeInProtectionLevel true
|
To return to the default setting, change true to false in the above command.
Configuring the Protection Levels that are Bypassed
In the Mobile Access tab of SmartDashboard, under Additional Settings > Protection Levels, is a list of Protection Levels. From this page you can edit the Authentication and Endpoint Security settings that are required for applications assigned to each Protection Level. You can also create new Protection Levels. If you select, Applications using this protections level can only be accessed from within Check Pint Secure Workspace, all applications assigned to that Protection level will only be accessed from within Secure Workspace.
However, if you want to allow access to an application only from Secure Workspace, but you also need to accommodate the user connecting from an endpoint that does not support Secure Workspace (such as an iPhone), then:
- Create or use a Protection Level named ESOD_Relaxed_PL which enforces Endpoint Compliance Policy policy1.
- Assign the Protection Level to the application.
- Configure the Protection Level as “Bypassed”.
To configure different access permissions for various Protection Levels for Secure Workspace, from the Mobile Access CLI, in expert mode, run:
cvpnd_settings listAdd ISWRelaxedModeProtectionLevelNames ESOD_Relaxed_PL
|
You can add other Protection Levels as well.
Restoring a Protection Level from being Bypassed for Secure Workspace
- Run:
cvpnd_settings listRemove ISWRelaxedModeProtectionLevelNames
|
- Follow the on-screen instructions.
Finalize the Configuration for Secure Workspace
- Restart the Mobile Access services by running
cvpnrestart.If the Mobile Access gateway is part of a cluster, make the same change on each cluster member.
- In SmartDashboard, assign the Protection Levels to the applications.
- Install the policy.
Applications Permitted by Secure Workspace
In its default configuration, Secure Workspace allows access to a limited group of applications. This is likely to be sufficient for most end-users working with the Mobile Access Portal and retrieving information from network hosts.
The following table lists the latest version of applications that Secure Workspace permits by default.
Applications Permitted by Secure Workspace by Default
Process Name
|
Application
|
Description
|
DW20.EXE, dwwin.exe
|
Dr. Watson
|
A process offers support proper application crash handling.
|
igfxsrvc.exe
|
Intel video card driver process
|
A process offers support video card functional.
|
iedw.exe
|
Internet Explorer
|
Microsoft Internet Explorer web browser
|
unsecapp.exe
|
Microsoft Windows process
|
A process offers support towards compatibility issues.
|
ieuser.exe
|
Internet Explorer
|
Microsoft Internet Explorer web browser
|
ieinstal.exe
|
Internet Explorer
|
Microsoft Internet Explorer web browser
|
conime.exe
|
Microsoft Console IME (Input Method Editor)
|
A process is used when the locale of the computer is set to a non-western language.
|
runner.exe
|
CShell ActiveX component
|
A CShell process required on Windows Vista.
|
sndvol.exe
|
Microsoft Windows Volume Control
|
A process associated with the Microsoft Windows OS.
|
SearchIndexer.exe
|
Content indexing service
|
A Windows Vista service to index modified content.
|
Acrobat.exe
|
Adobe Acrobat Writer
|
A process is used to create and print PDF documents.
|
acrodist.exe
|
Adobe Acrobat Distiller
|
A process is used to create and print PDF documents.
|
acrotray.exe
|
Acrobat Traybar Assistant
|
A process provides a shortcut to additional configuration options for Adobe products and is used to create PDF documents.
|
telnet.exe
|
Microsoft Telnet Client
|
A terminal emulation program for TCP/IP networks.
|
hypertrm.exe
|
Microsoft HyperTerminal
|
A Windows utility that offers Telnet facilities.
|
Putty.exe
|
Putty
|
Free implementation of Telnet and SSH client.
|
SecureCRT.exe
|
SecureCRT
|
Telnet and SSH client implementation from VanDyke Software, Inc.
|
ptw32.exe
|
TN3270 Telnet Client
|
TN3270 telnet client.
|
pcsfe.exe
|
TN3270 Telnet Client
|
IBM Personal Communications Session Manager. A TN3270 telnet client.
|
ftp.exe
|
Microsoft FTP Client
|
Microsoft FTP Utility process that provides basic FTP access.
|
internat.exe
|
Predefined Application
|
Windows process that provides multi-lingual features in Microsoft Windows. This program is important for the stable and secure running of the computer and should not be terminated.
|
Mstsc.exe
|
Microsoft Remote Desktop
|
Allows initiation of terminal services commands via command line.
|
Vncviewer.exe
|
VNC Viewer
|
Remote administration tool process from TWD Industries.
|
radmin.exe
|
RAdmin
|
Remote Administrator Server from Famatech Corp.
|
WISPTIS.EXE
|
Predefined Application
|
Process is installed alongside Microsoft office or comes packaged with Windows update. This process handles Windows Ink Services and often runs with Adobe Acrobat Reader.
|
MSOHELP.EXE
|
Predefined Application
|
Microsoft Office 2003 suite process.
|
MSTORDB.EXE
|
Predefined Application
|
Microsoft Office 2003 suite process.
|
imapi.exe
|
Predefined Application
|
Microsoft Windows Image Mastering API process, used for CD recording. This program is important for the stable and secure running of endpoint computers and should not be terminated.
|
OIS.EXE
|
Predefined Application
|
Microsoft Office Picture Manager process.
|
CPSWS.exe
|
Check Point Secure Workspace
|
Check Point Secure Workspace executable. This executable should be allowed in order to enable Secure Workspace to start.
|
net.exe
|
Predefined Application
|
Microsoft Windows OS process that offers additional functions to the Local Area Network.
|
net1.exe
|
Predefined Application
|
Microsoft Windows OS process that offers additional functions to the Local Area Network.
|
svchost.exe
|
Predefined Application
|
Generic Host Process for Win32 Services, an integral part of Microsoft Windows OS. It manages 32-bit DLLs and other services and cannot be stopped or restarted manually.
|
rundll32.exe
|
Predefined Application
|
Process that executes DLLs and places their libraries into memory. This program is important for the stable and secure running of the computer.
|
msiexec.exe
|
Predefined Application
|
Windows Installer Component process. This program is important for the stable and secure running of the computer.
|
verclsid.exe
|
Predefined Application
|
Microsoft Windows OS process that verifies a COM object before the COM object is instantiated by Windows Explorer.
|
AcroRd32Info.exe
|
Predefined Application
|
Adobe Acrobat Reader process. This process starts automatically when opening a PDF file and collects information about this file.
|
MSOXMLED.exe
|
Predefined Application
|
Microsoft Office InfoPath process used by Microsoft Office to open and edit XML files.
|
java.exe
|
Predefined Application
|
Sun Microsystems Java Runtime component
|
javaw.exe
|
Predefined Application
|
Sun Microsystems Java Runtime component
|
jview.exe
|
Predefined Application
|
Microsoft Java Virtual Machine Command Line Interpreter
|
wjview.exe
|
Predefined Application
|
Microsoft Java Virtual Machine Command Line Interpreter
|
helpctr.exe
|
Predefined Application
|
Microsoft Windows OS process. Process is initiated when launching online Help in Windows 2000 or later versions.
|
unregmp2.exe
|
Predefined Application
|
Windows Media Player component. A process associated with the Microsoft Windows OS.
|
sndvol32.exe
|
Predefined Application
|
Microsoft Windows Volume Control. A process associated with the Microsoft Windows OS.
|
STAProxy.exe
|
Predefined Application
|
Check Point SSL Network Extender Application Mode component.
|
ctfmon.exe
|
Predefined Application
|
Microsoft Office Suite process that activates the Alternative User Input Text Input Processor (TIP) and the Microsoft Office XP Language Bar.
|
mobsync.exe
|
Predefined Application
|
Microsoft Synchronization Manager. Process associated with Internet Explorer.
|
netsh.exe
|
Predefined Application
|
Microsoft Windows OS process that allows display or modification of the network configuration of a computer that is currently running.
|
notepad.exe
|
Microsoft Notepad
|
Microsoft Notepad
|
calc.exe
|
Microsoft Calculator
|
Microsoft Calculator
|
wordpad.exe
|
Microsoft Wordpad
|
Microsoft Wordpad
|
mspaint.exe
|
Microsoft Paint
|
Microsoft Paint
|
winword.exe
|
Microsoft Word
|
Microsoft MS Office Word
|
excel.exe
|
Microsoft Excel
|
Microsoft MS Office Excel
|
powerpnt.exe
|
Microsoft PowerPoint
|
Microsoft MS Office PowerPoint
|
acrord32.exe
|
Adobe Acrobat Reader
|
Adobe Acrobat Reader
|
netscape.exe
|
Netscape Navigator
|
Netscape Navigator web browser
|
mozilla.exe
|
Mozilla
|
Mozilla web browser
|
firefox.exe
|
Mozilla Firefox
|
Mozilla Firefox web browser
|
iexplore.exe
|
Internet Explorer
|
Microsoft Internet Explorer web browser
|
cmd.exe
|
Predefined Application
|
Microsoft Windows Command Prompt
|
Citrix
|
Predefined Application
|
Citrix Presentation Server (XenApp) application pool.
|
SSL Network Extender in Secure Workspace
When using SSL Network Extender inside Secure Workspace, Secure Workspace traffic and traffic from outside the Secure Workspace are encrypted.
Secure Workspace Policy Overview
Secure Workspace governs access to applications and directories on endpoint computers according to a Secure Workspace policy.
Each Mobile Access gateway has its own, individual Secure Workspace policy. The policy:
- Grants or denies permission for users to run applications.
- Allows applications to save files to specific files and directories.
- Defines general portal protection security settings and user experience behavior.
Administrators can add to the list of Approved Applications, and can add, edit, or delete applications from the list.
You can define locations where the application is allowed to save files that remain after Secure Workspace shuts down. These locations are called Allowed Save locations. There is no need to define locations for files that are not needed after Secure Workspace shuts down. Temporary files are deleted when the Secure Workspace is closed.
Secure Workspace includes a built-in Firewall that allows you define Outbound Firewall Rules. These are the IP addresses and ports that approved applications are allowed to access. By default, desktop applications are allowed access to all addresses and ports.
Note that settings for the approved applications, save locations, and Outbound Firewall Rules are independent. For example, the save locations are not restricted to a particular application, and similarly, Outbound Firewall Rules apply to all applications.
Integration with Check Point Program Advisor
Secure Workspace can be configured to work together with a Check Point Program Advisor server to check whether an application that is not an approved application is legitimate. Program Advisor identifies programs according to their filename and MD5 hash.
For details of Program Advisor, see your version of the Endpoint Security Administrator Guide. If the Program Advisor is used, the sequence of Secure Workspace checks is as follows:
- User selects a program to run in Secure Workspace.
- Secure Workspace checks the policy. If the program is not allowed by the Secure Workspace policy, program execution is blocked.
- If the program is allowed by the policy, Secure Workspace queries the Program Advisor server about the program.
- Program Advisor returns one of three responses about the application: Trusted, Untrusted, or Unknown.
- Secure Workspace allows or blocks the application according to the Program Advisor responses, in one the following ways, as defined in the policy:
- Allow Trusted only.
- Allow Trusted and Unknown.
Configuring the Secure Workspace Policy
The Secure Workspace policy determines the permitted activities and behavior that end users will experience when working in Secure Workspace.
To configure the Secure Workspace Policy:
- On the SmartDashboard Mobile Access tab, select Endpoint Security On Demand > Secure Workspace.
- Configure the Secure Workspace policy. Click Edit policy.
The Secure Workspace Settings window opens.
- Fill in the fields according to the explanations below.
Portal Protection Settings
- Prevent endpoint from printing secure documents prevents any documents in the Secure Workspace being printed
- Secure clipboard contents prevents any item copied from inside Secure Workspace from being pasted or saved outside Secure Workspace
- Enable Program Advisor to validate the integrity of approved applications. When a user starts an application that is not an Approved Application, Secure Workspace contacts a Check Point Program Advisor server and checks whether the application is legitimate. The server returns one of three responses: The application is trusted; The application is untrusted, or the application is unknown. Configure the Secure Workspace policy to handle Program Advisor responses in one the following ways:
- Allow Trusted only
- Allow Trusted and Unknown
User Experience Settings
- Prevent endpoint from switching between Secure Workspace and regular desktop prevents the user from switching back and forth between these environments. Access to the regular desktop is only allowed if Secure Workspace is closed.
- Enable welcome window prevents the window that says "Welcome to Secure Workspace" from appearing on the endpoint machine.
Configuring Approved Applications
Approved applications are available from Secure Workspace, and are allowed to run on endpoint computers. You can add, edit or remove applications from the list.
- Application Name is the name of the approved application.
- File Name is the path and filename corresponding to the application selected. If needed, specify more than one location per application. You can specify it using one of the following formats:
- Absolute path in the following format: <disk>:\<folder_path>\<binary_name>. Secure Workspace allows the endpoint to run the binary from specified location only. The full path is needed if the location of the program does not appear in the PATH.
- File name, for example: \<binary_name>. Secure Workspace allows the endpoint to run the binary with the specified name from any location on the disk. Use if the location appears in the PATH.
- Path with environment variable, for example: <path_with_env_variable(s)>\<binary_name>. Secure Workspace resolves the environment variable on endpoint, and uses its value as part of the path to executable.
Add Application
- Add shortcut to the Start Menu adds a shortcut to the application to the Start Menu in the Secure Workspace. The shortcut is only added if the application exists on the client computer.
- MD5 hash is the signature of the application. It is possible to add several hashes, for example: one for each version of the application. You can use the ICSinfo Tool, or any MD5 calculator, to calculate the hash function of an application.
|
Note - Check Point Program Advisor is a more maintainable and reliable way of checking the security and integrity of programs than manually adding MD5 hashes.
|
Configuring Applications by Vendor
You can configure which applications users can access from Secure Workspace. If a vendor is trusted then all applications from this vendor are trusted.
By default, users can access applications from these vendors. You cannot add a vendor to the list.
Vendor ID
|
Vendor Name
|
Description
|
1
|
Adobe
|
Signed by Adobe
|
2
|
Apple
|
Signed by Apple
|
3
|
Check Point
|
Signed by Check Point
|
4
|
Computer Associates
|
Signed by Computer Associates
|
5
|
Google
|
Signed by Google
|
6
|
IBM
|
Signed by IBM
|
7
|
Intel
|
Signed by Intel
|
8
|
Microsoft
|
Signed by Microsoft
|
9
|
Mozilla
|
Signed by Mozilla
|
10
|
Oracle
|
Signed by Oracle
|
11
|
Sun
|
Signed by Sun
|
12
|
Rare Ideas
|
Signed by Rare Ideas
|
13
|
Juniper
|
Signed by Juniper Networks
|
14
|
Citrix
|
Signed by Citrix Systems
|
15
|
VMware
|
Signed by VMware
|
Configuring Allowed Save Locations
Allowed Save locations are locations where applications are allowed to save files that remain after Secure Workspace shuts down. There is no need to define locations for temporary files that can be deleted after Secure Workspace shuts down.
Configuring Outbound Firewall Rules
Outbound Firewall Rules are IP addresses and ports that approved applications are allowed to access when they make outbound connections.
A default rule allows desktop applications to access to all addresses and ports.
The default rule can be deleted and replaced with more restricted rules. However, configure the rules carefully.
Configuring a Secure Workspace Policy per Gateway
|
Note - Applies to centrally managed Mobile Access only.
|
A Secure Workspace policy that is configured in SmartDashboard is applicable for all Mobile Access gateways. To configure a Secure workspace policy that is applicable per gateway, see sk34939.
Secure Workspace End-User Experience
This section provides an overview of the Secure Workspace workflow.
Disabling Internet Explorer Protected Mode
If users use Internet Explorer to open the SSL VPN portal on Windows Vista or Windows 7, they must disable Internet Explorer Protected Mode. If Protected Mode is not disabled, SSL VPN might run, but they can have unexpected errors.
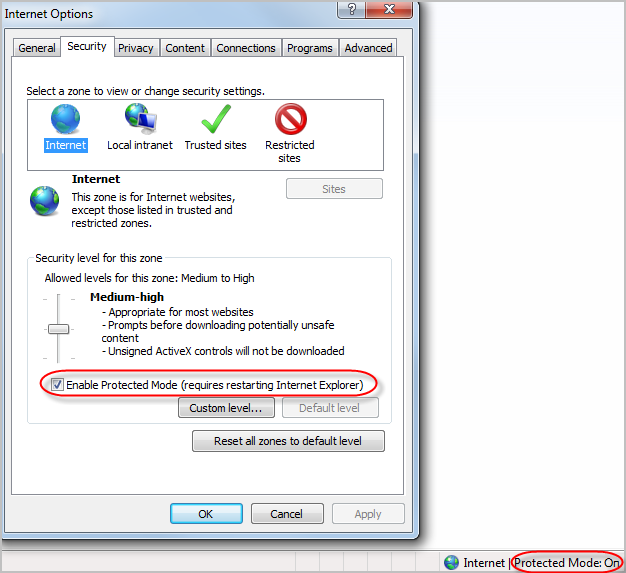
On Windows 7 , protected mode is enabled by default. You can see that it is enabled:
- In the > tab. See that is selected.
- In the bottom right of the Internet Explorer browser window, it says .
If Endpoint Security on Demand is configured on the gateway, the scan detects that Protected mode is on and instruction to disable Protected mode open.
If Endpoint Security on Demand is not configured on the gateway, users are not alerted that they must disable Protected mode. However they must do the same steps to disable Protected mode so that they can access the SSL VPN portal without problems.
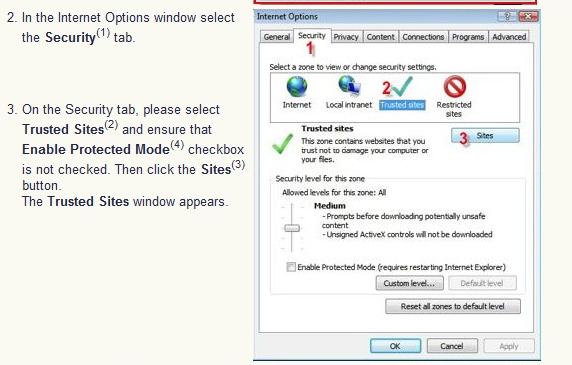
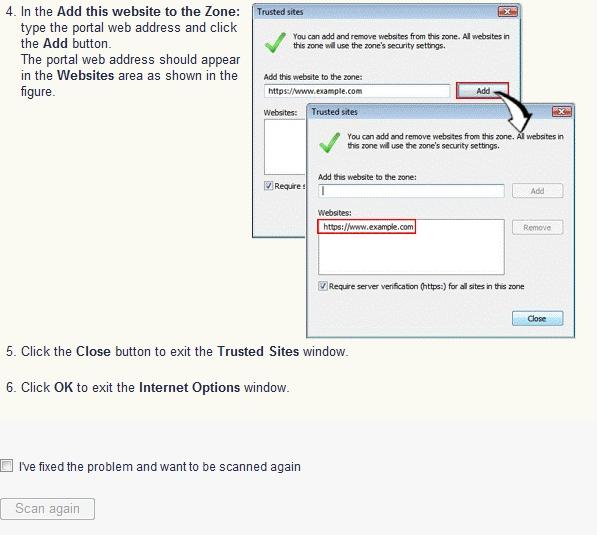
Here are the instructions that users get to disable Protected Mode. All users must do these steps even if they do not get the instructions automatically.
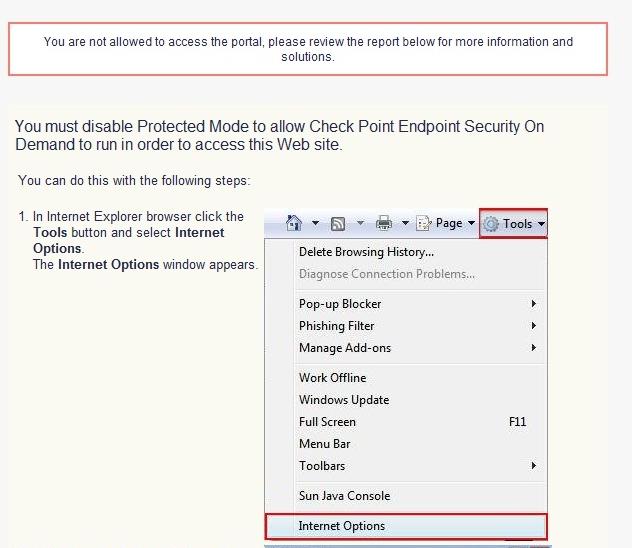
After these steps, close all Internet Explorer windows. The next time you open Internet Explorer, Protected mode is off.
Logging on to the Mobile Access Portal Using Secure Workspace
Secure Workspace initializes when a user logs on to the Mobile Access Portal. If the administrator has configured the Mobile Access gateway to require Secure Workspace, this occurs automatically. If the administrator has configured the gateway to allow users to choose whether or not to use Endpoint Security On Demand, an option appears on the Login screen.
To log on using Secure Workspace,
- Enter the Mobile Access Portal URL in your browser. If the Use Check Point Secure Workspace option appears on to login screen, enable it and log on normally.
- Secure Workspace is installed on the endpoint machine by using ActiveX (for Windows with Internet Explorer), or Java. For more details see First time Installation of ActiveX and Java Components.
- The Mobile Access Portal appears in a browser window on the secure desktop.
Working with the Secure Workspace Virtual Desktop
The Secure Workspace virtual desktop looks and feels like a normal Windows desktop.
The principal difference is that Secure Workspace only allows users to work with a limited number of pre-approved applications and files and, by default, does not allow users to print, customize the desktop or perform any system configuration activities. Since most users only use Secure Workspace to work with the Mobile Access Portal, these functions are rarely needed.
Start Menu and Taskbar
The virtual desktop Start menu and taskbar function in the same manner their "real" counterparts do. Configuration settings in the Secure Workspace policy determine which shortcuts and options are available to users.
Allowing Users to Save Files to the "Real" Desktop
Users occasionally need to download and save files from resources behind the Mobile Access gateway to "real" desktop folders. Conversely remote users may need to upload files to the corporate network from the endpoint computer.
To allow this, the administrator must configure the Secure Workspace policy to allow endpoints to switch between the secure and regular desktops. This is accomplished in the User Experience Settings section of the Secure Workspace policy editor.
Accessing Files and Applications on the Endpoint Computer
Generally, users can access files and run applications in Secure Workspace in the same manner as on the "real" desktop. Since, by default, users have read-only (access) privileges to all folders and files, they can freely navigate the file system using Windows Explorer. When attempting to run a program or open a file for which a user does not have Secure Workspace permission, an error message appears.
Likewise, if a user attempts to save a file to a "real" desktop folder without Secure Workspace permissions, an error message appears.
Accessing Endpoint Applications in Secure Workspace
When SSL Network Extender network mode users initiate a Secure Workspace session, permitted Endpoint Applications are available in the virtual desktop as follows:
|
|
|
An Endpoint Application defined in the Native Application as...
|
... is available to Users as a
|
Path and executable name (already installed)
|
Shortcut in the Windows Start > Program menu.
|
Runs via default browser
|
Shortcut on the desktop.
|
Downloaded-from-Mobile Access application
|
Link in the Mobile Access Portal.
|
|
Note - During a Secure Workspace session, SSL Network Extender cannot toggle between the Network Mode and the Application Mode. User can change the mode, but must start a new Secure Workspace session after doing so.
|
Switching Between Secure Workspace and the "Real" Desktop
You can switch back and forth between the Secure Workspace virtual workspace and the "real" desktop at any time. To do so, click the lock icon, located in the tray area of the taskbar.
Exiting Secure Workspace
To exit Secure Workspace:
- From the Windows Start menu, select Close Secure Workspace.
A confirmation and reminder to save open files appears.
- Click Yes, close it now to continue closing Secure Workspace.
Troubleshooting Secure Workspace
Secure Workspace logs are automatically saved in %temp%\IswTmp\Logs. If you have issues with Secure Workspace, you can examine these logs or send them to Check Point technical support.
If an application stops working, a Secure Workspace window opens to help you send technical information to Check Point. Users can manually open this window if a process hangs or they experience instability.
To send technical information to Check Point:
- Press Ctrl+Alt+End.
A Secure Workspace window opens to help you send technical information to Check Point.
- Fill in the required information and click .
Endpoint Compliance Updates
Check Point provides Endpoint Compliance updates. You can download Endpoint Security On Demand updates from the Mobile Access tab in SmartDashboard.
You can configure Endpoint Security On Demand to retrieve updates automatically according to a defined schedule or you can manually download and install the updates.
Working with Automatic Updates
You can periodically check for and automatically download Endpoint Compliance updates. You can choose to download updates from the Check Point Download Center or you can install updates previously downloaded to your Security Management Server.
|
Note - Before performing an Endpoint Security On Demand update, install a policy at least once.
|
To configure automatic updates:
- On the SmartDashboard Mobile Access tab, select Endpoint Security On Demand > Endpoint Compliance Updates from the navigation tree.
- Select Enable Automatic Updates.
- In the Update Configuration section, click Configure.
The Automatic Updates window opens.
- On the User Center Credentials tab, enter your User Center email address and password.
- In the Endpoint Security On Demand tab, do the following:
- To install updates from the Download Center, select the Check Point website option.
- To install updates from your Security Management Server, select the My local Security Management Server option. If you want to install updates from the Download Center when the Security Management Server is unavailable, enable the indicated option.
- Select the interval, in minutes, after which Endpoint Security On Demand checks for available downloads.
- In the Tracking Configuration tab, select the various tracking options from the lists. You can select logging events or a variety of alert types.
- If there is a proxy server between the Security Management Server and the User Center, select the Proxy tab, and enter the proxy host name or IP address, and the proxy port number (for example: 8080).
- Click OK to complete the definition.
- Install the policy on the Mobile Access gateways.
Performing Manual Updates
To perform a manual Endpoint Security On Demand update:
- In the SmartDashboard Mobile Access tab, select Endpoint Security On Demand from the navigation tree.
- Click Update Databases Now.
- Enter your Check Point User Center credentials and click Next.
- Choose the All supporting gateways option to download to all available Mobile Access gateways. Alternatively, choose the Select option to select specific Mobile Access gateways for update, and then select the desired gateways in the left-hand list and then click Add.
- Click Finish. A progress bar appears during the download.
- Install policies on all affected gateways.
|
